How to Turn Tmux Into a Terminal IDE with Sessions, Scripts, and Plugins

Tmux already handles pane splitting and window management well enough out of the box, but most people stop there. The real productivity gains come from treating tmux as infrastructure: scripting your session layouts so a single command rebuilds your entire development environment, persisting sessions across reboots so you never lose context, and installing plugins that add clipboard integration, fuzzy finding, and pattern matching to your workflow. With tmux 3.6a (the current stable release) and a handful of well-chosen plugins, your terminal becomes something closer to a persistent, scriptable IDE than a simple multiplexer.
This guide covers the workflows and configurations that separate casual tmux users from people who build their entire workday around it.
Scripted Session Layouts - Reproducible Workspaces in One Command
Opening tmux, manually creating splits, navigating to the right directories, and starting services is tedious when you do it multiple times per day. A scripted session layout eliminates that ceremony entirely.
The core idea is simple: a shell script that calls tmux commands to build your exact window and pane arrangement, then runs whatever commands belong in each pane. Here is a practical example for a web development project:
#!/bin/bash
SESSION="webapp"

# Attach if session already exists
tmux has-session -t $SESSION 2>/dev/null && tmux attach -t $SESSION && exit

# Create new session with first window named "editor"
tmux new-session -d -s $SESSION -n "editor"
tmux send-keys -t $SESSION:editor "nvim ." C-m

# Window 2: server logs
tmux new-window -t $SESSION -n "server"
tmux send-keys -t $SESSION:server "npm run dev" C-m
tmux split-window -v -t $SESSION:server
tmux send-keys -t $SESSION:server.1 "docker compose logs -f" C-m

# Window 3: git
tmux new-window -t $SESSION -n "git"
tmux send-keys -t $SESSION:git "lazygit" C-m

# Select the editor window and attach
tmux select-window -t $SESSION:editor
tmux attach -t $SESSION
The tmux has-session check at the top makes the script idempotent - run it again and it attaches to the existing session instead of creating a duplicate. The -c flag on split-window and new-window can also set the working directory, which is useful when different panes need to operate in different subdirectories of a monorepo.
The key commands to remember:
| Command | Purpose |
|---|---|
tmux new-session -d -s name | Create a detached session |
tmux new-window -t session -n name | Add a named window |
tmux split-window -h / -v | Horizontal / vertical split |
tmux send-keys -t session:win.pane "cmd" C-m | Type and execute a command in a specific pane |
tmux select-layout even-vertical | Apply an automatic layout |
Tmuxinator and Tmuxp as Alternatives
If maintaining shell scripts feels brittle, tmuxinator
and tmuxp
let you define the same layouts in YAML. Tmuxinator is Ruby-based (gem install tmuxinator), while tmuxp is Python-based (pip install tmuxp, currently at version 1.67.0). Both generate the underlying tmux commands for you.
A tmuxp configuration for the same layout:
session_name: webapp
windows:
  - window_name: editor
    panes:
      - nvim .
  - window_name: server
    layout: even-vertical
    panes:
      - npm run dev
      - docker compose logs -f
  - window_name: git
    panes:
      - lazygit
Save this to ~/.config/tmuxp/webapp.yaml and run tmuxp load webapp. The YAML approach makes layouts easier to version control alongside your project, and tmuxp supports variable interpolation so you can parameterize paths and project names.
Session Persistence with tmux-resurrect and tmux-continuum
By default, all tmux sessions disappear when the tmux server stops - which happens on every reboot, crash, or if you accidentally run tmux kill-server. For long-running development environments where you have dozens of panes arranged with specific commands running in each, losing that state hurts.
tmux-resurrect solves this by saving and restoring the complete tmux environment. tmux-continuum builds on top of it to automate the save/restore cycle so you never have to think about it.
Setting Up Resurrect and Continuum
Both plugins install through TPM (covered in the next section). Add these lines to your tmux.conf:
set -g @plugin 'tmux-plugins/tmux-resurrect'
set -g @plugin 'tmux-plugins/tmux-continuum'

# Auto-save every 15 minutes
set -g @continuum-save-interval '15'

# Auto-restore when tmux server starts
set -g @continuum-restore 'on'
Press prefix + I inside tmux to install them. After that, prefix + Ctrl-s manually saves the environment, and prefix + Ctrl-r restores it. The save files live in ~/.local/share/tmux/resurrect/.
What Gets Restored
Tmux-resurrect captures session names, window names, pane layouts and geometry, the current working directory of each pane, and the running program (if it appears in the restorable programs list). By default, only a whitelist of safe-to-restart programs gets restored: vim, nvim, man, less, top, and htop.
You can extend this list for your own workflows:
set -g @resurrect-processes 'nvim lazygit "npm run dev" "docker compose up"'Use the ~ prefix for exact command matching when you need to distinguish between similar commands:
set -g @resurrect-processes '"~npm run dev" "~npm run build"'Pairing with Neovim Session Restore
If you use Neovim, add this setting so tmux-resurrect triggers Neovim’s own session save/restore:
set -g @resurrect-strategy-nvim 'session'This requires a Neovim session plugin like auto-session or persistence.nvim to handle Neovim’s side of the handshake. The result is that a reboot restores not just your tmux panes but also your open Neovim buffers, cursor positions, and splits within each pane.
TPM and Essential Plugins
TPM (Tmux Plugin Manager) brings package management to tmux. Without it, installing plugins means manually cloning repositories and sourcing scripts. With it, you declare plugins in your config file and press a key combination.
Installing TPM
git clone https://github.com/tmux-plugins/tpm ~/.config/tmux/plugins/tpmAdd this to the very bottom of your tmux.conf:
# Initialize TPM (keep this line at the bottom)
run '~/.config/tmux/plugins/tpm/tpm'
Reload your config with tmux source ~/.config/tmux/tmux.conf, then press prefix + I (capital I) to install any declared plugins. prefix + U updates them, and prefix + alt + u removes plugins you have deleted from the config.
TPM requires tmux 1.9 or higher, git, and bash. Given that the current stable is 3.6a, compatibility is not a concern on any modern system.
Plugins Worth Installing
Start with tmux-sensible (tmux-plugins/tmux-sensible). It sets reasonable defaults that eliminate 20+ lines of boilerplate config: UTF-8 support, 50,000-line scrollback, faster escape-time (important for Neovim users who otherwise experience a delay when pressing Escape), and focus-events on for terminal applications that need focus tracking.
For clipboard integration, tmux-yank (tmux-plugins/tmux-yank) connects tmux’s internal clipboard to your system clipboard. It auto-detects your platform and uses wl-copy on Wayland, xclip on X11, or pbcopy on macOS. In copy mode, y copies the selection to the system clipboard. Outside copy mode, prefix + y copies the current command line.
The tmux-fzf-url plugin (wfxr/tmux-fzf-url) scans the visible pane content for URLs and presents them in an fzf
selector. Press prefix + u and pick a URL to open it in your browser via xdg-open. Particularly useful when reviewing log output that contains links to dashboards, CI pipelines, or error tracking pages.
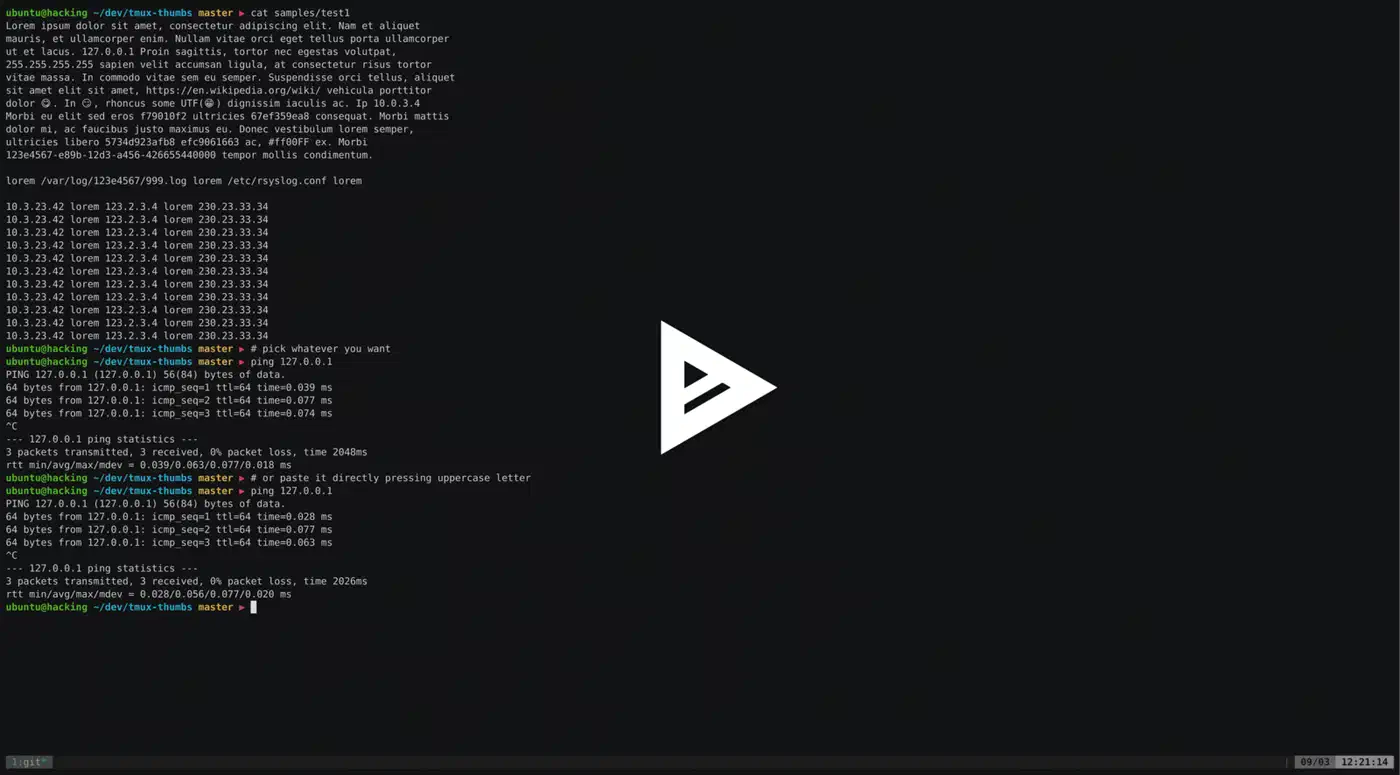
Finally, tmux-thumbs (fcsonline/tmux-thumbs) highlights copyable patterns in the visible pane - IP addresses, file paths, git hashes, UUIDs, hex strings - and assigns single-key hints to each match, similar to Vimium in a web browser. Press prefix + Space, see the hints overlay, press a key, and the matched text is copied. It is written in Rust, so the overlay renders instantly even with dense output.
| Plugin | Purpose | Key Binding |
|---|---|---|
| tmux-sensible | Sane defaults | N/A (automatic) |
| tmux-yank | System clipboard | y in copy mode |
| tmux-fzf-url | Open URLs from pane | prefix + u |
| tmux-thumbs | Copy patterns with hints | prefix + Space |
| tmux-resurrect | Save/restore sessions | prefix + Ctrl-s / Ctrl-r |
| tmux-continuum | Auto-save sessions | Automatic |
Advanced tmux.conf - Keybindings, Status Bar, and Nesting
Stock tmux is usable, but a few targeted config changes make a noticeable difference over a full workday.
Prefix Key
The default Ctrl-b prefix is awkward to reach. Two popular alternatives:
# Screen-style prefix
set -g prefix C-a
unbind C-b
bind C-a send-prefix

# Ergonomic alternative that avoids shell conflicts
set -g prefix C-Space
unbind C-b
bind C-Space send-prefix
Vi-Style Copy Mode
If you already think in vim motions, this makes copy mode feel natural:
setw -g mode-keys vi
bind -T copy-mode-vi v send -X begin-selection
bind -T copy-mode-vi y send -X copy-pipe-and-cancel "wl-copy"
Replace wl-copy with xclip -selection clipboard on X11 or pbcopy on macOS.
Intuitive Pane Splitting
The default % and " bindings for splits are not memorable. Visual mnemonics work better:
bind | split-window -h -c "#{pane_current_path}"
bind - split-window -v -c "#{pane_current_path}"
The -c "#{pane_current_path}" flag ensures new panes open in the same directory as the pane you split from, instead of defaulting to your home directory.
Seamless Vim/Tmux Navigation
vim-tmux-navigator
lets you use Ctrl-h/j/k/l to move between Neovim splits and tmux panes without switching mental models. Add it to your tmux.conf and install the corresponding Neovim plugin, and you can navigate between editor splits and terminal panes with the same keys.
Status Bar Customization
The status bar takes up one line but carries a lot of useful information. A minimal configuration that covers the essentials:
set -g status-style "bg=#1a1b26 fg=#c0caf5"
set -g status-right "#{?client_prefix,#[bg=red] PREFIX ,} %H:%M %d-%b"
set -g status-interval 5
The #{?client_prefix,...} conditional shows a bright red PREFIX indicator when you press the prefix key, which is helpful when you are learning new bindings or debugging key conflicts.
Nested Tmux for SSH Sessions
When you SSH into a remote server running its own tmux instance, every prefix key goes to your local tmux. The standard solution uses F12 as a toggle:
bind -T root F12 set prefix None \; set key-table off \; set status-style "bg=#4a0000"
bind -T off F12 set -u prefix \; set -u key-table \; set -u status-style
Press F12 to disable local tmux keybindings and turn the status bar red (a visual reminder that keystrokes now go to the remote tmux). Press F12 again to re-enable local bindings.
Performance Tuning and Memory
Tmux’s default scrollback buffer is 2,000 lines per pane. Increasing it to 50,000 lines (what tmux-sensible sets) is a reasonable middle ground. Going much higher - say 200,000+ lines - will increase memory consumption noticeably if you have many panes open. Each line in the buffer consumes memory, and tmux can become sluggish as the buffer fills.
Key performance settings:
# Scrollback - balance between usefulness and memory
set -g history-limit 50000

# Eliminate escape delay (critical for Neovim)
set -sg escape-time 0

# Faster status bar updates
set -g status-interval 5

# Enable focus events for terminal apps
set -g focus-events on
The escape-time setting deserves special attention. Tmux waits this many milliseconds after receiving an Escape keypress before deciding whether it is a standalone Escape or the start of a terminal escape sequence. The default (500ms) causes a half-second delay when switching modes in Neovim. Setting it to 0 fixes this but can occasionally cause issues with certain terminal emulators - try 10ms if 0 causes problems.
Real-World Workflow Patterns
Individual features are useful on their own, but they work best when combined into consistent daily patterns.
Project-Per-Session
Maintain one tmux session per project, named after the project: tmux new -s blog, tmux new -s api, tmux new -s infra. Switch between them with prefix + s (interactive session list with preview) or prefix + ( and prefix + ) for previous/next session. Combined with tmux-continuum, these sessions persist indefinitely - you can have a dozen projects suspended and ready to resume at any time.
Popup Terminals
Tmux 3.3+ supports floating popup windows that overlay your current workspace:
bind p display-popup -E -w 80% -h 80% "lazygit"
bind g display-popup -E -w 80% -h 80% "btop"
Press your binding, the popup appears, do your work, and press q (or the tool’s exit key) to dismiss it. This works well for tools you need to check briefly without disrupting your pane layout - git status, system monitoring, a quick shell calculation, or a scratchpad terminal.
Synchronized Pane Input
Toggle synchronized input to type in all panes at once:
bind e setw synchronize-panesThis is great for multi-server administration - SSH into four servers in four panes, press prefix + e, and every command you type executes on all four simultaneously. Press prefix + e again to turn it off.
Tmux Hooks for Automation
Tmux hooks let you trigger actions on specific events. A few practical examples:
# Show status bar only when multiple windows exist
set-hook -g after-new-window 'if "[ #{session_windows} -gt 1 ]" "set status on"'
set-hook -g window-closed 'if "[ #{session_windows} -lt 2 ]" "set status off"'

# Notify when a session closes
set-hook -g session-closed 'run-shell "notify-send \"tmux\" \"Session closed: #{session_name}\""'
Running Tmux as a Systemd Service
For always-on tmux sessions that start at boot without requiring a login, create a systemd user service at ~/.config/systemd/user/tmux.service:
[Unit]
Description=tmux default session
After=network.target

[Service]
Type=oneshot
RemainAfterExit=yes
ExecStart=/usr/bin/tmux new-session -d -s main
ExecStop=/usr/bin/tmux kill-server

[Install]
WantedBy=default.target
Enable it with systemctl --user enable tmux.service and loginctl enable-linger $USER (so the user session starts at boot, not just at login). Combined with tmux-continuum’s auto-restore, your sessions come back fully populated after a reboot with no manual intervention.
How Does Tmux Compare to Zellij?
Zellij (currently at version 0.44) is the most prominent modern alternative to tmux, written in Rust with a focus on user-friendliness.
A brief comparison:
| Feature | tmux | Zellij |
|---|---|---|
| Language | C | Rust |
| Plugin system | Shell scripts via TPM | WebAssembly (WASI) |
| Configuration | tmux.conf (custom syntax) | KDL format |
| Learning curve | Steeper, relies on documentation | Built-in toolbar shows shortcuts |
| Memory usage | ~5-10 MB | ~22 MB |
| Session persistence | Via tmux-resurrect plugin | Built-in (partial) |
| Remote sessions | Native | Added in v0.44 |
| Ecosystem maturity | 17+ years, massive plugin library | Younger, growing quickly |
Zellij is worth evaluating if you are starting fresh and value discoverability - its mode-based interface with a dynamic toolbar reduces the need for cheat sheets. Tmux remains the stronger choice if you need deep scripting capabilities, a proven plugin ecosystem, or compatibility with every server you will ever SSH into.
Putting It All Together
A complete, production-ready tmux.conf incorporating everything discussed here would include: TPM initialization, tmux-sensible as a base, tmux-resurrect and tmux-continuum for persistence, tmux-yank for clipboard, vim-tmux-navigator for seamless pane movement, a custom prefix key, vi copy mode bindings, intuitive split bindings, a status bar with a prefix indicator, and F12 nesting support. That is roughly 30-40 lines of configuration that changes how your terminal works in practice.
Start with the session scripting and persistence setup - those two changes alone save more time than any other tmux customization. Add plugins incrementally as you hit friction points in your daily work. The goal is not to configure everything at once but to build a setup that adapts to your workflow over time.