Build a Portable Hacking Lab with a Raspberry Pi 5

You can build a self-contained penetration testing lab on a Raspberry Pi 5 running Kali Linux ARM64, powered by a battery HAT, connected to a 7-inch portable display, and equipped with a wireless adapter capable of packet injection. The total cost lands between $200 and $250. What you get is a pocket-sized offensive security toolkit capable of running Nmap, Burp Suite, Wireshark, Aircrack-ng, and Metasploit in the field, during CTF events, or on authorized engagements where lugging a laptop is impractical.
The Pi 5 is the first Raspberry Pi genuinely worth using for this purpose. Previous generations either lacked RAM for running multiple tools simultaneously or suffered from CPU performance so limited that Metasploit became painful to use. The Pi 5’s quad-core Cortex-A76 clocked at 2.4GHz and 8GB of LPDDR4X memory change that equation. This guide walks through hardware selection, Kali installation, essential tool configuration, networking setup for offensive operations, and the legal and operational security considerations that keep this kind of lab from becoming a liability.
Hardware Selection and Assembly
The Pi 5’s quad-core Cortex-A76 at 2.4GHz and 8GB RAM make it the first Raspberry Pi genuinely capable of running security tools without painful lag. The 4GB model works but struggles when Metasploit and Burp Suite run simultaneously. For any serious use, the 8GB model is the correct choice. Every component below was selected to maximize capability while keeping the total build under $250.
Raspberry Pi 5 (8GB) is the foundation. At the time of writing, it retails for around $80. Do not substitute the 4GB model if you intend to run Metasploit alongside Burp Suite — the RAM ceiling becomes apparent quickly, and swap thrashing on a microSD card is miserable.
Storage matters more on the Pi 5 than on any previous generation because Metasploit’s database backend and Kali’s large tool catalog stress I/O continuously. A 128GB or 256GB A2-rated microSD card (Samsung EVO Select or SanDisk Extreme) is the minimum acceptable option. If your budget allows an extra $15-25, the Pi 5’s M.2 HAT adds an NVMe slot that accepts 2230 and 2242 form factor drives. Even an inexpensive 256GB NVMe drive reduces Metasploit startup time from 60 seconds to under 20 and makes the overall system feel dramatically more responsive. The NVMe route is worth it.
Battery HAT options divide into two camps. The PiSugar 3 ($40) holds a 5000mAh lithium cell, mounts directly under the Pi, and communicates over I2C for battery percentage reporting in software. It delivers 3-4 hours of moderate use. The Waveshare UPS HAT (C) uses removable 18650 cells for longer runtime but adds more bulk. Either works. The PiSugar is the neater install if you want a compact form factor.
Portable display: The Waveshare 7" HDMI touchscreen ($50-60) connects directly to the Pi’s micro-HDMI port and requires no driver configuration under Kali Linux. The official Raspberry Pi Touch Display 2 ($60) also works but uses the dedicated DSI connector, which can conflict with some HAT configurations. The Waveshare HDMI panel is the safer plug-and-play choice.
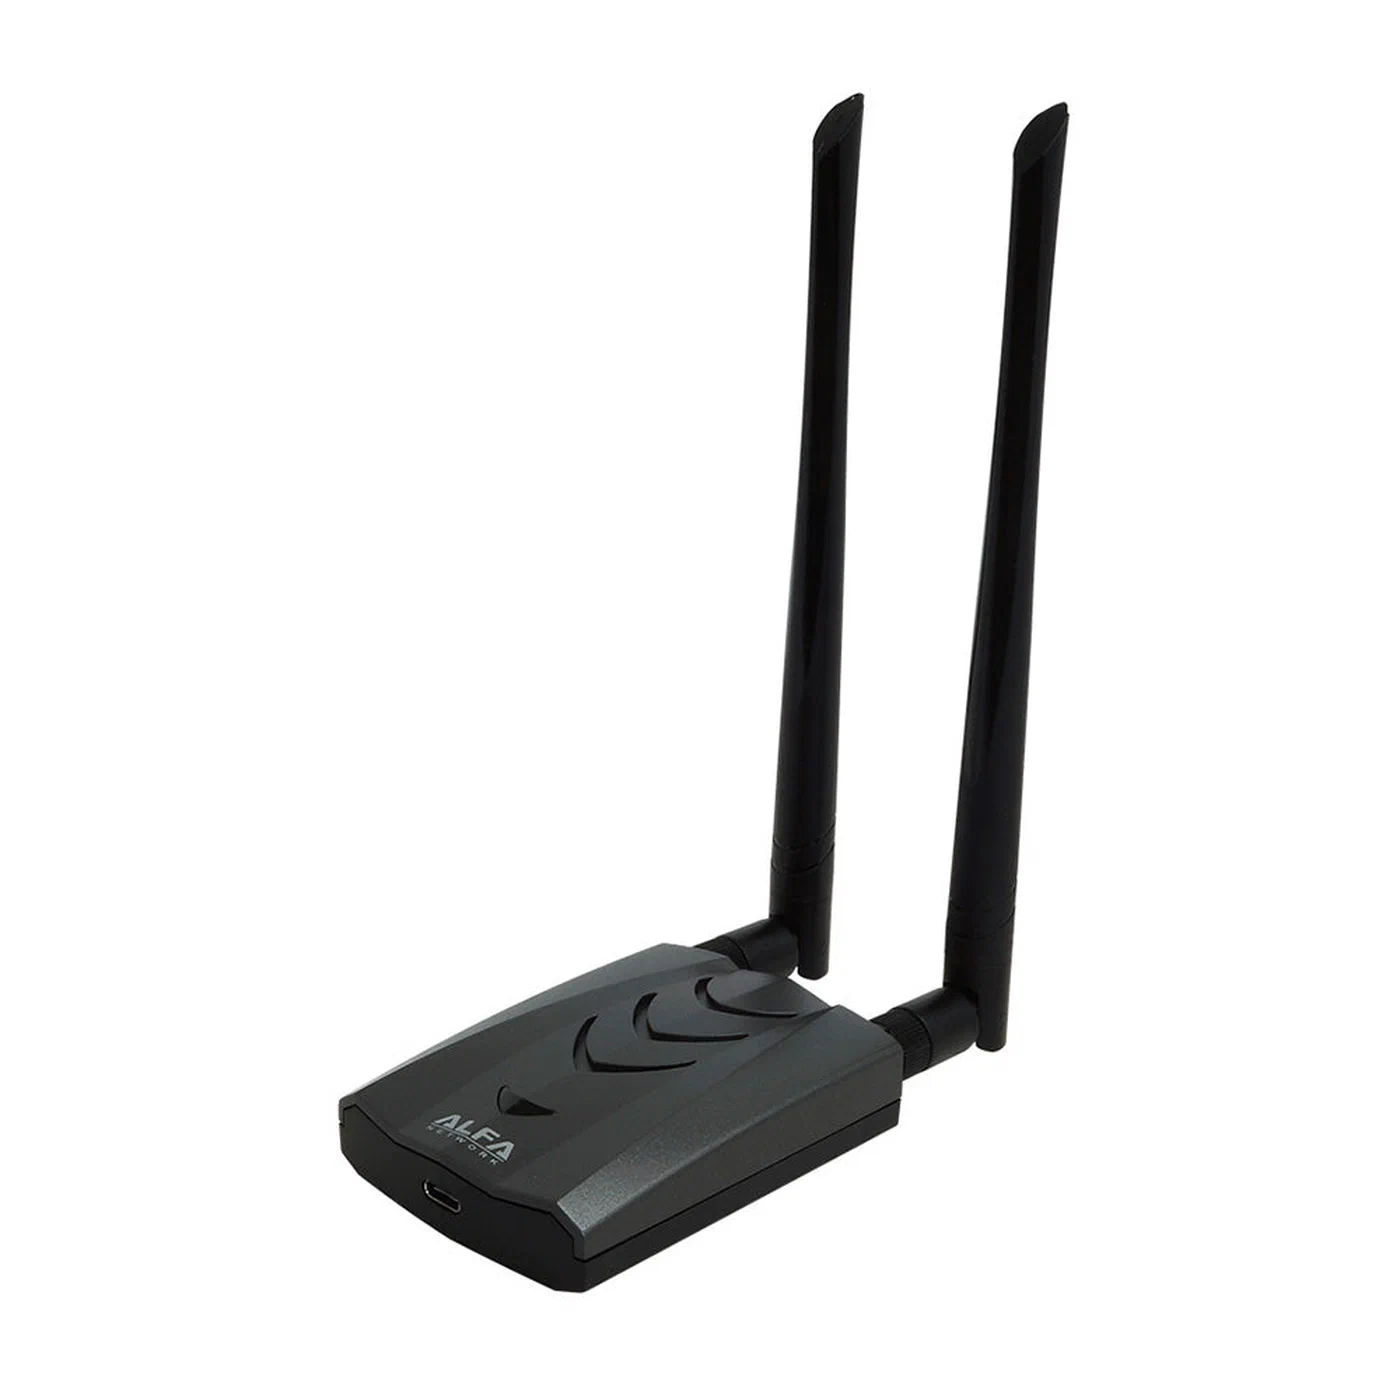
Wireless adapter for packet injection is the component with the least room for compromise. Not all USB wireless adapters support monitor mode and packet injection under Linux, and fewer still have reliable drivers on ARM64. The Alfa AWUS036ACH (RTL8812AU chipset) and the Alfa AWUS036ACSM (MediaTek MT7612U) are the two most reliable options as of 2026. Both support dual-band 802.11ac, both have maintained driver packages in Kali’s repositories, and both work correctly with Aircrack-ng’s injection test.
Compact keyboard: The Rii i4 mini Bluetooth keyboard with integrated touchpad ($15-20) pairs quickly with Kali’s Bluetooth stack and fits in a jacket pocket. The Logitech K380 is larger but significantly more comfortable for extended typing during an assessment.
Case and cooling: The Argon ONE V3 case ($25) provides passive cooling, a full-size HDMI port adapter, and a clean GPIO access panel that accommodates the battery HAT without interference. Active cooling matters for sustained workloads — Metasploit database operations and continuous Nmap scanning both push the CPU hard. Add the official active cooler ($5) to the Argon ONE if you plan extended sessions.
Installing and Configuring Kali Linux ARM64
Kali provides the pre-packaged tool ecosystem that makes this lab immediately useful without spending days compiling and configuring individual tools. The ARM64 image for Raspberry Pi is maintained by Offensive Security and mirrors the full x86_64 Kali experience.
Download the official Kali ARM64 image from kali.org/get-kali/#kali-arm. Select the “Kali Linux RaspberryPi 5” image with the XFCE desktop. Verify the SHA256 hash before writing. Flash to your microSD card or NVMe drive:
# For microSD (replace /dev/sdX with your actual device)
dd if=kali-linux-2026.1-raspberry-pi-arm64.img of=/dev/sdX bs=4M status=progress conv=fsync

# Or use balenaEtcher if you prefer a GUI
On first boot, change the default credentials immediately:
passwd # change from default 'kali' passwordThen update the system completely before installing anything else:
sudo apt update && sudo apt full-upgrade -y
sudo reboot
The Kali image for Pi 5 automatically expands the filesystem on first boot. Verify with df -h / that the full card capacity is visible. If using a minimal image rather than the desktop variant, install the full tool suite:
sudo apt install kali-linux-defaultThis metapackage pulls in Nmap, Wireshark, Metasploit Framework, Burp Suite Community, John the Ripper, Hashcat, SQLMap, Nikto, Hydra, and several hundred additional tools. Expect 15-20GB of additional downloads.
Configure the Alfa wireless adapter. The RTL8812AU chipset used in the AWUS036ACH requires a driver not included in the standard kernel. Kali ships the DKMS package:
sudo apt install realtek-rtl88xxau-dkmsAfter installation, verify the adapter appears:
iwconfig # should show wlan1 with the Alfa adapterTest monitor mode:
sudo airmon-ng start wlan1
sudo aireplay-ng --test wlan1mon  # should show injection is working
Performance tuning for the Pi 5. Edit /boot/firmware/config.txt to optimize for security tool workloads:
# Reduce GPU memory allocation — security tools don't need it
gpu_mem=128

# Enable the 2.4GHz turbo boost
arm_boost=1

# Optional: force PCIe Gen 3 for NVMe HAT stability
dtparam=pcie_gen=3
Set the CPU governor to performance mode for sustained workloads:
sudo apt install cpufrequtils
sudo cpufreq-set -g performance
Enable SSH so you can operate the Pi headlessly — useful when it’s running in a bag connected to a target network:
sudo systemctl enable ssh
sudo systemctl start ssh
Essential Pentesting Tools and Their Pi 5 Performance
Not every security tool runs well on ARM64. Some are CPU-bound in ways that hurt on the Pi’s architecture. Others rely on GPU acceleration that simply is not available. Here is an honest assessment of what works, what works with caveats, and what you should offload to a more powerful machine.
Nmap runs natively and efficiently on ARM64. A full TCP SYN scan (nmap -sS) of a /24 subnet completes in under 30 seconds at default timing. Enable service detection, scripting, and OS fingerprinting for a thorough host enumeration pass:
sudo nmap -sV -sC -O -T4 192.168.1.0/24 -oA scan-resultsThe -oA flag saves output in all three formats (normal, XML, grepable) simultaneously — useful for importing results into Metasploit or a reporting tool later.
Metasploit Framework is functional but has two performance characteristics worth knowing. First, msfconsole takes approximately 60 seconds to initialize on an SD card and 15-20 seconds on NVMe — the PostgreSQL database backend is the bottleneck. Initialize the database before your first session:
sudo msfdb init
sudo msfconsole
Second, search operations inside Metasploit are database-driven and fast once initialized. Module loading and exploit execution are not meaningfully slower than on an x86 machine for most common exploits. The Pi handles Metasploit better than its reputation suggests.
Burp Suite Community Edition runs under Java 21 ARM64, which is available in Kali’s repositories. Allocate memory explicitly:
java -jar -Xmx1g /usr/bin/burpsuiteManual web application testing — intercepting requests, modifying parameters, testing authentication — works well. Avoid running Burp’s automated scanner (Community Edition has a limited version) against large applications, as it will exhaust the allocated heap.
Aircrack-ng suite is arguably the Pi 5’s primary advantage over carrying a laptop. The full wireless attack workflow runs without issues:
# Capture WPA/WPA2 handshakes
sudo airodump-ng --bssid AA:BB:CC:DD:EE:FF -c 6 --write capture wlan1mon

# Deauthenticate clients to force reconnection and handshake capture
sudo aireplay-ng --deauth 5 -a AA:BB:CC:DD:EE:FF wlan1mon

# Crack captured handshake offline with rockyou
aircrack-ng capture-01.cap -w /usr/share/wordlists/rockyou.txt
The Pi 5’s CPU handles the dictionary attack at around 50,000-100,000 keys per second — slow compared to GPU cracking, but entirely adequate for common password lists and for generating candidate lists with rules.
Wireshark runs in GUI mode on the Pi 5’s XFCE desktop. Large capture files (over 100MB) render slowly. For field work, use tshark to capture and filter at the command line, then transfer PCAPs to a laptop for deep analysis:
sudo tshark -i wlan1mon -w capture.pcap -f "not broadcast"Hashcat in CPU-only mode is 100 to 1000 times slower than GPU-based cracking depending on the hash type. Use it on the Pi for small wordlist tests or to verify a hash format, then transfer hashes to a GPU-equipped machine for serious cracking work. The Pi is not a cracking rig.
Responder and Impacket are Python-based and run perfectly on ARM64. These Active Directory attack tools — LLMNR/NBT-NS poisoning, SMB relay, pass-the-hash — are among the most commonly used tools on internal network assessments, and the Pi handles them without issues:
sudo python3 /usr/share/responder/Responder.py -I eth0 -wrfNetworking Configuration for Offensive Operations
A penetration testing lab needs flexible networking. The Pi 5’s built-in capabilities plus the external Alfa adapter give you enough interfaces to handle most field scenarios.
Dual-interface setup is the baseline configuration. Use the Pi 5’s built-in Wi-Fi (wlan0) for internet connectivity and management access to the Pi itself. Put the Alfa adapter (wlan1) into monitor mode or connect it to target networks without affecting your management channel. This separation prevents losing SSH access to the Pi when wlan1 is put into monitor mode.
Rogue access point with hostapd. An evil twin access point requires hostapd for the AP itself and dnsmasq for DHCP and DNS services. Install both:
sudo apt install hostapd dnsmasqA minimal hostapd.conf for creating a rogue AP:
interface=wlan1
driver=nl80211
ssid=TargetNetworkName
hw_mode=g
channel=6
auth_algs=1
wpa=2
wpa_passphrase=password123
wpa_key_mgmt=WPA-PSK
wpa_pairwise=CCMP
Route client traffic through the Pi with iptables NAT:
sudo iptables -t nat -A POSTROUTING -o wlan0 -j MASQUERADE
echo 1 | sudo tee /proc/sys/net/ipv4/ip_forward
VPN for anonymity. For external testing engagements where you need to mask the Pi’s real IP, WireGuard is the correct tool:
sudo apt install wireguardConfigure your WireGuard tunnel in /etc/wireguard/wg0.conf and bring it up with:
sudo wg-quick up wg0USB Ethernet gadget mode lets you plug the Pi into a target computer’s USB port and create a direct network connection without any visible network infrastructure. Add these lines to /boot/firmware/config.txt:
dtoverlay=dwc2And to /boot/firmware/cmdline.txt, append (on the same line):
modules-load=dwc2,g_etherThe target computer sees a USB Ethernet adapter. Configure the Pi’s usb0 interface with a static IP and use it for direct access to the target machine.
Bluetooth reconnaissance. The Pi 5’s built-in Bluetooth stack supports device discovery and basic interaction with BLE devices:
sudo bluetoothctl
[bluetooth]# scan on  # discover nearby devices
[bluetooth]# info AA:BB:CC:DD:EE:FF  # get device details
For BLE attack research in controlled lab environments, btlejuice and GATTacker run on Node.js, which is available on Kali ARM64.
Operational Security and Legal Considerations
A portable hacking lab creates legal exposure that desktop security tools do not. The portability and concealment that make this lab useful in authorized engagements make it appear suspicious when unauthorized use is suspected. Understanding the legal boundaries is not optional.
The legal requirement is absolute: never use penetration testing tools against networks or systems you do not own or have explicit written authorization to test. This applies even to “passive” techniques like packet capture on public Wi-Fi — intercepting others’ communications is illegal in most jurisdictions regardless of whether you read the data. In the United States, the Computer Fraud and Abuse Act (CFAA) applies. In the United Kingdom, the Computer Misuse Act. Most countries have equivalent statutes. Get written authorization before testing anything you do not own.
Full-disk encryption is mandatory for a portable device containing security tools, captured credentials, client reports, and engagement notes. If the Pi is lost or seized, LUKS encryption protects that data. Encrypt the SD card or NVMe drive before installing Kali, or use Kali’s installer with the encrypted LVM option. To encrypt an additional volume after installation:
sudo cryptsetup luksFormat /dev/sdb1  # format with LUKS
sudo cryptsetup open /dev/sdb1 secure-data  # unlock
sudo mkfs.ext4 /dev/mapper/secure-data  # create filesystem
MAC address randomization prevents your hardware address from being logged by network infrastructure during assessments. Change the Alfa adapter’s MAC before connecting to any target network:
sudo ip link set wlan1 down
sudo macchanger -r wlan1  # assign random MAC
sudo ip link set wlan1 up
Log management. Kali logs command history (~/.bash_history), tool output, and application logs by default. After each engagement, review and securely delete sensitive logs:
shred -vfz -n 5 ~/.bash_history
history -c && history -w
Engagement documentation. Use CherryTree (pre-installed on Kali) or Obsidian to document findings, capture screenshots with dates and timestamps, and organize evidence during assessments. Store all engagement data on the LUKS-encrypted volume, not the system partition.
Physical security. The Pi’s portability is both its strength and its most significant risk. Use a nondescript case — avoid “Kali Linux” branding on the exterior. Enable automatic screen lock with a short timeout (5 minutes). Configure PAM to limit failed login attempts. If operating in environments with strict physical security, be prepared to explain what the device is if questioned.
Isolated practice networks. For learning and practicing offensive techniques, set up isolated virtual machine labs rather than testing on any live network. VulnHub provides downloadable vulnerable VMs. Hack The Box offers structured challenges through a dedicated VPN — never scan HackTheBox machines from your regular internet connection without the HackTheBox VPN active.
Putting It Together
The Raspberry Pi 5 portable hacking lab is a legitimate and capable tool for penetration testers, security students, and CTF competitors. At $200-250 all-in, it offers a reasonable capability-to-cost ratio compared to a dedicated security laptop, and its physical discretion is genuinely useful in certain authorized engagement scenarios.
What the build is not: a replacement for a GPU cracking rig, a high-performance fuzzing platform, or a machine capable of running dozens of concurrent processes. Know the ceiling, work within it, and offload the heavy computation to more powerful hardware when the job demands it.
The next step after building this lab is spending time with it on VulnHub machines and Hack The Box. The tools are only as useful as the knowledge behind them, and that knowledge only comes from practice on systems you are authorized to touch.