How to Self-Host Plausible Analytics on a VPS in Under 30 Minutes

You can deploy a fully self-hosted Plausible Analytics
instance on a $6/month VPS using Docker Compose and a Caddy
reverse proxy for automatic HTTPS. The whole process takes under 30 minutes. Once running, you add a single <script> tag to your site and you are done - no cookie banners needed, no personal data collected. Plausible’s tracking script weighs under 1 KB gzipped, stores everything in a ClickHouse
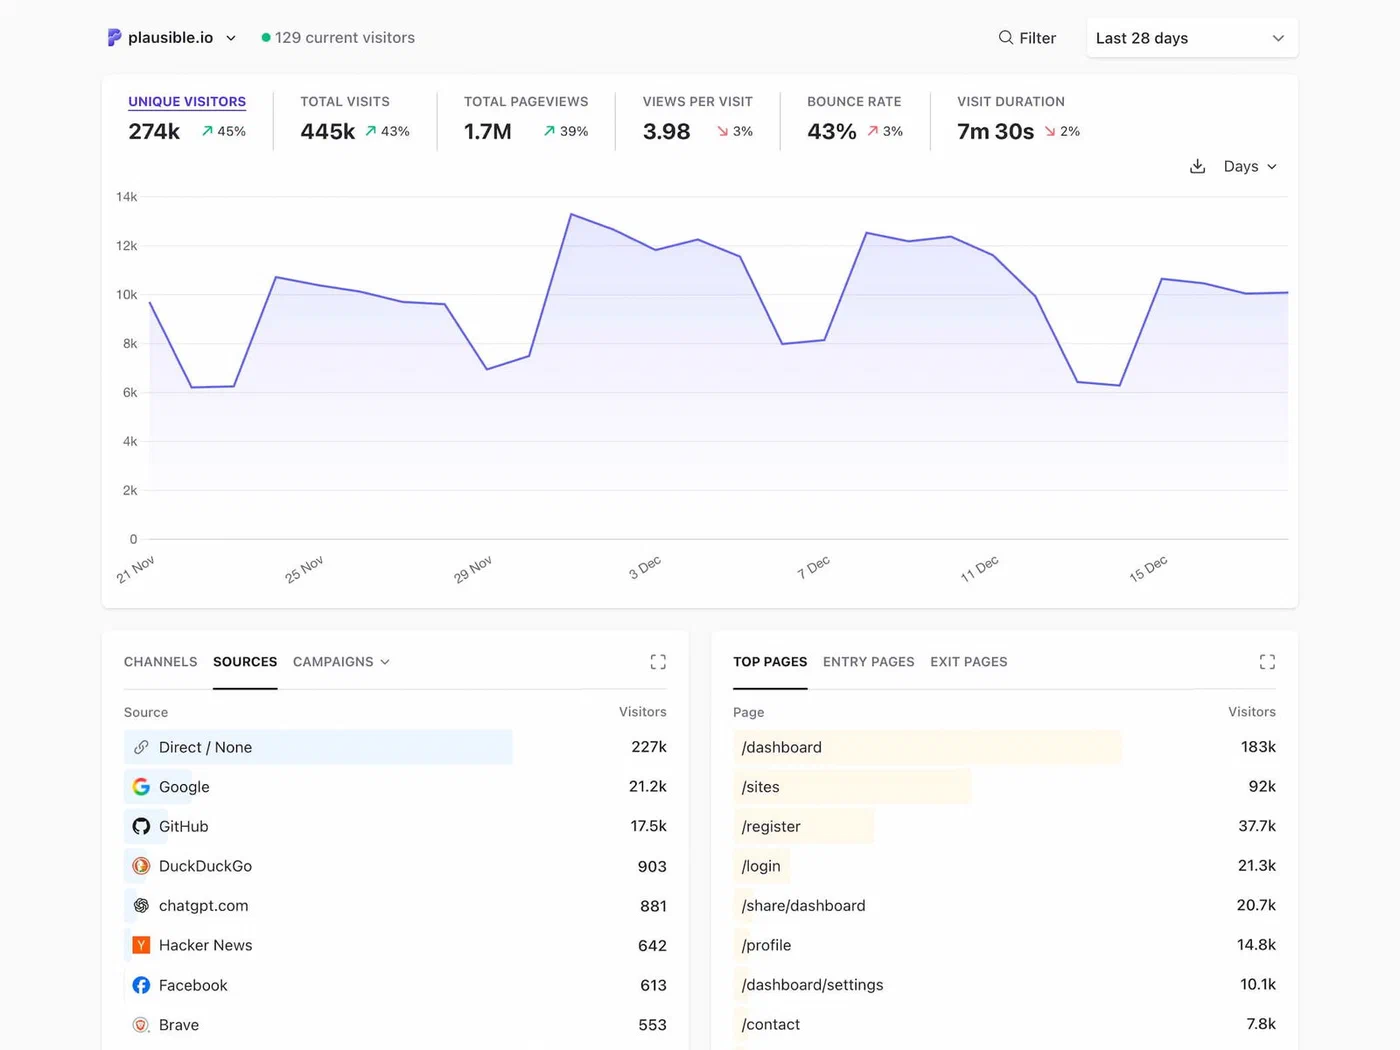
database on your own server, and gives you a clean, fast dashboard that shows exactly what you need to know about your traffic.
This guide walks through the full setup: provisioning a VPS, deploying Plausible Community Edition with Docker Compose, configuring Caddy as a reverse proxy with automatic TLS, adding the tracking script to your site, and migrating away from Google Analytics.
Why Self-Host Plausible in 2026
Google Analytics 4 is a complicated tool. The interface is dense, the learning curve is steep, and the data model is built around marketing funnels that most personal sites and small projects do not need. On top of that, GA4 collects personal data extensively, uses cookies, and requires a consent banner under GDPR, CCPA, and ePrivacy regulations. Browser-level tracking protection and ad blockers like uBlock Origin and Brave Shields actively block GA4 requests, which means your analytics numbers are already inaccurate if a meaningful portion of your audience uses these tools.
Plausible Community Edition (CE) v2.2, released in March 2026, is fully open source under AGPL-3.0. It is functionally equivalent to the hosted Plausible Cloud version - you get the same dashboard, the same API, and the same tracking capabilities. The only difference is that you run the infrastructure yourself.
The performance difference between the two tracking approaches is significant. Plausible’s plausible.js is 1 KB gzipped. Google’s gtag.js weighs in at roughly 28 KB gzipped. That is not a trivial difference when you are trying to hit good Core Web Vitals scores, particularly on LCP (Largest Contentful Paint) and TBT (Total Blocking Time). A lighter analytics script means your pages load faster, which is something Google itself rewards in search rankings.
Plausible uses no cookies at all. It does not store IP addresses and does not fingerprint visitors. This means you are compliant with GDPR, CCPA, and ePrivacy out of the box without needing a cookie consent banner. For a personal blog or small business site, eliminating the consent banner improves both user experience and page load performance.
On cost, the math works out in your favor. Plausible Cloud starts at $9/month for up to 10K monthly pageviews, and the price scales with traffic. A self-hosted instance on a Hetzner CX22 (2 vCPU, 4 GB RAM, 40 GB NVMe) costs $5.39/month regardless of how much traffic you get. On DigitalOcean , a comparable Basic Droplet runs $6/month. You own all the data - it sits in a ClickHouse database on your server, exportable at any time, with zero vendor lock-in or data sampling.
There is another practical advantage to self-hosting: ad blockers. Most content blockers ship with filter lists that block requests to plausible.io by default. When you self-host Plausible on your own domain (say analytics.yourdomain.com), those blocklists do not apply. Your tracking script loads from a first-party domain, and your analytics numbers become much more accurate.
VPS Setup and Prerequisites
You need three things before starting: a VPS, a domain name (or subdomain), and about 20 minutes.
Provision the Server
Any VPS with at least 2 GB of RAM and 1 vCPU will work. Plausible’s ClickHouse backend is the most resource-hungry component, and 2 GB of RAM handles it comfortably for sites with up to 100K monthly pageviews. The Hetzner CX22 at $5.39/month (2 vCPU, 4 GB RAM, 40 GB NVMe) is probably the best value option right now. DigitalOcean, Vultr, and Linode all have comparable offerings in the $5-6/month range.
Choose a data center close to where most of your traffic originates. If your audience is primarily in Europe, pick a European data center. The analytics data collection is not latency-sensitive for visitors (the script fires asynchronously), but your dashboard will load faster when you are close to the server.
DNS Configuration
Point a subdomain to your VPS. Create an A record for something like analytics.yourdomain.com pointing to your server’s IPv4 address. Set the TTL to 300 seconds so changes propagate quickly during setup. If your DNS provider supports it, add an AAAA record for IPv6 as well.
Do not use your root domain for Plausible - a subdomain keeps things clean and makes it easy to move the analytics server later if needed.
Initial Server Setup
SSH into your fresh server and run the basics:
apt update && apt upgrade -yInstall Docker Engine 27.x and Docker Compose v2 from the official Docker repository. Do not use the Snap version - it has filesystem permission issues that cause problems with volume mounts:
# Add Docker's official GPG key and repository
curl -fsSL https://get.docker.com | sh
Verify the installation:
docker compose version
# Should output v2.32 or later
Lock down SSH access while you are at it. Disable root login and password authentication in /etc/ssh/sshd_config:
PermitRootLogin no
PasswordAuthentication no
Set up ufw to allow only the ports you need:
ufw allow 22/tcp
ufw allow 80/tcp
ufw allow 443/tcp
ufw enable
Deploying Plausible with Docker Compose
Plausible CE ships with an official Docker Compose setup that runs three containers: the Plausible web application (an Elixir app), a PostgreSQL database for user and session data, and a ClickHouse database for analytics events.
Clone and Configure
Pull down the official hosting repository:
git clone https://github.com/plausible/community-edition plausible-ce
cd plausible-ce
Edit the plausible-conf.env file. The two critical settings are:
BASE_URL=https://analytics.yourdomain.com
SECRET_KEY_BASE=<generate-this>
Generate the secret key:
openssl rand -base64 48Copy the output into SECRET_KEY_BASE. If you want email reports (weekly traffic summaries sent to your inbox), configure the SMTP settings as well:
MAILER_EMAIL=analytics@yourdomain.com
SMTP_HOST_ADDR=smtp.yourdomain.com
SMTP_HOST_PORT=587
SMTP_USER_NAME=analytics@yourdomain.com
SMTP_USER_PWD=your-smtp-password
SMTP_HOST_SSL_ENABLED=true
Here is a complete plausible-conf.env for reference:
BASE_URL=https://analytics.yourdomain.com
SECRET_KEY_BASE=your-generated-secret-key-here
DISABLE_REGISTRATION=invite_only
TOTP_VAULT_KEY=your-totp-vault-key-here
Generate the TOTP vault key the same way as the secret:
openssl rand -base64 32Launch the Stack
The docker-compose.yml in the repository defines the three services:
plausible- the Elixir web app, exposed on port 8000plausible_db- PostgreSQL 16 for user accounts and site configurationplausible_events_db- ClickHouse 24.x for analytics event storage
Start everything:
docker compose up -dThe first startup takes 30-60 seconds while ClickHouse and PostgreSQL initialize their schemas. Watch the logs to make sure everything comes up cleanly:
docker compose logs -f plausibleYou should see a line like Access Plausible at https://analytics.yourdomain.com with no error messages. Press Ctrl+C to exit the log tail.
Verify all containers are healthy:
docker compose psAll three should show status “Up”. If any container is restarting, check its logs with docker compose logs <service-name>.
Create Your Admin Account
Visit https://analytics.yourdomain.com in your browser (this will not work until Caddy is configured in the next section - if you want to test first, you can temporarily access port 8000 directly). The first user to register becomes the site administrator.
After creating your account, lock down registration by setting DISABLE_REGISTRATION=true in plausible-conf.env and restarting the stack:
docker compose down && docker compose up -dConfiguring Caddy as a Reverse Proxy
Caddy handles TLS termination and proxies requests to the Plausible container. I recommend Caddy over Nginx here because it handles HTTPS automatically with zero configuration. Caddy provisions and renews Let’s Encrypt certificates automatically. You do not need to install certbot, set up cron jobs for renewal, or debug certificate chains.
Basic Caddyfile
Create a Caddyfile in your project directory:
analytics.yourdomain.com {
    reverse_proxy localhost:8000
    encode gzip
}
That is the entire configuration - three lines. Caddy will automatically obtain a TLS certificate for analytics.yourdomain.com, terminate HTTPS, compress responses with gzip, and forward requests to the Plausible app on port 8000.
Running Caddy with Docker
The cleanest approach is to add Caddy to the same docker-compose.yml:
caddy:
  image: caddy:2.9-alpine
  restart: unless-stopped
  ports:
    - "80:80"
    - "443:443"
    - "443:443/udp"
  volumes:
    - ./Caddyfile:/etc/caddy/Caddyfile
    - caddy_data:/data
    - caddy_config:/config
Add the volumes to the bottom of your docker-compose.yml:
volumes:
  caddy_data:
  caddy_config:
When running Caddy in Docker alongside the Plausible containers, update the reverse_proxy directive to use the Docker service name instead of localhost:
analytics.yourdomain.com {
    reverse_proxy plausible:8000
    encode gzip
}
Restart the full stack:
docker compose up -dWithin 60 seconds, visit https://analytics.yourdomain.com and you should see the Plausible login page with a valid TLS certificate (padlock icon in your browser).
Cloudflare Users
If your domain is behind Cloudflare’s proxy (orange cloud), the default HTTP-01 challenge for Let’s Encrypt will not work. You need to use DNS-01 challenges instead. Build a custom Caddy image with the Cloudflare DNS plugin, or use the caddy-cloudflare Docker image, and update your Caddyfile:
analytics.yourdomain.com {
    tls {
        dns cloudflare {env.CF_API_TOKEN}
    }
    reverse_proxy plausible:8000
    encode gzip
}
Set your Cloudflare API token as an environment variable in your Docker Compose file or .env file.
Rate Limiting
To protect the Plausible event API from abuse, consider adding rate limiting. With the caddy-ratelimit plugin, you can cap the event ingestion endpoint:
analytics.yourdomain.com {
    rate_limit {
        zone api_limit {
            match {
                path /api/event
            }
            key {remote_host}
            events 100
            window 1m
        }
    }
    reverse_proxy plausible:8000
    encode gzip
}
This limits each IP to 100 event submissions per minute, which is well above what legitimate tracking generates but low enough to mitigate abuse.
Adding the Tracking Script to Your Site
With Plausible running and Caddy handling HTTPS, adding analytics to your site is a one-line change.
The Basic Script Tag
Add this to the <head> section of every page you want to track:
<script defer data-domain="yourdomain.com" src="https://analytics.yourdomain.com/js/plausible.js"></script>Plausible starts collecting pageview data immediately with no further configuration needed.
Hugo Integration
For Hugo
sites, the best approach is to add the script to a custom partial. Create or edit layouts/partials/head/custom.html:
<script defer data-domain="yourdomain.com" src="https://analytics.yourdomain.com/js/plausible.js"></script>If your theme supports custom analytics configuration through config.toml, you can use that instead, but the partial approach works universally across all Hugo themes.
Bypassing Ad Blockers with a Script Proxy
Even with a self-hosted instance, some aggressive blocklists may eventually add your analytics subdomain. You can make your tracking script almost invisible to blockers by proxying it through your main domain.
In your site’s Caddy or Nginx configuration, add a route that serves the Plausible script from your own domain:
yourdomain.com {
    handle /js/visits.js {
        reverse_proxy analytics.yourdomain.com:443 {
            header_up Host analytics.yourdomain.com
        }
    }
    handle /api/event {
        reverse_proxy analytics.yourdomain.com:443 {
            header_up Host analytics.yourdomain.com
        }
    }
    # ... rest of your site config
}
Then update your script tag to use the proxied path:
<script defer data-domain="yourdomain.com" src="/js/visits.js"></script>From the browser’s perspective, the analytics script is just another first-party JavaScript file. No blocklist will flag it.
Custom Event Tracking
Plausible supports custom events for tracking specific user interactions. You can track button clicks, form submissions, file downloads, or any other action:
plausible("Download", {props: {file: "guide.pdf"}});
plausible("Signup", {props: {plan: "pro"}});
These events show up in a dedicated “Goals” section of your Plausible dashboard.
Migrating from Google Analytics
If you have historical data in Google Analytics that you want to preserve, Plausible supports CSV imports.
Export your GA4 data from the Google Analytics admin panel as CSV files. Then in Plausible, go to Settings, then Import Data, then Google Analytics CSV Import. Upload your exported files and Plausible will import historical pageviews, traffic sources, and geographic data.
The import is not perfect - GA4’s data model differs quite a bit from Plausible’s simpler approach - but it gives you continuity in your traffic trends. You will be able to see historical data alongside new Plausible data in the same dashboard.
After confirming the import looks correct, remove the GA4 tracking code from your site. Your pages will load faster and your visitors will not be tracked by Google anymore.
Backups and Maintenance
Your analytics data lives in two databases: PostgreSQL (small, handles user accounts and site config) and ClickHouse (larger, stores all analytics events). Both run as Docker volumes.
Set up a daily backup with a simple cron job:
# /etc/cron.d/plausible-backup
0 3 * * * root docker exec plausible-ce-plausible_db-1 pg_dump -U postgres plausible > /backups/plausible-pg-$(date +\%F).sql
0 3 * * * root docker exec plausible-ce-plausible_events_db-1 clickhouse-client --query "SELECT * FROM plausible_events_db.events FORMAT Native" > /backups/plausible-ch-$(date +\%F).native
For a more robust solution, use restic to back up the Docker volumes to an offsite location like Backblaze B2 or an S3 bucket.
When new versions of Plausible CE are released, upgrading is straightforward:
cd plausible-ce
docker compose pull
docker compose down
docker compose up -d
Check the Plausible CE changelog before upgrading to see if there are any breaking changes or migration steps.
Resource Usage at Scale
On a Hetzner CX22 (2 vCPU, 4 GB RAM), here is roughly what to expect:
| Monthly Pageviews | RAM Usage | CPU Usage | Disk Growth/Month |
|---|---|---|---|
| 1,000 | ~800 MB | Negligible | ~10 MB |
| 10,000 | ~1 GB | Minimal | ~100 MB |
| 100,000 | ~1.5 GB | Light spikes | ~500 MB |
| 500,000+ | ~2.5 GB | Moderate | ~2 GB |
ClickHouse compresses analytics data very well. Even at 100K pageviews per month, you are looking at well under a gigabyte of disk usage per month. The 40 GB NVMe on a CX22 will last you years before you need to think about disk space.
If you are running a higher-traffic site and start seeing ClickHouse consuming too much memory, you can tune its settings in the clickhouse-config.xml by limiting max_memory_usage and adjusting merge tree settings. But for most personal sites and small businesses, the defaults work fine.
Thirty minutes of setup, five dollars a month, and you get accurate, privacy-respecting analytics running on your own hardware. If GA4’s complexity has been annoying you or GDPR compliance is a concern, self-hosted Plausible solves both problems without much effort.