SDXL 2.0 LoRA: 50-300 MB Adapters on 12 GB VRAM

The best way to fine-tune Stable Diffusion XL 2.0 is with Low-Rank Adaptation (LoRA) : a small adapter that injects your style or subject without touching the base weights. Instead of retraining the full model, LoRA trains a tiny side network next to the frozen base. The result is a 50 to 300 MB file you can load, swap, and stack at inference, trained on a 12 GB GPU in an afternoon.
Key Takeaways
- LoRA trains a 50-300 MB adapter instead of the whole model, so a 12 GB consumer GPU is enough.
- Dataset quality decides the result: 15-50 sharp, well-captioned images beat hundreds of mediocre ones.
- A unique trigger word plus regularization images stop the new concept from bleeding into the base model.
- Train in bf16, not fp16: fp16 is the usual cause of NaN crashes with the 8-bit optimizer.
- SDXL 2.0 still has the most mature LoRA tooling in 2026; Flux.1 is the frontier but a rougher ride.
The 2026 Image Gen Landscape: SDXL 2.0 vs. Flux.1 vs. Others
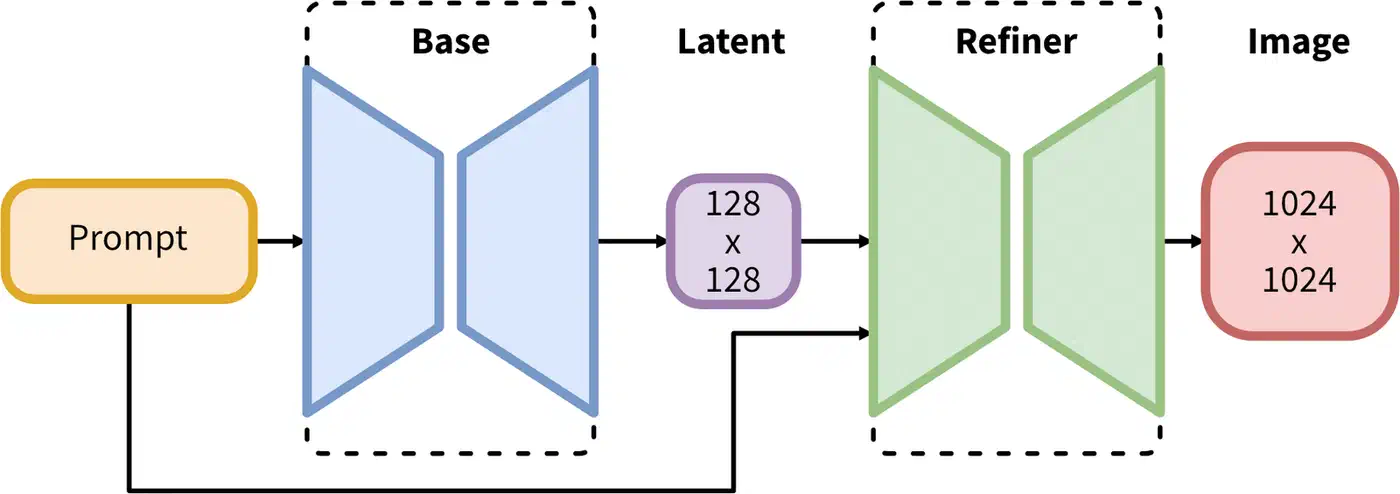
The image gen field has split into two camps. SDXL 2.0 stays on the UNet diffusion path it inherits from Stable Diffusion 1.x and 2.x. Its rivals, led by Flux.1 from Black Forest Labs, moved to the Diffusion Transformer (DiT). SDXL 2.0 keeps the UNet but gains much better training data, a redesigned near-lossless VAE, and a distillation pipeline that closes most of the quality gap with Flux.1 Dev at lower inference cost.
Flux.1 Dev makes stunning photorealistic images, but its DiT design means the LoRA training stack is still young. Tools like x-flux and SimpleTuner support it, but the hyperparameter map is less charted and training is more fragile. SDXL 2.0 has the mature stack, built on years of kohya_ss work, thousands of public LoRAs on CivitAI, and well-known recipes. When I want a style LoRA with steady, repeatable results, SDXL 2.0 is still my pick in 2026. Flux.1 Dev is the frontier if you need top-tier photorealism and can absorb a rougher training cycle. For how SDXL, FLUX, and Qwen-Image stack up on one 24 GB card, see the best local image models
roundup.
For base models, Hugging Face Hub (stabilityai/stable-diffusion-xl-base-2.0) and CivitAI are the two main sources. Pick one with a VAE baked in, or pair it with the SDXL 2.0 VAE on the side. Check the license: SDXL uses CreativeML Open RAIL-M, which allows commercial use with credit and bans certain harmful content. And check whether the checkpoint is full or distilled. For training you want the full, non-distilled base. Distilled models have had steps cut from their denoising schedule and don’t fine-tune as cleanly.
Fine-Tuning Method Comparison
LoRA wins over the other fine-tune methods on a simple set of trade-offs. Full DreamBooth tunes every weight in the UNet and text encoders. It can produce great results, but it needs 24+ GB of VRAM, ships a 6 to 7 GB checkpoint, and risks erasing the base model’s general skills. Textual inversion sits at the other end: it only learns a new embedding vector and can’t teach the model visual patterns its weights don’t already hold. LoRA is the sweet spot. It injects small rank-decomposed matrices at each attention layer, trains on consumer hardware, ships a small shareable file, and stacks with other LoRAs at inference time.
| Method | VRAM Required | Output Size | Preserves Base Model | Swappable | Best For |
|---|---|---|---|---|---|
| LoRA (r=16) | 8-12 GB | 50-150 MB | Yes (adapter only) | Yes | Style, character, quick experiments |
| LoRA (r=64) | 12-18 GB | 200-400 MB | Yes | Yes | Complex concepts, high fidelity |
| LyCORIS / LoCon | 10-16 GB | 100-500 MB | Yes | Yes | Fine-grained style with local attention |
| LyCORIS / LoHa | 10-16 GB | 100-400 MB | Yes | Yes | Styles with Hadamard decomposition |
| DreamBooth (LoRA) | 12-16 GB | 50-200 MB | Yes | Yes | Subject-driven, more stable than full DB |
| DreamBooth (Full) | 24-40 GB | 6-7 GB | No (new checkpoint) | No | Maximum fidelity, production checkpoints |
| Full fine-tune | 40-80 GB | 6-7 GB | No | No | Dataset distillation, NSFW tuning |
| Textual Inversion | 6-8 GB | < 100 KB | Yes | Yes | Soft concept injection, limited range |
LyCORIS adapters (LoCon and LoHa) are worth knowing as a middle ground. LoCon applies LoRA-style splits to the UNet’s conv layers in addition to the attention layers, giving it more room for style. LoHa uses Hadamard products to build the weight update, which some find steadier at higher ranks. Both work in kohya_ss via the lycoris network module. For most use cases, a plain LoRA at rank 16 to 32 is the right start. Try LyCORIS if you find that standard LoRA isn’t catching the full richness of your target style.
Dataset Preparation with Vision-Language Models
A LoRA is only as good as the data it trains on, and dataset prep is the most slept-on step in the pipeline. A style LoRA that captures a look (watercolor, brutalist photos, a comic inking style) usually needs 15 to 50 sharp, well-captioned images. A character or face LoRA, which must learn an identity across poses and light, is more reliable with 20 to 100. Either way, quality beats quantity: ten crisp, varied images beat a hundred blurry, samey ones.
Captioning is where modern VLMs changed the game. Hand-writing a caption for 50 images is dull; for 500 it is the bottleneck of the project. Florence-2 (Microsoft) and LLaVA-v1.6 both write rich, accurate captions at low VRAM cost on your own box. The script below scans a folder and writes matching .txt caption files, the format both kohya_ss and SimpleTuner expect:
from transformers import AutoProcessor, AutoModelForCausalLM
from PIL import Image
import os, glob, torch

model_id = "microsoft/Florence-2-large"
model = AutoModelForCausalLM.from_pretrained(model_id, trust_remote_code=True).cuda().half()
processor = AutoProcessor.from_pretrained(model_id, trust_remote_code=True)

image_dir = "/data/my_lora_dataset"
prompt = "<MORE_DETAILED_CAPTION>"

for img_path in glob.glob(f"{image_dir}/*.jpg") + glob.glob(f"{image_dir}/*.png"):
    image = Image.open(img_path).convert("RGB")
    inputs = processor(text=prompt, images=image, return_tensors="pt").to("cuda", torch.float16)
    output = model.generate(**inputs, max_new_tokens=256)
    caption = processor.batch_decode(output, skip_special_tokens=True)[0]
    caption_path = os.path.splitext(img_path)[0] + ".txt"
    with open(caption_path, "w") as f:
        f.write(caption)
    print(f"Captioned: {img_path}")
Review a sample of the machine-made captions and fix the wrong ones. VLMs sometimes invent the medium or misread text. Captions should describe what’s in the image without naming the concept you’re teaching; the trigger word fires that concept instead.
The trigger word is one of the biggest design calls in LoRA training. Every LoRA needs a unique token that isn’t in the base model’s vocabulary, like ohwx for a person or styl3 for a style. It goes at the front of every training caption: "ohwx woman standing in a park, afternoon light". At inference, the trigger word fires the learned concept cleanly. A real word like van_gogh or watercolor tangles your concept with the model’s prior sense of the term and blends unpredictably.
Regularization images fix a sister problem, concept bleeding, where the LoRA gets so loud it paints over the base model’s general knowledge. Train a face LoRA with no regularization and even trigger-free prompts may still pump out your subject’s face: the model has forgotten how to draw a generic person. The fix is to mix in generic images from the same class (random portraits of other people), all without the trigger word, so the model keeps a steady reminder of the non-triggered version. A 1:1 subject-to-regularization ratio is a common start.
Preprocessing levels the technical quality of the set. SDXL’s native size is 1024 by 1024, but multi-resolution bucketing in kohya_ss and SimpleTuner lets you mix aspect ratios: the framework groups images into buckets and rescales within each, instead of cropping everything square. Before training, run a rejection pass: drop images below 512 px, flag blurry shots with a Laplacian variance filter, and dedupe with perceptual hashing. Tools like imgdataset-tools and wd14-tagger handle most of it.
Training Optimization on Consumer Hardware
SDXL 2.0 is a large model. The UNet alone has 2.6 billion parameters. Naive full-precision training quickly busts the VRAM of any consumer GPU. To fit a LoRA run on a 12 GB card, you need a specific stack of memory-cutting tricks used together, not one at a time. The good news: every popular framework ships these as sensible defaults, so you don’t have to build them from scratch.
Choosing a Training Framework
kohya_ss is still the most popular SDXL LoRA framework. It has a mature GUI (via gradio), a huge community wiki, and support for almost every training trick. If you want a web UI to set up your run and don’t want to hand-edit config files, start here.
SimpleTuner has emerged as a strong alternative. It has a cleaner Python codebase and better support for SDXL 2.0’s new bits. It handles multi-resolution bucketing more gracefully, treats the SDXL 2.0 VAE as a first-class citizen, and its YAML config is easier to read than kohya’s .toml format. It’s the better pick if you’re at home in a shell and want more control over the training loop.
Diffusers (Hugging Face) gives you the lowest-level access. You work right with the training scripts (train_dreambooth_lora_sdxl.py) and get full flex, but you also own the most config choices.
Key Hyperparameters
The learning rate is the single most impactful knob. Too high and the LoRA overfits fast, making images that look just like your training data no matter the prompt. Too low and training won’t converge in a sane number of steps. I start every style LoRA at 1e-4 with a cosine annealing schedule. For face or character LoRAs, where fine-grained identity is the goal, I drop to 5e-5 and train for more steps.
Network rank (r in LoRA-speak) sets the capacity of the adapter. A rank of 16 is enough for most style LoRAs and trains faster on less memory. Rank 32 or 64 gives more room for rich concepts (detailed character designs, multi-part styles) at the cost of a larger file and more VRAM. The alpha value is usually set equal to rank (so alpha=16 for r=16), which keeps the adapter’s scale steady during training.
Step count depends on your dataset size. A rough rule: multiply image count by 100 to get a starting step number. For a 30-image style set, start at 3000 steps. For a 60-image character set, start at 4000 to 6000 steps. These are starting points. Watch training loss in TensorBoard and save mid-run checkpoints every 500 steps. Then you can sample from them and find where the model peaks before overfit kicks in.
A Practical kohya_ss Training Run
Here is an example kohya_ss TOML configuration for a style LoRA on an RTX 5060 12 GB GPU:
[general]
enable_bucket = true
pretrained_model_name_or_path = "/models/sdxl-2.0-base.safetensors"
output_dir = "/output/my_style_lora"
output_name = "my_style_v1"
save_model_as = "safetensors"
caption_extension = ".txt"

[dataset_arguments]
train_data_dir = "/data/my_lora_dataset"
resolution = "1024,1024"
batch_size = 1

[training_arguments]
max_train_steps = 3000
learning_rate = 1e-4
lr_scheduler = "cosine"
lr_warmup_steps = 100
optimizer_type = "AdamW8bit"
mixed_precision = "bf16"
gradient_checkpointing = true
save_every_n_steps = 500

[network_arguments]
network_module = "networks.lora"
network_dim = 16
network_alpha = 16

[sample_prompt_arguments]
sample_every_n_steps = 500
sample_prompts = "/data/sample_prompts.txt"
sample_sampler = "euler_a"
Run it from the kohya_ss directory:
python sdxl_train_network.py --config_file my_style_lora.tomlA SimpleTuner Configuration
SimpleTuner uses a YAML config file and a separate environment file:
# config.yaml
model_type: "sdxl"
pretrained_model_name_or_path: "stabilityai/stable-diffusion-xl-base-2.0"
output_dir: "/output/my_style_lora"
train_batch_size: 1
gradient_accumulation_steps: 4
learning_rate: 1.0e-4
lr_scheduler: "cosine"
lr_warmup_steps: 100
max_train_steps: 3000
mixed_precision: "bf16"
gradient_checkpointing: true
use_8bit_adam: true
lora_rank: 16
lora_alpha: 16
report_to: "tensorboard"
validation_steps: 500
# Launch training
python train.py --config_file config.yamlVRAM Trade-offs by GPU Tier
| GPU | VRAM | Max LoRA Rank (bf16 + gradient checkpointing) | Typical Step Time |
|---|---|---|---|
| RTX 5060 | 12 GB | r=32 (r=16 comfortable) | ~4s/step |
| RTX 5070 Ti | 16 GB | r=64 | ~3s/step |
| RTX 5080 | 24 GB | r=128 | ~2s/step |
| RTX 5090 | 32 GB | r=256 (full fine-tune possible) | ~1.5s/step |
The 8-bit Adam optimizer (AdamW8bit from the bitsandbytes library) is the biggest memory win after gradient checkpointing. It tends to cut optimizer state memory by 50%. With bf16 mixed precision and gradient checkpointing on top, a rank-16 SDXL 2.0 LoRA fits well within 10 GB of VRAM. That leaves room for the VAE and the batch.
Watch training loss in TensorBoard by running tensorboard --logdir /output/my_style_lora/logs in a second shell. Loss should drop steadily for the first 1000 to 1500 steps and then flatten. If loss flattens early (before step 1000), your learning rate may be too low. If loss spikes or wobbles, your learning rate is too high. Sample images at checkpoint intervals tell you more than the loss number alone. A LoRA can have OK loss but make flat, concept-collapsed images if the training data was too samey.
Troubleshooting Common Training Failures
Even with a clean dataset and sensible knobs, training runs go wrong. The most common ways they fail are easy to spot and easy to fix.
NaN loss (the training loss shows nan after a few steps) is almost always a learning rate that’s too high, a corrupt training image, or the AdamW8bit optimizer running under fp16. When loss goes NaN, the first thing I check is the precision setting. Make sure mixed_precision is bf16, not fp16: SDXL 2.0 is trained in bfloat16, and the 8-bit optimizer has no numeric headroom under fp16 (the FAQ below explains why). Then halve the learning rate, and run a preprocessing pass to catch bad images (PIL.Image.verify()).
Mode collapse happens when the LoRA converges to a narrow output. Every image looks alike no matter the prompt, often like the modal image in your training set. It comes from thin dataset variety, a learning rate that’s too high, or too many training steps for the dataset size. Add more varied images to your dataset, lower the learning rate, and stop training earlier.
Catastrophic overfitting is the flip side of mode collapse. The LoRA copies your training images perfectly but fails to generalize. Prompts that include your trigger word but describe contexts not in your training set yield odd, jumbled outputs. Fix it by cutting step count (use earlier checkpoints), upping the regularization image count, and adding a small amount of noise augmentation if your framework supports it.
Slow convergence (loss barely moves after 1000 steps) usually means your learning rate is too low or your captions don’t agree with each other. Check that captions across your dataset use the same terms, and that your trigger word is at the start of every caption string.
Testing Your LoRA in ComfyUI
When training finishes, resist the urge to publish right away. A proper test pass catches problems that spot-checks miss. Build a standard prompt set before training starts: prompts that should fire your concept strongly, adjacent prompts that put the trigger word in an odd context, and prompts with no trigger word at all to check for concept bleeding. Run the set against every saved checkpoint at a fixed seed and compare the grids.
ComfyUI makes that loop fast and visual. Drop your trained .safetensors file into ComfyUI/models/loras/, then add a Load LoRA node between CheckpointLoaderSimple and your CLIPTextEncode or KSampler nodes. The node has two sliders: strength_model shapes the UNet denoiser and strength_clip shapes the text encoder. For most LoRAs, keep both equal and sweep them together.
That slider is the same lora_scale knob called “weight” in AUTOMATIC1111. At 1.0 the LoRA runs at full strength, which is usually too pushy: it flattens prompt control and makes every output look like a training image. I keep style LoRAs at 0.7 to 0.9; face and character LoRAs often need 0.8 to 1.0 to hold identity. You can also stack LoRAs at part strengths, for example [style_lora:0.6, lighting_lora:0.4].
For the full picture, build a prompt grid with ComfyUI’s batch features: fix the seed, vary LoRA strength across columns, and vary the subject across rows. The 2D grid reveals concept bleeding (trigger-free prompts that still change) and under-training (trigger prompts that look too close to the base) at a glance.
A careful test pass pays off in trust. A LoRA with a clear model card, accurate trigger words, and example images at typical strengths gets used and rated far more reliably than a bare safetensors file.
Merging and Sharing Your LoRA
Merging a LoRA into the base model produces a single checkpoint that loads faster, with no runtime adapter cost, and is simpler to ship to users who don’t want to juggle files. The kohya_ss merge script handles it:
python networks/merge_lora.py \
  --sd_model /models/sdxl-2.0-base.safetensors \
  --models /output/my_style_lora/my_style_v1.safetensors \
  --ratios 0.8 \
  --save_to /output/merged/my_style_sdxl.safetensors \
  --sdxl
The --ratios 0.8 flag sets merge strength, the same as running the LoRA at 0.8 scale. The trade-off is flexibility: a merged checkpoint can’t be unloaded at runtime, and you can’t stack it with other LoRAs through the standard adapter API.
Before you publish on CivitAI or Hugging Face, review the base model’s license. SDXL uses CreativeML Open RAIL-M, which allows commercial use as long as you obey its use rules (no CSAM, no content built to deceive through disinformation) and ship the license text when you redistribute. If you trained on a community checkpoint with its own terms, those apply on top. On CivitAI, accurate type tagging (style, character, concept) and a clear trigger word in the description are the metadata calls that matter most.
Frequently Asked Questions
Why does bitsandbytes AdamW8bit produce NaN loss in fp16 training?
The AdamW8bit optimizer from bitsandbytes
keeps its optimizer state, the running mean and variance, in block-wise 8-bit form. That state has very little numeric headroom, and fp16 makes it worse. fp16 tops out around 65,504, so a single large gradient can overflow to infinity, poison a quantization block, and turn the next update into NaN. SDXL 2.0 was trained in bfloat16, which keeps the full exponent range of fp32 and does not overflow the same way. The fix is mixed_precision = "bf16", exactly what the configs above already use. bf16 needs an NVIDIA Ampere card or newer (RTX 30-series and up). On an older fp16-only GPU, keep the gradient scaler enabled and halve the learning rate, but a bf16-capable card is the reliable answer.
Can I use an SDXL LoRA with Stable Diffusion 3.5?
No. A LoRA is a set of small weight matrices shaped to the layers of one specific base model. SDXL 2.0 uses a UNet backbone, while Stable Diffusion 3.5 uses a multimodal diffusion transformer, so the layers a LoRA hooks into do not line up. Loading an SDXL LoRA on SD 3.5 either errors out or produces noise. To get the same style on SD 3.5, retrain a LoRA on that base. The dataset and captions carry over; only the training run repeats.
How much VRAM does a full SDXL fine-tune need, and how long does it take?
A full fine-tune updates every UNet weight, so it needs far more memory than a LoRA: 40 to 80 GB of VRAM, which puts it on datacenter GPUs or a multi-GPU rig. Even on a rented A100 or H100, a modest dataset takes hours to a couple of days. This is why LoRA is the default for consumer hardware: it reaches most of the quality on a 12 GB card in an afternoon. Reach for a full fine-tune only when you are distilling a large dataset into a new base checkpoint.
What is the inference overhead of running a LoRA?
Small. A side-path LoRA adds a few percent to each generation step, usually lost in the noise next to the base model’s own cost. Loading the adapter adds a fraction of a second. Stacking several LoRAs adds up, so for a fixed production setup, merge the LoRA into the checkpoint to remove the runtime cost entirely.
Should the text encoder and UNet use different learning rates?
Often, yes. kohya_ss exposes unet_lr and text_encoder_lr separately. The text encoder is delicate: too high a rate there scrambles prompt understanding fast. A common split trains the UNet at 1e-4 and the text encoder at a third to a half of that, around 3e-5 to 5e-5. For a pure style LoRA you can also set text_encoder_lr to 0 and train the UNet alone, which leaves prompt behavior untouched.