Run Home Assistant in a Proxmox VM for Maximum Flexibility

Running Home Assistant OS (HAOS) inside a Proxmox VE virtual machine gives you the full, officially supported installation - add-ons, Supervisor, automatic updates - while sharing hardware with other VMs and containers. On a modest Intel N305 mini PC, you can run HAOS alongside Plex, Vaultwarden, Nextcloud, and a WireGuard VPN with room to spare. The entire setup takes under 30 minutes. Download the HAOS QCOW2 image, create a VM in Proxmox, import the disk, boot, and you are up and running.
This guide walks through the complete process on Proxmox VE 8.3, including USB device passthrough for Zigbee and Z-Wave coordinators, snapshot-based update safety nets, and a layered backup strategy that protects months of automations and device configurations.
Why Proxmox Plus Home Assistant Is the Standard Home Lab Setup
Home Assistant can be installed in several ways: directly on a Raspberry Pi, as a Docker container, as Home Assistant Core in a Python venv, or as HAOS in a virtual machine. Each approach has trade-offs, but for home lab users the Proxmox VM path has become the community default for good reasons.
HAOS is the full installation. It includes the Supervisor, the add-on store, automated OS-level updates, and official support from the Home Assistant team. The Container and Core installation methods skip the Supervisor entirely, which means no add-on store, no one-click installs for Zigbee2MQTT or Node-RED, and a lot more manual plumbing. If you want the complete experience without dedicating an entire machine to it, HAOS in a VM is the answer.
Proxmox VE 8.3, based on Debian 13 Trixie, is free for home use and provides a web-based management interface for KVM virtual machines and LXC containers from a single dashboard. It supports live migration between nodes if you eventually build a multi-host cluster, ZFS for data integrity, and PCIe passthrough for hardware like Coral TPUs. For a home lab, it is the hypervisor that gets out of your way.
The shared-hardware argument is compelling from a cost perspective. A single Beelink EQ12 Pro or Intel N305 mini PC (around $200-250) can comfortably run:
- HAOS VM: 2 vCPU, 2GB RAM
- Jellyfin or Plex LXC for media streaming
- Vaultwarden LXC for password management
- Nextcloud LXC for file sync
- WireGuard VM for remote VPN access
All of these run simultaneously without resource contention on an 8-core N305 with 16GB of RAM.
Snapshots are what really set this apart from bare-metal installations. Before a major Home Assistant update, you take a Proxmox snapshot in about 10 seconds. If the update breaks a critical integration - and this happens more often than anyone would like - you roll back instantly. No restoring backups, no debugging YAML at 11 PM. Just revert the snapshot and wait for a fix.
For automated backups, Proxmox Backup Server (PBS) can run on the same machine or on a separate NAS. It handles nightly VM backups with deduplication, and restoring a full HAOS VM from PBS takes roughly 3 minutes.
Community tooling makes this even easier. The community-scripts/ProxmoxVE helper scripts (the 2026 community-maintained fork of the original tteck scripts) provide one-line install commands for popular VMs and LXC containers. The HAOS install script is one of the most widely used and handles the entire VM creation process automatically.
Installing Proxmox VE 8.3 on Your Hardware
Before creating the Home Assistant VM, you need Proxmox running on your hardware. The installation is straightforward if you have ever installed a Linux distribution.
Download the Proxmox VE 8.3 ISO from proxmox.com
. Write it to a USB drive with Balena Etcher
or plain dd. Boot the target machine from the USB drive. The graphical installer walks you through disk partitioning, hostname, root password, and network configuration. The whole process takes about 10 minutes.
After installation, access the web UI at https://<proxmox-ip>:8006 and log in as root. The immediate task is switching from the enterprise repository (which requires a paid subscription) to the no-subscription repository. Edit /etc/apt/sources.list.d/pve-enterprise.list and replace enterprise.proxmox.com with download.proxmox.com/debian/pve. Then run:
apt update && apt dist-upgradeThe subscription nag dialog that appears on every login can be removed with the community no-nag script from the ProxmoxVE helper scripts. This is more maintainable than manually patching the JavaScript file, which breaks with every Proxmox update.
For networking, Proxmox creates a Linux bridge (vmbr0) over the physical NIC during installation. VMs connect through this bridge and receive their own IP addresses from your router’s DHCP server. Verify the bridge configuration in the Network tab of your Proxmox node - it should show vmbr0 bridged to your physical interface (something like enp1s0).
Storage on a single NVMe setup is simple: use local-lvm for VM disks and local for ISOs and templates. If you are adding a second drive for bulk storage, create a ZFS pool or a directory storage mount pointing at it.
One optimization worth doing on Intel N-series processors: set cpu: host in your VM configurations. This passes through the host CPU flags directly, enabling AVX-512 instructions on N305 and newer chips. This measurably speeds up certain Home Assistant ML workloads like the Whisper speech-to-text add-on.
Creating the Home Assistant OS VM Step by Step
There are two paths to get HAOS running: the community script (fast and recommended) or the manual method (educational and useful when the script does not match your setup).
The Community Script Method
SSH into your Proxmox host and run:
bash -c "$(wget -qLO - https://github.com/community-scripts/ProxmoxVE/raw/main/vm/haos-vm.sh)"The interactive script downloads the latest HAOS image, creates a VM with the recommended settings (q35 machine type, UEFI boot, appropriate CPU and RAM allocation), imports the disk, and boots the VM automatically. From start to finish, this takes about 5 minutes depending on your internet speed.
The Manual Method
If you prefer to understand each step, or if you need to customize the VM beyond what the script offers:
Grab the HAOS QCOW2 image from the Home Assistant OS releases page
. Choose the file named haos_ova-XX.X.qcow2.xz. Extract it with unxz. Upload to Proxmox via the web UI’s local storage upload button, or scp it to /var/lib/vz/images/ on the host.
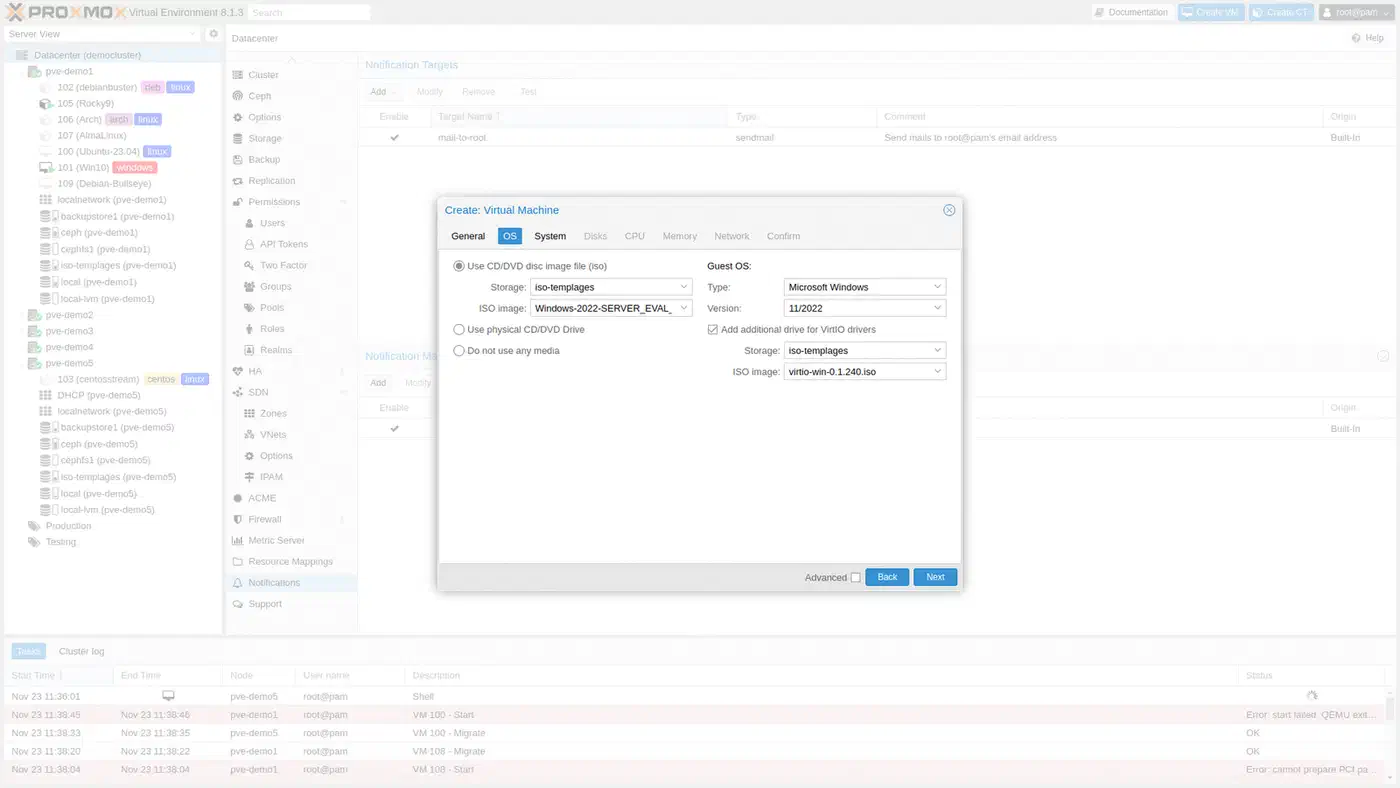
In the Proxmox web UI, click “Create VM.” Set the OS type to Linux 6.x, machine type to q35, and BIOS to OVMF (UEFI). Add an EFI disk on local-lvm. Remove the default IDE or SCSI disk that Proxmox creates - you will replace it with the imported HAOS image.
Now import the disk. In the Proxmox host shell, run:
qm importdisk <VMID> /path/to/haos.qcow2 local-lvm --format rawThen in the VM’s Hardware tab, click on “Unused Disk 0” and add it as scsi0 with SSD emulation enabled and Discard enabled for TRIM support.
In the VM’s Options tab, set the boot order so scsi0 is the primary boot device. Start the VM and wait 2-3 minutes for the first boot to complete. Access the Home Assistant onboarding wizard at http://homeassistant.local:8123 from any device on your local network.
Resource Recommendations
For a minimal setup with basic automations and a handful of integrations, 2 vCPU and 2GB RAM is sufficient. If you plan to run ML-based add-ons - Whisper for speech-to-text, Piper for text-to-speech, or a local AI conversation agent - bump that to 4 vCPU and 4GB RAM. Enable memory ballooning so the VM can dynamically allocate up to your configured maximum without permanently reserving it.
USB Passthrough for Zigbee and Z-Wave Coordinators
Most Home Assistant setups use a USB Zigbee or Z-Wave coordinator dongle. Getting USB devices into a Proxmox VM requires a few configuration steps.
First, identify the USB device. SSH into the Proxmox host and run lsusb. Your dongle will show up with a description like “Silicon Labs USB to UART” for a Sonoff Zigbee 3.0 USB Plus-E, or “Nabu Casa” for the Home Assistant Connect ZBT-1. Note the vendor and product IDs.
In the Proxmox web UI, navigate to your HAOS VM, then Hardware, then Add, then USB Device. Choose “Use USB Vendor/Device ID” and select the dongle from the dropdown. This binding method follows the device regardless of which physical USB port it is plugged into. If you have multiple identical dongles (say, two Sonoff sticks), use “Use USB Port” instead to map specific physical ports.
After adding the USB device, restart the VM. In Home Assistant, go to Settings, then System, then Hardware. The dongle should appear under /dev/ttyUSB0 or /dev/ttyACM0. From there, set it up with either the ZHA integration
(built-in) or the Zigbee2MQTT
add-on (more flexible, community favorite).
The Home Assistant Connect ZBT-1 (formerly SkyConnect) supports both Zigbee and Thread protocols. It passes through cleanly to the HAOS VM and works as a Zigbee coordinator in Zigbee2MQTT without extra configuration.
Dealing with Device Path Changes
USB serial device paths like /dev/ttyUSB0 can change across reboots if multiple USB devices are present. The fix is to create a udev rule on the Proxmox host that assigns a persistent symlink based on the device’s serial number. Create a file at /etc/udev/rules.d/99-zigbee.rules:
SUBSYSTEM=="tty", ATTRS{idVendor}=="10c4", ATTRS{idProduct}=="ea60", ATTRS{serial}=="YOUR_SERIAL_HERE", SYMLINK+="zigbee"Replace the vendor ID, product ID, and serial with values from udevadm info -a -n /dev/ttyUSB0. After reloading udev rules (udevadm control --reload-rules), the device will always be available at /dev/zigbee regardless of enumeration order.
Snapshots, Backups, and Update Strategy
A Home Assistant installation accumulates value over time - automations, device configurations, dashboards, history data. Without a proper backup strategy, a failed update or hardware failure means rebuilding from scratch.
Proxmox VM Snapshots
Before every Home Assistant version update, take a VM snapshot from the Snapshots tab in Proxmox. Snapshots are near-instant (under 10 seconds) and store only the delta from the current state, so they consume minimal additional storage. Keep 3-5 recent snapshots and delete older ones after a version has proven stable for a week or two.
Home Assistant Built-in Backups
The HA backup manager (Settings, then System, then Backups) creates full or partial backups of the HA configuration, add-ons, and media files. This is useful for migrating between installations, but on its own it stores backups on the same disk as the VM. Install the Google Drive Backup add-on or the Samba Backup add-on to automatically copy nightly backups to a separate location. For a git-based approach that keeps your config version-controlled, see how to back up Home Assistant config to GitHub automatically .
Proxmox Backup Server
For more thorough protection, install Proxmox Backup Server alongside PVE or on a separate machine. Even a Raspberry Pi 4 with an external USB drive works as a PBS target. Configure your PVE node to send nightly backups to PBS, which deduplicates efficiently and can retain 7 daily, 4 weekly, and 3 monthly restore points without eating enormous amounts of storage.
For offsite protection, use rclone on the Proxmox host to copy PBS backup data to Backblaze B2 at roughly $6 per terabyte per month. This covers you against complete hardware failure or a worst-case physical disaster.
Update Cadence
Not every update needs to happen on release day. A practical cadence:
- Home Assistant Core: update monthly. Minor versions are generally low-risk.
- HAOS: update quarterly during a planned maintenance window.
- HACS custom integrations: check compatibility before every Core update. Custom components from the Home Assistant Community Store are the most common source of post-update breakage.
If an update does break something critical, revert the VM to your pre-update Proxmox snapshot. You can also pin Home Assistant to a specific version from the VM terminal with ha core update --version X.X.X while waiting for an upstream fix.
Where to Go from Here
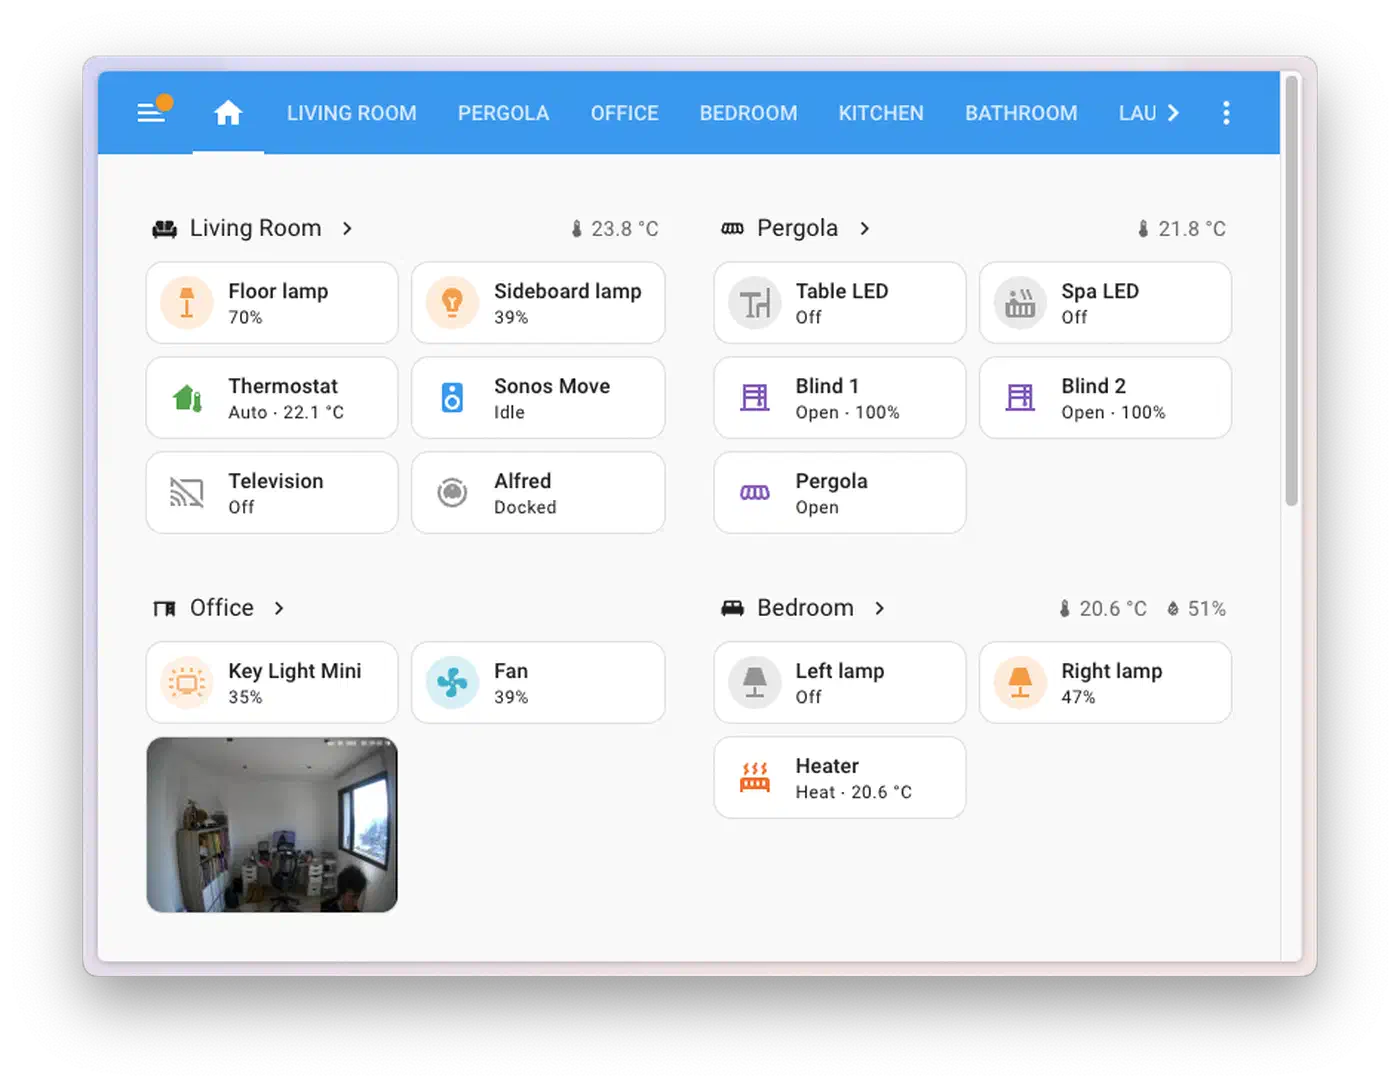
Once HAOS is running and your Zigbee devices are paired, the next steps depend on your setup. If you have not already, install Zigbee2MQTT through the add-on store and start pairing devices. Set up a few basic automations - motion-triggered lights, temperature alerts, presence detection - before going deep on dashboards or voice assistants.
For hardware expansion, PCIe passthrough opens up options like a Google Coral TPU for the Frigate NVR add-on (local camera object detection) or a dedicated Wi-Fi card for a hotspot VM. Both require IOMMU support on your host CPU, which the N305 and most recent Intel chips provide.
The initial 30 minutes of Proxmox and HAOS setup pays for itself the first time you roll back a bad update in 10 seconds instead of spending an evening troubleshooting broken integrations.