MCP Server Development: Build Custom Tools for Claude and Local LLMs

The Model Context Protocol
gives LLMs a standardized way to call external tools, read files, and query databases - without re-engineering integration code every time you switch models. You can build a working MCP server in Python using the official mcp SDK in under 100 lines and have it running with Claude Desktop or Claude Code in minutes. This guide walks through the full process, from a minimal first server to production deployment.
What MCP Is and Why It Changes Tool Use
MCP is a JSON-RPC 2.0 protocol that lets an LLM client (like Claude Desktop
, Claude Code, or Cursor) dynamically discover and invoke tools exposed by a server process. The key difference from older function-calling approaches is the discovery mechanism: instead of hard-coding tool definitions into every prompt, the client sends a tools/list request at connection time and gets back the full schema for everything the server exposes. Add a new tool to the server, restart it, and any connected client sees the new capability automatically.
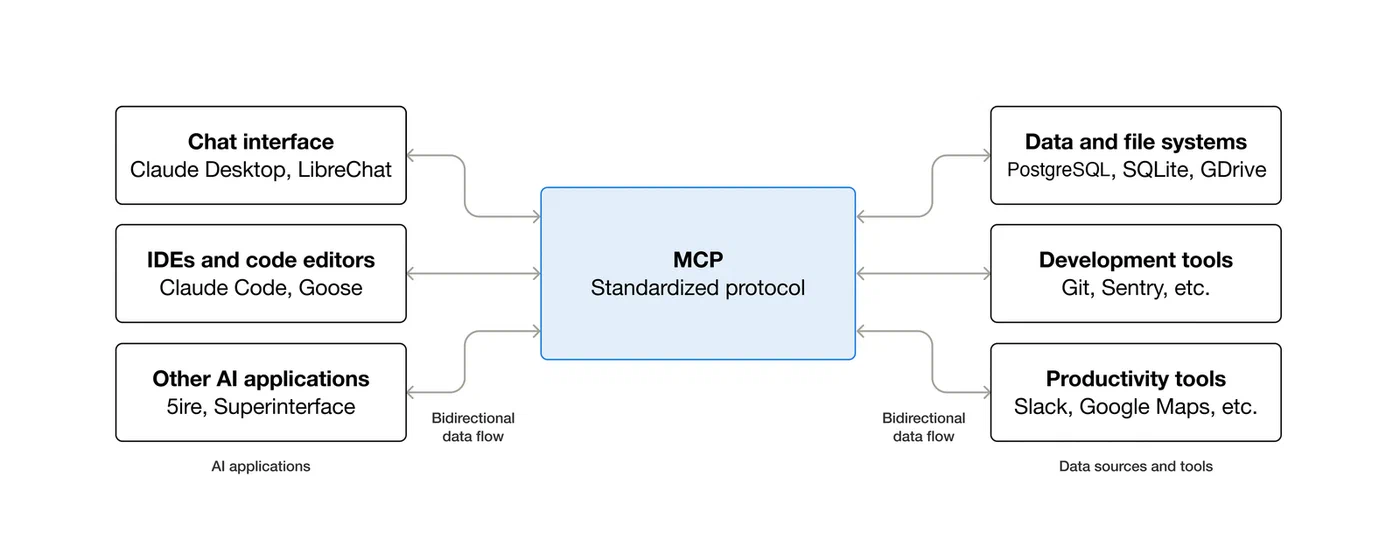
Three primitive types are defined in the spec:
- Tools - model-invoked functions that do things (read a file, query a database, call an API)
- Resources - application-controlled data the model can read, like file contents or database rows
- Prompts - reusable prompt templates the user or model can invoke
Two transport modes are supported: stdio (the server runs as a child process of the MCP client) and SSE/HTTP (the server runs as a standalone network service). For single-user local setups, stdio is simpler and more secure because there is no network port to expose. SSE mode makes sense when multiple clients or users need to share the same server instance.
As of early 2026, MCP is natively supported by Claude Desktop, Claude Code, Cursor, Windsurf, VS Code Copilot agents, and several Ollama front-ends like Open WebUI. Anthropic originally developed the spec, but it now sees broad industry adoption, with the TypeScript and Python SDKs actively maintained by the community and Anthropic together.
One thing the spec handles well is capability negotiation. When the client connects, a full initialize handshake runs before any tools are called. This lets both sides establish what protocol version they support and what optional features are available. If your server crashes during startup or writes unexpected output to stdout before the handshake completes, the client will fail silently - a common early headache that the debugging section below covers.
Setting Up Your Development Environment
The recommended Python setup uses uv
for dependency management:
uv init mcp-server
cd mcp-server
uv add "mcp[cli]>=1.5"
This creates a virtual environment and lockfile automatically. If you prefer pip, the equivalent is pip install "mcp[cli]>=1.5". The [cli] extra installs the mcp command-line tool used for running and testing servers directly.
For TypeScript, the setup is:
npm init -y
npm install @modelcontextprotocol/sdk@^2.0
For simple servers, a single server.py (or index.ts) file is enough. Larger projects benefit from organizing tool definitions into a tools/ directory and keeping the main server file focused on initialization and routing.
Registering with Claude Desktop: Edit ~/.config/Claude/claude_desktop_config.json on Linux (the equivalent path on macOS or Windows) and add your server entry:
{
  "mcpServers": {
    "my-tools": {
      "command": "uv",
      "args": ["run", "server.py"],
      "cwd": "/path/to/mcp-server"
    }
  }
}
For Claude Code, use the CLI: claude mcp add my-tools -- uv run server.py. This writes the config to .claude/settings.json in the current project and persists across sessions.
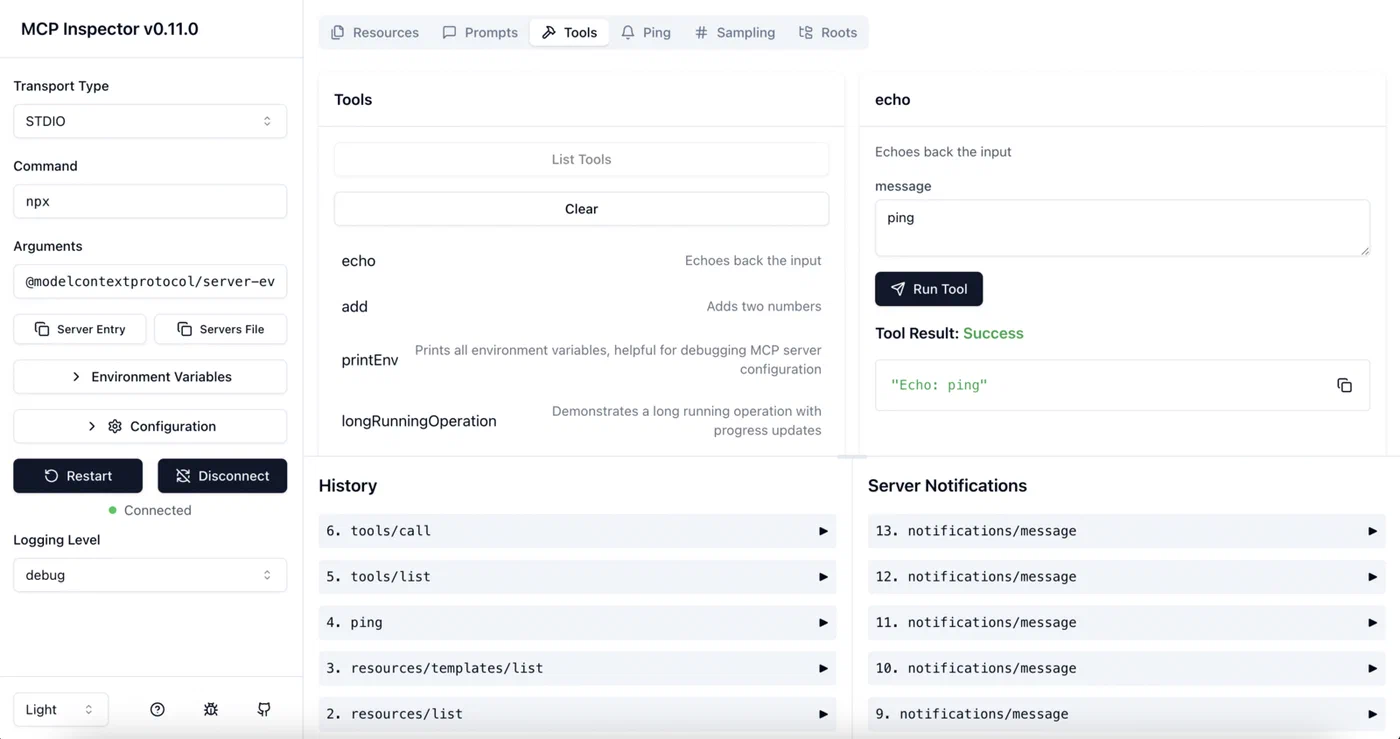
MCP Inspector is worth installing before you write a single line of server code: npx @modelcontextprotocol/inspector. It opens a browser-based GUI that lets you manually send tools/list and tools/call requests against any server, and shows the raw JSON-RPC exchange in real time. Running it against your server before connecting an actual LLM catches schema errors and handler crashes immediately, without the overhead of debugging through an LLM client.
Building Your First MCP Server
The Python SDK’s FastMCP class handles protocol negotiation, capability advertisement, and request routing. A minimal file-reading server looks like this:
from mcp.server.fastmcp import FastMCP

server = FastMCP("my-tools")

@server.tool()
def read_file(path: str) -> str:
    """Read a file's contents. Path must be within the allowed directory."""
    import os
    allowed_base = "/home/user/documents"
    abs_path = os.path.realpath(path)
    if not abs_path.startswith(allowed_base):
        return f"Error: access denied - path must be within {allowed_base}"
    with open(abs_path) as f:
        return f.read()

if __name__ == "__main__":
    server.run()
The @server.tool() decorator converts the function’s type hints and docstring into the JSON schema the LLM receives. The function signature is effectively the tool’s API - parameter names and the docstring are what the model sees when deciding whether and how to call the tool. Write them as you would write documentation for another developer.
The path traversal check above is not optional. The LLM controls what goes into the path argument, so you need to treat it as untrusted input. os.path.realpath() resolves symlinks before checking the prefix, so a path like /home/user/documents/../../../etc/passwd does not slip through.
A tool that calls a REST API follows the same pattern with async support:
import httpx
import os

@server.tool()
async def search_gitea(query: str, repo: str = "") -> str:
    """Search code or issues in the local Gitea instance."""
    token = os.environ.get("GITEA_TOKEN")
    if not token:
        return "Error: GITEA_TOKEN environment variable not set"

    base_url = os.environ.get("GITEA_URL", "http://localhost:3000")
    headers = {"Authorization": f"token {token}"}

    async with httpx.AsyncClient() as client:
        params = {"q": query, "limit": 10}
        if repo:
            params["repos"] = repo
        resp = await client.get(
            f"{base_url}/api/v1/repos/search",
            headers=headers,
            params=params,
            timeout=10.0
        )
        resp.raise_for_status()
        data = resp.json()

    results = [f"- {r['full_name']}: {r['description']}" for r in data.get("data", [])]
    return "\n".join(results) if results else "No results found"
Credentials go in environment variables, not source code. Pass them via the env field in the MCP client config:
{
  "mcpServers": {
    "my-tools": {
      "command": "uv",
      "args": ["run", "server.py"],
      "env": {
        "GITEA_TOKEN": "your-token-here",
        "GITEA_URL": "http://localhost:3000"
      }
    }
  }
}
Resources are distinct from tools. Where tools are invoked by the model at its discretion, resources are data the application exposes that the model can read when directed. Use @server.resource() for things like listing available configuration files:
@server.resource("config://list")
def list_configs() -> str:
    """List available configuration files."""
    import glob
    files = glob.glob("/home/user/.config/myapp/*.yaml")
    return "\n".join(files)
Run the server in stdio mode with mcp run server.py. For SSE, add --transport sse --port 8808.
Database Integration and Security
SQLite integration uses Python’s standard library and needs no extra dependencies:
import sqlite3

@server.tool()
def query_logs(level: str = "error", limit: int = 50) -> str:
    """Query application logs by severity level."""
    allowed_levels = {"debug", "info", "warning", "error", "critical"}
    if level.lower() not in allowed_levels:
        return f"Error: level must be one of {', '.join(sorted(allowed_levels))}"

    conn = sqlite3.connect("/var/log/myapp/logs.db")
    cursor = conn.cursor()
    cursor.execute(
        "SELECT timestamp, message FROM logs WHERE level = ? ORDER BY timestamp DESC LIMIT ?",
        (level, min(limit, 200))
    )
    rows = cursor.fetchall()
    conn.close()
    return "\n".join(f"[{r[0]}] {r[1]}" for r in rows)
Two things to notice: the parameterized query (? placeholders) prevents SQL injection even if the LLM generates a malicious level string, and the allowed_levels allowlist adds a second layer of validation. The limit cap prevents the model from requesting thousands of rows in a single call - a real concern in agentic workflows where tools can be called in tight loops.
For PostgreSQL, use asyncpg with connection pooling:
import asyncpg
import asyncio

_pool = None

async def get_pool():
    global _pool
    if _pool is None:
        _pool = await asyncpg.create_pool(os.environ["DATABASE_URL"])
    return _pool

@server.tool()
async def lookup_user(email: str) -> str:
    """Look up a user account by email address."""
    pool = await get_pool()
    async with pool.acquire() as conn:
        row = await conn.fetchrow(
            "SELECT id, name, created_at FROM users WHERE email = $1",
            email
        )
    if row is None:
        return "User not found"
    return f"ID: {row['id']}, Name: {row['name']}, Created: {row['created_at']}"
Connection pooling avoids the TCP handshake overhead of opening a new database connection on every tool invocation. The LLM can call tools many times in a single conversation turn, so per-call connection setup latency adds up quickly.
Using Pydantic models as tool parameter types improves reliability significantly. Replace primitive types with a model when a tool takes multiple structured inputs:
from pydantic import BaseModel, Field

class SearchParams(BaseModel):
    query: str = Field(..., description="Search terms to look for")
    max_results: int = Field(10, ge=1, le=100, description="Maximum results to return")

@server.tool()
def search_docs(params: SearchParams) -> str:
    """Search the documentation index."""
    # Pydantic has already validated and coerced the inputs
    ...
The JSON schema exposed via tools/list is generated from the Pydantic model, including constraints like ge=1, le=100. Well-behaved LLM clients use these constraints to generate valid inputs, and the validation runs automatically before your handler function is called.
For SSE transport, add Bearer token authentication in middleware. Store tokens hashed server-side and rotate them with the same discipline you would apply to any API key. Rate limiting is also worth implementing before any server faces real traffic. A sliding window counter per tool name, backed by a collections.deque, is enough to prevent a runaway agentic loop from hitting external APIs hundreds of times per minute.
Testing, Debugging, and Deployment
Test tool handler functions independently of the MCP protocol. They are regular Python functions, so pytest works directly:
# test_server.py
from server import read_file, query_logs

def test_read_file_blocks_traversal():
    result = read_file("/home/user/documents/../../../etc/passwd")
    assert result.startswith("Error: access denied")

def test_query_logs_rejects_invalid_level():
    result = query_logs(level="DROP TABLE users")
    assert result.startswith("Error:")

def test_query_logs_caps_limit():
    # Should not raise even with an unreasonably large limit
    result = query_logs(level="error", limit=99999)
    assert isinstance(result, str)
For protocol-level debugging, start with MCP Inspector (npx @modelcontextprotocol/inspector). Point it at your server command or SSE URL and manually craft tools/call payloads to verify response schemas and error handling paths.
When things go wrong at the transport level, set MCP_LOG_LEVEL=debug before starting the server. This logs every JSON-RPC message to stderr. Most “tool not found” errors in production trace back to a failed initialization handshake - commonly caused by the server crashing at startup, or printing debug output to stdout before the first JSON-RPC message, which corrupts the message stream.
For production with SSE mode, run the server behind a reverse proxy with TLS termination. A minimal systemd unit:
[Unit]
Description=My MCP Server
After=network.target

[Service]
Type=simple
User=mcpuser
WorkingDirectory=/opt/mcp-server
EnvironmentFile=/etc/mcp-server/environment
ExecStart=/opt/mcp-server/.venv/bin/mcp run server.py --transport sse --port 8808
Restart=on-failure

[Install]
WantedBy=multi-user.target
Docker Compose works well for servers that need database access or controlled filesystem access:
services:
  mcp-server:
    build: .
    ports:
      - "127.0.0.1:8808:8808"
    environment:
      - DATABASE_URL=postgresql://user:pass@db:5432/mydb
    volumes:
      - /home/user/documents:/documents:ro
    depends_on:
      - db

  db:
    image: postgres:16
    volumes:
      - pgdata:/var/lib/postgresql/data

volumes:
  pgdata:
Binding to 127.0.0.1 on the host side means only local processes can reach the server. The ro mount flag on the document volume prevents the server from writing to the host filesystem even if a bug in the tool handler allows it.
One setup worth considering for local LLMs: if you are running Ollama with a front-end like Open WebUI, SSE mode lets multiple model sessions share the same MCP server and its connection pool. The overhead is small, and you avoid the bookkeeping of running a separate server process per user session.
The combination of typed tool schemas, Pydantic validation, parameterized queries, and environment-based credential injection covers the vast majority of security concerns in real-world MCP servers. The remaining work - rate limiting, authentication for SSE, audit logging - follows the same patterns you would apply to any internal API service.
Running Multiple Servers Together
MCP clients can connect to several servers simultaneously. Claude Desktop and Claude Code both support this: you add multiple entries under mcpServers in the config and each one runs as a separate process. The client presents all tool schemas from all connected servers in a single merged list, and routes each tools/call to the correct server based on the tool name.
This separation is useful for keeping concerns isolated. A database server, a file-system server, and an API-integration server can be developed and updated independently. When you fix a bug in the database server, you restart only that process without touching the others.
One naming caveat: tool names must be unique across all connected servers. If two servers expose a tool called read_file, the client behavior is undefined - in practice, one silently shadows the other. Prefix your tool names with a namespace (db_query_logs, fs_read_file) to avoid conflicts when running multiple servers.
For teams sharing MCP servers across multiple developers, SSE mode combined with project-scoped config (.claude/settings.json committed to the repo) provides a clean setup: everyone on the team gets the same tools automatically when they clone the project, and the server itself can run on shared infrastructure or as a Docker service in the project’s compose stack.