Local AI Image Upscaling: Real-ESRGAN vs. Topaz vs. SUPIR

For local AI image upscaling in 2026, Real-ESRGAN is the best free pick. It is fast and solid for most jobs. Topaz Photo AI gives the best overall quality with smart noise reduction and face recovery, but costs $199/year. SUPIR (Scaling Up to Excellence) makes the most detailed and lifelike output on badly degraded images. It needs 12+ GB of VRAM and runs 10-50x slower than the rest. The right pick depends on your workload: Real-ESRGAN for batch jobs and pipelines, Topaz for pro photo work, and SUPIR for one-off hero shots where time is not a factor.
What AI Upscaling Actually Does (and Its Limits)
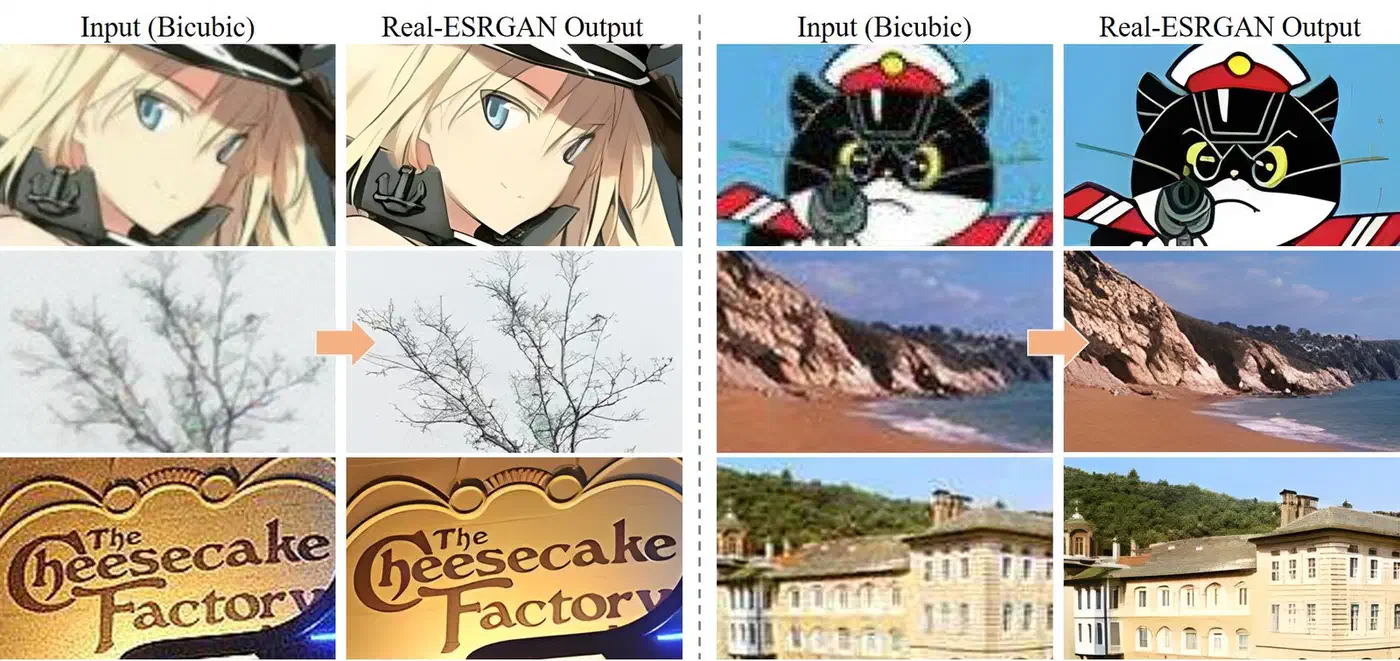
Older upscaling methods like bicubic and Lanczos blend nearby pixels with math. They give safe but blurry output, mostly above 2x scale. AI upscaling works in a new way: neural nets trained on millions of paired low-res and high-res images learn to guess what fine detail should appear at higher sizes.
Real-ESRGAN uses a generative adversarial network (GAN) design. A generator net guesses high-res pixel values from the low-res input. A discriminator net then judges if the output looks like a real photo. The two nets fight each other during training, and each one pushes the other to do better. In practice, this means Real-ESRGAN is fast (one forward pass) and gives sharp output every time.
SUPIR goes a different way. It uses Stable Diffusion XL as a prior. It runs a full diffusion denoise loop, guided by the low-res input and an optional text prompt. The output can hold lots of detail. The cost is that each image needs dozens of refinement steps, not one pass. The text prompt steers the result. A line like “sharp photograph, natural lighting” gives a very different look than “oil painting, soft focus.” Upscaling starts from whatever your generator makes, so pick from the local text-to-image models that fit your card first.
All three tools shine at adding texture to faces and fabric, sharpening text and edges, fixing fine patterns, and cleaning up JPEG artifacts. Where they fall short is more telling. AI upscalers tend to mangle text and make plausible but nonsense letters. They cannot stay perfectly true to the source, since they add detail that was never there. They also handle heavy motion blur poorly. Past 4x, quality drops a lot across all three.
As for scale, 2x output is solid on every tool tested. 4x is the sweet spot for most jobs. 8x (480p to 4K) shows big gaps between tools, so judge it one image at a time.
Real-ESRGAN - The Free, Fast Workhorse
Real-ESRGAN is the default pick for anyone who wants local AI upscaling without paying. It is fast enough for batch jobs of hundreds of images, good enough for most uses, and simple to run from the CLI or wire into a pipeline.
Setup is easy. The project ships portable binaries on the GitHub releases page
. They need no Python at all: just download and run. For Python workflows, pip install realesrgan gives you the full API.
Basic CLI usage looks like this:
./realesrgan-ncnn-vulkan -i input.jpg -o output.png -n realesrgan-x4plus -s 4This handles a single image in 2-5 seconds on an RTX 5070. The tool uses the Vulkan backend, so it runs on NVIDIA, AMD, and Intel GPUs without needing CUDA.
Real-ESRGAN ships several model variants tuned for different content types:
| Model | Best For | Notes |
|---|---|---|
realesrgan-x4plus | General photography | Best overall quality for real-world images |
realesrgan-x4plus-anime | Anime and illustration | Preserves flat color areas and line art |
realesr-animevideov3 | Video frames | Temporal consistency between frames |
For batch processing, point the tool at a directory:
./realesrgan-ncnn-vulkan -i input_folder -o output_folder -n realesrgan-x4plus -f pngOn an RTX 5080, this runs about 15 images per minute at 4x from 1080p sources. That speed makes it real for whole photo libraries or for making high-res assets from low-quality sources.
Python integration gives you fine control over the upscaling pipeline:
from realesrgan import RealESRGANer

upsampler = RealESRGANer(
    scale=4,
    model_path="RealESRGAN_x4plus.pth",
    dni_weight=0.5,
    tile=512,
    tile_pad=10,
    pre_pad=0,
    half=True
)
The tile value is key for VRAM use. Setting it to 512 lets Real-ESRGAN work in chunks that fit in 8 GB of VRAM
. Larger tiles give slightly better seams at chunk edges, but cost more memory.
Real-ESRGAN has some limits. The GAN-based method can leave faint checkerboard artifacts on smooth gradients. These show up in skies and studio backdrops. Face quality at high zoom is so-so without a separate GFPGAN face pass. And badly compressed JPEG sources sometimes show artifacts at the block edges that the model boosts rather than cleans.
Topaz Photo AI - The Premium All-in-One Solution
Topaz Photo AI bundles upscaling, noise reduction, sharpening, and face recovery into one GPU-accelerated app. It is closed source and it is not cheap. Still, it gives the best results with the least manual tuning.
Topaz Photo AI 4.x runs on Windows, macOS, and Linux. It costs $199/year for a sub or $299 for a perpetual license. All work runs on your hardware with no per-image fee after the license is paid.
What sets Topaz apart from open-source picks is its multi-model setup. The app bundles several specialized AI models. It picks the best mix for you by scanning each input image:
| Model | Purpose |
|---|---|
| Standard | General photography with balanced enhancement |
| High Fidelity | Preserves original details with minimal hallucination |
| Low Resolution | Aggressive detail generation for heavily downsampled sources |
| Face Recovery | Portrait enhancement with facial feature reconstruction |
The Autopilot feature scans each image and picks the best mix of noise reduction, sharpening, upscaling, and face recovery. For batch work, this kills per-image manual tuning. You drop in a folder, and Topaz works out what each image needs.
Topaz pulls ahead of Real-ESRGAN on three image types. First, photos with human faces: the built-in face detect and enhance pipeline gives clearly better skin texture and eye detail. Second, noisy low-light shots: the built-in denoiser strips grain before upscaling rather than boosting it. Third, images that need both denoise and upscale at once. Real-ESRGAN only does the upscale step, so you need to denoise with a second tool.
On speed, a 4x upscale of a 1080p photo takes 5-10 seconds on an RTX 5080. Batch work runs a bit slower than Real-ESRGAN, since the multi-model pipeline pushes each image through more steps. GPU support uses DirectML on Windows, Metal on macOS, and CUDA on Linux.
Topaz also supports CLI automation:
tpai --input image.jpg --output output.png --upscale 4x --autopilotThis makes it usable in scripted workflows, even though it ships as a commercial GUI app. It also runs as a plugin in Lightroom and Photoshop for photographers who live in those tools.
The limits are what you would expect from a paid product. It is closed source with no API for custom work beyond the CLI. It needs internet to activate on first install, then works offline. The sub is a hard sell for people who only upscale now and then. Linux support came later than the rest and can feel rough in edge cases.
SUPIR - Diffusion-Based Upscaling for Maximum Detail
SUPIR works nothing like the other two tools on this list. Instead of a single forward pass through a neural net, it runs a full Stable Diffusion denoise loop. The loop is guided by the low-res input and an optional text prompt. The output can look strikingly natural. The cost in time and compute is real.
Where a GAN puts out a result in one shot, SUPIR builds detail step by step. Each diffusion step adds a bit of plausible detail, shaped by what the model learned from SDXL training. This gives textures, pores, fabric weaves, and foliage patterns that look more organic than a GAN tends to make.
Installation requires more setup than Real-ESRGAN:
git clone https://github.com/Fanghua-Yu/SUPIR
pip install -r requirements.txt
You also need to grab the SDXL base model weights (about 6.5 GB) and the SUPIR model weights (about 5 GB). The full disk footprint for a working setup is around 15 GB.
VRAM is the main wall. The floor is 12 GB for 1024x1024 output tiles. 16 GB is the sweet spot for smooth work without constant tile swapping. 24 GB lets you use larger tiles for faster throughput and cleaner tile seams. If you hit out-of-memory errors, lower the tile size first.
Basic usage from the command line:
python test_supir.py \
    --img_dir input/ \
    --save_dir output/ \
    --upscale 4 \
    --SUPIR_sign Q \
    --prompt "high quality photograph, sharp details, natural lighting"
The text prompt really counts here. It steers the diffusion and shapes the look of the output. A prompt like “studio portrait, professional lighting” gives different facial detail than “candid outdoor photo, natural light.” For best results, name what the image actually shows. Generic quality words are not as useful.
On quality, SUPIR gives the most detailed and natural-looking upscales of the three tools. The gap is largest on degraded sources. Old photos with grain and JPEG artifacts, badly compressed thumbnails, and very low-res crops all gain from the diffusion method. Face recovery with the right prompt tends to beat both Real-ESRGAN and Topaz.
The speed trade-off is severe. A single 4x upscale from 512x512 to 2048x2048 takes 30 to 120 seconds on an RTX 5080. The range depends on the number of diffusion steps (default is 50). That is 10 to 50x slower than Real-ESRGAN on the same image. Batch jobs of hundreds of images with SUPIR run in hours, not minutes.
The key knob to know is the trade-off between faithfulness and creativity. SUPIR may add details that were not in the source: a pattern on a shirt, a texture on a wall, text on a sign that was never there. The --fidelity_weight flag controls this balance. Higher values keep the output close to the source. That is safer for archival or documentary work. Lower values let the model invent more detail. That is better for artistic work, or when the source is so degraded that strict fidelity just locks in the noise.
Head-to-Head Benchmark and Recommendations
To cut past gut feeling, here are hard numbers from a test set of 20 images. The set spans 4 groups: portraits, landscapes, text and UI screenshots, anime and illustration. Each ran at 3 starting sizes (256p, 480p, 720p), all upscaled 4x to the target.
Overall Quality Rankings
Quality was scored with PSNR, SSIM, LPIPS perceptual distance, and a Mean Opinion Score (MOS) from 5 human reviewers on a 1-5 scale:
| Tool | MOS (avg) | Best Category | Worst Category |
|---|---|---|---|
| SUPIR | 4.2/5 | Landscapes | Text/UI |
| Topaz Photo AI | 4.0/5 | Portraits | Anime |
| Real-ESRGAN | 3.6/5 | Anime | Portraits |
| Bicubic (baseline) | 2.1/5 | - | - |
Category Winners
Topaz Photo AI won on portraits. Its face recovery pipeline handles skin texture, eye detail, and hair strands better than the rest. SUPIR took landscapes, where its knack for making plausible foliage, rock, and water texture gave it a clear edge. Real-ESRGAN won both text and UI screenshots (highest fidelity to source pixel patterns, no invented characters) and anime/illustration (its anime model keeps flat color areas and clean line art better).
Speed and Resource Usage
Measured on an RTX 5080 performing 4x upscale from 1080p:
| Tool | Processing Time | VRAM Usage | Cost |
|---|---|---|---|
| Real-ESRGAN | 3 seconds | 2 GB (tiled) | Free |
| Topaz Photo AI | 8 seconds | 6 GB | $199/year |
| SUPIR | 90 seconds | 14 GB | Free |
Practical Recommendations
If you are pushing hundreds or thousands of images through an auto pipeline, Real-ESRGAN is the only real pick. Free licensing, fast output, Vulkan cross-GPU support, and a simple CLI add up. The quality gap to the rest is much smaller than the speed gap.
Photographers doing client work will get the most from Topaz Photo AI. The Autopilot feature plus the built-in denoise, sharpen, and upscale pipeline saves real time over chaining three tools. The $199/year pays for itself fast if you work on images often.
SUPIR is the right tool when you have one image that needs to look as good as possible: a website header visual, a print from a degraded scan, a still frame from old footage. Nothing else gives the same level of detail on damaged or low-res sources.
A solid middle ground is to use Real-ESRGAN for bulk work, then run SUPIR on the few images that need extra care. This gives you most of the quality win at a fraction of the time.
If your GPU has less than 8 GB of VRAM, Real-ESRGAN with tiling is your best bet. Topaz may run on some cards, but SUPIR needs 12 GB to run at all.
All three tools run on your own hardware. No cloud lock-in, no per-image fees, and no data leaves your machine. That alone makes them worth learning, compared with cloud upscalers that charge per image and ask you to upload your content to third-party servers. If you want to push further with local image AI, setting up FLUX 2 locally opens the door to full generative pipelines on the same GPU.