Linux File Recovery: extundelete, PhotoRec, Btrfs snapshots

If you just ran rm on something important and you’re in a panic, stop touching that filesystem right now. Run mount -o remount,ro /dev/sdX to remount the partition read-only first. Every write to the disk after deletion cuts your odds of getting those files back. Here is the short answer. For ext4, try extundelete
or debugfs first, then PhotoRec
as a fallback. For Btrfs, roll back a snapshot if you have one, or use btrfs restore if you don’t. The right move depends on your case, so read on.
Why Recovering Deleted Files on Linux Is Harder Than You Expect
Most Linux users learn the hard way that rm is permanent. Windows has its Recycle Bin and macOS has the Trash. The terminal rm command has neither. It removes the directory entry that points to the file’s inode and marks those data blocks as free. The bytes stay on disk until something else writes over them. That can happen seconds or hours later, depending on your hardware and how busy the system is.
On a busy system, journal writes, log rotation, package manager jobs, and browser cache activity all grab new blocks. The window you have before deleted data gets overwritten shrinks with every process that touches the disk.
SSDs make this much worse. Modern Linux distros turn on fstrim.timer by default, which runs weekly TRIM jobs. Some mount setups add discard for nonstop TRIM. Once the SSD controller gets a TRIM command for those blocks, it can zero or remap them in hardware. After that, no software tool can bring the data back. You can check if your drive supports TRIM with:
cat /sys/block/sda/queue/discard_max_bytesIf the value is non-zero, TRIM is supported and may already be running. To see how your SSD holds up under different loads, our guide on benchmarking NVMe SSDs on Linux covers fio, hdparm, and monitoring with smartd.
Your filesystem type also decides which tools work and how likely a recovery is:
| Filesystem | Recovery Difficulty | Tool Support | Notes |
|---|---|---|---|
| ext4 | Moderate | Good - extundelete, debugfs, PhotoRec | Journal retains metadata; best-supported recovery |
| Btrfs | Easy with snapshots, hard without | btrfs restore, snapshots | COW architecture complicates traditional undelete |
| XFS | Very hard | Almost none | xfs_undelete is experimental; PhotoRec is your only real option |
| ZFS | Easy with snapshots | zfs rollback, zfs diff | Similar to Btrfs - snapshots are the primary recovery path |
The golden rule: stop writing to the filesystem now. If the deleted files sat on a non-root partition, unmount it. If they sat on the root filesystem, boot from a live USB and work from there. Fedora Workstation Live, Ubuntu Live, or any distro’s live image will do. Every second the system stays mounted read-write lowers your odds.

Recovering Deleted Files from ext4
ext4 is still the default filesystem on Debian, Ubuntu, Fedora, and most popular distros. It also has the best recovery tool support of any Linux filesystem. The reason is simple. The ext4 journal and inode structures keep enough metadata to rebuild deleted files, at least for a while.
extundelete - Your Best First Attempt
extundelete reads the ext4 journal to find deleted inode entries and rebuild files. The original version (0.2.4, released 2013) still works on many systems. A newer fork called extundelete-ng supports the latest e2fsprogs (1.47+) and adds 64-bit block support for modern ext4 volumes.
Install and run it:
# Install from distro repos (original version)
sudo apt install extundelete    # Debian/Ubuntu
sudo dnf install extundelete    # Fedora

# Unmount the partition first
sudo umount /dev/sda1

# Recover all recently deleted files
sudo extundelete /dev/sda1 --restore-all

# Or recover a specific file by path
sudo extundelete /dev/sda1 --restore-file home/user/documents/report.pdf
Recovered files land in a RECOVERED_FILES/ directory wherever you ran the command. extundelete works best within minutes of deletion on a quiet filesystem. It can’t recover files whose inodes were already reused. It may also lose the original filenames if the directory entry was overwritten.
debugfs - Targeted Inode Recovery
Maybe you know the inode number of a deleted file, from ls -i run before deletion or from log files. If so, debugfs gives you direct access to ext4 internals:
# Open the filesystem in debugfs
sudo debugfs /dev/sda1

# List recently deleted inodes with size and deletion time
debugfs: lsdel

# Dump a specific inode's data blocks to a file
debugfs: dump <inode_number> /recovery/myfile.pdf
This is precise, but you need to know which inode you want. The lsdel output shows deletion timestamps and file sizes. That helps you spot the right inode when you don’t have the number memorized.
ext4magic - Powerful but Abandoned
ext4magic used to beat extundelete on hard recoveries. It was strong at restoring whole directory trees with the original permissions and timestamps. It could use journal transactions that extundelete missed, and it supported recovery by time window.
However, ext4magic was declared abandoned in January 2025. More than 30 releases of e2fsprogs have shipped since its last update, and the tool can no longer read modern ext4 filesystems correctly. The maintainer flatly tells people not to use it. If you find old guides that push ext4magic, skip it and use extundelete or debugfs instead.
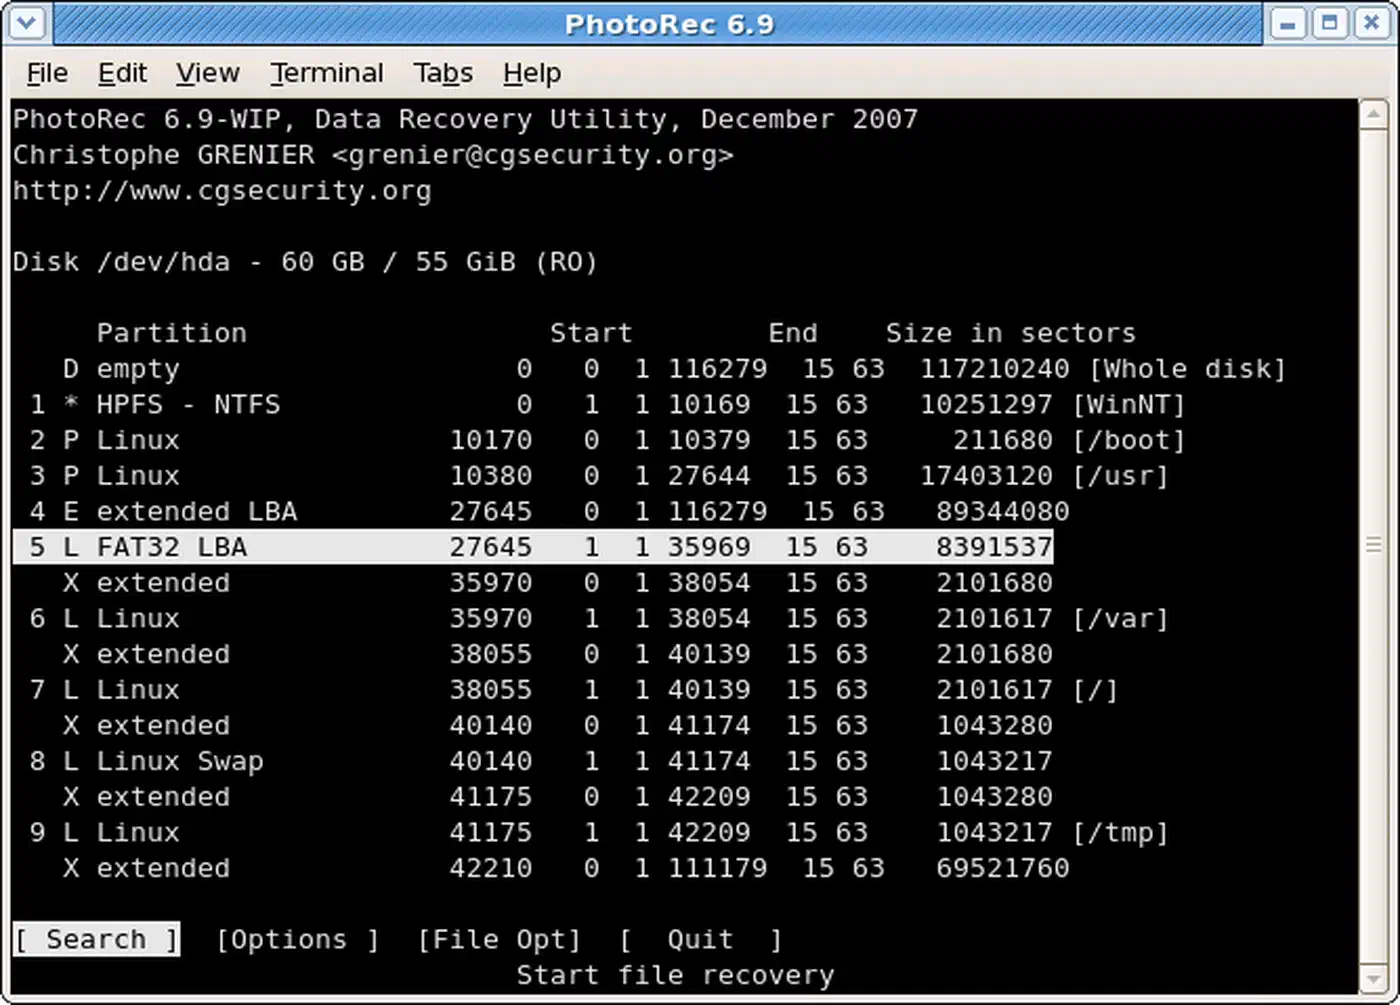
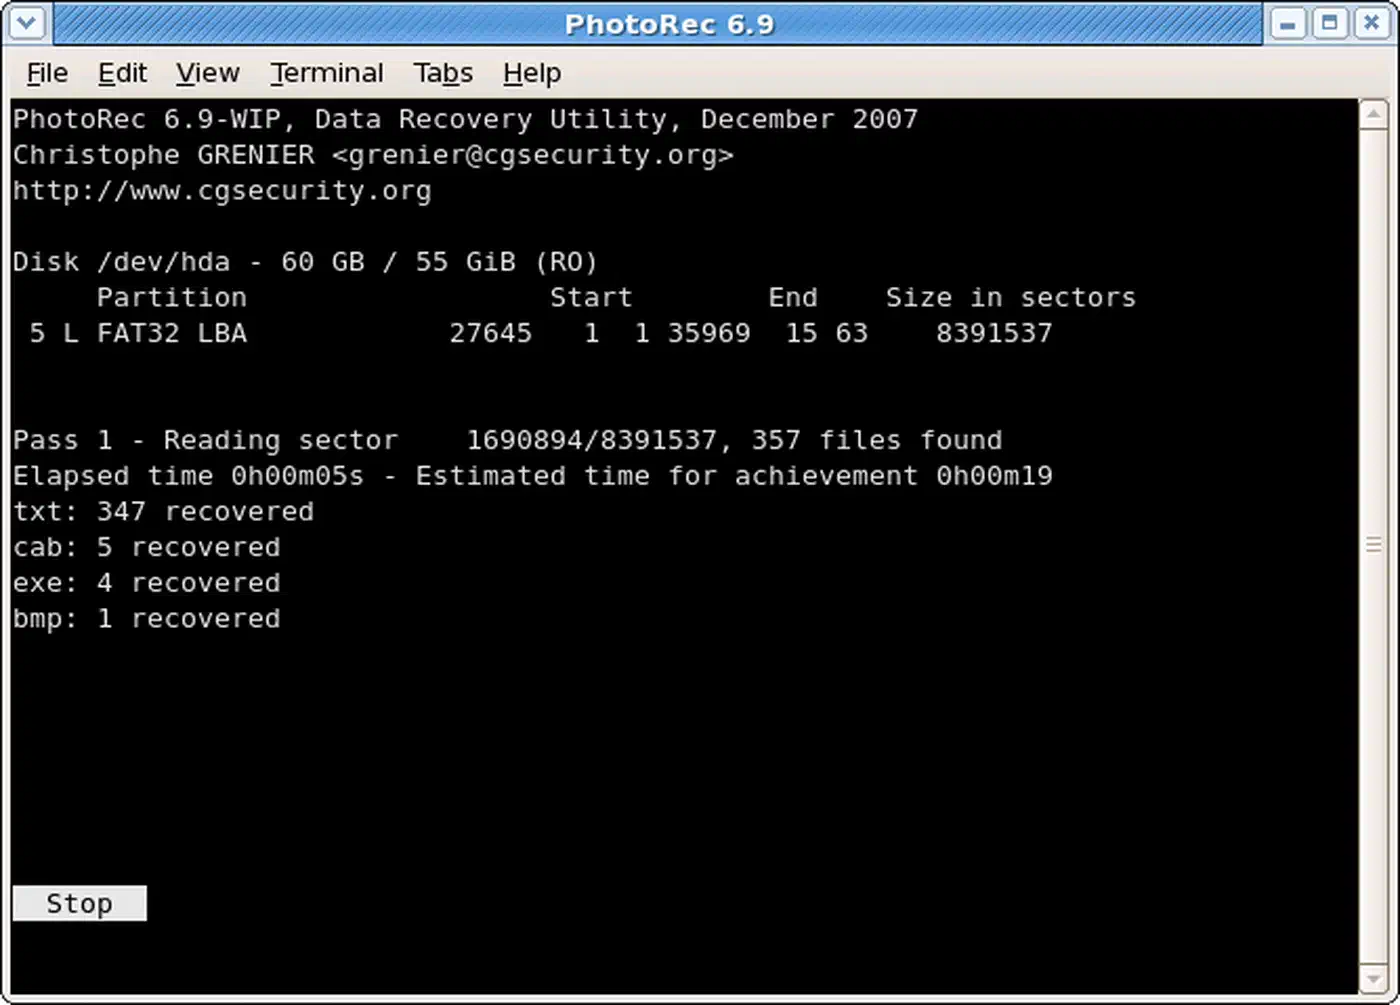
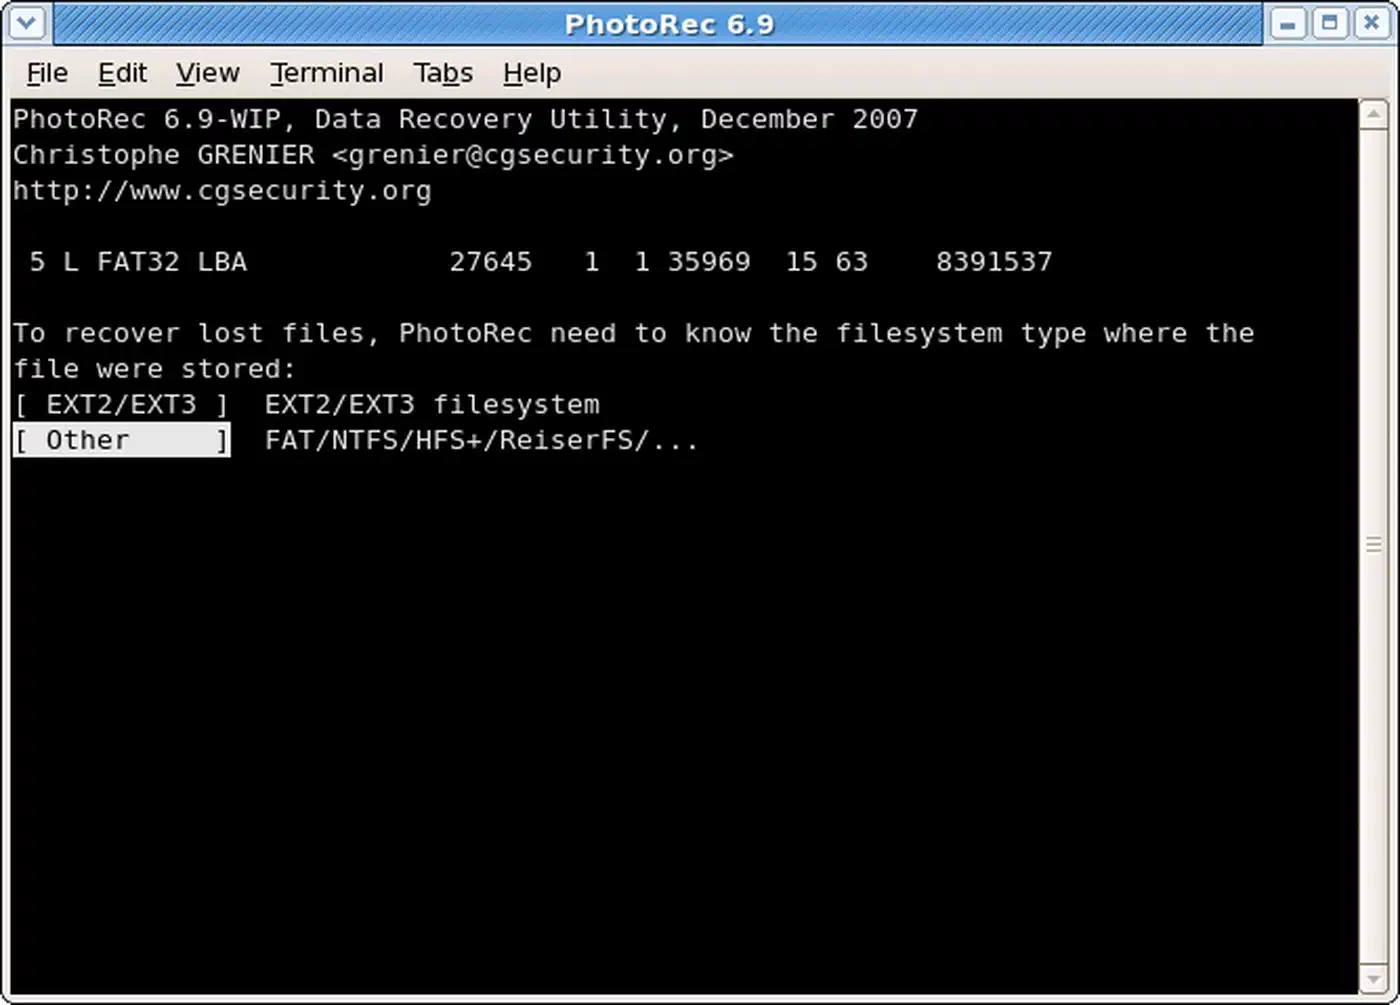
PhotoRec - The Last Resort That Always Works
When metadata-based recovery fails, PhotoRec takes over. It ships with the TestDisk package, and the current stable version is 7.2. PhotoRec skips the filesystem and scans raw disk sectors for file signatures. Those are the magic bytes in headers and footers that mark each file type.
# Install TestDisk (includes PhotoRec)
sudo apt install testdisk

# Run PhotoRec on the partition
sudo photorec /dev/sda1
PhotoRec supports over 480 file formats. That covers documents, images, databases, archives, and source code. The tradeoff is real. Recovered files lose their original names and folder layout. PhotoRec renames each one by type and sequence number, like f0001234.pdf. For large recoveries, expect to sort through thousands of generic file names.
A Step-by-Step ext4 Recovery Walkthrough
Say you just ran rm -rf ~/Documents on an ext4 partition. Here is the full recovery process:
Stop everything. Do not close terminals, do not open new programs, do not run
lson the affected partition.Remount read-only (if
/homeis a separate partition):sudo mount -o remount,ro /homeIf
/homeis on the root partition, reboot from a live USB. On Ubuntu Live or Fedora Live, the internal drive will not be mounted by default.Identify the partition:
lsblk -fRun extundelete:
sudo extundelete /dev/sda2 --restore-all --after $(date -d "-1 hour" +%s)The
--afterflag limits recovery to files deleted in the last hour, reducing noise.Check the results in
RECOVERED_FILES/. If your files are not there, try PhotoRec as a second pass.Copy recovered files to a different drive before remounting the original read-write.
Recovery Tool Comparison
| Tool | Preserves Names | Preserves Structure | Speed | Best For |
|---|---|---|---|---|
| extundelete | Sometimes | No | Fast | Recent deletions, single files |
| debugfs | No | No | Fast | Known inode recovery |
| PhotoRec | No | No | Slow | Corrupted FS, any file type |
| Scalpel | No | No | Moderate | Targeted file carving by type |
| Foremost | No | No | Moderate | Header/footer-based carving |
Scalpel and Foremost are two more options. Both carve files by signature, just like PhotoRec. Scalpel runs multiple threads, so it scans faster. Foremost is older but well documented for forensic work. In practice, PhotoRec covers the most file formats and is the best kept up of the three.
Recovering Deleted Files from Btrfs
Btrfs uses a copy-on-write (COW) design . Changed data goes to new disk locations instead of getting overwritten in place. This makes the usual undelete tools useless. extundelete walks ext4 inode tables, so it spits out garbage on Btrfs. The B-tree structure maps inodes to blocks in a wholly different way.
On the other hand, Btrfs has built-in snapshots. Set them up well, and recovery becomes easy.
Snapshot Rollback - The Ideal Scenario
If you have automatic snapshots configured through snapper or btrbk , recovery is as simple as:
# List available snapshots
sudo snapper -c home list

# Restore a specific file from a snapshot
cp /.snapshots/42/snapshot/home/user/documents/report.pdf ~/recovered/

# Or undo all changes since a snapshot
sudo snapper -c home undochange 42..0
Btrfs snapshots are instant and use almost no extra disk space at first. COW means only the blocks changed after the snapshot get stored on their own. That tiny cost is why automatic snapshots are worth it.
What about the performance hit? Taking a snapshot is nearly free. The risk is piling up many snapshots on a heavily written filesystem. COW metadata can fragment and slow things down over time. The fix is a sound retention setup. Keep 24 hours of hourly snapshots and 7 days of daily ones, then let older ones get cleaned up on their own. Don’t turn on Btrfs quota groups (qgroups) for snapshot tracking, since they are known to slow the filesystem down.
btrfs restore - When You Have No Snapshots
Without snapshots, recovery is harder but not hopeless. btrfs restore reads the Btrfs metadata trees straight from the raw device. It then pulls files by walking older tree roots that COW has not yet overwritten:
# Basic recovery to a separate drive
sudo btrfs restore /dev/sda1 /mnt/recovery/

# Use -s to search for older filesystem states
sudo btrfs restore -s /dev/sda1 /mnt/recovery/

# Use -i for case-insensitive path matching
sudo btrfs restore -si /dev/sda1 /mnt/recovery/
For badly corrupted filesystems where the current superblock is damaged, btrfs-find-root can find older tree root nodes:
# Find alternate root tree offsets
sudo btrfs-find-root /dev/sda1

# Use a specific offset with btrfs restore
sudo btrfs restore -t 293847562 /dev/sda1 /mnt/recovery/
PhotoRec also works on Btrfs partitions, since it ignores filesystem structure. It is your fallback when btrfs restore can’t find the files you need.
Setting Up Snapper for Automatic Snapshots
Btrfs recovery without snapshots is hard, so setting up automatic snapshots should be a priority for any Btrfs user:
# Create a snapper config for /home
sudo snapper -c home create-config /home

# Edit the config for timeline snapshots
sudo nano /etc/snapper/configs/home
Key settings to configure:
TIMELINE_CREATE="yes"
TIMELINE_LIMIT_HOURLY="24"
TIMELINE_LIMIT_DAILY="7"
TIMELINE_LIMIT_WEEKLY="4"
TIMELINE_LIMIT_MONTHLY="0"
TIMELINE_LIMIT_YEARLY="0"
This creates hourly snapshots and keeps 24 hours plus 7 days of history. On a typical desktop, that adds a few hundred megabytes at most. It costs far less than losing your files.
What About Encrypted Partitions?
If your deleted files sat on a LUKS -encrypted partition, recovery is still possible. The catch: you need the passphrase or key file. The encryption layer sits between the recovery tools and the raw disk data, so you have to unlock the volume first:
# Open the LUKS volume
sudo cryptsetup luksOpen /dev/sda2 recoveryvolume

# Now run recovery tools against the decrypted mapper device
sudo extundelete /dev/mapper/recoveryvolume --restore-all
If you have lost the LUKS passphrase, the data is gone. There is no way to recover a LUKS passphrase. Brute-forcing modern LUKS2 key derivation (Argon2id) is not feasible. Back up your LUKS headers with cryptsetup luksHeaderBackup. A corrupted header with no backup also means total data loss, even if you still know the passphrase.
How ext4’s Journal Affects Your Recovery Window
The ext4 journal is what makes metadata-based recovery possible. It is also a ticking clock. The journal stores recent filesystem changes, like file creation, deletion, and metadata edits, in a circular buffer. As new writes fill the journal, old entries get overwritten.
How long your recovery window lasts depends on filesystem activity. On a quiet server with few writes, journal entries for a deleted file might last for days. On a busy desktop, they can vanish in minutes. The default ext4 journal size is 128 MB, which fills faster on systems with heavy writes.
A few things catch people off guard here:
- Reads don’t destroy journal data on their own. But background jobs that reads trigger, like
updatedb, file indexers, oratimeupdates, do write to the journal - On an active desktop, the recovery window is usually minutes. On a lightly used server, it can stretch to hours
- Saving a journal image right after deletion freezes the recovery window:
debugfs -R "dump_inode <8> /recovery/journal.img" /dev/sda1
This is why “remount read-only now” is not optional. It is the single best move you can make to keep your recovery odds high.
Prevention: Trash, Snapshots, and Backups
The best time to deal with accidental deletion is before it happens. Three layers of protection each cover a different failure mode.
Layer 1: Trash Integration for the Terminal
Install trash-cli to add a Freedesktop.org-compliant trash can to the command line:
# Install
sudo apt install trash-cli    # Debian/Ubuntu
pip install trash-cli          # Any distro via pip

# Use trash-put instead of rm
trash-put ~/documents/old-report.pdf

# List trashed files
trash-list

# Restore a file to its original location
trash-restore

# Empty the trash
trash-empty
Some guides tell you to alias rm to trash-put in your .bashrc. That works on personal machines. On shared servers it can trip up other admins who expect rm to act like rm. On servers, call trash-put by name instead.
Layer 2: Filesystem Snapshots
For Btrfs users, snapper or btrbk handle automatic snapshots, as covered above. btrbk is lighter than snapper for server use. It supports incremental send/receive to remote backup targets. ZFS users get an equally strong snapshot system. See our guide on ZFS snapshot automation and retention policies .
ext4 users don’t get filesystem-level snapshots. LVM snapshots cover similar ground if your partitions sit on LVM:
# Create an LVM snapshot
sudo lvcreate --snapshot --size 5G --name home_snap /dev/vg0/home

# Mount and browse the snapshot
sudo mount /dev/vg0/home_snap /mnt/snapshot
You can convert ext4 to Btrfs in place with btrfs-convert. It carries real risk, though. Only try it with a full backup already in hand.
Layer 3: Offsite Backups with Restic
Restic (current version 0.18.x) gives you fast, encrypted, deduplicated backups. It writes to local disks, SFTP servers, S3-compatible storage, and many other backends:
# Initialize a backup repository
restic -r sftp:user@backup-server:/repo init

# Back up /home
restic -r sftp:user@backup-server:/repo backup /home

# Restore a specific file from the latest snapshot
restic -r sftp:user@backup-server:/repo restore latest \
  --include /home/user/documents/report.pdf \
  --target /recovery/
Schedule backups with a systemd timer and you have automated offsite protection.
The 3-2-1 Rule Applied to Linux
The classic backup rule calls for 3 copies of your data, on 2 types of media, with 1 copy offsite. A practical Linux setup:
| Layer | What | Where | Recovery Speed |
|---|---|---|---|
| Btrfs snapshots | Point-in-time filesystem state | Same disk | Instant |
| rsync to NAS | File-level copy | Local network, different device | Minutes |
| Restic to Backblaze B2 | Encrypted, deduplicated backup | Offsite cloud | Minutes to hours |
Test your recovery plan often. Run a quarterly drill where you restore a test file from each layer. Check that snapshot retention has not expired, that your NAS sync is current, and that restic prune has not dropped the snapshots you would need.
When All Else Fails
If none of these tools recover your files, commercial data recovery services can sometimes pull data off drives at the hardware level. Expect to pay hundreds or thousands of dollars, and success is never a sure thing. For SSDs that have been TRIM’d, even the pros can’t help.
The better bet is prevention. Install trash-cli today. Set up automatic snapshots if you run Btrfs. Point restic or a similar backup tool at a remote target. Those few minutes will save you from ever reading an article like this one in a cold sweat.