 Botmonster Tech
Debian router with nftables: CAKE SQM reaches 15ms latency

Yes, a plain Debian 12 or Fedora Server install on cheap x86 hardware, or a Raspberry Pi 5, makes a better router than most consumer gear. It often beats boxes that cost twice as much. You need two network interfaces, a few config files, and about two hours. The result is a gateway with a real stateful firewall via nftables, proper DNS and DHCP from dnsmasq, and traffic shaping that works through CAKE SQM. Every config is plain text you can track in Git.
The guide covers hardware choices, base system setup, a complete nftables ruleset with NAT and IPv6, dnsmasq and DNS-over-TLS, CAKE bufferbloat fixes, and an optional WireGuard VPN. Every config file is copy-pasteable.
Why Replace Your Consumer Router
Consumer routers ship with proprietary firmware. It gets security updates for maybe two to three years. After that, you’re running a device with known CVEs facing the public internet. TP-Link, Netgear, and ASUS routers have all had critical bugs go unpatched for months. If you would rather keep the hardware, flashing OpenWrt puts a maintained Linux on the same box. A Debian box running unattended-upgrades gets security patches on its own for the full LTS cycle. Debian 12 Bookworm is supported through 2028.
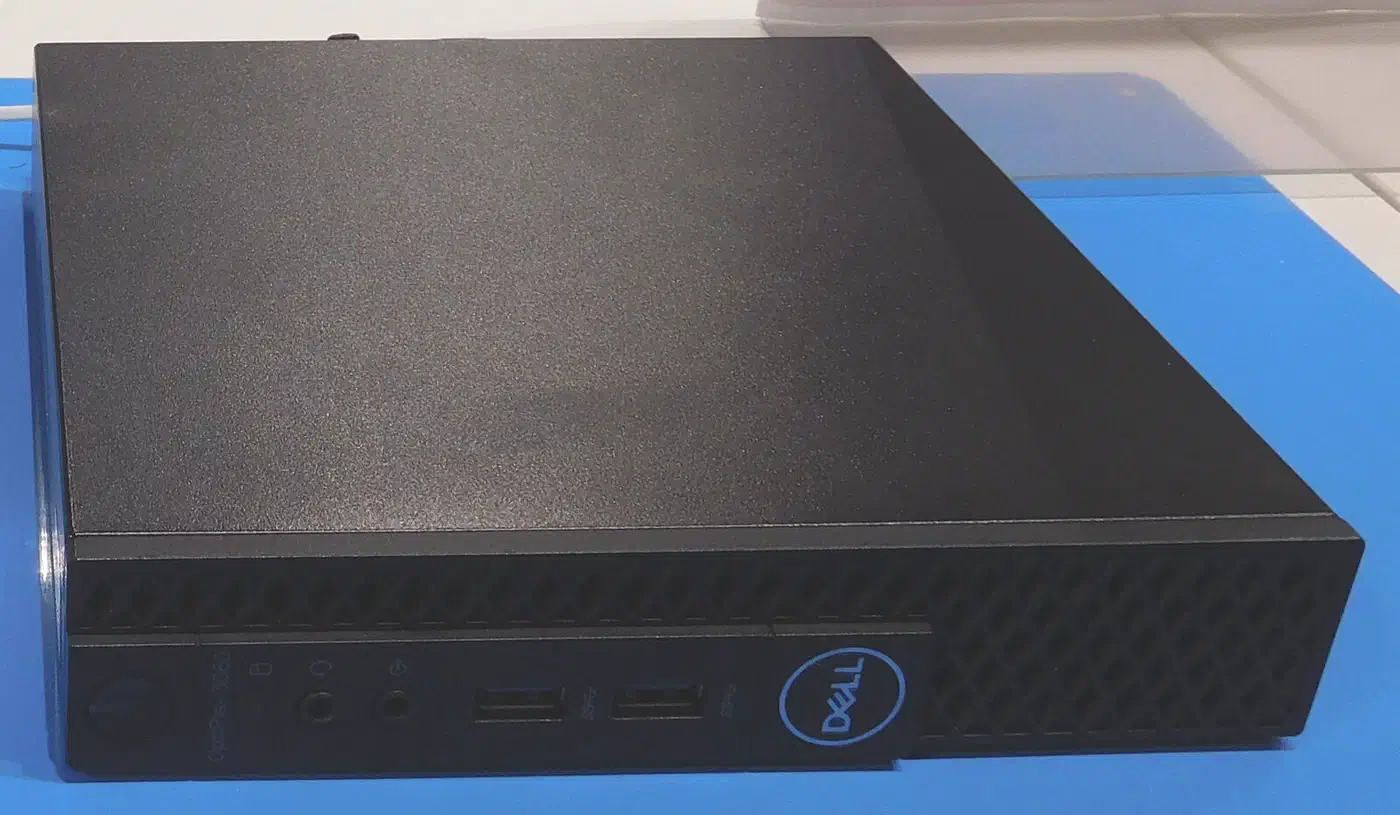
Consumer routers also hit performance ceilings fast. Their SoCs are built around Wi-Fi, not routing speed. A Raspberry Pi 5 (8 GB, $175 list) pushes 940 Mbps wire-speed with nftables NAT. A used Dell OptiPlex Micro 3050 ($60-90 on eBay) paired with a $25 Intel i225-V 2.5GbE PCIe card handles 2.5 Gbps at near-zero CPU load. Both push more raw throughput than a $150 consumer Wi-Fi router. They still leave headroom for firewall rules and traffic shaping.
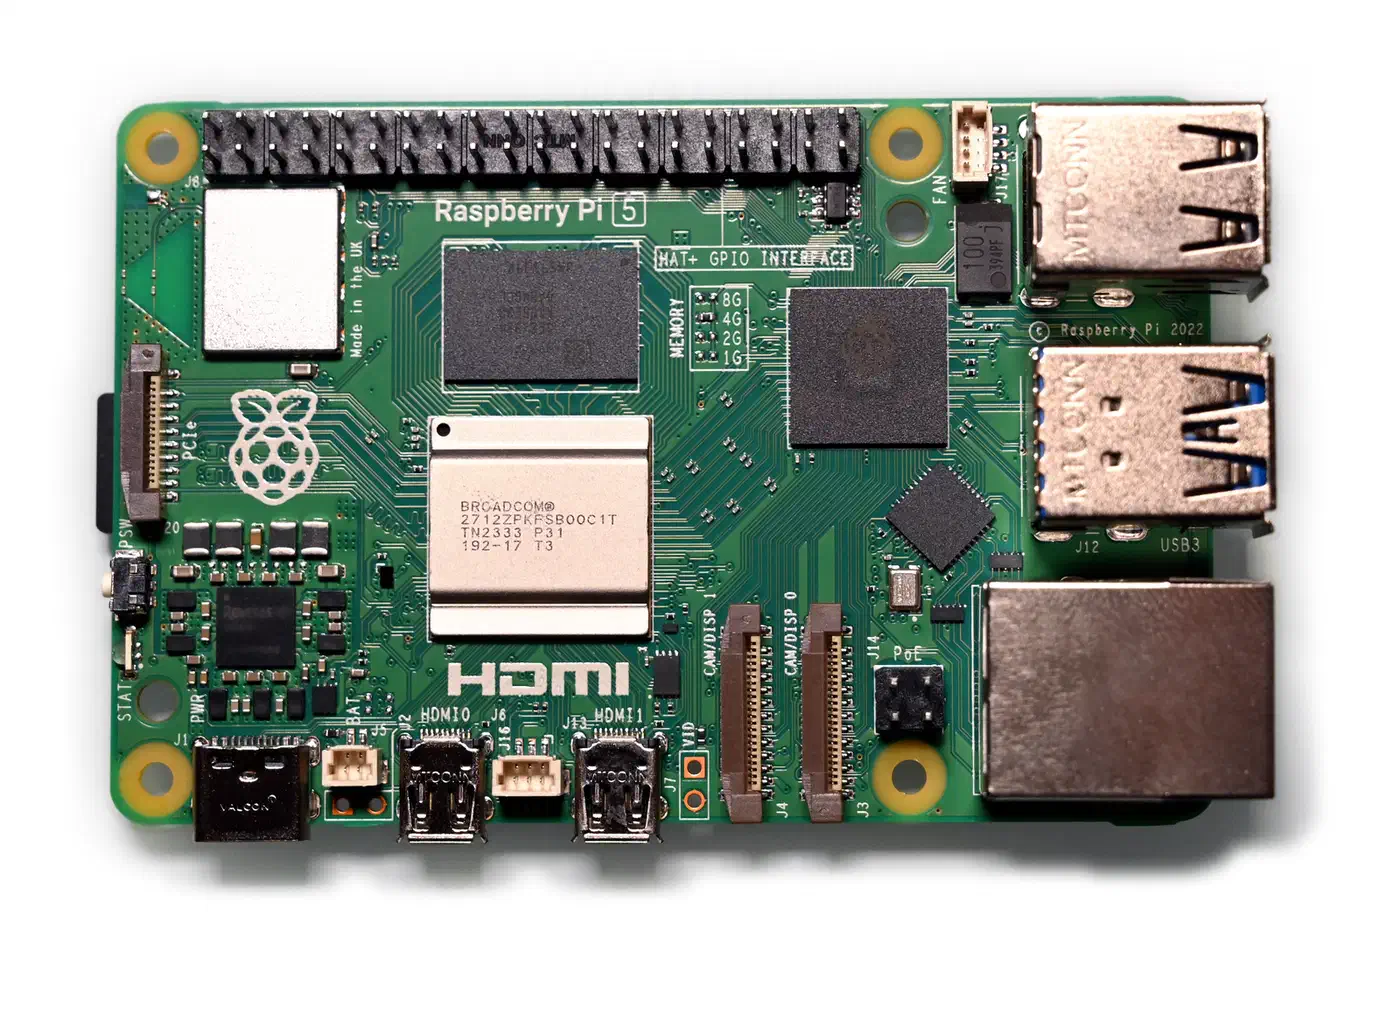
Here is what you gain with a Linux router:
- Full nftables firewall with logging, rate limiting, and geo-blocking
- Real traffic shaping with CAKE SQM that eliminates bufferbloat
- DNS-over-TLS via Unbound for encrypted upstream DNS
- Built-in WireGuard VPN server
- Per-device bandwidth monitoring with vnStat or ntopng
Here is what you lose: the all-in-one box. You will manage two devices, a router and a separate Wi-Fi access point such as a Ubiquiti U6-Lite or TP-Link EAP670. Splitting routing from wireless is the single biggest reliability win you can make. Setup takes two to three hours instead of a 10-minute consumer router wizard.
| Option | Cost | Throughput | Firewall | SQM/QoS |
|---|---|---|---|---|
| Linux Router (Pi 5 or OptiPlex) | $60-200 | 1-2.5 Gbps | Full nftables | CAKE |
| Ubiquiti EdgeRouter | $100-300 | 1-2 Gbps | iptables-based | fq_codel |
| pfSense appliance | $200-600 | 1-10 Gbps | pf | ALTQ/Limiters |
| Consumer Router | $80-200 | 300-900 Mbps | Basic NAT | Minimal/none |
Base System Setup: Distro, NICs, and IP Forwarding
Start with a Debian 12 (Bookworm) minimal install. Skip the desktop and the GUI. Debian is the base to pick here for its stability and long support window, which suits a box that runs 24/7. Fedora Server 41 (kernel 6.12+) works if you want newer kernel features.
Identify and Rename Network Interfaces
After installation, identify your two NICs:
ip link showYou will see interface names like enp1s0 and enp2s0. Rename them to wan0 and lan0 with a systemd .link file so the names say which is which:
# /etc/systemd/network/10-wan0.link
[Match]
MACAddress=aa:bb:cc:dd:ee:01

[Link]
Name=wan0
# /etc/systemd/network/10-lan0.link
[Match]
MACAddress=aa:bb:cc:dd:ee:02
[Link]
Name=lan0Configure Network Addresses with systemd-networkd
The WAN interface gets its address from your ISP via DHCP. The LAN interface gets a static IP that becomes the gateway for all your devices:
# /etc/systemd/network/10-wan0.network
[Match]
Name=wan0

[Network]
DHCP=yes

[DHCPv4]
UseDNS=no
# /etc/systemd/network/20-lan0.network
[Match]
Name=lan0
[Network]
Address=192.168.1.1/24Disable NetworkManager fully. It conflicts with systemd-networkd:
systemctl disable --now NetworkManager
systemctl enable --now systemd-networkd
Enable IP Forwarding and Tune Kernel Parameters
The kernel needs explicit permission to route packets between interfaces. Create a sysctl config:
# /etc/sysctl.d/99-router.conf
net.ipv4.ip_forward=1
net.ipv6.conf.all.forwarding=1

# Increase conntrack table for heavy NAT use
net.netfilter.nf_conntrack_max=131072
net.netfilter.nf_conntrack_tcp_timeout_established=3600

# Enable BBR congestion control
net.core.default_qdisc=fq
net.ipv4.tcp_congestion_control=bbr
Apply immediately:
sysctl --system
cat /proc/sys/net/ipv4/ip_forward   # Should return 1
For high-throughput setups, enable hardware offloading on both interfaces:
ethtool -K wan0 gro on gso on
ethtool -K lan0 gro on gso on
Check available offload features with ethtool -k wan0. Disable hardware checksum offload only if nftables logging shows garbled packet data.
nftables Firewall and NAT Configuration
nftables replaced the old iptables/ip6tables/ebtables stack with one unified framework. It has been the default in Debian since Buster (2019) and in RHEL since version 8. The iptables command still exists on modern distros, but it just translates to nftables behind the scenes via iptables-nft. For new installs, use native nftables syntax only. The iptables-legacy backend is deprecated.
The diagram below shows the overall layout. Traffic enters through the WAN interface, passes through nftables filtering and CAKE shaping, and reaches LAN devices through a switch. WireGuard VPN clients connect through a separate tunnel interface.
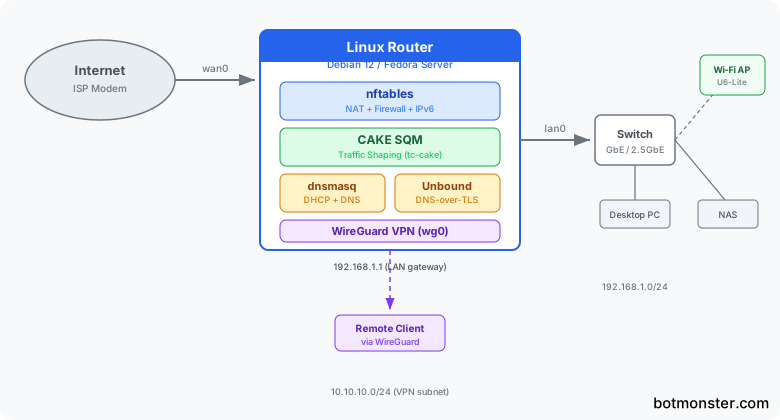
Here is a complete /etc/nftables.conf for a home router. It handles IPv4 NAT, stateful filtering for both input and forwarding, ICMP rate limiting, and IPv6 rules:
#!/usr/sbin/nft -f
flush ruleset

define WAN = wan0
define LAN = lan0
define LAN_NET = 192.168.1.0/24

table inet filter {
    chain input {
        type filter hook input priority 0; policy drop;

        # Allow established/related, drop invalid
        ct state established,related accept
        ct state invalid drop

        # Allow loopback
        iif lo accept

        # ICMP/ICMPv6 rate limited
        ip protocol icmp limit rate 10/second accept
        ip6 nexthdr icmpv6 limit rate 10/second accept

        # Allow essential ICMPv6 for IPv6 to function
        icmpv6 type { nd-neighbor-solicit, nd-neighbor-advert, nd-router-solicit, nd-router-advert } accept

        # LAN-facing services
        iifname $LAN tcp dport 22 accept          # SSH
        iifname $LAN udp dport { 53, 67, 68 } accept  # DNS, DHCP
        iifname $LAN tcp dport 53 accept           # DNS over TCP

        # WireGuard (optional - remove if not using VPN)
        udp dport 51820 accept

        # Log and drop everything else
        log prefix "nft-input-drop: " limit rate 5/minute
        drop
    }

    chain forward {
        type filter hook forward priority 0; policy drop;

        # Allow established/related, drop invalid
        ct state established,related accept
        ct state invalid drop

        # Allow LAN to WAN (internet access)
        iifname $LAN oifname $WAN accept

        # Allow WireGuard clients to reach LAN and WAN
        iifname "wg0" oifname $LAN accept
        iifname "wg0" oifname $WAN accept
        iifname $LAN oifname "wg0" accept

        # IPv6 forward rules - critical since IPv6 gives
        # every device a public address
        # Allow ICMPv6 for path MTU discovery and neighbor discovery
        ip6 nexthdr icmpv6 icmpv6 type {
            echo-request, echo-reply,
            nd-neighbor-solicit, nd-neighbor-advert,
            nd-router-solicit, nd-router-advert,
            packet-too-big
        } accept

        # Example: port forward to internal server
        # iifname $WAN oifname $LAN ip daddr 192.168.1.50 tcp dport 25565 accept

        log prefix "nft-forward-drop: " limit rate 5/minute
        drop
    }
}

table inet nat {
    chain prerouting {
        type nat hook prerouting priority dstnat; policy accept;

        # Example: port forward to Minecraft server
        # iifname $WAN tcp dport 25565 dnat to 192.168.1.50:25565
    }

    chain postrouting {
        type nat hook postrouting priority srcnat; policy accept;

        # Masquerade all LAN traffic going out WAN
        oifname $WAN masquerade
    }
}
Enable and start the nftables service so rules load at boot:
systemctl enable --now nftablesVerify the loaded ruleset:
nft list rulesetPort Forwarding
To forward external port 25565 to an internal Minecraft server at 192.168.1.50, uncomment the two lines in the config above. One is in the prerouting chain (the DNAT rule), and the other is in the forward chain (the accept rule). Then reload:
nft -f /etc/nftables.confTest from an external machine with nmap -p 25565 <your-public-ip>.
DHCP, DNS, and dnsmasq Configuration
dnsmasq handles both DHCP and DNS in one small daemon. That is all a home router needs. Install it:
apt install dnsmasqEdit /etc/dnsmasq.conf:
# Bind only to the LAN interface
interface=lan0
bind-interfaces

# DHCP range and lease time
dhcp-range=192.168.1.100,192.168.1.250,24h

# Gateway and DNS server
dhcp-option=3,192.168.1.1
dhcp-option=6,192.168.1.1

# Domain for local resolution
local=/lan/
domain=lan

# Static DHCP leases (in separate directory for easy management)
dhcp-hostsdir=/etc/dnsmasq.d/hosts/

# Upstream DNS (points to local Unbound on port 5335)
server=127.0.0.1#5335

# Don't read /etc/resolv.conf for upstream
no-resolv

# Cache size
cache-size=1000
Create the hosts directory and add static leases as needed:
mkdir -p /etc/dnsmasq.d/hosts/# /etc/dnsmasq.d/hosts/static-leases
dhcp-host=AA:BB:CC:DD:EE:FF,192.168.1.50,minecraft-server
dhcp-host=11:22:33:44:55:66,192.168.1.51,nasAdd local DNS entries to /etc/hosts:
192.168.1.1    router.lan gateway.lan
192.168.1.50   minecraft.lan
192.168.1.51   nas.lan
DNS-over-TLS with Unbound
A local Unbound instance gives you encrypted DNS upstream. You don’t need Pi-hole or external DoH services. Install it:
apt install unboundSet Unbound to listen on port 5335 so it does not clash with dnsmasq on port 53. Then have it forward queries over TLS:
# /etc/unbound/unbound.conf.d/dns-over-tls.conf
server:
    interface: 127.0.0.1
    port: 5335
    do-not-query-localhost: no

    # DNSSEC validation
    module-config: "validator iterator"
    auto-trust-anchor-file: "/var/lib/unbound/root.key"

    # Privacy
    hide-identity: yes
    hide-version: yes
    qname-minimisation: yes

    # Performance
    num-threads: 2
    msg-cache-size: 50m
    rrset-cache-size: 100m
    prefetch: yes

forward-zone:
    name: "."
    forward-tls-upstream: yes
    # Cloudflare
    forward-addr: 1.1.1.1@853#cloudflare-dns.com
    forward-addr: 1.0.0.1@853#cloudflare-dns.com
    # Quad9
    forward-addr: 9.9.9.9@853#dns.quad9.net
    forward-addr: 149.112.112.112@853#dns.quad9.net
Restart both services:
systemctl restart unbound
systemctl restart dnsmasq
Verify DNSSEC is working:
dig @127.0.0.1 -p 5335 sigfail.verteiltesysteme.net  # Should return SERVFAIL
dig @127.0.0.1 -p 5335 sigok.verteiltesysteme.net     # Should return NOERROR
IPv6 DHCP and SLAAC
If your ISP hands you a prefix delegation (usually a /56 or /48 via DHCPv6-PD), set dnsmasq to advertise a /64 on the LAN with SLAAC. Add this to /etc/dnsmasq.conf:
enable-ra
dhcp-range=::,constructor:lan0,ra-stateless
This tells dnsmasq to send Router Advertisements so clients set up their own IPv6 addresses. Paired with the IPv6 forwarding rules in the nftables config above, your LAN devices get full IPv6 access with proper firewall cover.
Traffic Shaping with CAKE SQM
Bufferbloat is why your video calls stutter and your game ping spikes to 300ms when someone on your network starts a big download. When a router’s outgoing queue fills up, every packet has to wait behind megabytes of bulk transfer data. That includes latency-sensitive VoIP and gaming traffic. A 10ms base latency turns into 200-500ms under load. It also blunts newer transports: QUIC and HTTP/3 only pull ahead when the queue stays short.
Test your connection at the Waveform Bufferbloat Test before doing anything. If you get a grade of C or worse, you have bufferbloat.
CAKE (Common Applications Kept Enhanced) is the modern Linux qdisc that fixes this. It folds Active Queue Management (AQM), Fair Queuing (FQ), and traffic shaping into one qdisc. CAKE has been in the mainline kernel since 4.19, so no extra kernel modules are needed on any modern distro. It replaced the older mix of fq_codel and htb shaping. CAKE does the whole job in one shot with less config.
Upload Shaping
Apply CAKE to your WAN interface with your upload bandwidth set to 90-95% of measured speed:
tc qdisc replace dev wan0 root cake bandwidth 450mbit besteffort wash nat ack-filter-aggressiveKey options:
bandwidth 450mbit: set to 90-95% of your actual upload speed. If your upload is 500 Mbps, use 450.nat: turns on proper flow tracking for traffic behind NAT. Routers need this.wash: clears DSCP marks from upstream that might not match your local policy.ack-filter-aggressive: cuts TCP ACK congestion on asymmetric links. It helps when your download is much faster than your upload.
Download Shaping with IFB
CAKE can only shape outgoing (egress) traffic. Download bufferbloat lives in incoming (ingress) traffic. To shape it, you redirect incoming packets through an Intermediate Functional Block (IFB) device and apply CAKE there:
# Create and bring up IFB device
ip link add ifb-wan0 type ifb
ip link set ifb-wan0 up

# Redirect incoming WAN traffic to IFB
tc qdisc add dev wan0 handle ffff: ingress
tc filter add dev wan0 parent ffff: u32 match u32 0 0 \
    action mirred egress redirect dev ifb-wan0

# Apply CAKE on the IFB device
tc qdisc replace dev ifb-wan0 root cake bandwidth 900mbit besteffort wash
Set the IFB bandwidth to 90-95% of your measured download speed.
Persist Across Reboots
These tc commands do not survive a reboot on their own. Wrap them in a systemd service:
# /etc/systemd/system/sqm.service
[Unit]
Description=SQM (CAKE) Traffic Shaping
After=network-online.target
Wants=network-online.target

[Service]
Type=oneshot
RemainAfterExit=yes

# Upload shaping
ExecStart=/sbin/tc qdisc replace dev wan0 root cake bandwidth 450mbit besteffort wash nat ack-filter-aggressive

# Download shaping via IFB
ExecStart=/sbin/ip link add ifb-wan0 type ifb
ExecStart=/sbin/ip link set ifb-wan0 up
ExecStart=/sbin/tc qdisc add dev wan0 handle ffff: ingress
ExecStart=/sbin/tc filter add dev wan0 parent ffff: u32 match u32 0 0 action mirred egress redirect dev ifb-wan0
ExecStart=/sbin/tc qdisc replace dev ifb-wan0 root cake bandwidth 900mbit besteffort wash

# Cleanup on stop
ExecStop=/sbin/tc qdisc del dev wan0 root
ExecStop=/sbin/tc qdisc del dev wan0 ingress
ExecStop=/sbin/ip link del ifb-wan0

[Install]
WantedBy=multi-user.target
Enable it:
systemctl enable --now sqm.serviceVerify It Works
After applying CAKE, rerun the Waveform Bufferbloat Test. You should see latency under load drop from 200-500ms down to 5-15ms. Video calls stop freezing mid-sentence, and game ping is flat even during large transfers.
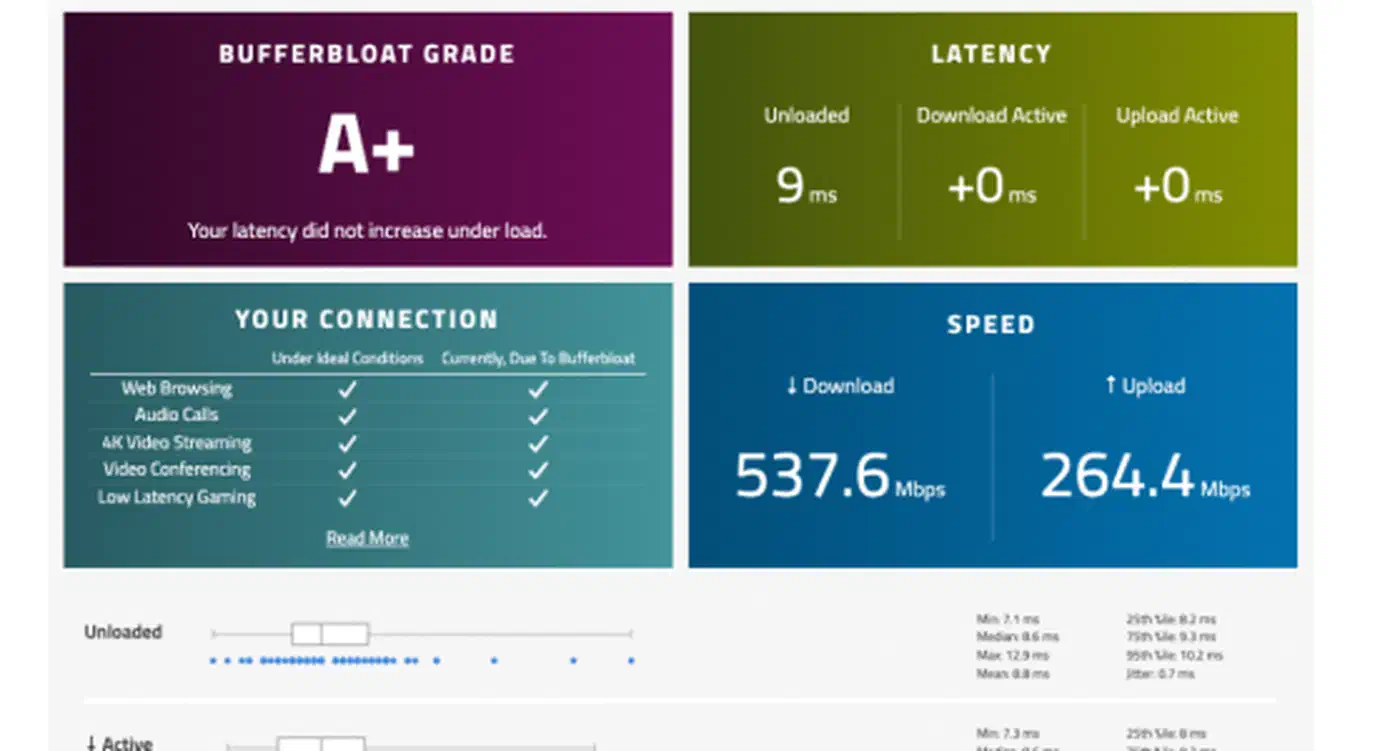
Monitor CAKE statistics:
tc -s qdisc show dev wan0
tc -s qdisc show dev ifb-wan0
This shows drops, ECN marks, and per-tin flow counts. High drop rates mean your bandwidth setting is too close to the actual line speed. Lower it by another 5%.
WireGuard VPN Integration
Add a WireGuard VPN server to your Linux router, and you can reach your home network safely from anywhere. WireGuard runs in the kernel, so it adds almost no overhead.
Install and generate keys:
apt install wireguard
wg genkey | tee /etc/wireguard/server-private.key | wg pubkey > /etc/wireguard/server-public.key
chmod 600 /etc/wireguard/server-private.key
Create the server config:
# /etc/wireguard/wg0.conf
[Interface]
PrivateKey = <contents of server-private.key>
Address = 10.10.10.1/24
ListenPort = 51820

[Peer]
# Phone
PublicKey = <client-public-key>
AllowedIPs = 10.10.10.2/32
Start WireGuard:
systemctl enable --now wg-quick@wg0The nftables config shown earlier already covers WireGuard. UDP port 51820 is open in the input chain, and the forward chain allows traffic between wg0 and both the LAN and WAN interfaces. VPN clients get full access to the home network and internet through the router’s NAT. To extend this and link two separate home networks, see the guide on WireGuard site-to-site tunnels.
What to Expect and Where to Go Next
After this guide you will have a router that boots in under 30 seconds and forwards traffic at wire speed. It keeps latency under 15ms even during heavy transfers, and it gives you SSH-accessible config files for everything. All of it fits in a Git repository.
A few things this guide skipped that you might want to add later:
- VLAN trunking for separate IoT and guest networks using 802.1Q tags on the LAN interface
- Failover WAN with a USB LTE modem as backup, switched automatically via systemd-networkd or a custom watchdog script
- Monitoring dashboards using vnStat for bandwidth graphs or ntopng for deep packet inspection and per-device traffic analysis
- UPS integration with
nut(Network UPS Tools) so the router shuts down cleanly during extended power outages
The same nftables ruleset and CAKE config that runs on a Raspberry Pi 5 also runs on a rack-mount server with 10GbE ports. For the moments a bad ruleset locks you out, a PiKVM gives you the console back over the network.