Webhook Relay with Cloudflare Tunnels: Free ngrok Alternative

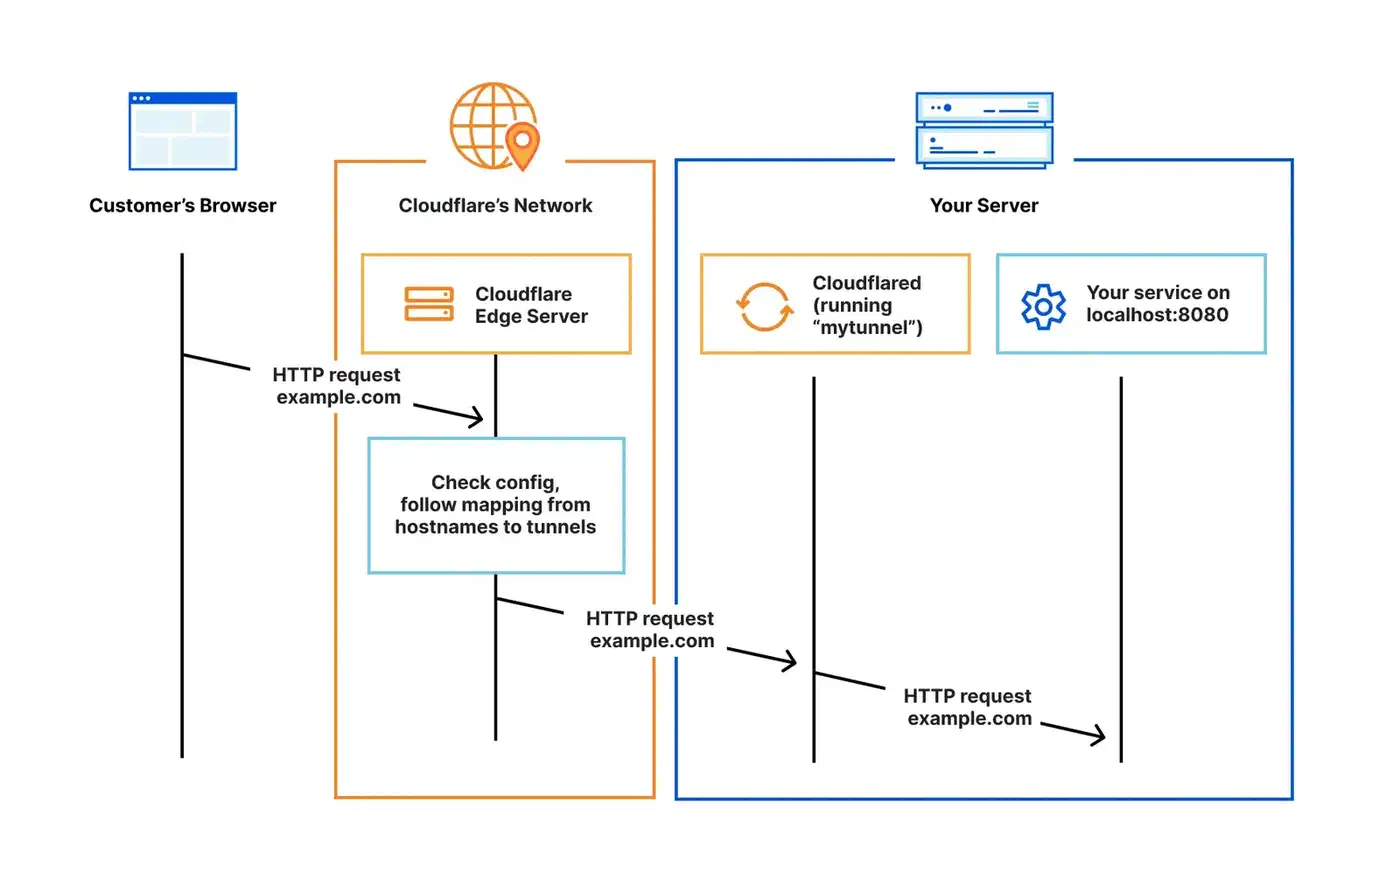
You can expose a local dev server to webhooks from GitHub, Stripe, or Twilio. Run cloudflared next to a FastAPI app. This drops port forwarding, public IPs, and paid ngrok plans. Cloudflare Tunnels open an outbound-only encrypted link from your machine to Cloudflare’s edge. The edge then proxies webhook requests back to your local FastAPI endpoint with full TLS, auto reconnect, and no firewall changes.
The trick works because cloudflared opens QUIC connections outward from your machine. No inbound ports ever open on your router. Cloudflare’s edge gets the webhook POST from GitHub or Stripe. It routes that POST through your tunnel and hands it to localhost:8000, where FastAPI handles it. You get a stable, public URL like webhooks.yourdomain.com that survives reboots.

Why Webhook Development on Localhost Is Painful
Webhook providers like GitHub, Stripe, Shopify, and Twilio send HTTP POST requests to a URL you set in their dashboard. The catch is plain: localhost:8000 is not reachable from the internet. Your dev machine sits behind NAT, a firewall, or both. Without a fix, those webhook payloads never arrive.
The usual workarounds all have downsides. Port forwarding needs router access plus a static IP or dynamic DNS. It also exposes your machine straight to the internet with no shield. A reverse proxy on a VPS means you run another server, pay for hosting, and juggle TLS certificates. A self-hosted WireGuard VPN gives you secure inbound access too. But it needs every webhook provider to route through your VPN, and none of them do.
ngrok made the tunnel approach popular and still works well for quick debugging. But its free tier has tightened a lot. The free plan now caps you at 1 GB monthly bandwidth, 2-hour sessions, and random throwaway URLs. It also injects a browser warning page into HTML responses. Custom domains and stable URLs need a paid plan: $8 per month for Personal, $20 per month for Pro.
Cloudflare Tunnels
solve this another way. If you have a domain on Cloudflare, the free plan lets you create a named tunnel with a stable hostname at no cost and no bandwidth cap. The cloudflared daemon runs on your machine. It keeps steady outbound QUIC connections to Cloudflare’s edge. Because the link is outbound-only, your firewall and router need no setup.
Tunnels also handle many ingress rules from one daemon. You can map webhooks.yourdomain.com to localhost:8000 and api.yourdomain.com to localhost:3000 at the same time. Cloudflare’s WAF, DDoS protection, and bot management sit in front of your local server by default. That is a big security win over raw port forwarding.
For one-off tests without any Cloudflare account, there is a quick-start mode. The command cloudflared tunnel --url http://localhost:8000 makes a temporary tunnel with a random *.trycloudflare.com subdomain. It goes away when you stop the process, but it works fine for a quick check.
How Tunnels Compare
| Feature | Cloudflare Tunnels | ngrok (Free) | ngrok (Pro) | Tailscale Funnel | localhost.run |
|---|---|---|---|---|---|
| Price | Free | Free | $20/month | Free (personal) | Free |
| Custom domain | Yes | No | Yes | No | No |
| Persistent URL | Yes | No | Yes | Yes | No |
| Bandwidth cap | None | 1 GB/month | 1 GB/month | None | Unspecified |
| WAF/DDoS protection | Yes | No | Yes | No | No |
| Request inspection | No | Yes | Yes | No | No |
| UDP support | No | No | No | Yes | No |
| Requires install | Yes (cloudflared) | Yes (ngrok) | Yes (ngrok) | Yes (tailscale) | No (SSH only) |
Cloudflare Tunnels win on cost and features for steady webhook relay use. ngrok wins for live API debugging thanks to its request inspection and replay tools. Tailscale Funnel is the simplest pick if you already run Tailscale for internal networking, but it cannot assign custom domains. localhost.run needs no install at all, just an SSH command. It only handles short-lived, quick-share cases.
Setting Up Cloudflare Tunnels with a Named Route
A named tunnel with a stable hostname is what makes this work for real webhook integrations. Providers like GitHub and Stripe store your endpoint URL and keep sending to it. A random URL that changes every session breaks that right away.
Install cloudflared
On Debian/Ubuntu:
curl -L https://github.com/cloudflare/cloudflared/releases/latest/download/cloudflared-linux-amd64.deb -o cloudflared.deb
sudo dpkg -i cloudflared.deb
cloudflared --version
On macOS:
brew install cloudflaredAuthenticate and Create the Tunnel
Log in to your Cloudflare account. This opens a browser window where you pick which domain (zone) the tunnel will use:
cloudflared tunnel loginThis stores a cert.pem file in ~/.cloudflared/. Next, create a named tunnel:
cloudflared tunnel create webhook-relayThis creates a tunnel UUID and a credentials file at ~/.cloudflared/<UUID>.json. Then add a DNS record that points your chosen subdomain to the tunnel:
cloudflared tunnel route dns webhook-relay webhooks.yourdomain.comCloudflare automatically adds a CNAME record pointing webhooks.yourdomain.com to <UUID>.cfargotunnel.com.
Write the Config File
Create ~/.cloudflared/config.yml:
tunnel: webhook-relay
credentials-file: /home/youruser/.cloudflared/<UUID>.json

ingress:
  - hostname: webhooks.yourdomain.com
    service: http://localhost:8000
  - hostname: admin.yourdomain.com
    service: http://localhost:3000
    originRequest:
      noTLSVerify: false
  - service: http_status:404
The ingress block routes requests by hostname. The catch-all http_status:404 at the bottom is required, since cloudflared rejects configs without it. You can add as many hostname rules as you need. Each one points to a different local service and port.
Run the Tunnel
cloudflared tunnel run webhook-relayAdd --loglevel debug during first setup to see exactly what is happening. Once it runs, any request to webhooks.yourdomain.com gets forwarded to localhost:8000.
Building the FastAPI Webhook Receiver
FastAPI handles async requests on its own. It also checks payloads with Pydantic , and the same type-safe validation patterns apply here. That helps webhook receivers, which must take varied JSON shapes and reply before the provider’s timeout window closes.
Scaffold the Project
Using uv as the package manager:
uv init webhook-relay && cd webhook-relay
uv add fastapi uvicorn[standard] pydantic structlog
The Core Receiver
Create main.py with a dispatcher pattern that routes webhooks by provider:
import hashlib
import hmac
import json
import os
import secrets
from datetime import datetime, timezone

import structlog
from fastapi import BackgroundTasks, FastAPI, HTTPException, Request, Response

app = FastAPI(title="Webhook Relay")
logger = structlog.get_logger()

GITHUB_SECRET = os.getenv("GITHUB_WEBHOOK_SECRET", "")
STRIPE_SECRET = os.getenv("STRIPE_WEBHOOK_SECRET", "")


@app.get("/health")
async def health():
    return {"status": "ok", "tunnel": "webhook-relay"}


@app.post("/webhook/{provider}")
async def receive_webhook(
    provider: str, request: Request, background_tasks: BackgroundTasks
):
    body = await request.body()
    headers = dict(request.headers)

    # Dispatch to provider-specific verification
    if provider == "github":
        verify_github_signature(headers, body)
    elif provider == "stripe":
        verify_stripe_signature(headers, body)

    # Parse payload
    try:
        payload = json.loads(body)
    except json.JSONDecodeError:
        raise HTTPException(status_code=400, detail="Invalid JSON")

    # Log the delivery
    event_type = headers.get("x-github-event", headers.get("stripe-event", "unknown"))
    delivery_id = headers.get(
        "x-github-delivery", headers.get("stripe-request-id", "none")
    )

    logger.info(
        "webhook_received",
        provider=provider,
        event_type=event_type,
        delivery_id=delivery_id,
        payload_preview=json.dumps(payload)[:200],
        timestamp=datetime.now(timezone.utc).isoformat(),
    )

    # Offload heavy processing to background
    background_tasks.add_task(process_webhook, provider, event_type, payload)

    return Response(status_code=200)


def verify_github_signature(headers: dict, body: bytes):
    signature = headers.get("x-hub-signature-256", "")
    if not GITHUB_SECRET:
        return
    expected = "sha256=" + hmac.new(
        GITHUB_SECRET.encode(), body, hashlib.sha256
    ).hexdigest()
    if not secrets.compare_digest(signature, expected):
        raise HTTPException(status_code=401, detail="Invalid signature")


def verify_stripe_signature(headers: dict, body: bytes):
    sig_header = headers.get("stripe-signature", "")
    if not STRIPE_SECRET or not sig_header:
        return
    try:
        import stripe
        stripe.Webhook.construct_event(body, sig_header, STRIPE_SECRET)
    except stripe.error.SignatureVerificationError:
        raise HTTPException(status_code=401, detail="Invalid Stripe signature")


async def process_webhook(provider: str, event_type: str, payload: dict):
    """Handle webhook processing in the background."""
    logger.info(
        "processing_webhook",
        provider=provider,
        event_type=event_type,
    )
    # Your actual business logic here:
    # - Update a database
    # - Trigger a CI/CD pipeline
    # - Send a notification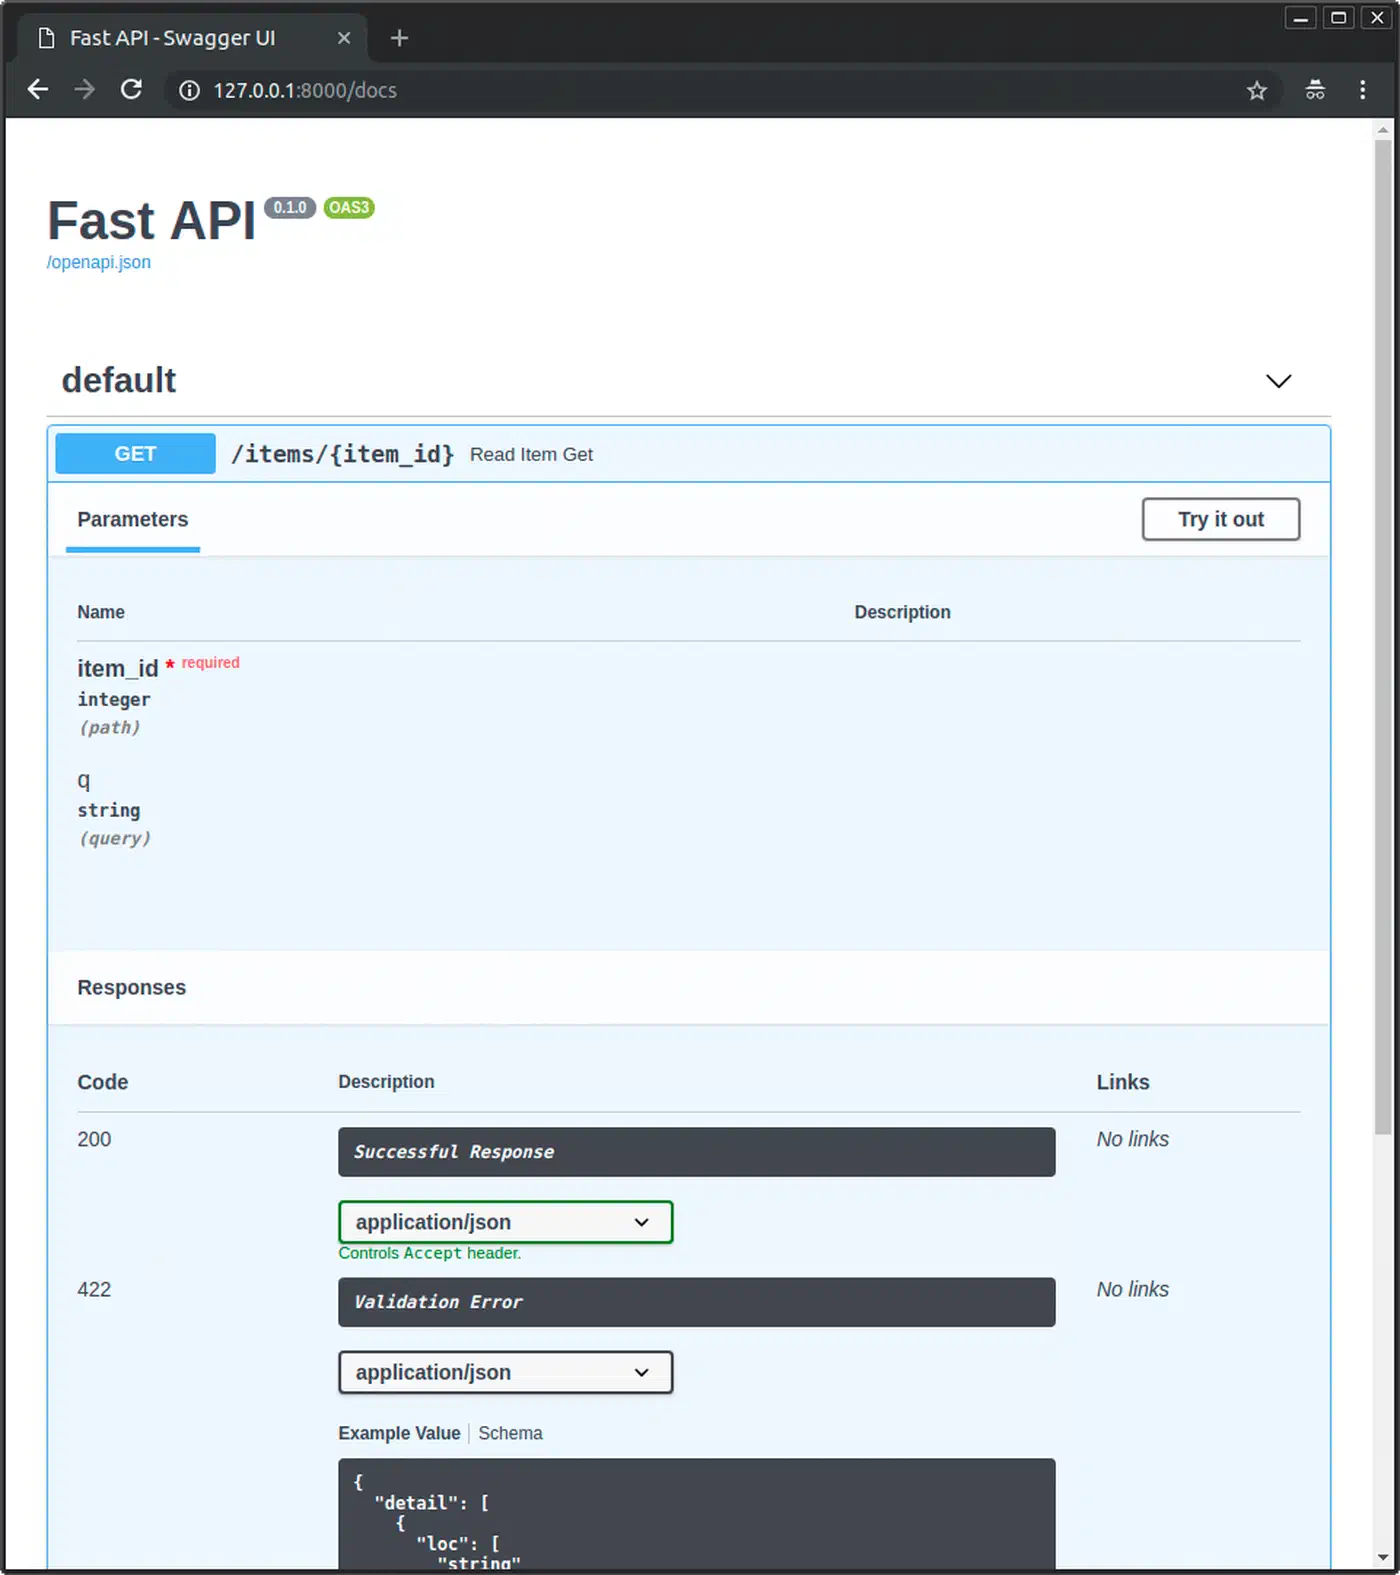
A few things to note in this code. The endpoint returns 200 right away and pushes the real work into BackgroundTasks. GitHub wants a reply within 10 seconds, Stripe within 20. If your handler blocks on database writes or API calls, the provider marks the delivery as failed and retries.
All HMAC checks use secrets.compare_digest() rather than ==. A plain string compare leaks timing data. The same constant-time discipline shows up when you verify OAuth tokens
in an auth flow. An attacker could use that to forge signatures byte by byte. The handler reads request.body() as raw bytes before it parses JSON. Signature checks need the exact bytes the provider sent. Parsing and re-serializing would shift whitespace and break the HMAC.
Last, structlog gives you JSON logs you can filter by provider, event type, or delivery ID. That beats grepping free-text log lines when something breaks at 2 AM. To browse those deliveries from a page instead of the terminal, you can index them and add an instant search box with Meilisearch and HTMX that needs almost no client-side code.
Run the Receiver
uvicorn main:app --reload --port 8000With the cloudflared tunnel running at the same time, webhooks sent to webhooks.yourdomain.com/webhook/github land at this endpoint.
Securing and Hardening the Relay
A public webhook endpoint is an attack surface. Signature checks are the first layer, but they are not the only one you need.
Content Validation and Size Limits
Add middleware to reject oversized payloads and odd content types:
from fastapi import Request
from starlette.middleware.base import BaseHTTPMiddleware

MAX_BODY_SIZE = 1_048_576  # 1 MB

class WebhookSecurityMiddleware(BaseHTTPMiddleware):
    async def dispatch(self, request: Request, call_next):
        if request.url.path.startswith("/webhook/"):
            content_type = request.headers.get("content-type", "")
            if "application/json" not in content_type:
                return Response(status_code=415, content="Unsupported media type")
            content_length = int(request.headers.get("content-length", 0))
            if content_length > MAX_BODY_SIZE:
                return Response(status_code=413, content="Payload too large")
        return await call_next(request)

app.add_middleware(WebhookSecurityMiddleware)
IP Allowlisting
Some providers publish their webhook source IP ranges. GitHub lists theirs at https://api.github.com/meta in the hooks array. You can fetch these on a schedule and check incoming request IPs against them in middleware. One note: behind Cloudflare Tunnels, the real client IP arrives in the CF-Connecting-IP header, not in the socket’s remote address.
Idempotency Handling
Webhook providers retry deliveries when they do not get a 2xx response. GitHub retries up to 3 times. Stripe retries with backoff for up to 3 days. Without idempotency handling, your app runs the same event many times.
Store the delivery ID from each request in a SQLite table or an in-memory cache with a TTL. That ID is X-GitHub-Delivery for GitHub and the timestamp part of Stripe-Signature for Stripe. Before you process an event, check if you have seen that delivery ID and skip duplicates.
Rate Limiting
Install slowapi to add per-IP rate limiting:
uv add slowapifrom slowapi import Limiter
from slowapi.util import get_remote_address
limiter = Limiter(key_func=get_remote_address)
app.state.limiter = limiter
@app.post("/webhook/{provider}")
@limiter.limit("60/minute")
async def receive_webhook(provider: str, request: Request, ...):
...A limit of 60 requests per minute per IP soaks up retry storms from providers without hurting normal traffic. The same slowapi pattern shows up in this FastAPI URL shortener , which pairs SQLite storage with per-IP throttling.
Cloudflare Access for Non-Webhook Routes
Use Cloudflare Access
policies to lock down admin or monitoring routes. You can require email login, mTLS client certificates, or SSO for any path that is not /webhook/*. The webhook endpoints stay open for provider traffic.
Running as a Persistent Development Service
Starting both cloudflared and uvicorn by hand every session gets old fast. You have a few ways to automate it.
Option 1: Process Manager with Honcho
Install honcho
(a Python Procfile runner) and create a Procfile:
tunnel: cloudflared tunnel run webhook-relay
api: uvicorn main:app --reload --port 8000
Then run both with:
honcho startBoth processes start together. Their output is mixed with color-coded labels, and stopping one stops both.
Option 2: systemd User Services
For steady background operation, create two systemd user services.
~/.config/systemd/user/webhook-relay-tunnel.service:
[Unit]
Description=Cloudflare Tunnel for Webhook Relay
After=network-online.target
Wants=network-online.target

[Service]
ExecStart=/usr/bin/cloudflared tunnel run webhook-relay
Restart=on-failure
RestartSec=5

[Install]
WantedBy=default.target~/.config/systemd/user/webhook-relay-api.service:
[Unit]
Description=FastAPI Webhook Receiver
After=webhook-relay-tunnel.service
Wants=webhook-relay-tunnel.service

[Service]
WorkingDirectory=/home/youruser/webhook-relay
ExecStart=/home/youruser/webhook-relay/.venv/bin/uvicorn main:app --port 8000
Restart=on-failure
RestartSec=5
EnvironmentFile=/home/youruser/webhook-relay/.env

[Install]
WantedBy=default.target
Enable and start both:
systemctl --user enable --now webhook-relay-tunnel webhook-relay-apiThe API service starts after the tunnel service via the After= directive. That makes sure the tunnel is up before the receiver starts taking requests.
Option 3: Docker Compose
For teams or repeatable setups, use Docker Compose with two containers:
services:
  tunnel:
    image: cloudflare/cloudflared:latest
    command: tunnel run webhook-relay
    volumes:
      - ~/.cloudflared:/etc/cloudflared:ro
    restart: unless-stopped

  api:
    build: .
    ports:
      - "8000:8000"
    environment:
      - GITHUB_WEBHOOK_SECRET=${GITHUB_WEBHOOK_SECRET}
      - STRIPE_WEBHOOK_SECRET=${STRIPE_WEBHOOK_SECRET}
    depends_on:
      - tunnel
    restart: unless-stopped
The tunnel container mounts your local ~/.cloudflared directory (which contains the credentials and config) as a read-only volume.
Verifying the Tunnel
Check the tunnel status with:
cloudflared tunnel info webhook-relayA healthy tunnel shows 4 connections across at least 2 Cloudflare edge locations. If you see fewer, check your network or run with --loglevel debug. For ongoing uptime checks, add a self-hosted status page with Gatus. It polls /health and alerts you the moment the tunnel or API process dies.
Testing the Relay End-to-End
With both services running, test with curl first:
curl -X POST https://webhooks.yourdomain.com/webhook/generic \
  -H "Content-Type: application/json" \
  -d '{"event": "test", "data": "hello"}'
For Stripe-specific testing, the Stripe CLI can forward events directly and trigger mock webhooks:
stripe listen --forward-to http://localhost:8000/webhook/stripe
# In another terminal:
stripe trigger payment_intent.succeeded
The Stripe CLI creates a webhook signing secret when it starts listening. Use that value as your STRIPE_WEBHOOK_SECRET during local development. For GitHub, go to your repository’s Settings > Webhooks. Set the Payload URL to https://webhooks.yourdomain.com/webhook/github, choose application/json as the content type, and enter your secret. GitHub sends a ping event at once to confirm the endpoint is reachable. The same setup works for self-hosted Gitea: point Gitea’s repository webhooks at the tunnel URL and check signatures with the same HMAC-SHA256 logic.
For production relay, webhook payloads often need to survive restarts and support replay. Add Redis or PostgreSQL as a durable event store instead of in-memory state or log files. If you deploy close to your providers, an edge-resident SQLite store keeps event reads fast. This setup also unlocks a dead-letter queue: failed webhook attempts get stored and can be retried later rather than lost.