Generating SVG Graphics with AI

For precise technical diagrams, prompt an LLM to output SVG or Mermaid.js syntax instead of pixel-based images. This creates lightweight, resolution-independent graphics that search engines can read. Vector formats offer performance and clarity that raster images simply can’t match.
Why SVG? The Case Against Raster Images for Technical Diagrams
Most bloggers use screenshots or PNG exports for diagrams. This habit seems easy but carries hidden costs. A PNG flowchart often weighs 100 KB to 400 KB. In contrast, the same SVG diagram usually stays between 5 KB and 20 KB. This huge difference improves Core Web Vitals metrics like Largest Contentful Paint. Better performance helps your search rankings.
Resolution independence is another big win. High-DPI displays are now the standard. A PNG that looks sharp on a 1080p monitor often looks blurry on a 4K screen. Since SVG uses math to describe shapes, it stays crisp at any size. It looks perfect on a laptop, an iPhone, or a tablet. Once you switch to SVG, you won’t want to go back to blurry images.
SVG also helps with SEO and accessibility. The text inside an SVG file is real code that search engines can read. Screen readers can scan labels and titles just like normal text. In contrast, a PNG is just an opaque blob. If your diagrams have important keywords, SVG makes that data useful for search rankings and for all readers.
Finally, SVG solves the dark mode problem. You don’t need to maintain separate light and dark versions of every image. Instead, SVG elements can adapt to dark mode with zero JavaScript through the currentColor keyword. A few CSS rules let your diagrams switch colors automatically. This method removes the need for JavaScript or duplicate files.
Choosing the Right Format: SVG vs. Mermaid.js vs. React/JSX
Vector graphics aren’t all the same. Picking the right format early saves time later. Your choice depends on three factors: is it a standard diagram type? Does it need to be interactive? Finally, how much raw SVG code can you handle in your workflow?
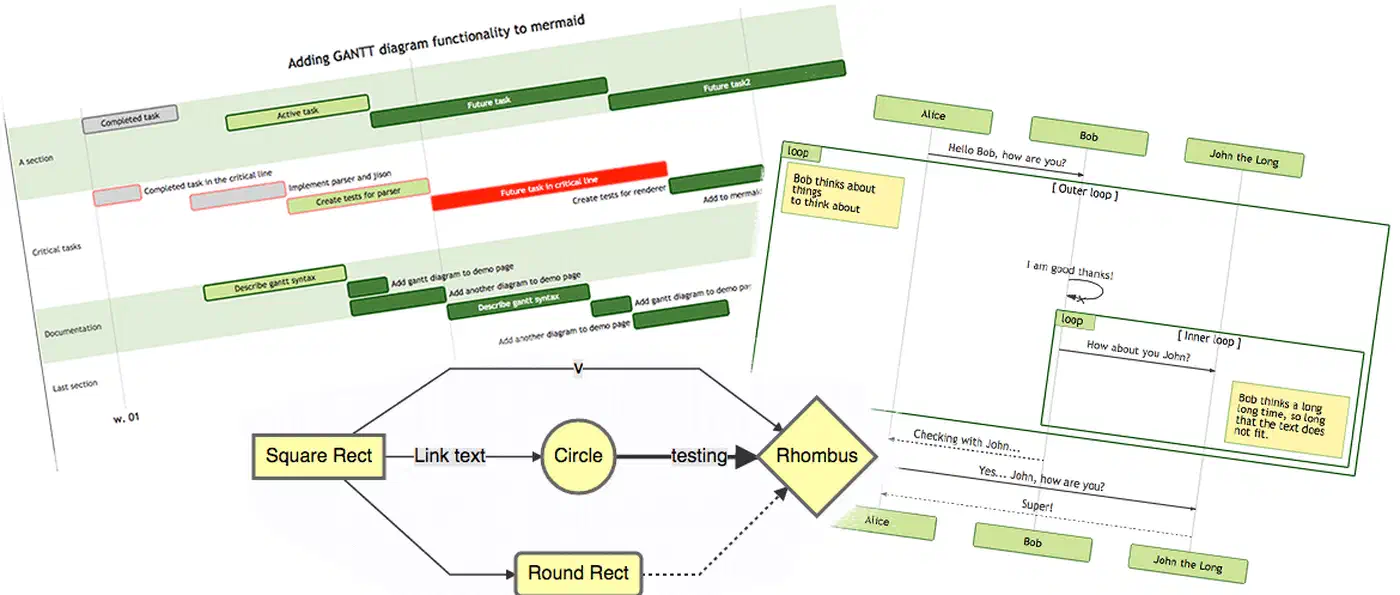
Mermaid.js is the quickest way to publish standard diagrams. It supports flowcharts, sequence diagrams, and Gantt charts with a simple syntax. LLMs generate valid Mermaid code reliably because the format is compact and clear. You can store the code as plain text next to your Markdown. This makes it easy to track changes in git. For Hugo , you can use a shortcode to handle the rendering. It’s a one-time setup that makes future work much faster.
Raw SVG works best for custom layouts that Mermaid can’t handle. Use it for physical system maps, annotated screenshots, or custom icons. LLMs generate raw SVG well when you use basic shapes like rectangles and circles. They struggle with complex paths and dense coordinate data. For simple custom designs, raw SVG is excellent. However, quality drops for very intricate illustrations.
React/JSX components are the best choice for interactive charts. Use tools like D3.js or Recharts if you need live data or user filters. This approach is powerful but requires more engineering work. For a Hugo blog, you might need a custom pipeline or extra JavaScript. Only use this method when interactivity is a real requirement.
Here’s the simple choice: if it’s a standard type like a flowchart, use Mermaid. If it’s a simple, custom shape, use raw SVG. For interactive or data-heavy charts, use React or D3. If these feel too hard, tools like Excalidraw or Figma are great manual options for complex work.

Prompting for Vector Semantics
Prompting an LLM for SVG or Mermaid code is different from writing prose. You must shift from describing appearance to describing structure. LLMs reason well about symbolic relationships. However, they lack an internal model of visual space. Vague aesthetic prompts usually produce poor results.
The “structure over appearance” rule works well in practice. For example, a prompt that lists specific nodes and edges works better than one asking for a “nice diagram.” The first prompt gives the model logical steps to follow. In contrast, the second prompt forces the model to invent visual styles. Consequently, the output often fails.
Specify the technical constraints before you ask for raw SVG code. Define the viewBox dimensions so the graphic scales correctly. Request <text> elements with standard system fonts to keep file sizes small. Most importantly, ask the LLM to use currentColor for strokes and fills. This simple step helps your diagrams work with dark mode automatically.
A template for this method looks like this:
Generate a raw SVG diagram with viewBox="0 0 800 400". Use only <rect>, <circle>, <line>,
<text>, and <g> elements. Don't use complex <path> data. Use currentColor for all stroke
and fill attributes. Use a standard sans-serif font for all text.
The diagram should show: [your structural description here].
For example, a prompt describing a sequential process from Request to Respond produces this:

The best Mermaid prompts supply the actual content instead of asking the AI to invent it. Compare a generic “OAuth flow” prompt with one that lists every specific redirect and validation step. The second prompt produces code that is both correct and accurate. Clear steps lead to better syntax and logic.
Multi-shot prompting also improves quality for complex diagrams. Before you make a request, show the LLM a working example of the code you want. Paste a clean SVG snippet or a short Mermaid diagram. Then, ask the model to use that same structure for your new request. The model will follow the pattern and avoid common errors.
LLMs often struggle with complex <path> coordinate data. This happens because path data is dense and position-dependent. Transformers are not geometry engines. Therefore, you should use basic shapes instead. Use <rect rx="8"> for rounded corners instead of a bezier path. Only use <path> when you truly need custom curves.
Iterative Refinement of Generated Graphics
AI-generated SVG code is rarely ready on the first try. You should use a “generate, review, and refine” loop. Most diagrams need one to three attempts to reach high quality. Each step should target one specific problem. Don’t try to rewrite the whole diagram at once.
One powerful technique is the “graphic-to-code” workflow. Take a photo of a whiteboard sketch or a screenshot of an old diagram. Upload it to a multimodal LLM and ask it to recreate the image as clean SVG code. This method works well for turning rough ideas into vector graphics. Consequently, it solves the blank-page problem. When the source is a flat raster image with no real structure to describe, a browser-based raster-to-SVG converter traces the pixels into vector paths directly, which can be a faster starting point than prompting from scratch.
Surgical precision is better than wholesale regeneration when you iterate. Instead of starting over, ask the AI to change one specific part. For example, tell it to make an arrow dashed or change a background color. Targeted prompts keep the correct parts of your diagram safe. Therefore, you save time and keep your git history clean.
Always validate your SVG code before you use it. Paste the code into an online tool like SVG Viewer. LLMs sometimes generate invalid tags or attributes that look correct but fail in a browser. Checking the code only takes a few seconds. In contrast, debugging a broken image on your live site takes much longer.
Store your SVG source as plain text files next to your blog posts. Save each diagram as its own .svg file and commit it to git. This method lets you track exactly what changed in each version. You can also roll back to older versions if needed. Portable files make your content easier to manage.
Optimization for Hugo and Web Performance
AI tools often produce SVG files with extra bloat. They include metadata, redundant IDs, and empty groups that you don’t need. Before you add an SVG to your blog, you should run it through SVGO. This tool removes the waste and keeps your files small.
SVGO is a command-line tool that optimizes SVG files. You can install it with npm and run it on any diagram. For most AI graphics, this reduces the file size by 30% to 60%. Consequently, your page loads faster. Smaller files mean better performance for all your readers.
Wiring SVGO into Hugo Pipes adds another layer of help. You can call SVGO from your Hugo shortcodes instead of running it manually. Hugo Pipes can load, minify, and inline your SVG files automatically. Therefore, every graphic stays small without extra effort.
Deciding between inline SVG and <img> tags is important. Inline SVG gives you full CSS control. You can use dark mode variables and CSS animations easily. However, it makes your HTML files larger. In contrast, <img> tags keep your HTML clean but don’t inherit CSS variables.
The choice is simple. Use inline SVG for diagrams that need dark mode or animations. Use <img> tags for static, self-contained graphics. This rule helps you balance performance and features correctly.

Accessibility is also a requirement. Every SVG should include a role="img" attribute and a <title> element. These tags help screen readers describe the image to non-sighted users. This step is necessary for WCAG compliance. Good descriptions make your blog useful for everyone.
Dark mode theming is the biggest advantage of SVG. You can define your theme colors as CSS variables in your stylesheet. Then, use those variables inside your SVG code. This method makes your diagrams part of your site’s theme.
:root {
  --diagram-stroke: #1a1a2e;
  --diagram-fill: #f8f9fa;
  --diagram-text: #1a1a2e;
  --diagram-accent: #4361ee;
}

[data-theme="dark"] {
  --diagram-stroke: #e2e8f0;
  --diagram-fill: #1e293b;
  --diagram-text: #e2e8f0;
  --diagram-accent: #7c9fff;
}
Tell the LLM to use these variable names directly. For example, use stroke="var(--diagram-stroke)". Your diagrams will now switch colors automatically when the user toggles dark mode. This removes the need for duplicate files or complex scripts.
Building a Repeatable SVG Workflow for Bloggers
One-off SVG generation is slow and tedious. Instead, use a four-step process to publish graphics in under ten minutes. First, describe the diagram structure in plain English. Second, use a template to generate the Mermaid or SVG code. Third, refine the output with targeted prompts. Finally, optimize the file with SVGO and commit it to git.

Maintaining a library of prompt templates is the best way to speed up your work. Save your best prompts for architecture diagrams, flowcharts, and tables in a local file. These templates should include your preferred dimensions and CSS variable names. Consequently, you won’t have to start from scratch every time. Here are four examples:
Architecture Diagram Template:
Generate an SVG architecture diagram with viewBox="0 0 900 500". Use only <rect rx="6">,
<text>, <line>, and <g> elements. Use currentColor for strokes and var(--diagram-fill) for
box backgrounds. Group related services using labeled <g> containers. The architecture is:
[describe your services and connections here].
Sequence Diagram Template (Mermaid):
Generate a Mermaid sequence diagram for this flow. Include all participant labels.
Use activation boxes to show processing time. Use dashed arrows for return messages.
The flow is: [enumerate each step: Actor -> Target: Action].
Flowchart Template (Mermaid):
Generate a Mermaid flowchart (direction: TD). Use rectangular nodes for actions and
diamond nodes for decisions. Label every edge clearly. The process is:
[describe each step and decision branch explicitly].
Comparison Table as SVG:
Generate an SVG comparison table with viewBox="0 0 800 400". Use a header row with
var(--diagram-accent) background. Alternate row colors using var(--diagram-fill).
Use <text> elements with explicit coordinates. The comparison covers: [list data here].
Save your SVG files in the post directory. You can reference them as standard images or use a shortcode for inline embedding. The shortcode is the better choice for themed sites. It reads the file, minifies the code, and outputs inline HTML. This method keeps your workspace clean and your site fast.
Knowing when to use manual tools is also important. Excalidraw is great for hand-drawn styles and informal sketches. Draw.io works better for complex network maps with many nodes. Figma is the best choice for polished UI mockups and marketing graphics. AI generation is fastest for structured diagrams that you can describe in a single paragraph.
Use a simple test to choose your tool. Can you describe every part of the diagram in a few sentences? If so, AI generation is likely faster. However, if the description feels like an essay, you should use a visual tool. The goal is to find the fastest path to a clear and accurate diagram.
The Long-Term Payoff
Building SVG generation into your workflow is a smart investment. Every diagram you create stays crisp and clear as display technology improves. You won’t need to revisit old posts to fix blurry images. Also, every diagram that uses CSS variables will follow your site’s theme automatically. Text-based files are easy to search and track in git.
This workflow is often faster than exporting PNG files for most technical diagrams. It uses smaller files and provides better accessibility. Furthermore, you get stronger SEO signals and easy dark mode support. These advantages help you build a better site and publish content more quickly.
Start by using Mermaid for your next flowchart or sequence diagram. Practice the “generate, review, and refine” loop. Build your first prompt template and save it for later use. Once you feel comfortable, try using raw SVG for custom shapes. Within a few posts, you will find it hard to go back to blurry raster images.