Custom Mechanical Keyboards: Layout, Switches, Stabilizers, Build

Building a custom mechanical keyboard means assembling five core components: a PCB, a case, a plate, switches, and keycaps. The result is a board that types, sounds, and feels exactly the way you want. Budget $100 to $400 depending on materials, set aside three to six hours for a first build, and you’ll end up with a board no mass-produced model can match. This guide walks every decision from PCB choice to firmware flashing and final assembly.
Choosing Your PCB, Layout, and Form Factor
The PCB is the foundation of your build. It determines which case fits, how many keys you get, and what firmware you can run. There are hundreds of options, so start with two decisions: layout size and hot-swap versus soldered.
Layout sizes follow a naming convention based on the percentage of keys compared to a full 104-key board:
| Layout | Keys | What You Lose | Example PCBs |
|---|---|---|---|
| 60% | ~61 | Function row, arrows, numpad | GH60, BM60 |
| 65% | ~68 | Function row, numpad | KBD67, BM65 |
| 75% | ~84 | Numpad | GMMK Pro PCB |
| TKL (80%) | ~87 | Numpad | Various |
| Full-size | 104 | Nothing | Various |
For a first build, 65% is the sweet spot. You keep arrow keys and a few navigation keys without paying for a massive case or needing a gigantic desk footprint.
The next decision is hot-swap versus soldered. Hot-swap PCBs use Kailh or Gateron sockets that let you push switches in and pull them out without a soldering iron. Great for beginners and anyone who wants to try different switches later. Soldered PCBs allow a wider range of switch options and tighter tolerances. However, they demand soldering skills and make switch changes tedious.
Popular PCBs worth considering in 2026 include the BM60 and BM65 (budget, hot-swap, QMK and Vial compatible), Keychron Q-series PCBs (mid-range, gasket-mount ready), and the Willow64 (premium, wireless with ZMK support).
Most custom PCBs run on either an ATmega32U4 or RP2040 microcontroller. RP2040 boards are more common now because the larger flash storage (2MB+) fits QMK’s full feature set without compromises. If you want wireless, ZMK firmware with an nRF52840-based controller like the nice!nano v2 is the standard path. QMK does not officially support Bluetooth.
One more note: ANSI layout is the de facto standard in the custom keyboard world. If you need ISO, verify your PCB supports it and budget extra for harder-to-find keycap kits.
Plates, Cases, and Mounting Styles
The case and plate affect your keyboard’s sound, typing flex, and overall feel as much as the switches. Getting this right prevents expensive mistakes.
Plate Materials
The plate sits between your switches and the PCB. Its material changes the typing feel and acoustics dramatically:
| Material | Flex | Sound Character | Price |
|---|---|---|---|
| Aluminum | Stiff | Bright, higher pitched | $$ |
| Polycarbonate (PC) | Flexible | Deep, thocky | $$ |
| FR4 | Moderate | Balanced, slightly muted | $ |
| Brass | Very stiff | Sharp, metallic | $$$ |
| POM | Soft | Muted, soft | $$ |
Aluminum is the most common plate material and a solid default for a first build. If you want a deeper sound with more flex, polycarbonate is the popular alternative. FR4 is a good budget option that sits between the two.
Mounting Styles
The mounting style describes how the plate and PCB assembly attach to the case. It has a bigger impact on typing feel than most people expect:
In a tray mount, the PCB screws directly into standoffs in the case bottom. Rigid, budget-friendly, and the most common in entry-level builds. The downside is uneven flex because the standoffs create stiff spots.
Top mount attaches the plate to the inside top of the case. You get slight flex, cleaner sound than tray mount, and a more uniform typing feel.
Gasket mount uses silicone or poron strips between the plate and case to cushion the typing surface. This gives the most flex and the most comfortable feel, and it is the premium standard in 2026.
Sandwich mount puts the plate between a top and bottom case piece with screws running through both. It falls between tray and gasket in feel.
For case materials, CNC aluminum is the premium choice: heavy, durable, and excellent acoustics. Injection-molded plastic is lighter and cheaper. Stacked acrylic gives you a transparent look that shows off RGB. 3D-printed cases (FDM or resin) let you go fully custom with shapes no manufacturer sells.
Sound Dampening Mods
Three modifications have become nearly standard in custom builds:
- Case foam: a sheet of PE foam or silicone between the PCB and the case bottom absorbs resonance and removes hollow sounds.
- Plate foam: foam between the plate and PCB reduces ping and tightens acoustics.
- Tape mod: two to three layers of masking tape on the back of the PCB create a “poppy” sound signature. Free, reversible, and effective.
A practical budget tip: spend more on the case and plate than on keycaps. A $30 keycap set on a well-built gasket-mount aluminum board sounds better than $150 keycaps on a tray-mount plastic case.
Switches, Stabilizers, and Lubing
Switches get the most attention, but stabilizers have more influence on how your keyboard actually sounds. Poorly prepped stabs will ruin an otherwise excellent build.
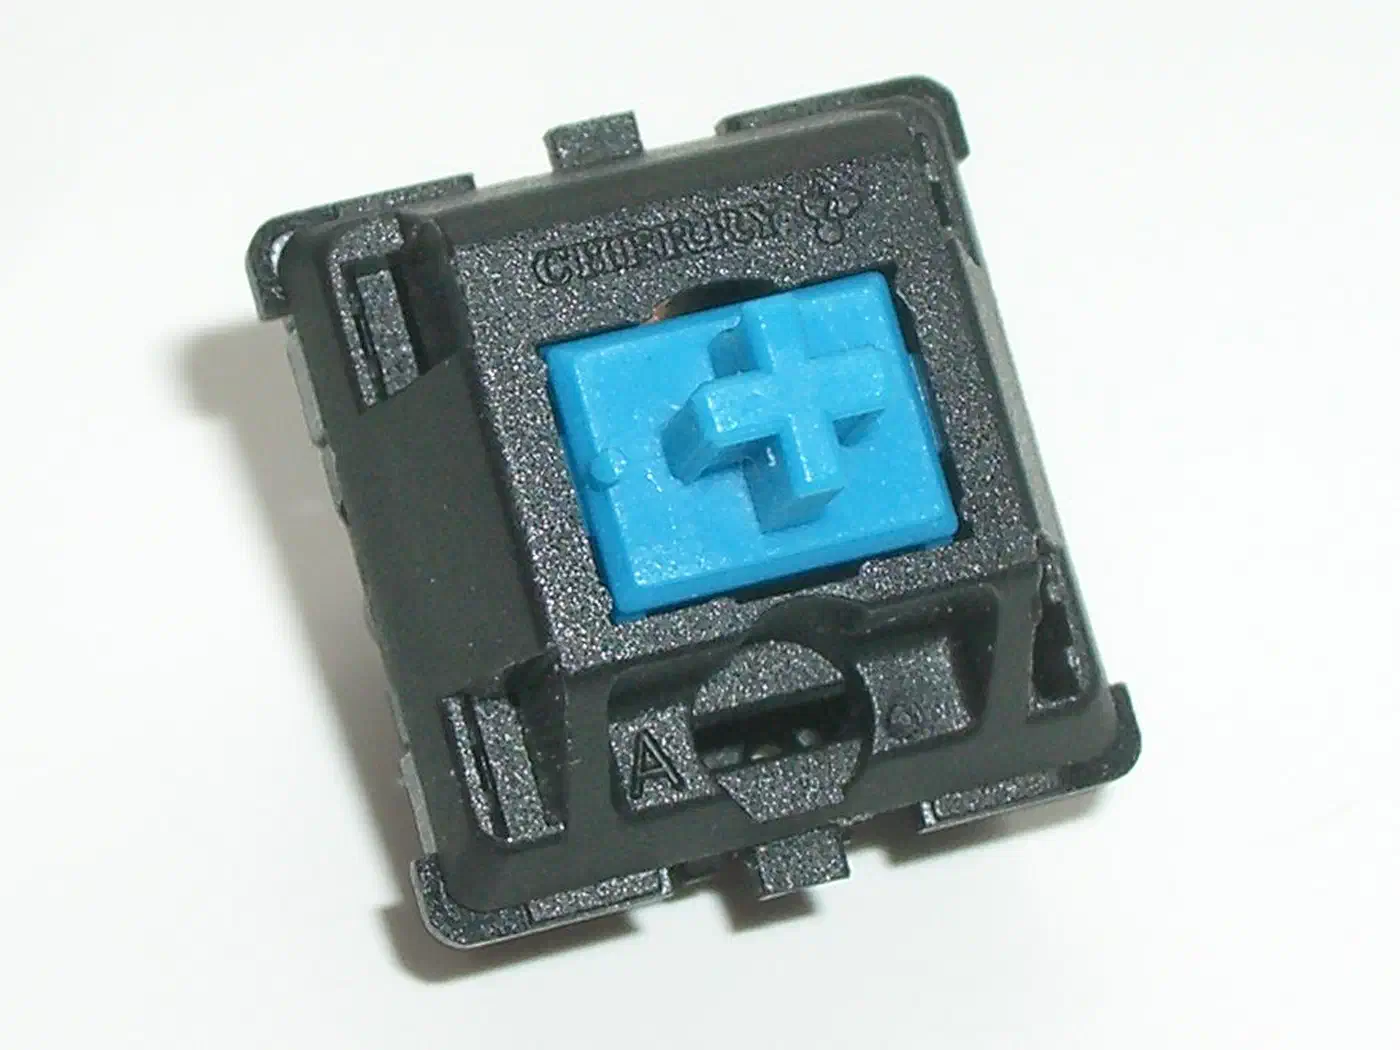
Switch Types
Mechanical switches fall into three categories:
- Linear: smooth press with no tactile bump. Popular for both typing and gaming. Examples: Gateron Yellow, Cherry MX Black, HMX Xinhai.
- Tactile: a noticeable bump at the actuation point gives physical feedback. Examples: Boba U4T (62g), Holy Panda.
- Clicky: a bump plus an audible click mechanism. Examples: Kailh Box Jade, Cherry MX Blue.
Linears dominate the custom keyboard community, but tactiles have a strong following among programmers who want physical feedback without the noise of clicky switches. For a detailed breakdown of lightweight options that balance feel and acoustics, see our guide on tactile switches under 45g .
Switch Specs That Matter
Three numbers define a switch’s character: actuation force in grams (45g is light, 67g is heavy), total travel distance (typically 3.5-4mm), and housing material. Nylon produces a deeper thock, while polycarbonate gives a higher-pitched clack.
Budget Switches Worth Trying
You do not need to spend a dollar per switch to get a good typing experience. These budget options perform near premium levels when lubed:
| Switch | Type | Actuation Force | Price per Switch |
|---|---|---|---|
| Gateron G Pro 3.0 Yellow | Linear | 50g | ~$0.25 |
| Akko V3 Cream Yellow | Linear | 50g | ~$0.20 |
| HMX Xinhai | Linear | 53g | ~$0.30 |
| Outemu Silent Peach | Silent Linear | 45g | ~$0.15 |
| Boba U4T | Tactile | 62g | ~$0.55 |
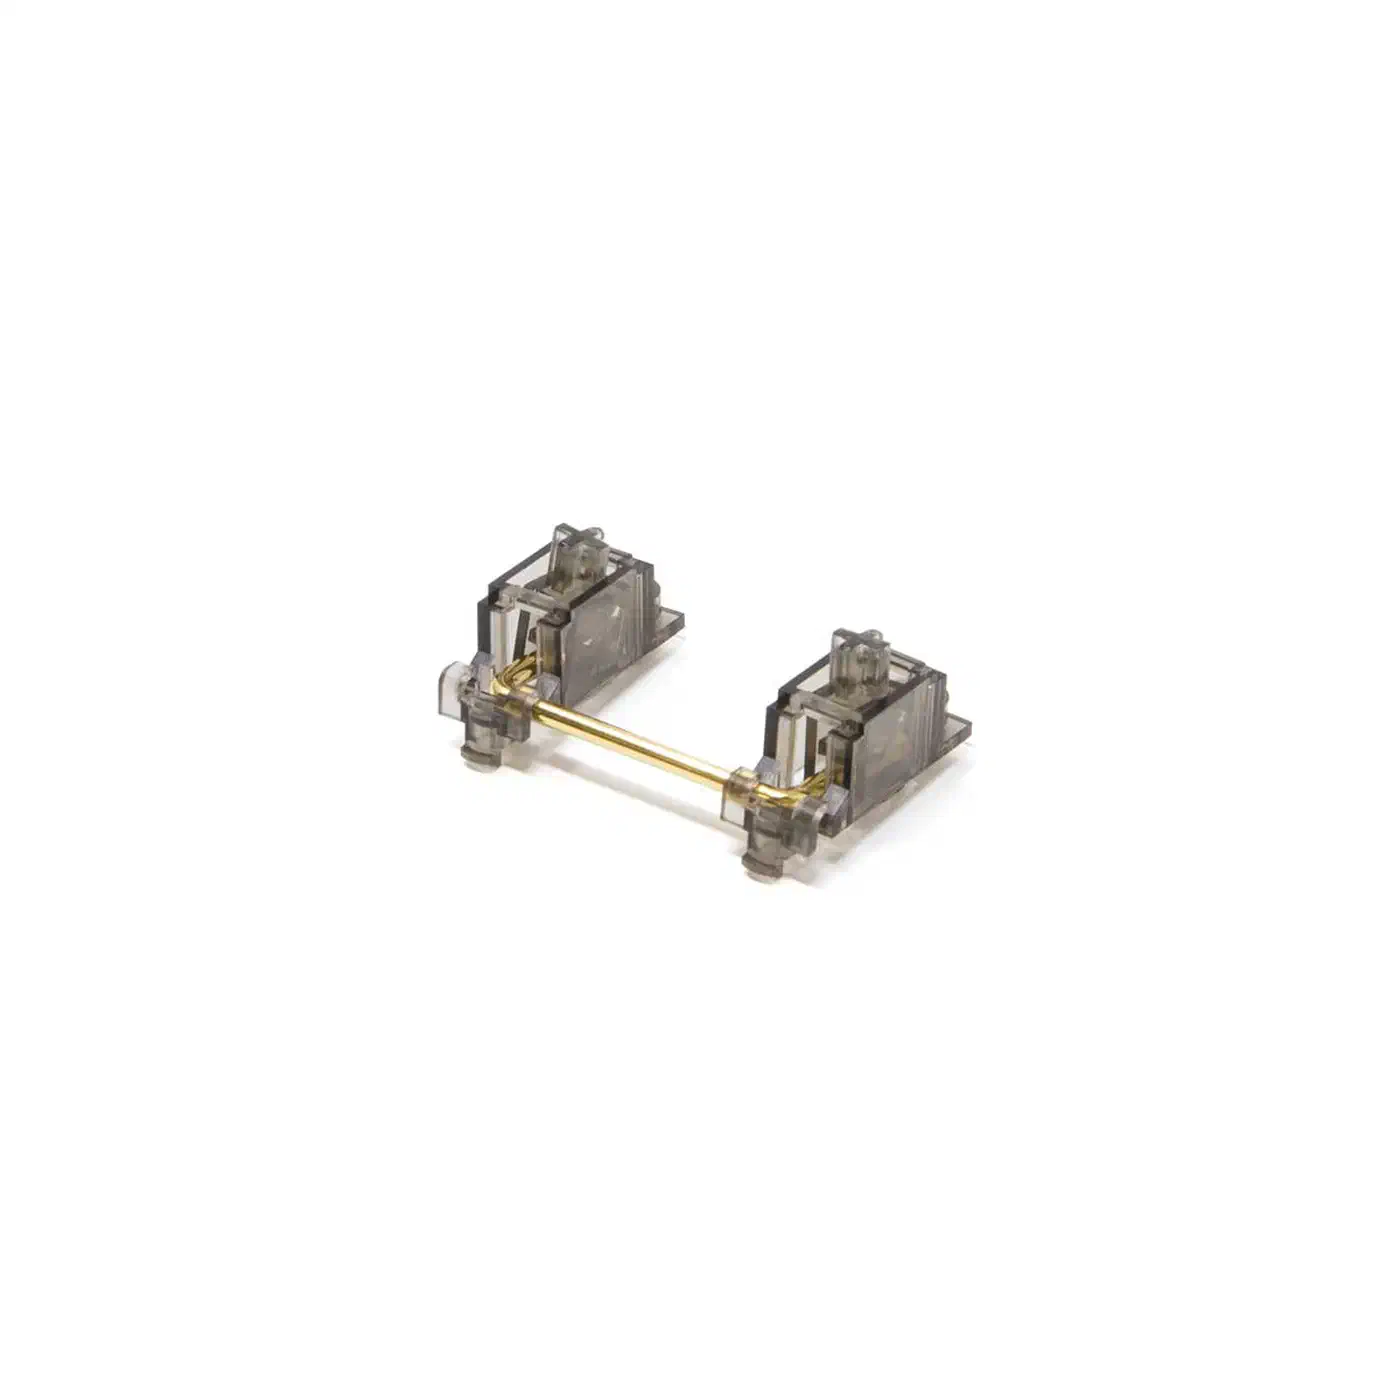
Stabilizer Preparation
Stabilizers support the larger keys: spacebar, enter, shift, and backspace. Bad stabilizers rattle, tick, and make the whole board sound cheap. Don’t skip this step.
Use screw-in stabilizers (Durock V2 or TX Stabilizers). Lube the wire with dielectric grease (Permatex or Krytox 205g0) and lube the housing stems with Krytox 205g0. The improvement from properly lubed stabilizers is dramatic. You’ll notice it on every spacebar press.
Switch Lubing
Lubing switches reduces scratchiness, dampens spring ping, and produces a smoother, deeper sound. The process is straightforward but tedious:
- Open switches with a switch opener tool (about $8).
- Apply Krytox 205g0 (for linears) or Tribosys 3203 (thinner, for tactiles, to preserve the bump) to the stem rails, spring, and lower housing contact points using a thin brush (size 0).
- Reassemble and test.
If your switches have housing wobble (the top and bottom housing pieces shift when pressed), add switch films (TX films or Deskeys films). These thin gaskets tighten tolerances and deepen the sound.
A warning on lube: less is more. Over-lubing makes linears feel sluggish and mutes tactile bumps. Apply a thin, even coat. Resist the urge to glob it on.
Keycap Profiles
Keycaps come in different sculpted profiles that affect typing comfort, sound, and aesthetics. Here is a quick comparison of the most popular profiles:
| Profile | Height | Sculpted | Best For | Notes |
|---|---|---|---|---|
| Cherry | 9.4mm | Yes | All-around use | Most popular, great balance of speed and comfort |
| SA | 16.5mm | Yes | Aesthetics, deep sound | Tall, retro look, can cause fatigue |
| MT3 | 16.5mm | Yes | Programmers, typists | Deep scoop, excellent finger placement |
| DSA | 7.6mm | No (uniform) | Ortholinear, portability | Low profile, same shape every row |
| KAT | ~11mm | Yes | Balanced typing | Shorter SA, sculpted without the height |
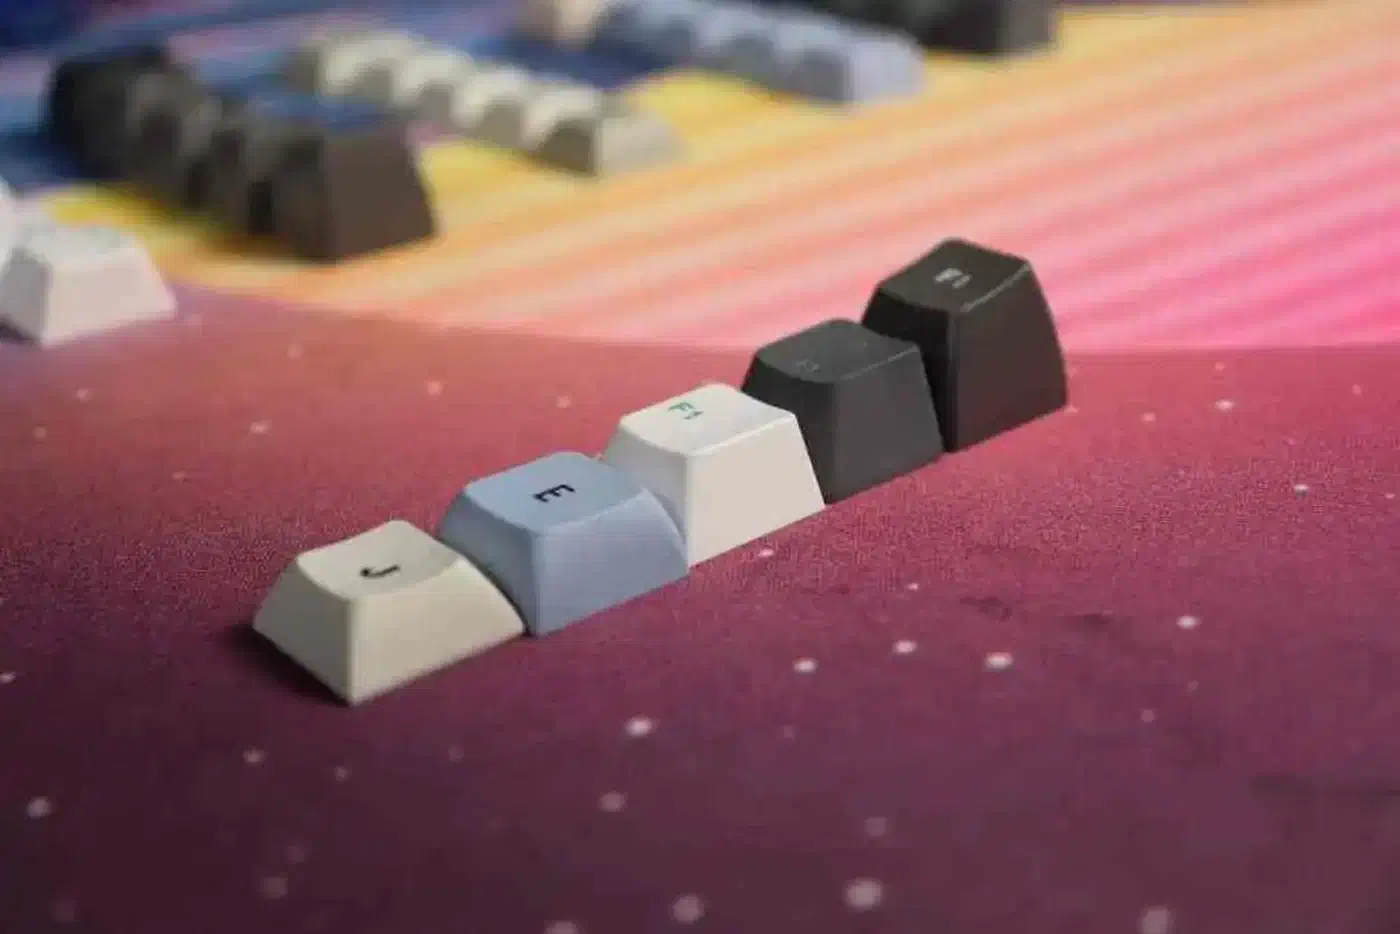
For programming, Cherry and MT3 are the strongest choices. Cherry is the safe default that works well for everyone. MT3’s deep scooped shape helps your fingers find home position, which programmers who spend all day typing tend to appreciate.
Flashing Firmware with QMK and Vial
Firmware turns your PCB into an actual keyboard. It handles key scanning, debouncing, and all the programmability that makes custom boards worth building.
QMK Firmware is the open-source standard. It uses a rolling release model and supports hundreds of keyboards. The workflow looks like this:
# Install QMK CLI
pip install qmk

# Set up your environment
qmk setup

# Compile firmware for your board
qmk compile -kb <board> -km <keymap>

# Flash firmware
qmk flash -kb <board> -km <keymap>
To flash, put the keyboard into bootloader mode by double-tapping the reset button on the PCB. QMK then uploads the .hex or .uf2 firmware file. On Linux, you’ll need udev rules to flash without root. The qmk setup command handles this by creating rules in /etc/udev/rules.d/.
Vial is a QMK fork that adds a real-time GUI configurator. Connect your keyboard, open the Vial desktop or web app, and drag-and-drop remap keys without recompiling firmware. Vial embeds the layout definition in the firmware itself, so it works with any Vial-enabled board without waiting for manufacturer support.
The difference between VIA and Vial is important. VIA requires the keyboard maker to submit a JSON layout definition to a central repository. Vial is self-contained. For boards without official VIA support, Vial is often the easier path.
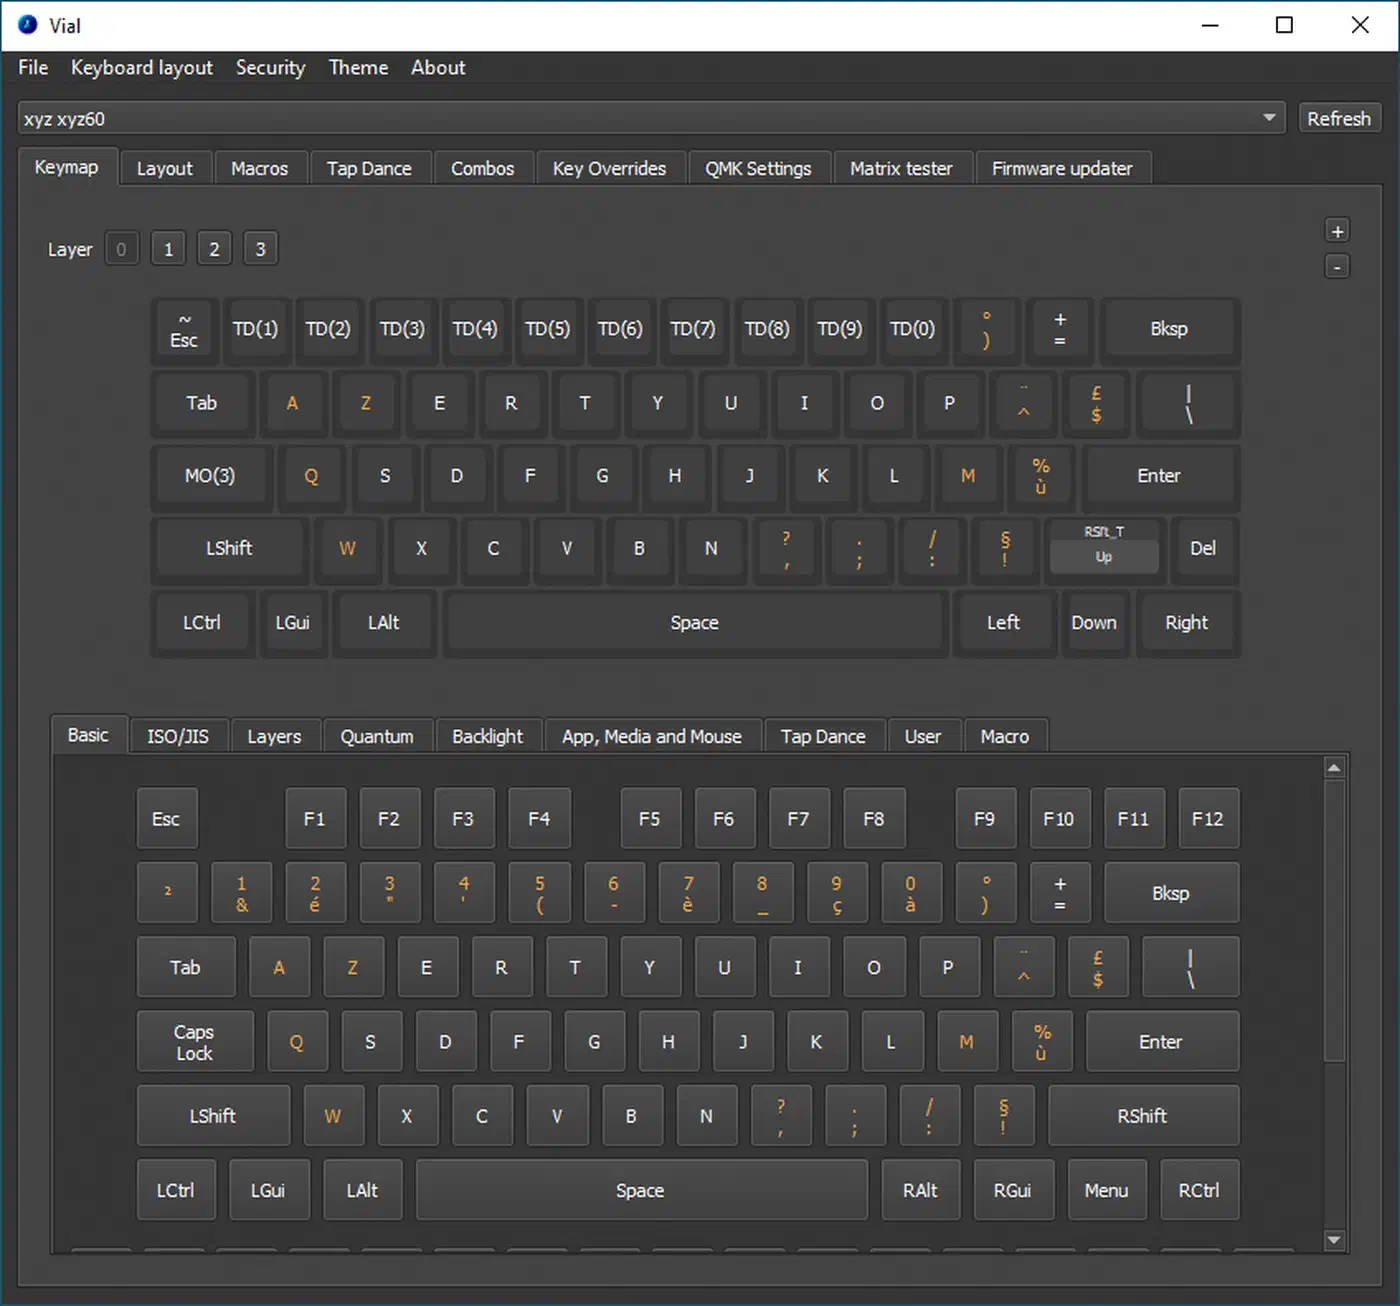
Essential QMK Features for Programmers
Where QMK really pays off is in its programmability features:
- Layers let you hold a key (like Caps Lock) to activate a whole new keymap. Put HJKL arrows on a layer and you never leave the home row.
- Tap-dance gives a key two functions: tap Escape to get Escape, hold it to get Control.
- Combos map simultaneous key presses to a different action. Press J+K together for Escape.
- Macros record complex key sequences to a single key press.
A 60% keyboard with well-configured layers can be more efficient than a full-size board because your fingers never leave the home row. This is what makes the custom firmware worth learning.
Assembly Walkthrough
With all components in hand, follow this order. Skipping steps or rearranging them leads to frustration.
Before You Start
Flash firmware to the bare PCB first. Plug it in, flash QMK or Vial, then use a metal tweezer to short each switch pad. Verify every key registers on a keyboard tester site. This catches dead pads before you invest time in the full build.
Step-by-Step Assembly
- Lube and install stabilizers on the PCB. Test each stabilizer by pressing it with your finger. Listen for rattle and check for smooth travel before proceeding.
- Place the plate on the PCB, aligning the switch cutouts with the solder pads or hot-swap sockets.
- Insert corner switches first. Press four switches into the plate corners to lock the plate and PCB alignment.
- Insert the remaining switches. Check that both pins are straight on every switch before pressing it in. Hot-swap sockets are fragile, and bent pins can destroy them.
- Test every switch with a keyboard tester website before putting on keycaps. Fix any non-registering keys now.
- Mount the PCB and plate assembly into the case. If you’re using dampening foam, layer it in now (case foam first, then the assembly).
- Install keycaps and do a final typing test.
Mistakes That Frustrate First-Time Builders
Forgetting to flash firmware before assembly is the most costly mistake. If your PCB turns out to be dead, you’ll have wasted hours building around it. Always flash and test the bare board first.
Inserting switches with bent pins is the most common hardware mistake. Hot-swap sockets can only handle so many forced insertions before a pad lifts off the PCB. Inspect every switch before pressing it in. If a socket pad does come loose, our keyboard PCB repair guide covers how to diagnose and resolder common PCB failures at home.
Using too much lube is tempting but counterproductive. Over-lubing makes linears feel like you’re typing through mud and mutes the bump on tactiles. Use a size 0 brush and apply a thin coat. You can always add more later, but removing excess is a pain.
Skipping stabilizer prep will haunt you every time you hit the spacebar. Unlubed stabilizers rattle and tick on every press. Spend 20 minutes to lube them properly. It makes a bigger difference to overall sound than the switches do.
Sound Tuning After Assembly
If the spacebar sounds hollow, stuff a small piece of foam inside the keycap cavity. If the board sounds pingy or metallic, add more case foam or try the PE foam mod between the PCB and plate. Sound tuning is iterative: make one change at a time and test. For an even quieter result from the start, our guide to silent mechanical keyboard switches covers modern options that eliminate both bottom-out and top-out noise.
Where to Buy Parts
Sourcing parts can be confusing when you’re starting out. These are the established vendors the custom keyboard community relies on:
| Vendor | Region | Specialty |
|---|---|---|
| KBDfans | Global (ships from China) | Full kits, PCBs, cases, plates, switches |
| CannonKeys | US | In-house designs, premium kits, switches |
| Divinikey | US | Switches, stabilizers, lube supplies |
| Keygem | EU (Germany) | European-friendly shipping, switches, keycaps |
| Keychron | Global | Budget-to-mid-range complete kits |
| Alexotos Vendor List | Global | Community-maintained vendor directory |
For a first build, KBDfans and CannonKeys both sell complete DIY kits that include a matched case, plate, PCB, and stabilizers. Buying a kit eliminates compatibility guesswork and usually saves money compared to sourcing each part separately.
Estimated Build Time
Expect a first build to take three to six hours including stabilizer and switch lubing. Here is a rough breakdown:
| Step | Time |
|---|---|
| Stabilizer lubing and installation | 30-45 min |
| Switch lubing (70 switches) | 1.5-2.5 hours |
| Firmware flash and bare PCB test | 15-30 min |
| Physical assembly | 30-45 min |
| Keycap installation and final test | 15-20 min |
| Sound tuning and adjustments | 15-30 min |
Switch lubing is by far the longest step. Some builders skip it on a first build to get typing sooner and lube switches over the following weeks as a side project. With hot-swap sockets, you can pull switches out one at a time, lube them, and put them back without disassembling anything.
The end result is a keyboard built to your exact preferences: your chosen sound profile, your preferred actuation force, your layout. Most people who finish a first build start planning a second one before the keycaps are even on.