Setup Local Voice Control with Willow for Home Assistant

Willow provides sub-second local voice control for Home Assistant without sending your audio data to the cloud. By using an ESP32-S3 Box, you can build a private smart speaker that matches the responsiveness of commercial assistants while keeping every spoken word inside your own network. This guide walks through the full setup: hardware selection, server deployment, firmware flashing, pipeline configuration, and the fixes for the most common problems.
Why Local Voice Control Matters in 2026
Every time you say “Hey Alexa” or “OK Google,” an audio clip travels from your home to a data center, gets transcribed by a third-party model, passes through an intent classifier, triggers an action, and returns a response - usually in under two seconds. That pipeline is genuinely impressive engineering. It is also a continuous stream of your household’s spoken data flowing to Amazon and Google servers, where it is logged, reviewed by quality-assurance contractors, and used to improve future models.
Cloud voice assistants have three structural problems for privacy-conscious homeowners. First, every command is recorded and associated with your account. Second, the system stops working during internet outages, which tend to happen at exactly the moments when home automation is most useful. Third, the underlying models and capabilities are controlled entirely by vendors who can change pricing, features, or data policies at any time.
Local voice control eliminates all three problems. When wake word detection runs on the device itself, no audio leaves your home until you speak the trigger phrase, and even then the audio goes only to your own server. When the speech-to-text model runs on your home server, transcription happens in milliseconds without any external dependency. Home Assistant’s “Year of the Voice” initiative, which ran through 2023 and 2024, built a first-class local intent engine - the “Assist” pipeline - specifically to support this architecture. Willow is the firmware layer that connects affordable ESP32-S3 hardware to that pipeline.
Latency figures for a warmed-up local stack on reasonable server hardware (a four-core mini-PC or a Raspberry Pi 5) are typically 300–700 ms from end of speech to device response, which is perceptually equivalent to a commercial assistant. On a home server with a dedicated GPU or a modern x86 CPU running the tiny.en Whisper model, response times can drop below 300 ms consistently.
Hardware Requirements
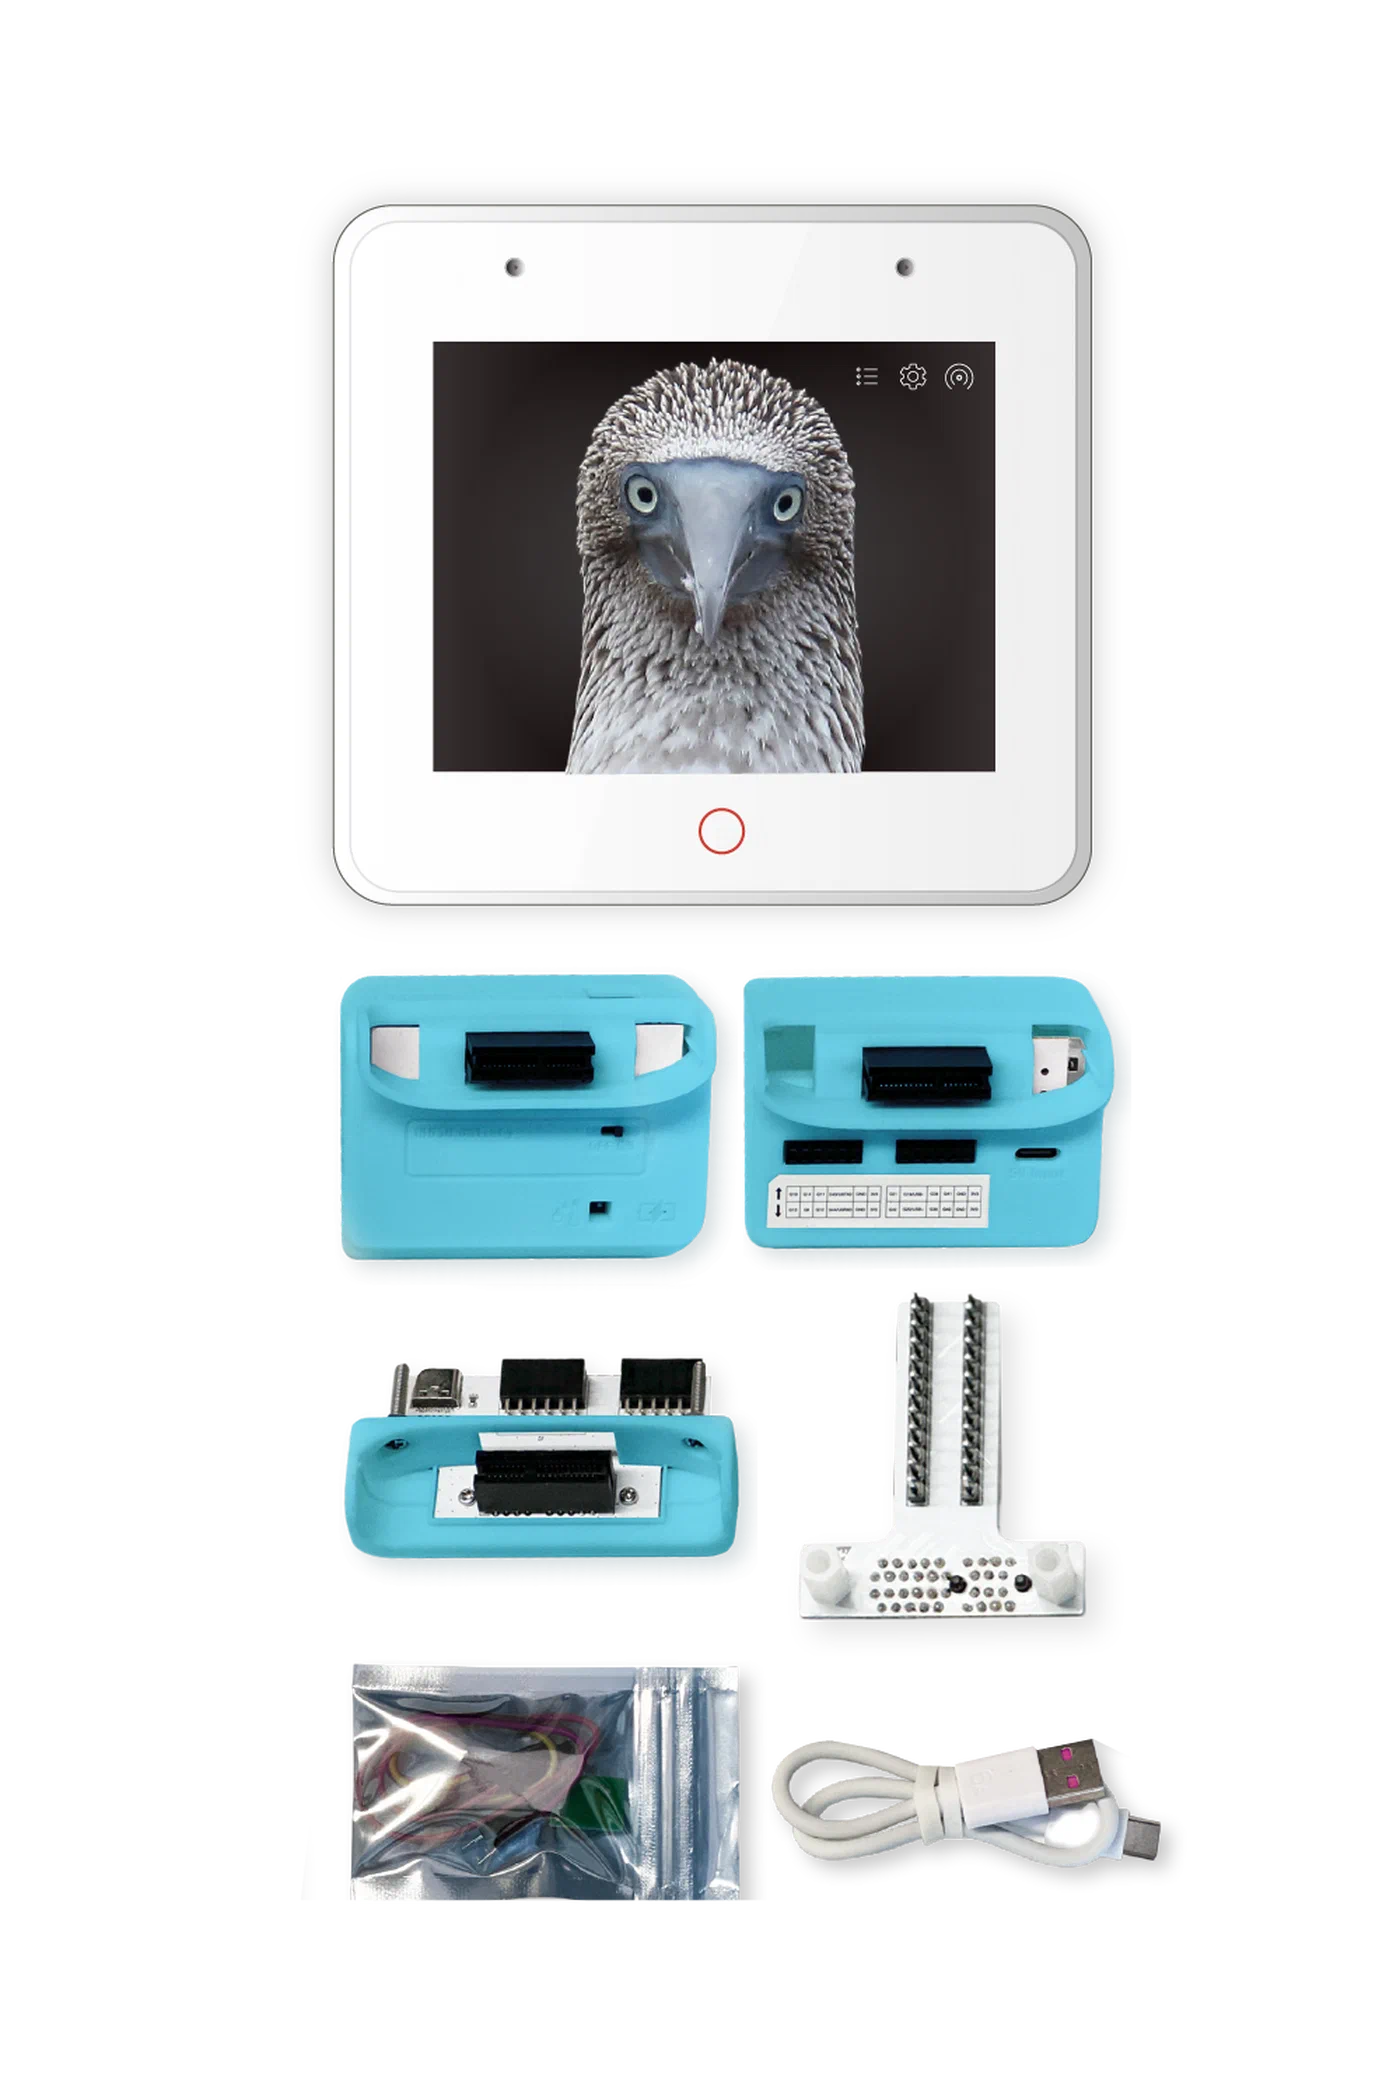
The primary platform for Willow is the M5Stack ESP32-S3 Box-3, which retails for approximately $50. It includes dual MEMS microphones with a dedicated DSP chip for wake word processing, a 2-inch IPS touchscreen, a built-in speaker, and a USB-C port for both power and firmware flashing. The dual-mic array with hardware DSP is not a cosmetic feature - it is what makes always-on wake word detection power-efficient and accurate, because the DSP handles the signal processing at milliwatt-level power draw instead of waking the main CPU for every audio frame.
Two alternative variants are available at lower price points. The ESP32-S3 Box (original, $40) shares the same core hardware but uses an older enclosure design. The ESP32-S3 Box-Lite ($30) omits the display entirely, making it suitable for installations where visual feedback is not needed, such as inside a cabinet or mounted near a light switch.
On the server side, you need to run the Willow Application Server (WAS) - a Docker container that manages device configuration, firmware updates, and the bridge between the ESP32 devices and Home Assistant. Minimum requirements are 2 GB of RAM and a 64-bit CPU (x86_64 or ARM64). A Raspberry Pi 4 with 4 GB RAM, a Synology NAS running DSM 7, or any Linux mini-PC works well. If you want to run local speech-to-text on the same machine rather than using a cloud fallback, budget at least 4 GB of RAM for the Whisper inference container.
The Willow Inference Server (WIS) is the optional local STT backend that runs OpenAI Whisper models on your server. WIS is where audio from the ESP32 is transcribed to text before being forwarded to Home Assistant’s Assist pipeline. Running WIS locally is strongly recommended - it eliminates the cloud fallback, reduces latency by keeping traffic on the LAN, and means your audio never leaves your home regardless of what happens with external services.
One network requirement that catches many users: all devices - the ESP32-S3 Box units, the WAS/WIS server, and the Home Assistant instance - must be on the same Layer 2 broadcast domain or at least have mDNS/multicast routing enabled between them. If your ESP32 devices are on a guest VLAN that is firewalled from your server VLAN, Willow will not work without explicit routing rules for UDP multicast and the WAS API port.
Installing the Willow Application Server
Before starting, ensure you have Docker and Docker Compose installed on your server, and that Home Assistant is running with the REST API accessible. You will need a Home Assistant long-lived access token, which you can generate at http://your-ha-instance:8123/profile under “Long-Lived Access Tokens.”
Create a directory for WAS and add the following docker-compose.yml:
version: "3.8"
services:
  willow-application-server:
    image: ghcr.io/toverainc/willow-application-server:latest
    container_name: willow-was
    restart: unless-stopped
    ports:
      - "8080:8080"
    volumes:
      - ./was-config:/app/config
    environment:
      - WAS_PORT=8080
Start the container with docker compose up -d. The WAS web UI will be available at http://your-server-ip:8080. On first run, the UI walks you through the required configuration fields:
- Home Assistant URL: The full URL of your HA instance, e.g.,
http://192.168.1.10:8123 - Long-Lived Token: The token generated in your HA profile
- Default Language: Select from supported languages (English, German, French, Spanish, and more)
- Wake Word: Choose between “Alexa” (licensed from Espressif, highest accuracy), “Hi ESP” (fully open), or a custom model
If you are also running WIS for local STT, add a second service to the same docker-compose.yml:
  willow-inference-server:
    image: ghcr.io/toverainc/willow-inference-server:latest
    container_name: willow-wis
    restart: unless-stopped
    ports:
      - "9000:9000"
    volumes:
      - ./wis-models:/app/models
    environment:
      - WIS_PORT=9000
In the WAS UI, set the STT backend to “Local (WIS)” and enter http://your-server-ip:9000 as the WIS endpoint. On first start, WIS will download the selected Whisper model (several hundred MB for tiny.en, around 1.5 GB for small). Verify WAS is reachable from the ESP32’s network segment by opening http://your-server-ip:8080/api/v1/config in a browser from a device on the same subnet - it should return a JSON configuration object.
Flashing the ESP32-S3 Box with Willow Firmware
Willow provides a browser-based web installer that handles firmware flashing without requiring command-line tools, drivers, or a development toolchain. Navigate to heywillow.io and click “Flash Device.” The installer uses the WebSerial API, which is currently supported only in Chromium-based browsers (Chrome and Edge). Connect your ESP32-S3 Box via USB-C and select it from the serial port picker in the browser dialog.
The flashing process takes two to four minutes. During flashing, the device will reboot several times - this is normal. Do not disconnect the USB cable until the installer reports success.
After flashing completes, unplug the USB cable and power the device from a USB power adapter. On first boot, the ESP32-S3 Box broadcasts a Wi-Fi access point named willow-XXXXXX. Connect your laptop or phone to this hotspot. A captive portal will open automatically (or navigate to 192.168.4.1 manually). In the captive portal, enter:
- Your home Wi-Fi SSID and password
- The URL of your WAS instance:
http://192.168.1.x:8080 - Your preferred wake word (this can be changed later from WAS)
After saving, the device connects to your home Wi-Fi and registers with WAS. Within 30 seconds, it should appear in the WAS dashboard as “online” with its IP address and firmware version displayed. The device’s screen will show a ready state animation.
Configuration options you can adjust in the WAS UI after pairing include wake word selection, microphone gain, speaker volume, display brightness, and the language for both STT and TTS responses.
Wake Word and Speech-to-Text Pipeline
Understanding the full audio pipeline helps you tune performance and diagnose problems. The pipeline has three distinct stages, each running in a different location.
Stage 1: Wake word detection on-device. The ESP32-S3 Box’s DSP chip runs wake word detection continuously at extremely low power - typically 50–80 mW in always-listening mode. The DSP analyzes audio in real time using a pre-trained neural network model stored in the device’s flash memory. No audio is transmitted anywhere during this phase. When the model’s confidence score exceeds the configured threshold, the DSP signals the main CPU and audio capture begins. This architecture is why smart speakers do not drain their batteries running full inference 24 hours a day.
Stage 2: STT transcription on the server. After wake word detection, the device captures 2–4 seconds of audio and transmits it over a WebSocket connection to WAS, which forwards it to WIS. WIS runs Whisper inference on the audio buffer and returns a text transcription. The choice of Whisper model has a significant impact on both latency and accuracy:
| Model | Language | Size | Latency (4-core CPU) | Best for |
|---|---|---|---|---|
tiny.en | English only | 75 MB | ~120 ms | Speed-critical, English-only homes |
base | Multilingual | 145 MB | ~200 ms | Multilingual households |
small | Multilingual | 483 MB | ~400 ms | Best accuracy, adequate hardware |
medium | Multilingual | 1.5 GB | ~900 ms | Not recommended for interactive use |
For most English-speaking households, tiny.en gives the best user experience - it is fast enough that the total round-trip from end-of-speech to device response is under 500 ms on a modest server.
Stage 3: Intent recognition in Home Assistant. The transcribed text is sent to HA’s conversation API endpoint (/api/conversation/process) as a POST request with the text payload. HA’s built-in Assist pipeline parses the text against a set of registered intents. Supported built-in commands include device control (“turn off the kitchen lights,” “lock the front door”), sensor queries (“what is the temperature in the bedroom,” “is the garage door open”), and scene activation. The response text is sent back through WAS to the device, where it is spoken using the configured TTS engine.
Custom Wake Words and Voice Profiles
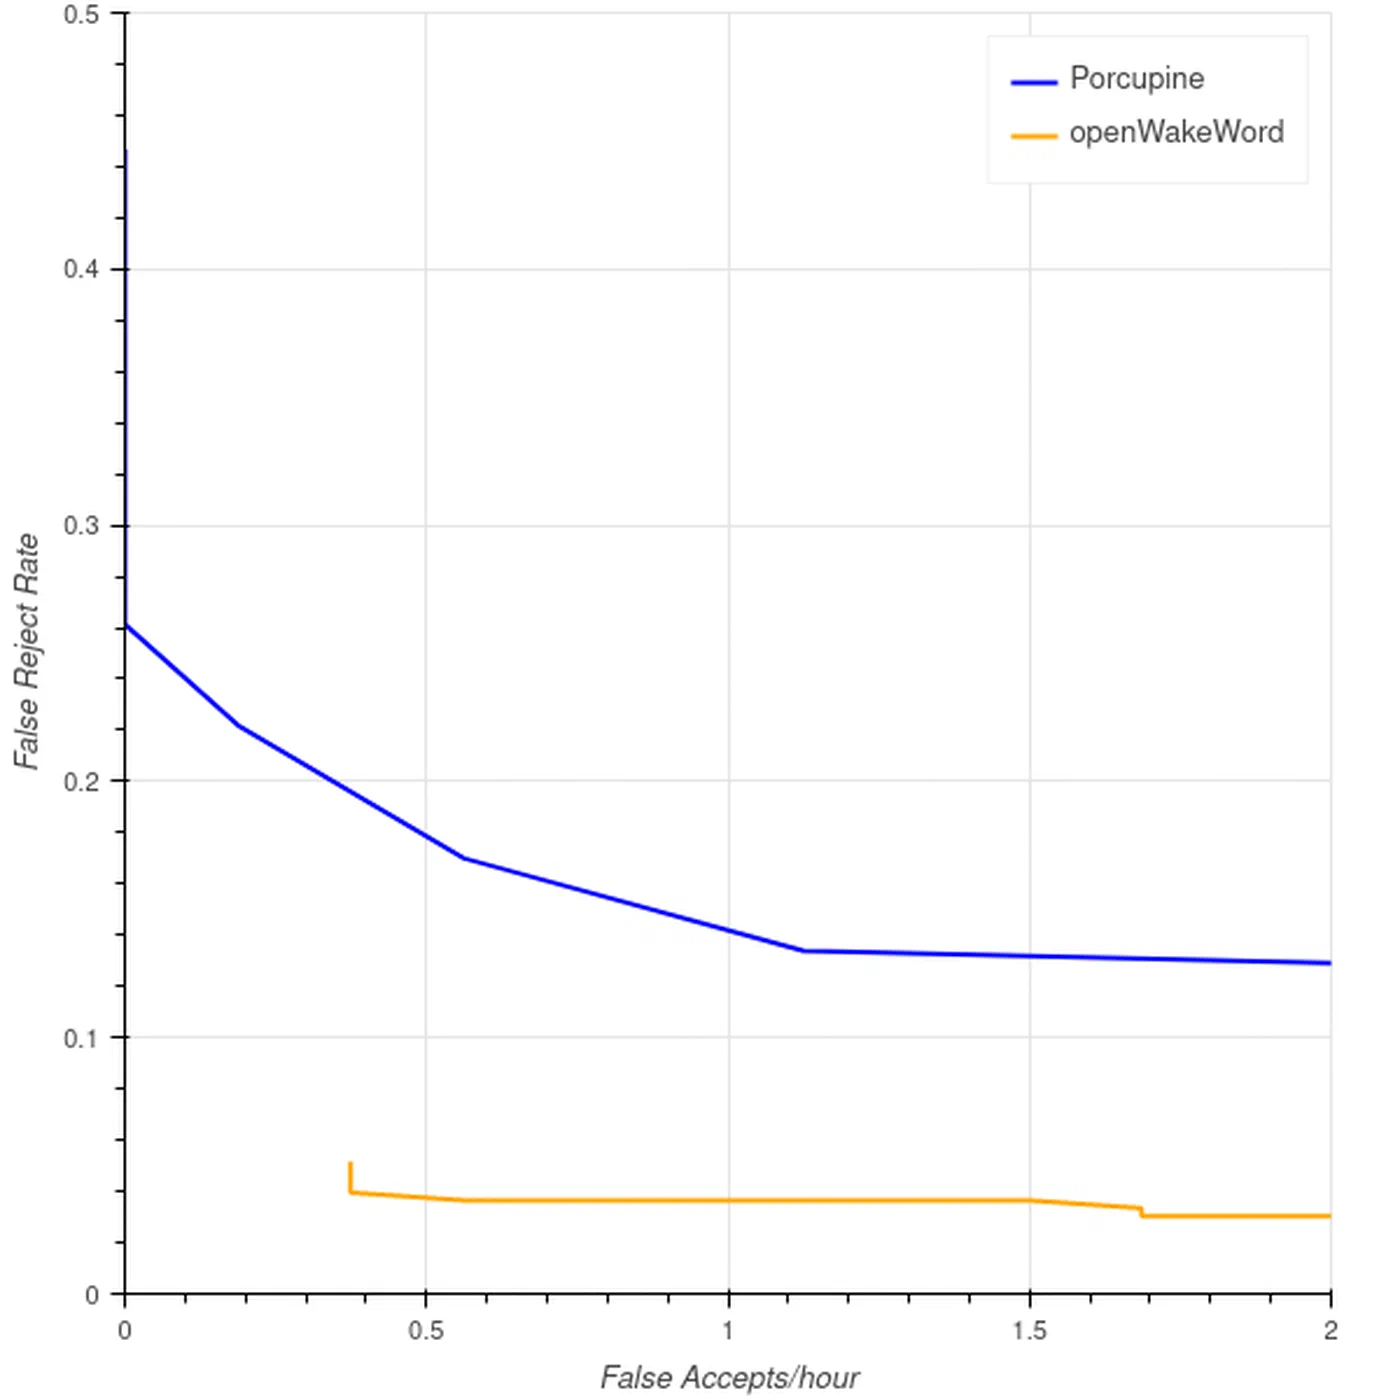
The default wake word options - “Alexa” (from Espressif’s licensed implementation) and “Hi ESP” - work adequately but have trade-offs. “Alexa” has excellent false-rejection resistance because it was trained on millions of samples, but using Amazon’s trademark for a local assistant feels ironic. “Hi ESP” is fully open but has a higher false-trigger rate because it is a less distinctive phoneme sequence.
openWakeWord is an open-source framework for training custom wake word models that can run on microcontrollers, including the ESP32-S3. Training a custom model requires positive examples (recordings of your chosen wake word) and negative examples (background noise, conversation, music, other speech). The recommended minimum is 100 positive examples for a functional model and 500 for reliable performance. Recording the wake word in different rooms, at different distances, and from multiple speakers (if multiple people will use the device) dramatically improves accuracy.
After training, export the model as a .tflite file and upload it to WAS through the wake word management section of the UI. WAS distributes the model to all registered devices on their next connection. Custom wake word models have a higher false positive rate than commercial equivalents until you accumulate enough training data, so plan for an initial tuning period where you adjust the sensitivity threshold in WAS. The openWakeWord GitHub repository
also hosts a community model repository where pre-trained models for common phrases like “Hey Jarvis,” “Computer,” and others are available for download without any training.
Multi-Room Setup and the Assist Pipeline
One of Willow’s practical strengths is that a single WAS instance supports multiple ESP32-S3 Box devices simultaneously. Each device registers independently with WAS, maintains its own WebSocket connection, and can be assigned a name (e.g., “kitchen,” “bedroom”) that Home Assistant uses for room-aware commands. When a device sends a request, WAS tags it with the device identifier, allowing HA to interpret commands like “turn on the lights” in the context of which room the device is in. You configure this in HA by adding each Willow device as a separate conversation entry with an area assignment.
Home Assistant’s Assist pipeline, introduced in 2023 and substantially extended since, goes significantly beyond simple device on/off commands. Assist supports multi-step conversations, context retention across turns, and custom sentence templates defined in YAML. For example, you can define custom intents that handle queries like “run the dishwasher at midnight” or “remind me to take my medication in 30 minutes” - commands that the built-in sentence parser alone would not understand. Combining Willow’s always-on hardware with Assist’s extensible intent system gives you a voice interface that is genuinely comparable to commercial assistants for home automation tasks.
Custom TTS with Piper
The default TTS voice used by WAS for responses is functional but robotic. Piper is an open-source neural text-to-speech engine developed by the Rhasspy project that produces significantly more natural-sounding speech while running entirely locally. Piper provides pre-trained voice models for dozens of languages and regional accents, ranging from compact 30 MB models to high-quality 130 MB models.
To use Piper as the TTS backend, add it as a third service in your docker-compose.yml and configure WAS to use http://your-server-ip:5000 as the TTS endpoint. The WAS UI has a TTS backend selector where you switch from the default engine to the Piper URL. After saving, all device responses will use the Piper voice. Selecting a voice model is a personal preference - the en_US-lessac-high model is a popular choice for English because it sounds natural at conversational pace and handles smart home vocabulary (device names, room names, numbers) cleanly.
Comparing Local Voice Options: Willow, Wyoming, and Rhasspy
If you are evaluating local voice control options for Home Assistant, three projects are worth comparing:
| Feature | Willow (ESP32-S3 Box) | Wyoming Protocol (HA native) | Rhasspy v3 |
|---|---|---|---|
| Hardware | Dedicated ESP32-S3 Box | Any mic-equipped device | Any mic-equipped device |
| Wake word | On-device DSP (low power) | CPU-based (higher power) | CPU-based |
| Setup complexity | Low (web installer) | Medium | High |
| HA integration | Native via REST API | Native (built-in) | Via MQTT or REST |
| Custom wake words | Yes (openWakeWord) | Yes (openWakeWord) | Yes |
| Display/touchscreen | Yes (Box-3) | No | No |
| Power consumption | ~80 mW (always-on) | Depends on host hardware | Depends on host hardware |
| Multi-device | Yes (one WAS, many devices) | Yes | Yes |
Wyoming Protocol is Home Assistant’s own local voice standard, built into HA from 2024 onward. It works with USB microphones connected directly to the HA host, or with Wyoming satellite devices built on Raspberry Pi. It is the right choice if you already have Pi hardware available or want the deepest HA integration with the fewest moving parts. Rhasspy is the veteran of the space - highly configurable, but with a steeper learning curve and less polished setup experience. Willow is the best choice when you want a dedicated, aesthetically acceptable always-on device with a display and hardware wake word DSP, and you are comfortable with Docker for the server components.
Troubleshooting Common Issues
Commands recognized but not executed in HA. Check whether the long-lived access token in WAS has expired. HA tokens do not expire by default, but tokens created with a custom expiry will stop working silently. Regenerate the token and update it in the WAS configuration UI. Also verify that the HA REST API is accessible from the WAS container’s perspective by running curl -H "Authorization: Bearer YOUR_TOKEN" http://your-ha-ip:8123/api/ from the server - it should return HA’s API status JSON.
High false wake word trigger rate. The device is activating from speech or media playing nearby. In the WAS UI, navigate to the wake word settings and lower the sensitivity value (a lower number means fewer activations). If the device is near a television, try physically relocating it or adjusting the mic gain to reduce its pickup radius. Custom wake word models trained with relevant negative examples (TV audio, music) also reduce false triggers significantly.
Slow response (more than 3 seconds end-to-end). Switch the Whisper model from small to base or tiny.en in the WIS configuration. Check server CPU utilization during a command - if the CPU is pinned at 100% during inference, the server is underpowered for the selected model. On ARM64 hardware like a Raspberry Pi 4, the tiny.en model with 4 threads typically gives the best latency-to-accuracy ratio.
No audio output from the device after command. This almost always indicates WAS does not have a valid TTS backend configured. In the WAS UI, check the TTS settings. If you are using HA’s built-in TTS, verify the TTS URL resolves correctly from within the WAS container. If you are using Piper, confirm the Piper container is running and responding on its configured port.
Checking logs. For server-side errors, docker logs willow-was shows the WAS application log including all API calls, authentication errors, and device connections. docker logs willow-wis shows Whisper inference logs including model load times and transcription output, which is useful for confirming what the server is actually hearing from the device. For firmware-level errors on the ESP32 itself, connect the device via USB and open a serial monitor at 115200 baud to see boot logs and runtime output.
Power Consumption and Practical Deployment
The ESP32-S3 Box-3 in always-listening mode consumes approximately 70–90 mW, which over a full year amounts to roughly 0.7 kWh - less than a dollar of electricity in most markets. This is meaningfully lower than a Raspberry Pi 4 running a Wyoming satellite (around 2.5–5 W idle), and dramatically lower than a full always-on smart speaker (typically 2–4 W). The hardware DSP’s ability to handle wake word detection without waking the application CPU is the key architectural reason for this efficiency.
For practical placement, the ESP32-S3 Box-3 works well with the included desktop dock but can also be mounted flat against a wall using the rear magnetic connector with an optional wall bracket. Placing devices in rooms where you most frequently issue commands - kitchen, living room, bedroom - gives the best coverage. Each device should be within reasonable earshot of where you typically stand or sit, ideally not more than 2–3 meters away for reliable wake word detection in a noisy environment.
Willow’s local-first architecture is not just a privacy choice - it is also a reliability choice. When your internet connection goes down during a storm, your local voice control keeps working. When a cloud service changes its pricing, retires a skill, or updates its data policy, your local assistant is unaffected. The one-time investment in an ESP32-S3 Box and a few hours of setup yields a voice control system that is faster, more private, and more reliable than anything you can subscribe to.