How to Control Room LEDs with Your Voice Using WLED and Home Assistant

Flash WLED 0.15 onto an ESP32 over USB in under five minutes using the web installer at install.wled.me , wire up a WS2812B or SK6812 addressable LED strip with a properly sized 5V power supply, then add the device to Home Assistant via auto-discovery and configure voice control through the built-in Assist pipeline. You get hands-free color changes, effects, and brightness control with zero cloud dependency. Total cost is under $30 for a basic setup, and the whole thing takes about an hour.
Hardware Setup: ESP32, LED Strips, and Power Supply Sizing
Addressable LED strips draw serious current, and powering them incorrectly causes flickering, color shifts, or fried components. Getting the hardware right from the start saves hours of debugging later.
Picking a Controller
An ESP32-WROOM-32 or ESP32-S3 DevKitC ($4-8 on AliExpress) is the recommended WLED controller. Avoid ESP8266 for new builds - it lacks the RAM to run large strip effects and maintain a stable WiFi connection simultaneously. The ESP32-C3 works but has fewer GPIO options, so stick with the standard ESP32 or S3 variant unless you have a specific reason not to.
Choosing Your LED Strip
| Strip Type | Color Channels | Voltage | Best For | Approx. Price |
|---|---|---|---|---|
| WS2812B | RGB | 5V | Budget builds, short runs | $4-8/meter |
| SK6812 | RGBW | 5V | Better whites (dedicated W channel) | $6-10/meter |
| WS2815 | RGB | 12V | Long runs over 5 meters | $8-12/meter |
WS2812B is the go-to for most setups. If you care about warm white quality for ambient lighting, SK6812’s dedicated white channel makes a noticeable difference. WS2815 runs at 12V, which reduces voltage drop on longer runs - pick it if you’re lighting an entire room perimeter.
Power Supply Math
Each WS2812B LED draws up to 60mA at full white (20mA per channel for red, green, and blue). A 5-meter strip at 60 LEDs per meter gives you 300 LEDs, which translates to 18A at theoretical maximum. In practice you rarely run every LED at full white, so budget for about 60% of that - around 10.8A. A Mean Well LRS-75-5 (5V 15A, about $12) handles this comfortably with headroom to spare.
For strips longer than 2 meters, inject 5V power at both ends and every 2-3 meters along the run. Without power injection, LEDs at the far end of the strip appear reddish and dim because of voltage drop across the thin copper traces. Use 18AWG wire for all power runs.
Wiring the Data Line
Connect ESP32 GPIO16 (the default WLED data pin) to the LED strip’s DIN (data in) pad through a 330-ohm series resistor. Place a 1000uF electrolytic capacitor across the 5V and GND power input to absorb inrush current spikes when the supply first turns on.
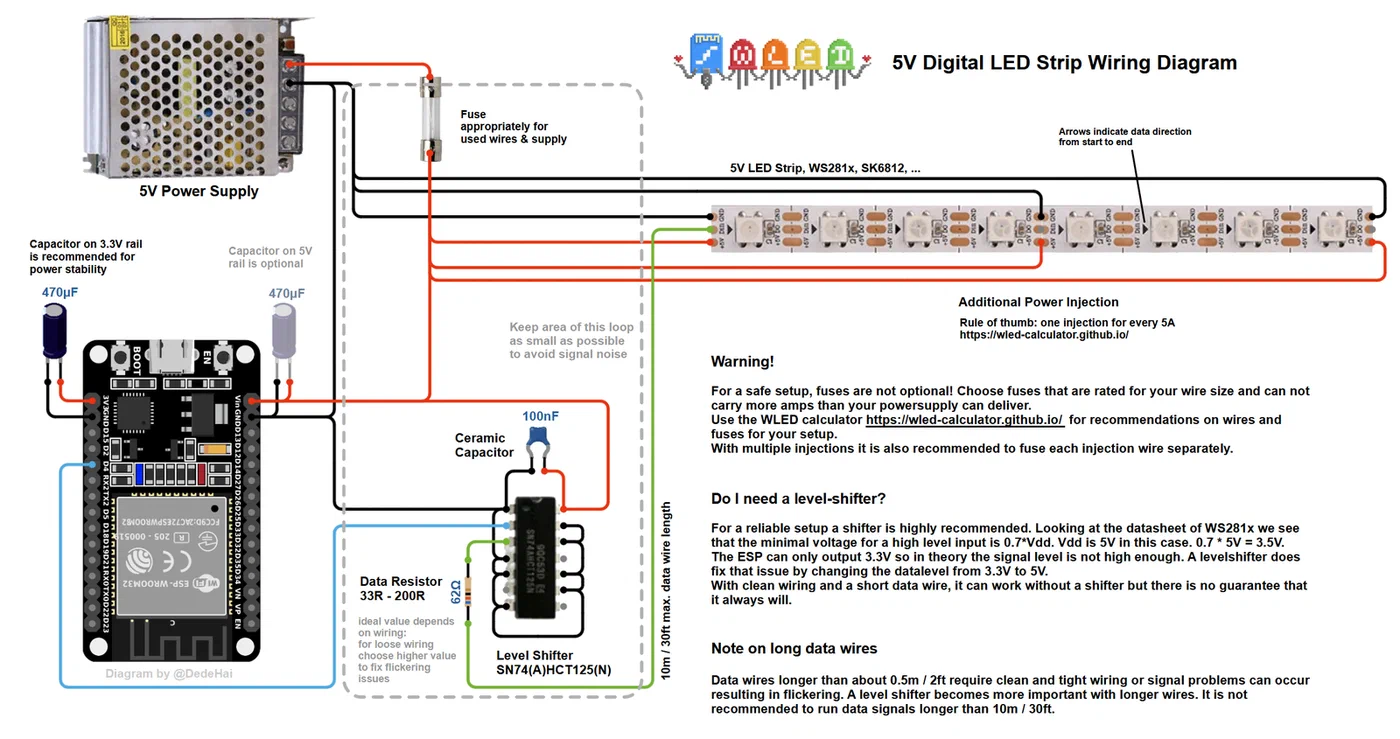
One note on logic levels: the ESP32 outputs 3.3V but WS2812B technically expects 5V data. Most strips tolerate 3.3V fine, but if you see occasional glitches - especially on longer data lines or with SK6812 strips - add a SN74HCT245 level shifter ($0.50) between the ESP32 and the strip. It is cheap insurance.
Flashing WLED and Initial Configuration
WLED used to require Arduino IDE or PlatformIO to compile and flash. Now you can do it from a browser. The current stable release is WLED 0.15.4.
The Web Installer

Navigate to install.wled.me in Chrome or Edge (Firefox does not support WebSerial), plug the ESP32 into USB, click “Install,” and select the latest stable WLED 0.15.x build. The entire flash takes about 60 seconds. No toolchain installation, no command line, no config files.
First Boot and WiFi
After flashing, WLED creates a WiFi access point called “WLED-AP” with the password wled1234. Connect to it from your phone, navigate to 4.3.2.1, and enter your home WiFi credentials. The device reboots and joins your network.
LED Configuration
In the WLED web interface, go to Settings then LED Preferences and configure:
- LED count - match your physical strip (e.g., 300 for a 5m strip at 60 LEDs/m)
- LED type - select WS281x for WS2812B or SK6812 RGBW for SK6812
- Data GPIO - set to 16 (or whatever pin you wired)
- Color order - GRB is standard for WS2812B
Set the “Maximum Current” to match your power supply rating (e.g., 10000 for a 10A supply). WLED automatically scales brightness to stay within this limit, preventing brownouts.
Presets Worth Saving
WLED supports up to 250 presets. A few useful starting points: “Reading Light” at warm white 2700K and 60% brightness, “Movie Mode” with dim amber bias lighting at 15%, and something fun like a rainbow chase at full brightness for when the mood strikes.
Home Assistant Integration and Voice Control
Once WLED joins your WiFi network, Home Assistant picks it up automatically via mDNS. Go to Settings, then Devices & Services, and accept the discovered WLED integration. This creates a light entity, an effect selector, preset buttons, and a brightness slider.
Setting Up for Voice Commands
Three things need to happen before voice commands work properly:
Assign the device to a room - Go to Settings, Devices, select WLED, and assign it to an area like “Bedroom” or “Living Room.” Voice assistants rely on area names to route commands like “turn on the living room lights.”
Expose the entity to Assist - Under Settings, Voice Assistants, then Expose Entities, make sure the WLED light is enabled. Give it a clear alias like “LED strip” or “room lights” instead of the default “WLED” name - it makes voice commands more natural.
Test basic commands - These work out of the box with Home Assistant Assist: “Turn on the bedroom lights,” “Set the living room lights to blue,” “Set the LED strip brightness to 50 percent,” “Turn off all lights.”
Voice Control for WLED Effects
Assist cannot call WLED effects directly by name (yet). The workaround is to create Home Assistant scripts that trigger specific WLED presets. For example, make a script called “Party Mode” that calls the wled.preset service with preset ID 3, then expose that script to Assist. Now saying “Activate party mode” fires the rainbow chase.
Hardware Voice Options
For a dedicated room mic, the Home Assistant Voice Preview Edition ($60) is purpose-built for this - it runs the Assist pipeline with wake word detection (“OK Nabu”) and needs only USB-C power. The older ESP32-S3-BOX-3 from Espressif also works as a voice satellite if you flash it with ESPHome firmware, though setup requires more effort.
Beyond Basics: Segments, Sync, and Automation
Once voice control works, WLED still has plenty left to offer.
Segments
You can divide a single physical strip into virtual zones. LEDs 0-100 become “desk backlight,” 101-200 become “shelf accent,” and 201-300 become “ceiling cove.” Each segment gets its own color, effect, and brightness, and Home Assistant sees them as separate entities. This means one ESP32 and one strip can act like three independent lights.
Multi-Controller Sync
Enable UDP sync (Settings, then Sync) to synchronize effects across multiple WLED controllers in the same room. All strips play the same effect with under 10ms latency over WiFi. Set one controller as the sender and the rest as receivers.
Automations
Home Assistant automations tie LED behavior to real events. Turn strips red when a motion sensor triggers at night. Shift to warm white at sunset using the sun integration. Flash green when a package tracking integration reports delivery.
The Adaptive Lighting integration (available through HACS) can also adjust WLED color temperature throughout the day - bright cool white at 5000K during work hours, shifting to warm 2700K in the evening to match circadian rhythms.
Audio Reactivity
WLED on ESP32 includes built-in audio-reactive support. Connect a MAX4466 microphone module ($2) to GPIO36, enable the audio-reactive usermod (included by default since WLED 0.15.0), and effects like “Frequency Reactive” and “Ripple” pulse in time with music. No external software needed.
WLED vs ESPHome for LED Strips
If you already use ESPHome for other devices, you might wonder whether to skip WLED entirely. The short answer: use WLED if LED effects are the primary goal. WLED ships with over 100 animation effects, a polished mobile-friendly UI, and dedicated features like segments, sync, and audio reactivity. ESPHome’s addressable LED support is functional but limited to basic transitions and a handful of effects. ESPHome makes more sense when the ESP32 also handles other sensors or switches alongside the LEDs. For a dedicated LED controller, WLED wins on features and ease of setup.