PiKVM KVM-over-IP: Raspberry Pi, $80-$385, Virtual Media, ATX

PiKVM turns a Raspberry Pi into a full KVM-over-IP device. It gives you IPMI-like remote access to any computer’s BIOS, boot loader, and OS through a web browser. You wire the Pi to the target machine’s HDMI output and USB port. Then you open the PiKVM web page from anywhere on your network. You get live video of the screen, keyboard and mouse control, virtual media mounting, and ATX power control. A DIY build runs under $100 in parts. Even the top PiKVM V4 Plus at about $385 costs far less than IPMI modules from HPE or Dell.
If you run a homelab, keep headless servers in a closet, or own machines at a far-off site, PiKVM solves a problem SSH and RDP cannot. It works when the OS has crashed, the network stack is down, or you need to change BIOS settings. Software-based remote tools are useless in those cases. PiKVM grabs the raw HDMI output from POST through GRUB and into the OS. It does not care which OS is installed, or whether the machine boots at all.
What PiKVM Is and Why You Need It
Commercial out-of-band management tools cost hundreds of dollars per server. HPE iLO, Dell iDRAC Enterprise, and Supermicro IPMI also tend to be locked to enterprise hardware. An HPE iLO license runs about $300. Dell iDRAC Enterprise sits between $200 and $400. Supermicro builds IPMI into its server boards, but you will not find it on consumer gear. PiKVM brings that same BIOS-level access to any machine: consumer PCs, NAS boxes, network gear, single-board computers, anything with an HDMI output and a USB port.
PiKVM is open-source software released under the GPLv3 license. The project lives on GitHub and supports several hardware builds:
- Raspberry Pi 4 (2GB+ RAM) with a USB HDMI capture dongle: the cheapest DIY option
- Raspberry Pi 5 with a CSI-to-HDMI adapter board for better video quality
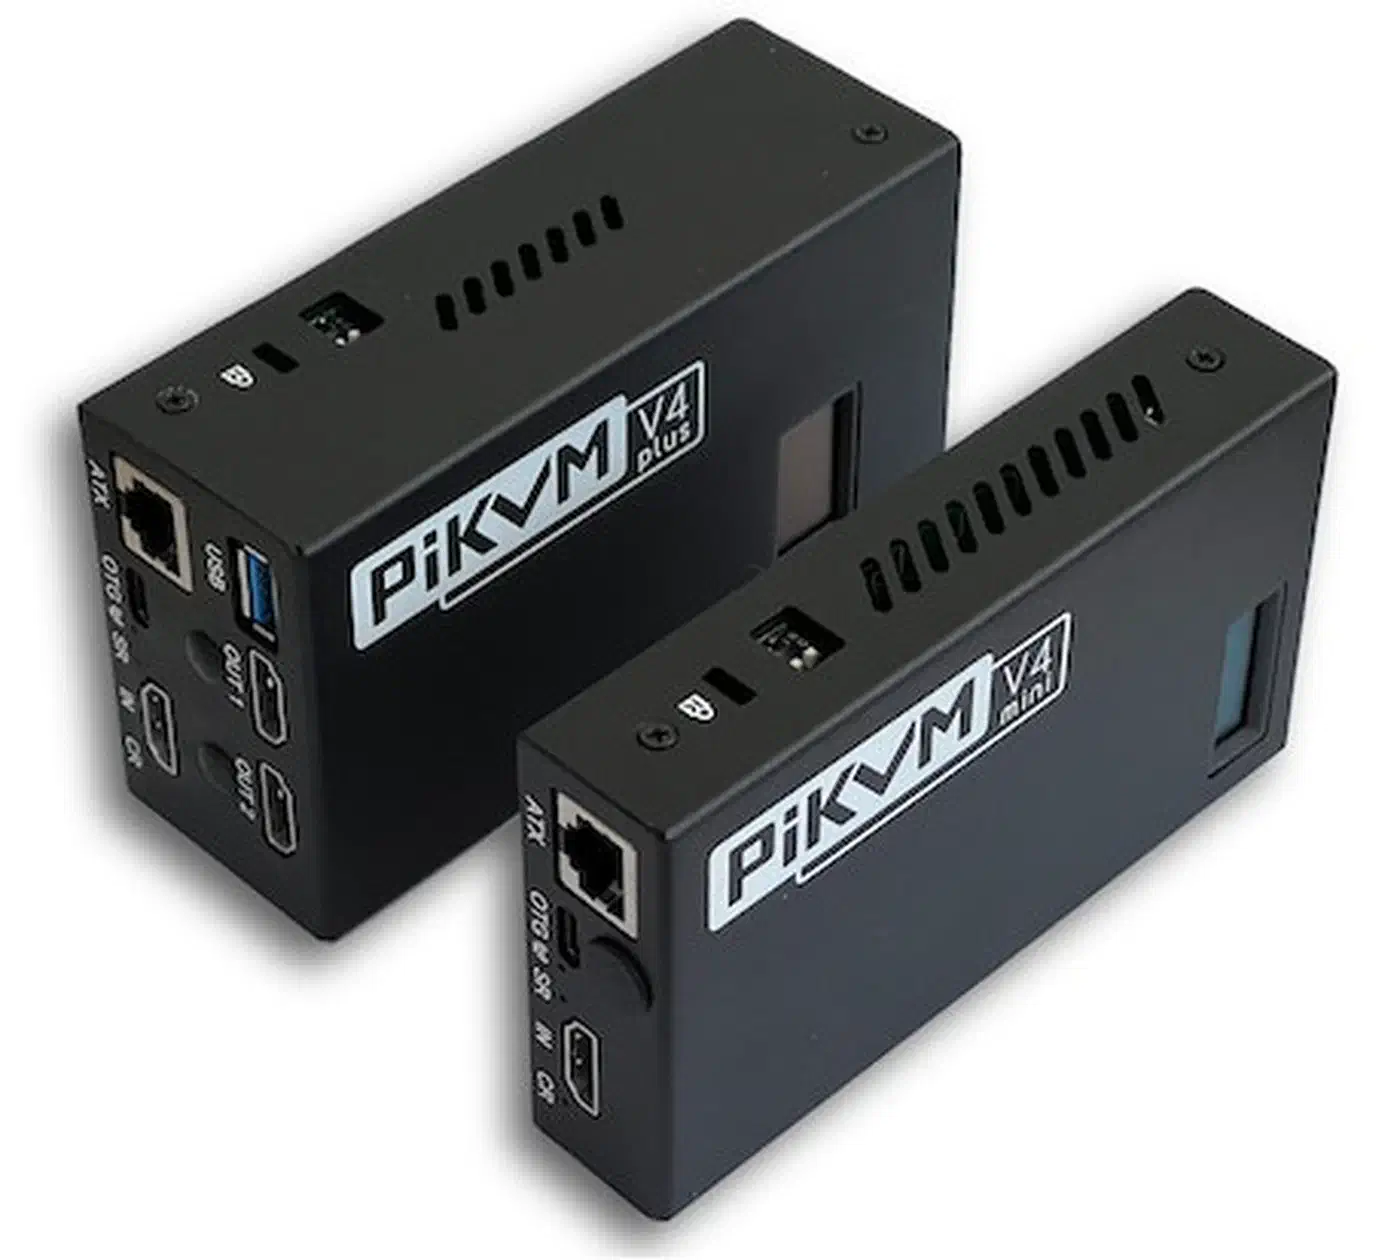
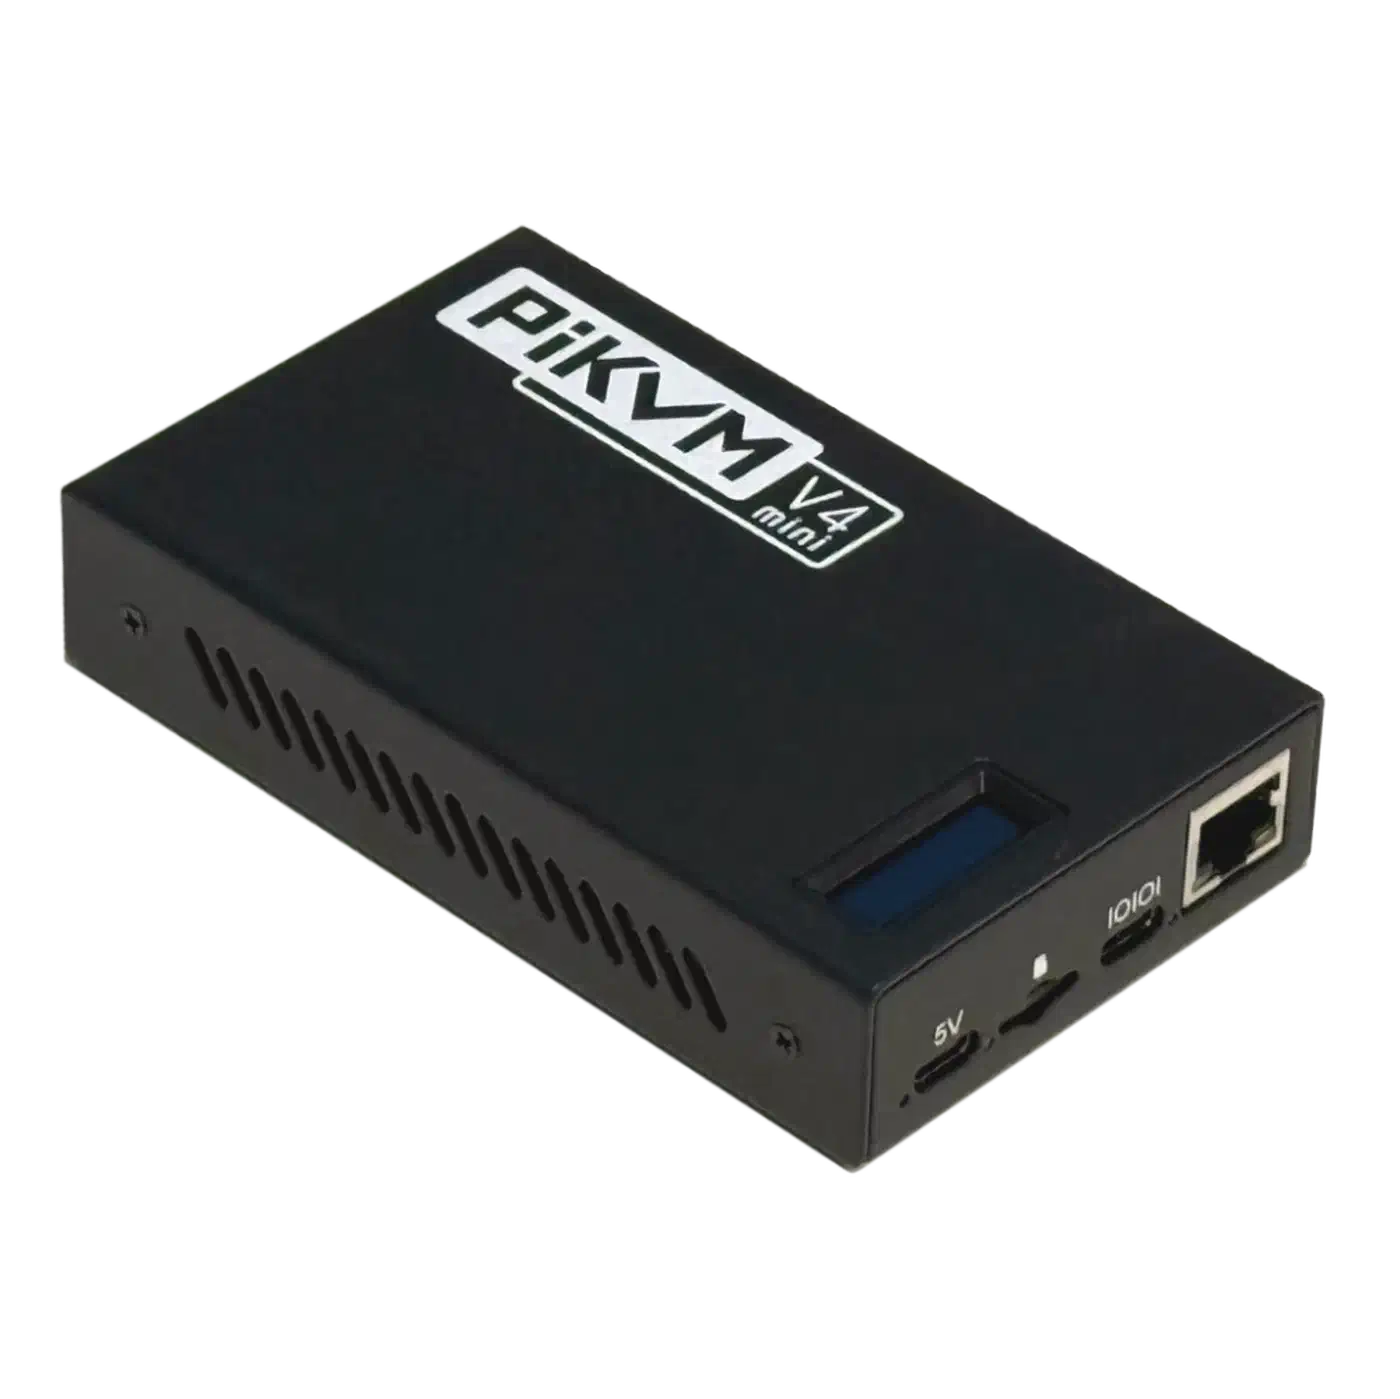
- PiKVM V4 Mini ($270): a purpose-built device with built-in CSI HDMI capture, ATX control, and a custom aluminum case
- PiKVM V4 Plus ($385): the flagship model. It adds USB 3.0 internal storage, more ports, and KVM switching
The video capture side delivers 1080p at 60fps with hardware H.264 encoding on the Pi. You get a snappy remote desktop with roughly 100ms lag on a local network. That is fast enough to walk through BIOS menus, run OS installers, and even do light desktop work on the remote machine.
Use Cases That Justify the Build
PiKVM makes the most sense in scenarios where no other remote access tool works:
- Headless homelab servers: Your Proxmox host kernel panics after an update. SSH is dead. PiKVM lets you watch the boot and fix GRUB from the couch.
- Remote sites: You keep a server at a second house or a friend’s place. Without PiKVM, a bad config change means a drive over. With PiKVM plus Tailscale , you fix it from anywhere.
- NAS in a closet: Your Synology or TrueNAS box needs a BIOS update. Skip the desk and the monitor: reach BIOS through PiKVM instead.
- Network gear: Many managed switches and routers have a console or HDMI port for first setup. PiKVM can grab that output and let you set up the device remotely.
Hardware Options and Cost Breakdown
PiKVM supports three main hardware paths. Each one trades off cost, video quality, and setup effort.
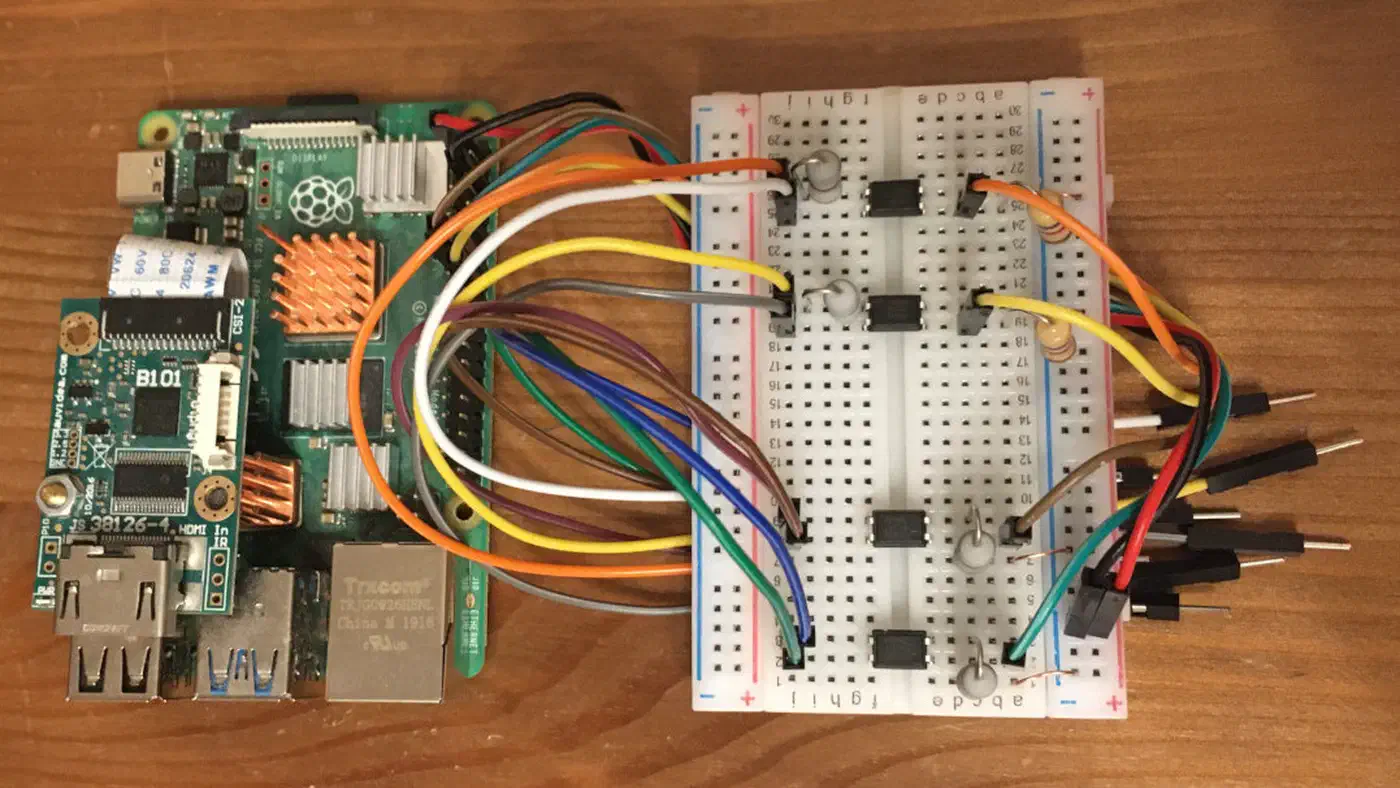
Option A: DIY Build with Raspberry Pi 4 (~$80-100)
This is the entry-level build. You need:
- Raspberry Pi 4 (2GB or 4GB): $45-70
- USB HDMI capture card (HDMI-to-USB dongle): $10-15 (must support UVC)
- USB-A to USB-C OTG cable for HID emulation: $5
- MicroSD card (16GB+): $8-10
- Power supply for the Pi: $10-15
The USB capture dongle is the weak link in this build. It works, but it adds more lag than a CSI capture path and uses more CPU on the Pi. For a homelab where you reach the KVM now and then to fix problems, that is fine.
Option B: DIY Build with Raspberry Pi 5 (~$100-130)
The Pi 5 build uses a CSI-to-HDMI adapter board from Geekworm or Waveshare in place of a USB capture dongle. The CSI path gives you cleaner video, lower CPU use, and less lag. You wire the adapter to the Pi’s CSI port with a flat flex cable.
- Raspberry Pi 5 (4GB): $70
- CSI-to-HDMI adapter board: $25-35
- USB-C OTG cable: $5
- MicroSD card (16GB+): $8-10
- Power supply: $10-15
Option C: PiKVM V4 Mini or V4 Plus ($270-$385)
The purpose-built hardware skips the DIY assembly. The V4 devices ship with built-in CSI HDMI capture, a hardware ATX control header, USB-C OTG, and a custom aluminum case. The V4 Plus adds an internal USB 3.0 slot for a flash drive (handy for ISOs), three ways to connect (WiFi, Ethernet, and optional cellular), and PCI brackets for rack mounting.
How It Compares to Alternatives
PiKVM is not the only KVM-over-IP option in this price range. Here is how it stacks up:
| Feature | PiKVM DIY (Pi 4) | PiKVM V4 Plus | JetKVM | TinyPilot Voyager 3 |
|---|---|---|---|---|
| Price | ~$80-100 | ~$385 | $69 | ~$99 |
| Video | 1080p60 (USB) | 1080p60 (CSI) | 1080p60 (H.264) | 1080p (USB) |
| Latency | ~100-150ms | ~60-100ms | ~30-60ms | ~100-200ms |
| Virtual Media | Yes | Yes | No | Yes |
| ATX Control | DIY wiring | Built-in | Via RJ11 extension | No |
| Open Source | Yes (GPLv3) | Yes (GPLv3) | Yes (Go/Linux) | Proprietary |
| Multi-server | Via external switch | Built-in switching | No | No |
| WiFi | Via Pi WiFi | Built-in | No | Via Pi WiFi |
| Form Factor | DIY/bulky | Compact aluminum | Tiny (credit card) | Compact plastic |
JetKVM is the most interesting rival. At $69, it costs less than even a DIY PiKVM build. Its Rockchip RV1106 chip gives it a fast 30-60ms lag, and it has a built-in 1.69-inch touchscreen. It ships with free WebRTC remote access through JetKVM Cloud, so you skip the VPN setup. The main trade-offs: no virtual media (you cannot mount ISOs remotely) and no WiFi.
TinyPilot Voyager 3 is the plug-and-play option at $99 per unit. It works out of the box and comes with paid support, but it runs closed software and lacks ATX power control. TinyPilot is winding down the older Voyager 2a model.
PiKVM’s edge is the mix of open-source software, virtual media, ATX power control, and a mature feature set built over years. If you need to mount ISOs for remote OS installs, PiKVM is the clear pick.
Software Installation and Configuration
PiKVM gives you a ready-to-flash OS image that turns your Pi into a KVM appliance in minutes.
Initial Setup
- Download the PiKVM OS image from pikvm.org/download for your exact hardware combo (Pi model plus capture method).
- Flash the image to your microSD card with balenaEtcher
or
dd. - Insert the card, wire your Pi to the target machine’s HDMI and USB ports, and power on.
- Open the web page at
https://<pi-ip-address>. The default login isadmin/admin. - Change the password right away: both the web UI password and the root SSH password (
ssh root@<pi-ip>, default passwordroot).
The web page gives you live HDMI video, virtual keyboard and mouse control, clipboard sharing (paste text to the remote machine), virtual media for ISO files, and ATX power controls once you wire the GPIO pins.
Essential Post-Install Configuration
PiKVM keeps its config changes in /etc/kvmd/override.yaml. The filesystem is read-only by default for safety, so you remount it before editing:
rw    # remount filesystem as read-write
nano /etc/kvmd/override.yaml
ro    # remount as read-only when done
Common config tweaks:
- Tune the
streamersection for resolution, FPS, and compression quality. Lower quality cuts bandwidth for slow links. The defaults work well for LAN access. - Some BIOS firmware does not support absolute mouse positioning. If the cursor jumps around in BIOS, switch to relative mode or dual mode in the override config.
- PiKVM supports TOTP 2FA for the web page. Turn it on in the admin panel under Security settings.
- PiKVM makes a self-signed SSL certificate by default. For trusted HTTPS, swap it for a Let’s Encrypt
certificate with
certbot, or import your own.
ATX Power Control Wiring
The optional ATX control feature lets you power on, power off, and hard reset the target machine from afar. You wire GPIO pins from the Pi to the target computer’s front panel header (power switch, reset switch, power LED) through an optocoupler relay board (about $5 from Amazon or AliExpress).
The wiring is simple. The optocoupler keeps the Pi’s GPIO apart from the motherboard’s front panel circuit, and PiKVM’s software does the rest. When you click “Power” or “Reset” in the web page, the Pi fires the right GPIO pin. That pin trips the optocoupler, which briefly shorts the motherboard’s power or reset pins: the exact thing the physical button does.
This is where PiKVM pulls ahead of JetKVM and TinyPilot. Cold-booting a powered-off server or force-resetting a frozen machine from afar kills the last reason you would ever need physical access.
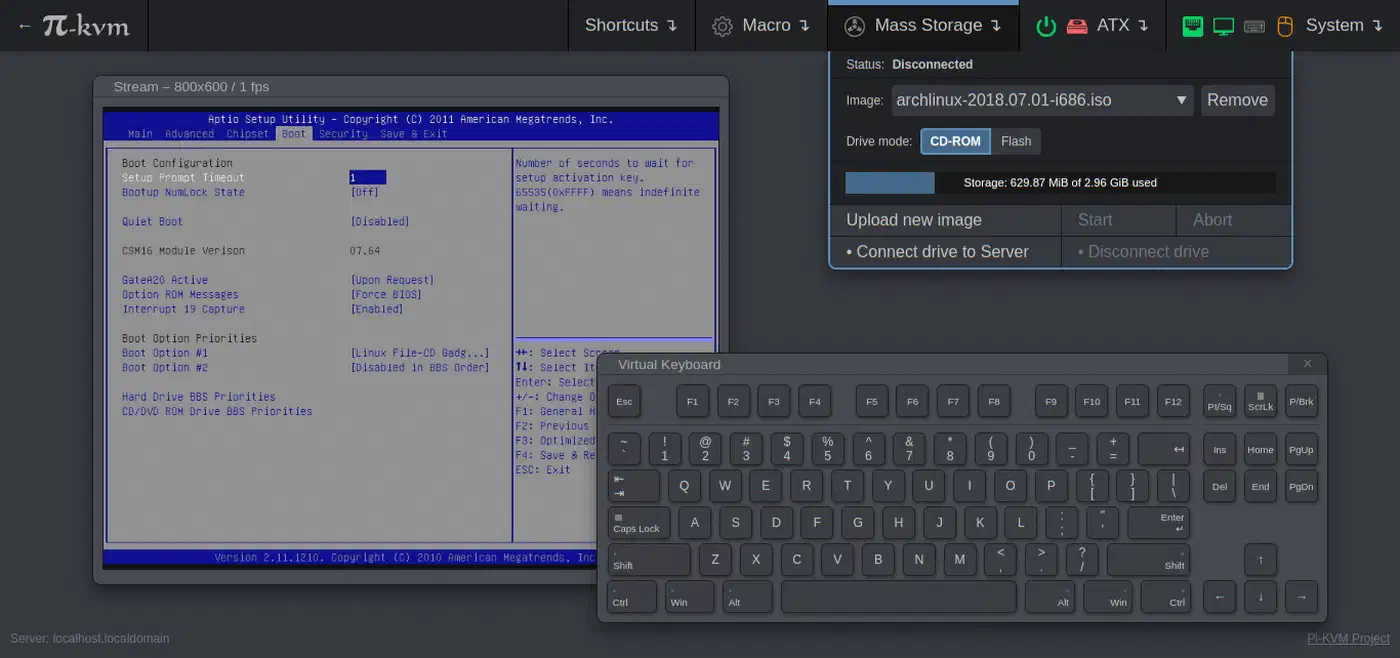
Virtual Media and Remote OS Installation
Virtual media lets you mount ISO files as USB drives on the target computer. You can then install an OS from afar with no physical media.
How It Works
- Upload an ISO file through the PiKVM web page: open the “Drive” menu, click “Upload”, and pick your ISO (Ubuntu, Proxmox, Windows, whatever you need).
- Click “Connect” to mount the ISO. The target computer now sees a USB mass storage device with the ISO contents, the same as a physical USB flash drive.
- Reboot the target machine, enter BIOS with the PiKVM virtual keyboard, set USB as the first boot device, then save and reboot.
- The machine boots from the virtual ISO. You finish the whole OS install through the PiKVM web page.
PiKVM can emulate either a USB mass storage device or a CD-ROM drive. CD-ROM mode is needed for some BIOS firmware that only boots from optical media. Toggle this in the Drive menu settings.
Image Management Tips
- Keep your common installer ISOs on an attached USB drive, not the Pi’s microSD card. The V4 Plus has an internal USB 3.0 slot just for this.
- PiKVM can pull ISOs straight from URLs, so you do not have to copy them through your workstation first.
- Keep a library of your most-used ISOs: Proxmox VE, Ubuntu Server, TrueNAS SCALE, Windows 11, and any recovery tools you lean on.
One speed note. ISO boot and install run over USB 2.0 emulation, which is slower than a native USB 3.0 flash drive. Expect OS installs to take 20-50% longer than they would with physical media. The ease of doing it from a browser usually beats the speed cost.
Advanced Features and Multi-Server Management
PiKVM includes several features that bring it close to enterprise IPMI.
Wake-on-LAN Integration
Set WoL MAC addresses in PiKVM to power on servers that are fully shut down. This pairs with the ATX GPIO power control for machines in a soft-off state. Between WoL and ATX control, you can take a server from fully off to running an OS without touching it.
Multi-Server Switching
One PiKVM can run several servers through an HDMI KVM switch (a TESmart 4-port switch runs about $40), driven by PiKVM’s GPIO. You switch between servers from the web page with no extra PiKVM units. The PiKVM V4 Plus has this switching built in.
API and Automation
PiKVM exposes a full REST API at /api/ for scripted control. You can script power cycles, grab video snapshots, and send keyboard input to set up servers on their own. A basic example:
# Check power state
curl -k -u admin:password https://pikvm/api/atx

# Trigger power button
curl -k -u admin:password -X POST https://pikvm/api/atx/power
You can fold this into infra automation, monitoring systems, or CI/CD pipelines that set up bare-metal servers.
Tailscale for Secure Remote Access
Install Tailscale
right on PiKVM for secure remote access from anywhere. You skip port forwarding and never expose the device to the public internet. Run tailscale up on the PiKVM and you can reach the web page through Tailscale’s mesh VPN from any device on your tailnet. This is the best path for remote access: far simpler and safer than opening ports on your router. If you want a fully self-hosted option with no third-party service, running your own tunnel endpoint
gives you the same encrypted link with little setup.
Prometheus Metrics and Monitoring
PiKVM exports hardware and session metrics fit for monitoring dashboards. You can track video stream uptime, open sessions, and target server power state in Grafana . For a homelab that already runs a Prometheus/Grafana stack, this slots into your current monitoring setup.
Security Hardening
PiKVM gives BIOS-level access to your servers, so locking it down is a must. A hacked PiKVM device hands an attacker full control over every machine wired to it.
Network Isolation
Put PiKVM on a dedicated management VLAN, apart from your regular LAN and any IoT devices. Set your router’s firewall rules to limit which hosts can reach the PiKVM’s web page. Only your management workstation and your VPN endpoint should get in.
Authentication and Access Control
Change default passwords right after first boot (both the web UI and SSH root password). Turn on TOTP two-factor auth in the web page. Disable SSH password login and switch to key-based login only.
PiKVM does not ship fail2ban , but the Arch Linux base can run it. Install and set up fail2ban to ban IPs after repeated failed login attempts.
Firewall Rules
PiKVM’s OS is built on Arch Linux and can use nftables for local firewall rules. A lean policy should deny all inbound traffic by default and only allow HTTPS (port 443) and SSH (port 22) from your management network or VPN subnet.
Troubleshooting Common Issues
A few problems come up often with PiKVM builds, above all DIY setups.
Black screen / no video: This is almost always an EDID issue. The HDMI capture device is not telling the target machine the right display specs. Unplug the HDMI cable, plug it into a real monitor for a moment, then reconnect it to PiKVM. For stubborn cases, PiKVM lets you override EDID data in the config. Also check that your target is not pushing a resolution above 1920x1080 at 60Hz (the V4 handles up to 1920x1200).
USB HID not recognized in BIOS: Some motherboard BIOS firmware has buggy USB drivers that choke on composite USB devices (keyboard, mouse, and mass storage in one device). The fix: either turn off mass storage emulation in PiKVM’s config, or use the Pico HID option to split the HID devices from mass storage onto different USB ports.
Mouse cursor jumping or not tracking: The BIOS does not support absolute mouse positioning. Switch to relative mouse mode in /etc/kvmd/override.yaml. You can also set dual-mode, which tries absolute first and falls back to relative.
Video lag or stuttering: If you use a USB capture dongle, try a different one. Quality varies a lot between cheap HDMI capture devices. CSI-based capture (V4 or Pi 5 with adapter) gives you smoother video. On the network side, use Ethernet, not WiFi, for the PiKVM’s link.
ATX power control not working: Check your optocoupler wiring again. The most common slip is reversing the polarity on the optocoupler input. Use a multimeter to check continuity when the GPIO fires. Also confirm the GPIO pin numbers in your PiKVM config match the physical wiring.
Getting Started
PiKVM pays for itself the first time you really need it: a kernel panic on a headless server, a botched BIOS update, an OS reinstall on a machine in another room. Any of those would normally mean a trip to the server closet with a monitor and keyboard under your arm.
For most homelab users, the DIY Pi 4 build at about $80-100 is the right starting point. If you want cleaner video and less fiddling, step up to a Pi 5 with CSI capture, or go straight to the V4 Mini. If you run several servers and want a polished, rack-mountable box, the V4 Plus earns its $385 price with built-in switching and storage.
The setup takes about 30 minutes for the hardware and another 15 for the software. Once it runs, you will wonder how you ran servers without it.