 Botmonster Tech
Linux file recovery: extundelete, PhotoRec, Btrfs snapshots

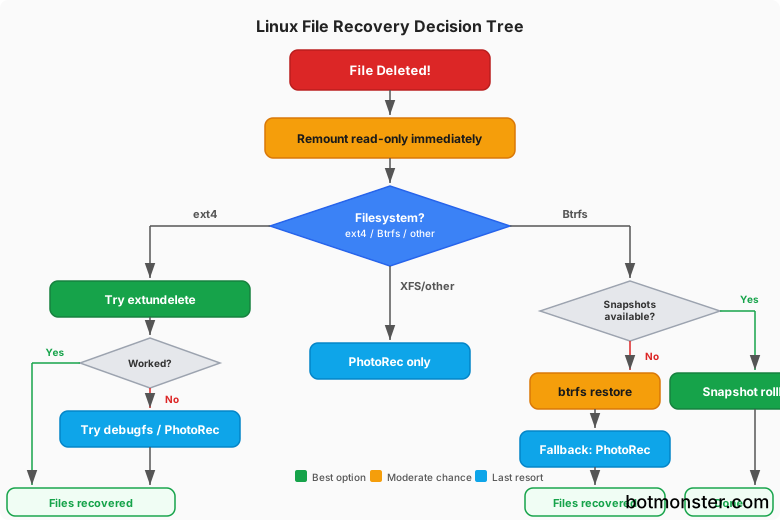
Linux file recovery starts with one rule: stop writing to the disk that held the lost files, and remount it read-only. Then check whether a running program still holds the file open, since you can recover it with one command. After that, the file system picks the tool: extundelete and PhotoRec on ext4, snapshots or btrfs restore on Btrfs.
Key Takeaways
- Every write to the disk after
rmcan destroy the data you want to recover, so remount read-only first. - A deleted file that a process still holds open can be recovered from
/proc/<pid>/fd/. - On ext4, debugfs
lsdeland TestDisk undelete do not work; extundelete and PhotoRec do. - ext4magic is abandoned and extundelete has had no upstream release since 2013.
- On Btrfs, snapshots turn recovery into a
cp; without them, runbtrfs restore -Dfirst as a dry run.
Linux file recovery first steps: stop writes and image the disk
The rm command has no trash can. It removes the directory entry and marks the file’s data blocks as free. The data stays on the disk until something writes over it. On a busy system, that can happen within seconds. System logs, package updates, browser caches and file indexers all grab free blocks, and each one shrinks the data you can recover.
Do these things in order:
- Stop writing. Do not install recovery tools onto the same partition. Do not save recovered data there either.
- Remount read-only. If the files lived on a separate partition such as
/home, runsudo mount -o remount,ro /home. If they lived on the root partition, shut down and boot a live system from USB. - Check for TRIM on SSDs. Run
cat /sys/block/sda/queue/discard_max_bytes. A non-zero value means the drive accepts TRIM. Ubuntu and Fedora runfstrim.timerweekly by default. Once a trim reaches the freed blocks, the SSD may return zeros, and no tool can recover the data. - Image the disk if it is damaged. A clicking drive, I/O errors in
dmesgor SMART warnings mean a damaged disk may not survive many reads. Copy it once to a disk image with GNU ddrescue and run every recovery tool on the image.
For the live USB, any distro image works. SystemRescue is a rescue system built for this job. It boots from a USB stick, reads ext4, XFS and Btrfs, and ships TestDisk, ddrescue and GParted.
Here is the imaging step. The image must go to a different disk with enough free space for the whole partition or disk:
sudo apt install gddrescue          # Debian/Ubuntu (Fedora: ddrescue)
sudo ddrescue -d -r3 /dev/sdb /mnt/usb/sdb.img /mnt/usb/sdb.map

# Attach the image read-only; partitions show up as /dev/loop0p1, p2...
sudo losetup -fP --show --read-only /mnt/usb/sdb.img
The map file lets ddrescue resume and retry damaged areas later without starting over. From here on, point every recovery tool at /dev/loop0p1 instead of the real disk. A mistake on the image then costs you no data.
Your filesystem decides which tools can help:
| Filesystem | Recovery difficulty | Tools that work | Notes |
|---|---|---|---|
| ext4 | Moderate | extundelete, PhotoRec, grep | Journal may hold old copies of inode data |
| Btrfs | Easy with snapshots, hard without | snapshots, btrfs restore, PhotoRec | Copy-on-write keeps old trees for a while |
| XFS | Very hard | PhotoRec, xfs_undelete | xfs_undelete is a third-party script |
| ZFS | Easy with snapshots | zfs rollback, .zfs/snapshot | Snapshots are the main recovery path |
Check whether the deleted file is still open
This step takes ten seconds and saves the most data. On Linux, rm only removes the name. If a program still has the file open, the kernel keeps the data alive until the program closes it. A log file under a running service, a video in a player, or a database file under a live process can all be recovered straight away.
List open files that have been deleted:
sudo lsof +L1The output shows the process ID, the file descriptor number and the old path, marked (deleted). Recover the data through /proc:
# Process 1234 holds the deleted file on descriptor 4
sudo cp /proc/1234/fd/4 ~/rescued-report.pdf
Recover the file before you stop the service or close the app. Once the last process lets go, the blocks are freed like any other deleted file. This trick works on every filesystem, ext4, Btrfs and XFS alike, because it reads the data from the kernel, not the disk. It is the only Linux file recovery method that keeps both the name and the data.
Recover deleted files from ext4
ext4 is still the default file system on Debian, Ubuntu and most other distros. Before you pick a tool, it helps to know what ext4 does on delete. It clears the extent tree inside the file’s inode, so the inode no longer says where the data lives. Tools that read only the inode find an empty file. Tools that recover data look elsewhere: in old copies of inode blocks in the journal, or in the raw data itself.
extundelete: the first tool to try
extundelete searches the ext4 journal for older copies of the inode, from before the delete. When it finds one, it can recover the file with its name. The last release is 0.2.4 from 2013, and upstream no longer maintains it. It is still packaged in Debian, Ubuntu, Fedora and EPEL, and it still works on many disks. A small community fork, extundelete-ng, patches it to build against current e2fsprogs and to handle 64-bit block numbers.
sudo apt install extundelete    # Debian/Ubuntu
sudo dnf install extundelete    # Fedora

sudo umount /dev/sda2

# Recover one file (path is relative to the partition root)
sudo extundelete /dev/sda2 --restore-file home/user/documents/report.pdf

# Recover everything deleted in the last hour
sudo extundelete /dev/sda2 --restore-all --after $(date -d "-1 hour" +%s)
The recovered files land in RECOVERED_FILES/ in the current directory. Run the command from a different disk, or the output overwrites the data you want. extundelete works best minutes after the delete, on a quiet filesystem. If the tool crashes or recovers nothing, move on to PhotoRec.
debugfs and ext4magic: what no longer works
Many guides still tell you to run debugfs with lsdel and then dump the inode. That method comes from ext2. On ext4 the cleared extent tree means lsdel usually lists nothing, and dump writes an empty file. debugfs is still useful for two things. ls -d /home/user/documents lists deleted entries in a folder, which tells you what was lost. And it can save the journal before it rolls over:
sudo debugfs -R "dump <8> /mnt/usb/journal.img" /dev/sda2ext4magic used to be the stronger journal tool, with whole-tree and time-window recovery. Its last release is 0.3.2 from 2014, and the project is now officially abandoned. Around 30 e2fsprogs releases have shipped since then, ext4magic can no longer process current ext4 filesystems, and its maintainers ask distro packagers to drop it. Skip it.
TestDisk has an undelete feature too, but it only covers FAT, exFAT, NTFS and ext2. On ext4, use TestDisk for lost partitions, covered below, not for files.
PhotoRec: the fallback that ignores the filesystem
When metadata recovery fails, PhotoRec reads the raw disk data and looks for file signatures. Those are the known bytes at the start and end of each file type. It ships in the TestDisk package. The current stable release is 7.2, and 7.3 is in testing. PhotoRec knows over 480 file extensions, from PDFs and JPEGs to SQLite databases and source code.
sudo apt install testdisk    # PhotoRec is in this package
sudo photorec /mnt/usb/sdb.img   # or the partition, e.g. /dev/sda2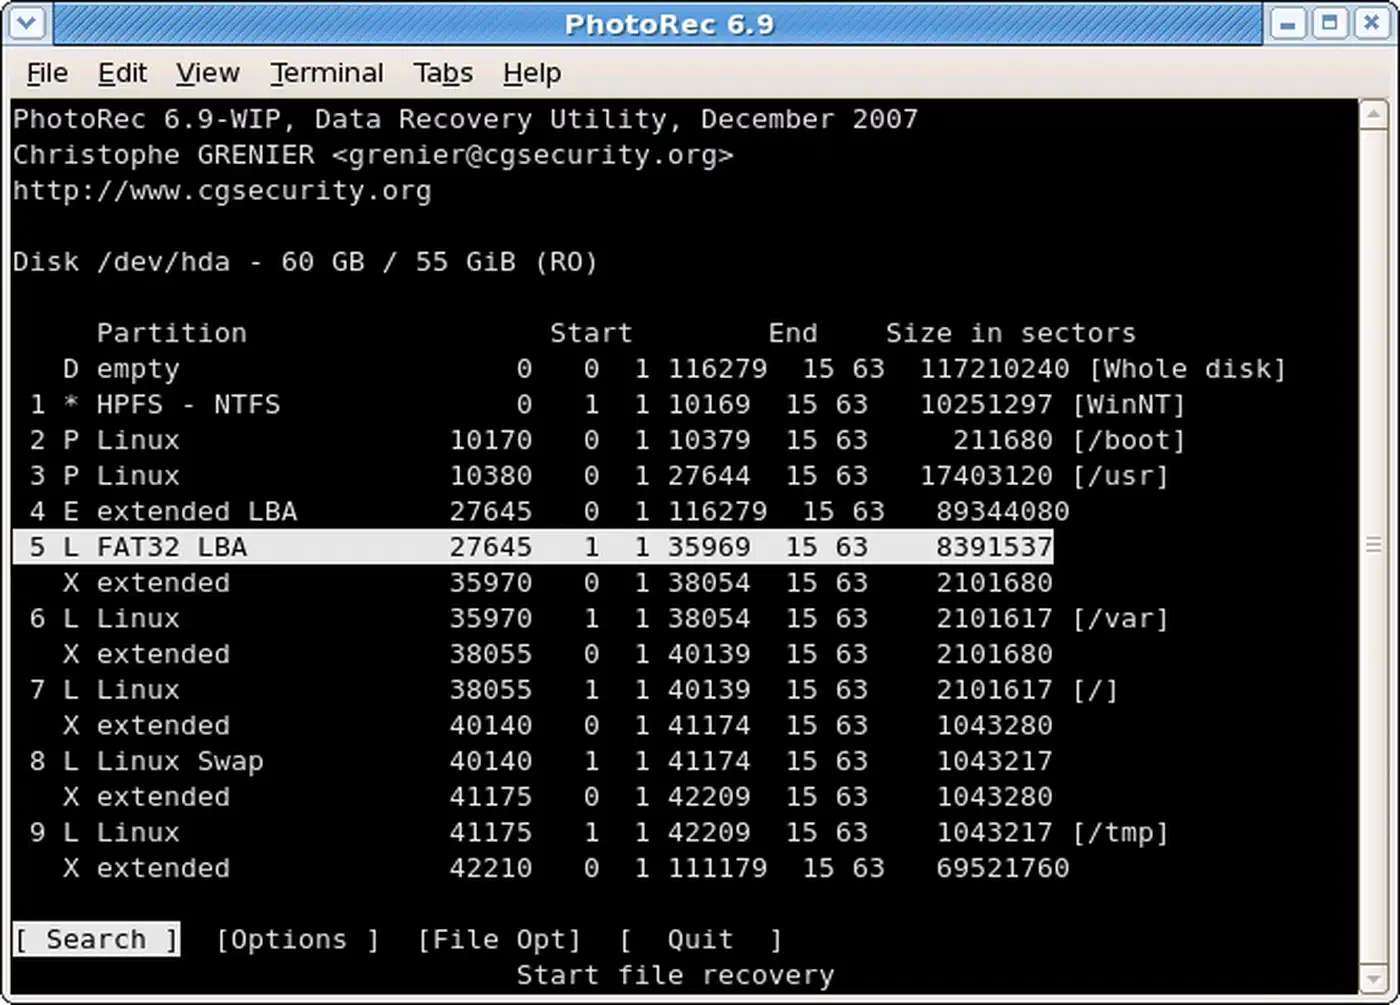
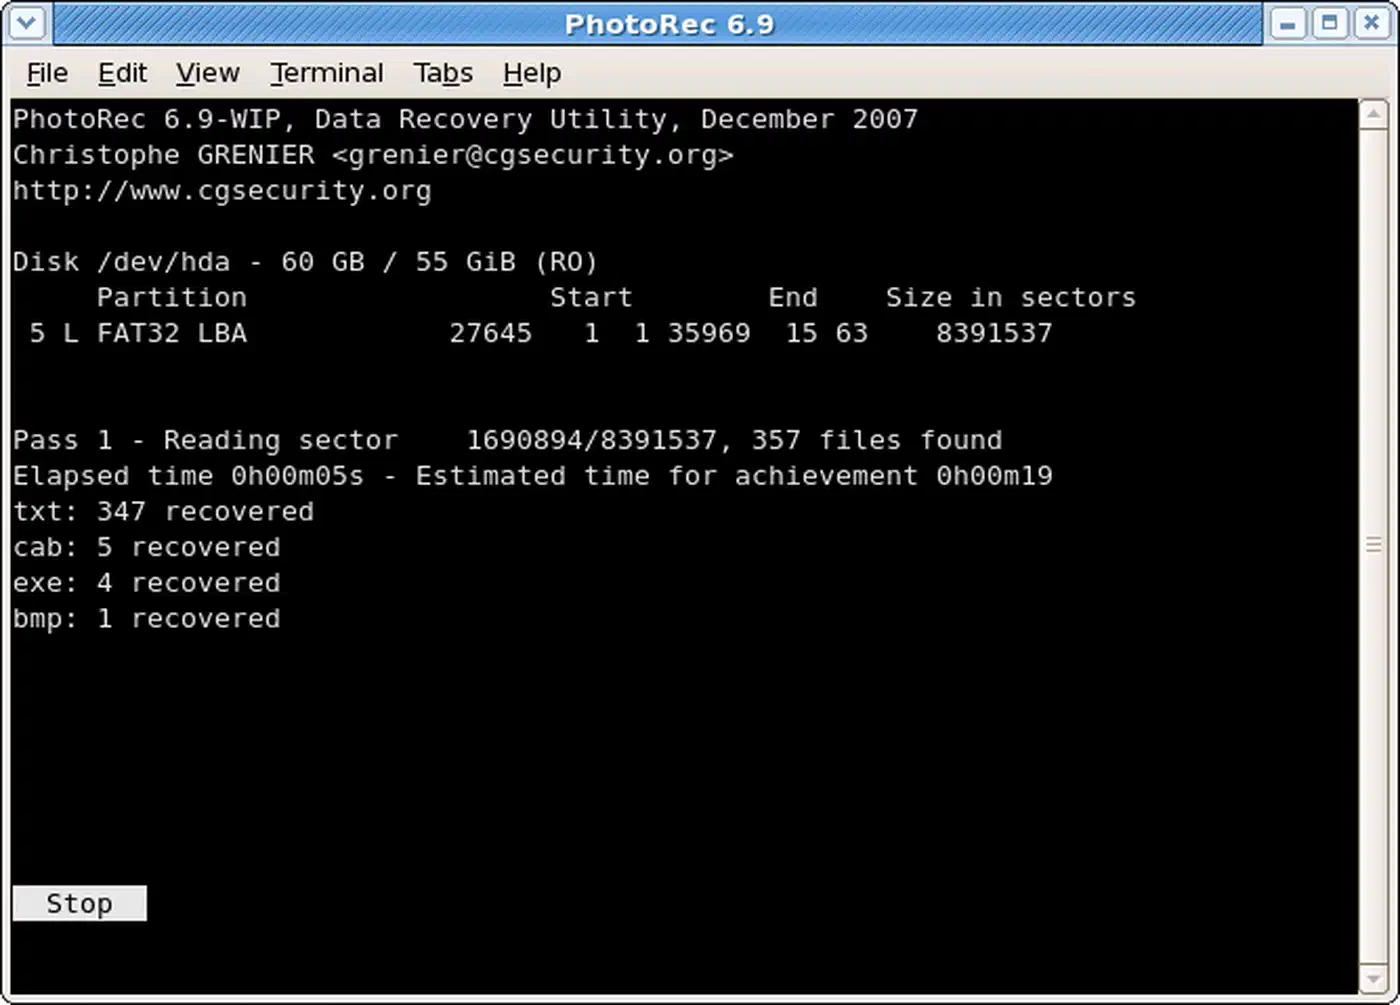
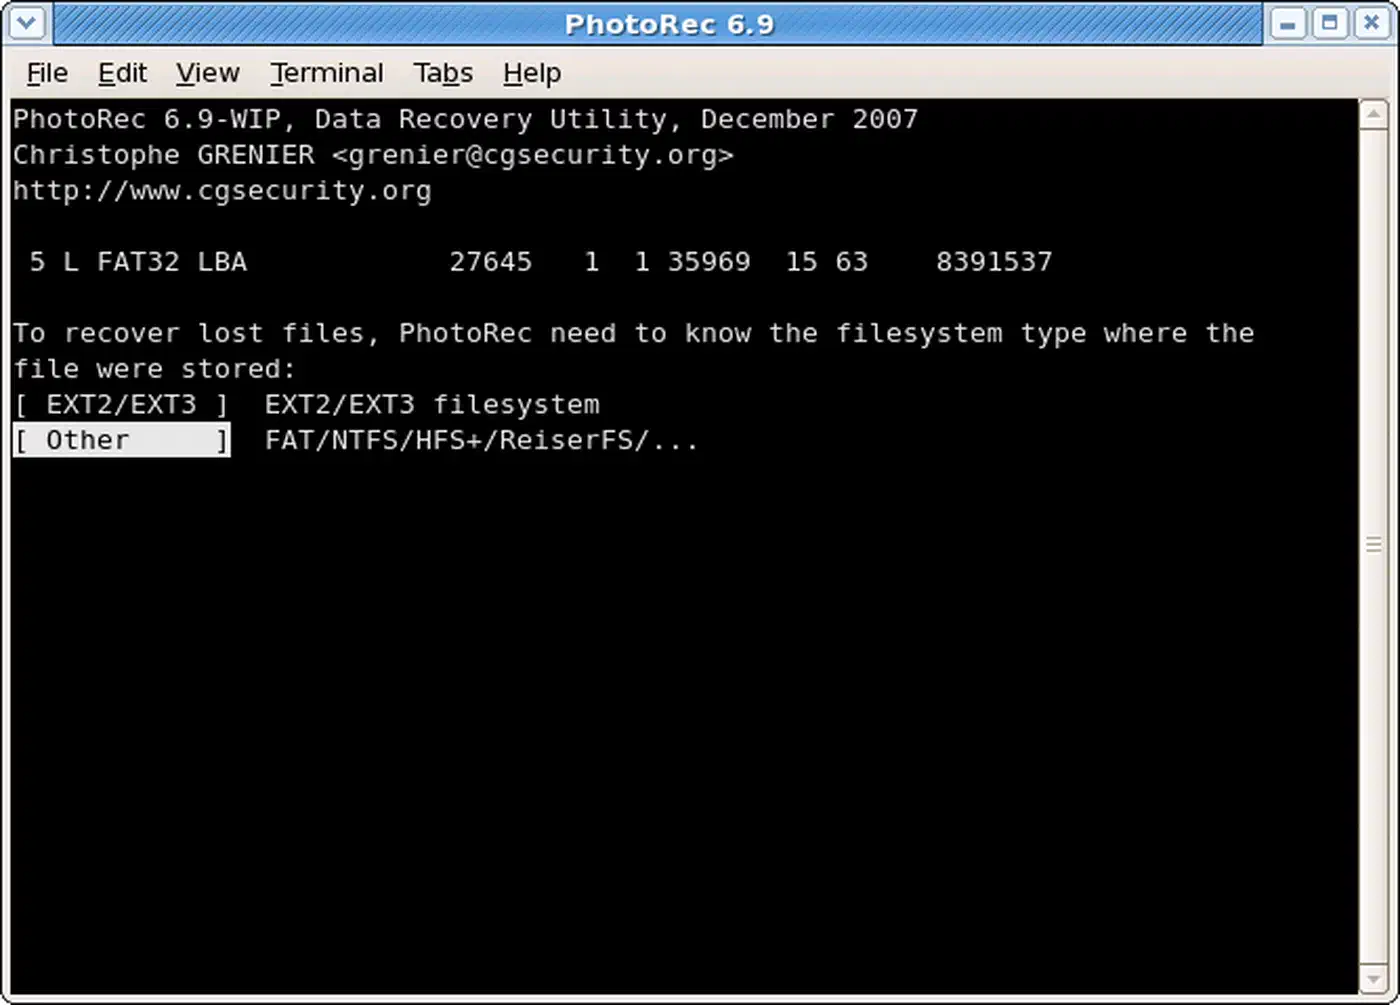
Pick the disk image or partition, then the file system type. Choose Free to scan only unused space, where deleted files live. Choose Whole when the filesystem is damaged. Save the recovered files to a different disk. The tradeoff is that PhotoRec loses names and folders. Files come back as f0001234.pdf, sorted into recup_dir.1, recup_dir.2 and so on. Narrow the file types in File Opt to cut the noise.
grep: recover a deleted text file
To recover a script, config file or note, you may not need a tool at all. If you remember a unique line from the file, search the raw partition for it:
sudo grep -a -C 200 -F 'unique line from the file' /dev/sda2 > /mnt/usb/found.txt-a treats the disk as text, and -C 200 keeps 200 lines on each side of the match. Open the output and cut the file data out by hand. It is crude, but it often beats PhotoRec for plain text.
ext4 recovery walkthrough
Say you just ran rm -rf ~/Documents on an ext4 laptop with one root partition:
- Stop. Do not open apps, and do not run
lson the disk. - Check for open files with
sudo lsof +L1and recover anything that shows up. - Shut down and boot a live USB. Leave the internal disk unmounted.
- Find the partition with
lsblk -f, which lists each partition with its file system. - Run extundelete with
--restore-all --afterfrom a USB drive. - Run PhotoRec on the same partition if files are still lost.
- Copy everything you recovered to another disk before you boot the old system again.
Recovery tool comparison
| Tool | Keeps names | Keeps folders | Speed | Status in 2026 |
|---|---|---|---|---|
| extundelete | Often | Sometimes | Fast | No upstream release since 2013, still packaged |
| PhotoRec | No | No | Slow | Active, 7.2 stable |
| grep | No | No | Slow | Text files only |
| debugfs | Names only | No | Fast | Data recovery does not work on ext4 |
| ext4magic | Yes | Yes | Fast | Abandoned, fails on current ext4 |
| Foremost, Scalpel | No | No | Moderate | Carvers like PhotoRec, fewer formats |
Recover a lost partition with TestDisk
Sometimes a whole partition is lost instead of a single file. A wrong fdisk command, a wiped partition table or a botched install can make a disk look empty, with all its data out of reach. The data is often intact. TestDisk scans the disk for partition boundaries, finds the lost partition and writes the partition table back. It is the standard tool to recover a lost partition on Linux.
sudo testdisk /dev/sdbChoose Create for a log, pick the disk and the partition table type (EFI GPT on most modern systems), then run Analyse and Quick Search. If your partition is missing, run Deeper Search. Highlight a found partition and press P to list its files. If they look right, choose Write and reboot. If the disk is damaged, recover from the ddrescue image first.
If the partition is there but will not mount because the superblock is damaged, ext4 keeps backup copies. List them, then point e2fsck at one:
sudo mke2fs -n /dev/sdb1         # -n only prints, it does not format
sudo e2fsck -b 32768 /dev/sdb1
Leave out -n and mke2fs formats the partition. Read the command twice before you press Enter.
Recover deleted files from Btrfs
Btrfs uses a copy-on-write design. New data goes to new blocks instead of overwriting old ones. extundelete reads ext4 inode tables, so it is useless here. In exchange, Btrfs gives you snapshots, and old metadata trees that linger after a delete. Both let you recover data that ext4 would lose.
Copy the file out of a snapshot
With snapper or btrbk taking automatic snapshots, you recover a file with a copy. Each snapper config keeps its snapshots in a .snapshots folder at the root of the subvolume it covers:
sudo snapper -c home list

# Snapshots of /home live under /home/.snapshots
sudo cp -a /home/.snapshots/42/snapshot/user/documents/report.pdf ~/recovered/

# Or undo every change made since snapshot 42
sudo snapper -c home undochange 42..0
A snapshot is instant and starts out using almost no extra space. Only blocks that change later take room. Keep the count sane: 24 hourly and 7 daily snapshots is a common setup. Let snapper-cleanup prune old ones on a Btrfs snapshot schedule. Btrfs quota groups slow things down with many snapshots, so leave them off unless you need them.
Snapper vs btrbk for recovery
Both create read-only Btrfs snapshots on a schedule. The difference is where the copies end up:
| snapper | btrbk | |
|---|---|---|
| Best for | Desktops, root rollback | Servers, backups to another disk |
| Restores with | undochange, rollback, cp | cp from the snapshot dir |
| Off-machine copies | No | Yes, btrfs send/receive over SSH |
| Configured in | /etc/snapper/configs/ | /etc/btrbk/btrbk.conf |
A snapshot on the same disk does not survive a damaged or dead disk. btrbk can send each snapshot to a second machine, which makes it a real backup. Many people run both.
btrfs restore: no snapshots
Without snapshots, btrfs restore reads the filesystem from the raw device, unmounted, and copies the recovered files to another disk. -D is a dry run, -i ignores errors, -s includes snapshots, and -v prints each file:
# Dry run: list the files it would recover
sudo btrfs restore -Dv /dev/sda3 /mnt/usb/recovery/

# Recover only the folder you lost
sudo btrfs restore -iv --path-regex '^/(|home(|/user(|/documents(|/.*))))$' \
  /dev/sda3 /mnt/usb/recovery/
The regex form looks odd, but every parent folder must match on the way down. If the current tree no longer holds the file, recover it from an older tree root. Copy-on-write leaves them on disk until the space is reused:
sudo btrfs-find-root /dev/sda3                     # prints candidate tree roots
sudo btrfs restore -Dv -t <bytenr> /dev/sda3 /mnt/usb/recovery/
Try the roots from newest to oldest, with -D first each time, until the tool lists the files you want to recover. PhotoRec also works on Btrfs because it ignores the filesystem. Pick Other at the filesystem prompt.
Set up snapper before you need it
sudo snapper -c home create-config /home
sudo nano /etc/snapper/configs/home
Set the timeline limits:
TIMELINE_CREATE="yes"
TIMELINE_LIMIT_HOURLY="24"
TIMELINE_LIMIT_DAILY="7"
TIMELINE_LIMIT_WEEKLY="4"
TIMELINE_LIMIT_MONTHLY="0"
TIMELINE_LIMIT_YEARLY="0"
Then enable snapper-timeline.timer and snapper-cleanup.timer with systemctl enable --now.
Encrypted partitions
To recover data from a LUKS disk, unlock it first. Then run the same tools against the mapper device, not the raw partition:
sudo cryptsetup open /dev/sda2 recoveryvolume
sudo extundelete /dev/mapper/recoveryvolume --restore-all
Without the passphrase or key file, the data is gone, and so is every disk image you made of it. LUKS2 uses Argon2id by default, which makes brute force impractical. A damaged LUKS header with no backup is just as fatal, so save one now with cryptsetup luksHeaderBackup.
How the ext4 journal sets your recovery window
extundelete depends on the journal, and the journal is a ring buffer. New metadata changes overwrite the oldest entries. Its size is set when the filesystem is made. Current e2fsprogs scales it with the filesystem, up to 1 GB on large disks. Check yours:
sudo dumpe2fs -h /dev/sda2 | grep -i journalOn a busy desktop, the entries for a deleted file can be gone in minutes. On a quiet server, they may last days. The damage comes from writes such as atime updates, updatedb and desktop file indexers. Saving the journal with debugfs right after the delete freezes the data it holds.
Prevention: trash, snapshots and backups
The best recovery is the one you never need. Three layers cover different failures.
A trash can for the terminal. trash-cli gives you trash-put, trash-list and trash-restore, using the same trash folder as your desktop. Use it by name on servers rather than aliasing rm, since other admins expect rm to behave like rm.
Snapshots. Btrfs users have snapper or btrbk, and ZFS has its own snapshots. ext4 on LVM can take an LVM snapshot before risky work:
sudo lvcreate --snapshot --size 5G --name home_snap /dev/vg0/homeOffsite backups. Restic makes encrypted, deduplicated backups to SFTP, S3-compatible storage and more. Restoring one file is a single command:
restic -r sftp:user@backup-server:/repo restore latest \
  --include /home/user/documents/report.pdf --target /recovery/
A systemd timer can run encrypted backups with restic and rclone every night.
| Layer | What | Where | Restore speed |
|---|---|---|---|
| Btrfs snapshots | Point-in-time state | Same disk | Instant |
| rsync to NAS | File copy | Another device on the LAN | Minutes |
| Restic to cloud | Encrypted backup | Offsite | Minutes to hours |
Test the restore path every few months. Pull one file from each layer and check that retention has not pruned what you would need.
Linux file recovery FAQ
Can you recover permanently deleted files on Linux?
Often, yes, if the data blocks have not been reused or trimmed. “Permanently deleted” usually means rm or an emptied trash, and both only free the blocks. Your odds drop with every write. On an SSD with TRIM, they drop to near zero once the trim runs.
Is there a Linux recovery USB?
Yes. SystemRescue is a live system made for repair, with TestDisk, ddrescue and GParted built in. An Ubuntu or Fedora live USB works too. Install testdisk into the live system, which runs from RAM, not from your disk.
Is there a GUI for Linux file recovery?
TestDisk and PhotoRec run in a text menu, which is easy to follow. PhotoRec also has a Qt front end called QPhotoRec. R-Linux is a free GUI tool for ext2, ext3 and ext4. For Btrfs, the command line is the only real option.
What is the best tool for recovering deleted files on Linux?
The best Linux file recovery tool depends on the filesystem and the damage. For an open file, use /proc. On ext4, try extundelete and then PhotoRec. On Btrfs, use snapshots and then btrfs restore. PhotoRec on a disk image works on any file system, TestDisk handles a lost partition, and a failing disk gets ddrescue first, then any of the above on the image.
When all else fails
Professional recovery labs can recover data from damaged drives at the hardware level. Expect to pay hundreds or thousands of dollars, with no promise of success. For an SSD that has already trimmed the blocks, even a lab cannot recover the lost data.
Prevention is cheaper. Install trash-cli, turn on snapshots if you run Btrfs, and point restic at a remote target.