Wildcard SSL Certificates with Let's Encrypt and DNS-01

A wildcard SSL cert for *.example.com from Let’s Encrypt
covers every one-level subdomain. You get one through the DNS-01 challenge, or, since February 2026, through the new DNS-PERSIST-01 challenge that skips per-renewal DNS edits. One wildcard cert replaces the per-service certs you’d otherwise juggle behind your reverse proxy.
Key Takeaways
- One wildcard cert covers every one-level subdomain under a domain, replacing dozens of per-service certs.
- Only DNS-based challenges (DNS-01 and DNS-PERSIST-01) issue wildcards; HTTP-01 and TLS-ALPN-01 won’t work.
- The newer DNS-PERSIST-01 challenge lets you authorize once and skip DNS edits on every renewal.
- Certbot and acme.sh both automate the DNS challenge through provider-specific plugins or tags.
- Systemd timers handle the 90-day renewal window cleanly, with deploy hooks to reload your reverse proxy.
Why Wildcard Certificates and When You Need Them
If you run three subdomains, single certs work fine. Each one gets its own HTTP-01 challenge, Certbot handles renewal, and life is simple. Once you pass 10 or 15 subdomains, the chore list grows. Every new service needs its own cert request, its own renewal entry, and its own way to break. A wildcard cert folds all of that into one.
Here is what a wildcard covers and what it does not:
| Covered | Not Covered |
|---|---|
app.example.com | example.com (apex domain - request separately) |
git.example.com | a.b.example.com (multi-level subdomain) |
anything.example.com | other-domain.org (different domain entirely) |
To cover both *.example.com and the apex example.com, request both in one cert with two -d flags. Certbot then issues a single SAN (Subject Alternative Name) cert that covers both.
Let’s Encrypt rate limits are another reason to go wildcard. The cap is 50 certs per registered domain per week. If you run 20+ subdomains and something forces a mass reissue (a server move, a config slip, a key leak), you can hit that cap fast. One wildcard cert counts as one issuance, no matter how many subdomains it covers.
When to stick with single certs: stay with one-per-host if you only use HTTP-01 (simpler, no DNS API needed). Also stay if your subdomains need different key types or lifetimes. Same goes if you want Certificate Transparency logs to list each subdomain by name instead of *.example.com. Wildcard certs hide the per-subdomain names in CT logs. That can be a privacy win or a transparency loss, depending on your stance.
One hard rule: Let’s Encrypt only issues wildcard certs through DNS-based challenges. Both classic DNS-01 and the newer DNS-PERSIST-01 qualify; HTTP-01 and TLS-ALPN-01 still do not. You must control DNS for the domain either way.
Setting Up Certbot with DNS-01 Challenge
Certbot 5.4.0 defaults to ECDSA P-256 keys for new certs. ECDSA certs are smaller and produce faster TLS handshakes than RSA. Don’t override this default unless you need to support very old clients.
Installing Certbot
The recommended installation method is via snap, which provides automatic updates:
sudo snap install certbot --classic
sudo ln -s /snap/bin/certbot /usr/bin/certbot
If snap isn’t an option, run sudo apt install certbot (Debian/Ubuntu) or sudo dnf install certbot (Fedora/RHEL). Those repos can ship an older build.
Choosing and Installing a DNS Plugin
Certbot DNS plugins are separate packages. Install the one matching your DNS provider:
| DNS Provider | Plugin Package | Credentials File |
|---|---|---|
| Cloudflare | certbot-dns-cloudflare | /etc/letsencrypt/cloudflare.ini |
| AWS Route 53 | certbot-dns-route53 | AWS IAM credentials (~/.aws/credentials) |
| Google Cloud DNS | certbot-dns-google | Service account JSON key file |
| DigitalOcean | certbot-dns-digitalocean | /etc/letsencrypt/digitalocean.ini |
| OVH | certbot-dns-ovh | /etc/letsencrypt/ovh.ini |
| RFC 2136 (BIND) | certbot-dns-rfc2136 | TSIG key configuration file |
For snap-based installations, install the plugin as a snap:
sudo snap install certbot-dns-cloudflare
sudo snap set certbot trust-plugin-with-root=ok
sudo snap connect certbot:plugin certbot-dns-cloudflare
Cloudflare Setup
At dash.cloudflare.com
, make a scoped API token with Zone:DNS:Edit for the zone you own. Save it to a creds file:
sudo mkdir -p /etc/letsencrypt
echo 'dns_cloudflare_api_token = YOUR_API_TOKEN_HERE' | sudo tee /etc/letsencrypt/cloudflare.ini
sudo chmod 600 /etc/letsencrypt/cloudflare.ini
Request the wildcard certificate:
sudo certbot certonly \
  --dns-cloudflare \
  --dns-cloudflare-credentials /etc/letsencrypt/cloudflare.ini \
  --dns-cloudflare-propagation-seconds 30 \
  -d "*.example.com" \
  -d "example.com"
Cloudflare DNS spreads in 5 to 10 seconds, so a 30-second wait is safe but not tight.
AWS Route 53 Setup
The Route 53 plugin uses standard AWS credentials. Your IAM policy needs these permissions:
{
  "Effect": "Allow",
  "Action": [
    "route53:GetChange",
    "route53:ChangeResourceRecordSets",
    "route53:ListHostedZones",
    "route53:ListHostedZonesByName"
  ],
  "Resource": "*"
}
Install and run:
sudo snap install certbot-dns-route53
sudo snap set certbot trust-plugin-with-root=ok
sudo snap connect certbot:plugin certbot-dns-route53

sudo certbot certonly \
  --dns-route53 \
  -d "*.example.com" \
  -d "example.com"
DigitalOcean Setup
At cloud.digitalocean.com , make a personal access token with read and write scope. Save it to a creds file:
echo 'dns_digitalocean_token = YOUR_DIGITALOCEAN_TOKEN' | sudo tee /etc/letsencrypt/digitalocean.ini
sudo chmod 600 /etc/letsencrypt/digitalocean.ini

sudo certbot certonly \
  --dns-digitalocean \
  --dns-digitalocean-credentials /etc/letsencrypt/digitalocean.ini \
  --dns-digitalocean-propagation-seconds 60 \
  -d "*.example.com" \
  -d "example.com"
Certificate Output
After issuance, Certbot writes your files to fixed paths:
- Certificate chain:
/etc/letsencrypt/live/example.com/fullchain.pem - Private key:
/etc/letsencrypt/live/example.com/privkey.pem
These are symlinks. Certbot updates them on each renewal, so your reverse proxy config never needs to change.
Using acme.sh as an Alternative
acme.sh is a pure shell-script ACME client. It needs nothing beyond bash and curl. Its main edge over Certbot: built-in support for 150+ DNS providers, no extra plugins to install. If your provider has no Certbot plugin, acme.sh likely supports it out of the box.
Installation and Basic Usage
curl https://get.acme.sh | sh -s email=your@email.comThis drops acme.sh in ~/.acme.sh/ and adds a cron job for auto-renewal. To issue a wildcard cert with Cloudflare:
export CF_Token="YOUR_CLOUDFLARE_API_TOKEN"
export CF_Zone_ID="YOUR_ZONE_ID"

~/.acme.sh/acme.sh --issue \
  -d "*.example.com" \
  -d "example.com" \
  --dns dns_cf
Swap dns_cf for your provider’s tag: dns_aws for Route 53, dns_gd for GoDaddy, dns_he for Hurricane Electric, dns_linode for Linode, and so on. The full list lives in the acme.sh wiki
.
Installing the Certificate
Once issued, install the cert wherever you want it:
~/.acme.sh/acme.sh --install-cert -d "*.example.com" \
  --key-file /etc/ssl/private/example.com.key \
  --fullchain-file /etc/ssl/certs/example.com.pem \
  --reloadcmd "systemctl reload nginx"
acme.sh remembers the install path and reload command. Renewals then copy the new cert in place and reload the service for you.
DNS-PERSIST-01: The Newer Persistent Authorization Option
Let’s Encrypt announced DNS-PERSIST-01 in February 2026, a second DNS-based challenge that ships an authorization once and reuses it for every renewal. Staging opened in late Q1 2026, with production rollout targeted for Q2 2026. It does not replace DNS-01. It sits beside it for cases where rewriting TXT records on every renewal is expensive, like IoT fleets, multi-tenant platforms, and batch issuance pipelines.
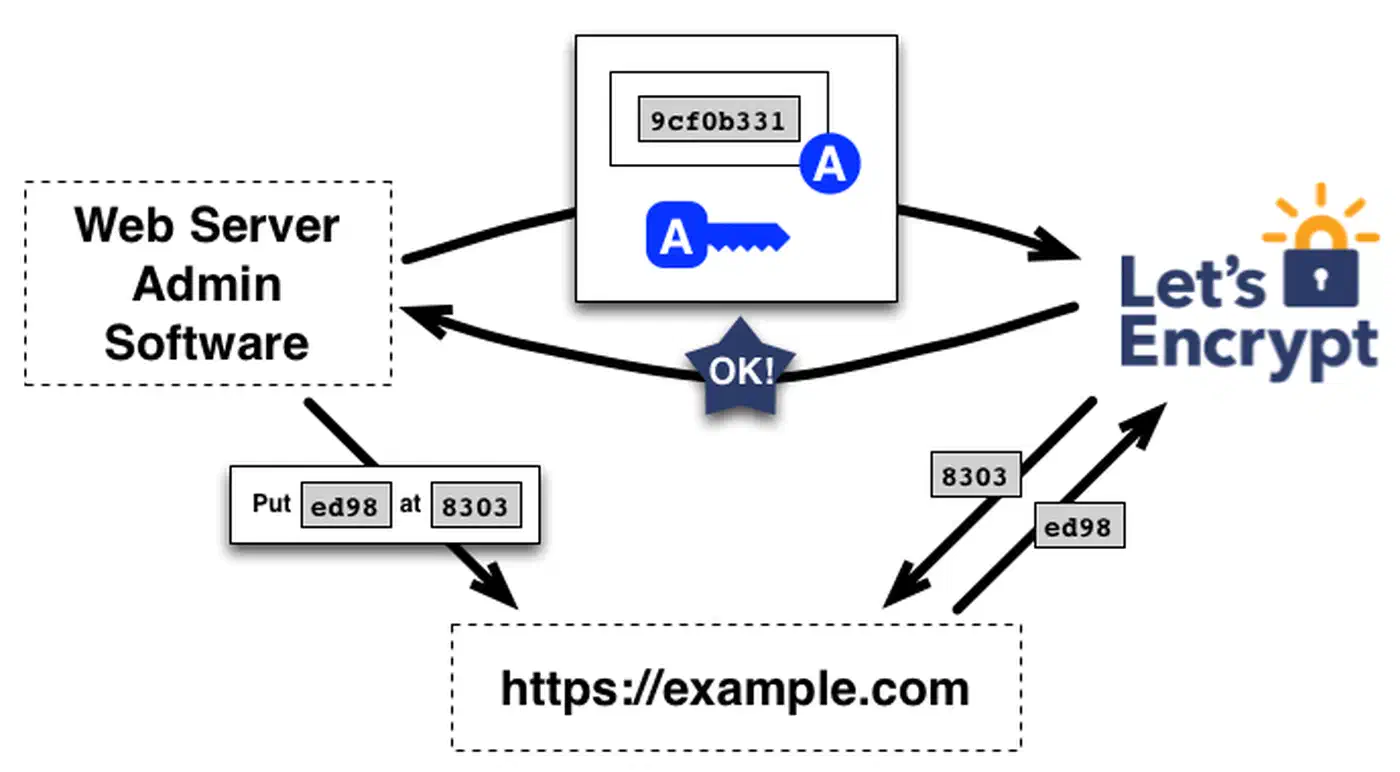
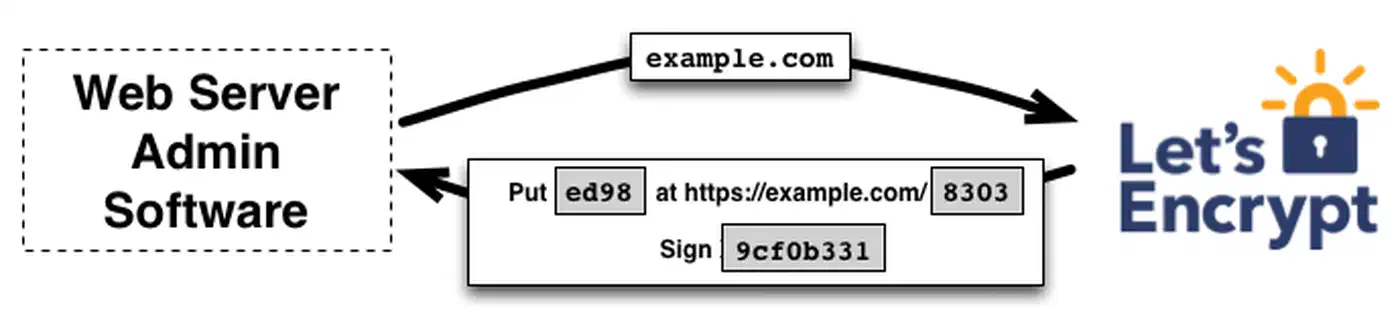
How DNS-PERSIST-01 Differs From DNS-01
The classic DNS-01 flow generates a fresh token per validation. Your client writes the TXT record, Let’s Encrypt reads it, your client deletes it. DNS-PERSIST-01 publishes one record at _validation-persist.example.com naming the issuer and the ACME account URI. Let’s Encrypt re-checks that record on every renewal. No further DNS edits.
| Trait | DNS-01 | DNS-PERSIST-01 |
|---|---|---|
| Record location | _acme-challenge.example.com | _validation-persist.example.com |
| Record content | One-time token per issuance | Standing pointer to ACME account |
| Renewal DNS work | Write and delete TXT each time | None after first publish |
| Sensitive asset | DNS API credentials | ACME account key |
| Wildcard support | Yes (always) | Yes (with policy=wildcard) |
The Persistent TXT Record
The minimum record looks like this:
_validation-persist.example.com. IN TXT (
  "letsencrypt.org;"
  " accounturi=https://acme-v02.api.letsencrypt.org/acme/acct/1234567890"
)
Add policy=wildcard to extend authorization to *.example.com and direct subdomains under one persistent record. Add persistUntil=<UTC_timestamp> if you want the authorization to lapse on a known date. Multiple TXT records at the same label authorize multiple CAs in parallel, each line naming a different issuer.
The security tradeoff shifts. With DNS-01, the asset you must guard is DNS write access on every renewal host. With DNS-PERSIST-01, the asset is the ACME account key. DNS write access can stay locked down once the persistent record is in place.
When To Pick DNS-PERSIST-01
- You run hundreds or thousands of certs and don’t want every renewal touching DNS.
- You can’t distribute DNS API credentials to every cert-issuing host or container.
- Your DNS provider rate-limits zone edits, throttling batch renewals.
- You’d rather protect a single ACME account key than scoped DNS tokens scattered everywhere.
Stick with DNS-01 if you only run a handful of certs, or if your ACME client doesn’t speak DNS-PERSIST-01 yet. Tooling is rolling out: Pebble , Let’s Encrypt’s test CA, supports it, and lego-cli has an in-progress implementation. Check your client’s release notes before you migrate production. The protocol spec is draft-ietf-acme-dns-persist-00 ; the CA/Browser Forum approved the underlying method in Ballot SC-088v3 .
Automating Renewal with Systemd Timers
Let’s Encrypt certs expire after 90 days. Certbot’s renew command scans every managed cert and renews any with under 30 days left. It reuses the DNS plugin and creds from the first issue, so you don’t set up anything new.
Creating the Systemd Timer
A periodic timer managed by systemd beats a cron job for this. It logs every run, catches up on missed jobs after downtime, and can stagger start times to avoid thundering-herd bursts.
Create the service unit at /etc/systemd/system/certbot-renewal.service:
[Unit]
Description=Certbot certificate renewal

[Service]
Type=oneshot
ExecStart=/usr/bin/certbot renew --quiet --deploy-hook "systemctl reload nginx"
Create the timer at /etc/systemd/system/certbot-renewal.timer:
[Unit]
Description=Run Certbot renewal daily

[Timer]
OnCalendar=*-*-* 03:00:00
RandomizedDelaySec=3600
Persistent=true

[Install]
WantedBy=timers.target
Enable and start the timer:
sudo systemctl enable --now certbot-renewal.timerVerify it is scheduled:
systemctl list-timers | grep certbotDeploy Hooks
The --deploy-hook flag fires a command only when a cert is actually renewed, not on every check. Common reload commands:
- Nginx:
systemctl reload nginx - Traefik (native): Traefik watches cert files and reloads automatically - no hook needed
- Traefik (Docker):
docker exec traefik kill -s HUP 1 - HAProxy:
systemctl reload haproxy - Apache:
systemctl reload apache2
Testing Before Going Live
Test the renewal flow without burning real rate limits:
sudo certbot renew --dry-runThis hits Let’s Encrypt’s staging server and walks the full flow: DNS plugin login, TXT record write, ACME check, TXT record cleanup.
Configuring Your Reverse Proxy
Nginx Configuration
Create a shared SSL configuration file at /etc/nginx/conf.d/ssl-params.conf:
ssl_certificate /etc/letsencrypt/live/example.com/fullchain.pem;
ssl_certificate_key /etc/letsencrypt/live/example.com/privkey.pem;

ssl_protocols TLSv1.2 TLSv1.3;
ssl_ciphers ECDHE-ECDSA-AES128-GCM-SHA256:ECDHE-RSA-AES128-GCM-SHA256:ECDHE-ECDSA-AES256-GCM-SHA384:ECDHE-RSA-AES256-GCM-SHA384;
ssl_prefer_server_ciphers off;
ssl_session_cache shared:SSL:10m;
ssl_session_timeout 1d;
ssl_stapling on;
ssl_stapling_verify on;
Each service then gets its own server block that pulls in the shared SSL settings:
server {
    listen 443 ssl http2;
    server_name app.example.com;
    include /etc/nginx/conf.d/ssl-params.conf;

    location / {
        proxy_pass http://127.0.0.1:8080;
        proxy_set_header Host $host;
        proxy_set_header X-Real-IP $remote_addr;
        proxy_set_header X-Forwarded-For $proxy_add_x_forwarded_for;
        proxy_set_header X-Forwarded-Proto $scheme;
    }
}
Every new subdomain needs a new server block with a fresh server_name and proxy_pass target. The wildcard cert handles TLS for all of them.
Pull cipher suites from Mozilla’s SSL Configuration Generator . Don’t copy cipher strings from blog posts. They go stale fast.
Traefik with External Certificate
If Certbot already manages your certs and you just want Traefik to pick them up, point at the cert in a dynamic config file:
# /etc/traefik/dynamic/certs.yml
tls:
  certificates:
    - certFile: /etc/letsencrypt/live/example.com/fullchain.pem
      keyFile: /etc/letsencrypt/live/example.com/privkey.pem
Traefik with Built-in ACME
Traefik
can fetch its own Let’s Encrypt wildcard certs, no Certbot needed. In your traefik.yml static config:
certificatesResolvers:
  letsencrypt:
    acme:
      email: your@email.com
      storage: /letsencrypt/acme.json
      dnsChallenge:
        provider: cloudflare
        resolvers:
          - "1.1.1.1:53"
          - "8.8.8.8:53"
Set the Cloudflare token as an environment variable:
export CF_DNS_API_TOKEN=your_cloudflare_api_tokenThen reference the resolver in your Docker Compose labels or dynamic configuration:
labels:
  - "traefik.http.routers.myapp.tls.certresolver=letsencrypt"
  - "traefik.http.routers.myapp.tls.domains[0].main=example.com"
  - "traefik.http.routers.myapp.tls.domains[0].sans=*.example.com"
Traefik watches cert expiry and renews on its own when fewer than 30 days are left. No cron jobs, no systemd timers, no deploy hooks.
Running Certbot in Docker
If you’d rather skip a host-level Certbot install, the official Docker image runs the DNS plugins just fine:
docker run --rm \
  -v /etc/letsencrypt:/etc/letsencrypt \
  -v /var/lib/letsencrypt:/var/lib/letsencrypt \
  certbot/dns-cloudflare certonly \
  --dns-cloudflare \
  --dns-cloudflare-credentials /etc/letsencrypt/cloudflare.ini \
  -d "*.example.com" \
  -d "example.com" \
  --agree-tos \
  --email your@email.com
The cert files land in the same /etc/letsencrypt/ folder on the host, thanks to the volume mount. For renewal, run the same container with renew instead of certonly. Schedule it from a cron job or a systemd timer on the host.
Docker Hub
hosts a plugin image for each DNS provider: certbot/dns-cloudflare, certbot/dns-route53, certbot/dns-google, certbot/dns-digitalocean, and more.
Monitoring Certificate Expiry
Auto-renewal doesn’t mean you can stop watching. Renewal can fail in silence if API tokens expire, the DNS provider tweaks its API, or your server loses outbound internet.
Check cert status by hand:
sudo certbot certificatesThis prints the expiry date for every managed cert.
For hands-off monitoring, Prometheus with the x509_cert_not_after metric tracks cert expiry and fires alerts when a cert has fewer than 14 days left. Gatus
is a simpler pick, with its [CERTIFICATE_EXPIRATION] > 168h health check. If you want something lighter, a cron script with OpenSSL works fine. For the full setup, see our guide on building a status page with Gatus
:
echo | openssl s_client -connect app.example.com:443 -servername app.example.com 2>/dev/null \
  | openssl x509 -noout -dates
Troubleshooting Common DNS-01 Issues
“No TXT Record Found”
The DNS record hasn’t reached Let’s Encrypt’s resolvers yet. Bump the wait:
--dns-cloudflare-propagation-seconds 60Check the record by hand:
dig -t TXT _acme-challenge.example.com @1.1.1.1If dig sees the record but Let’s Encrypt still can’t, the cause is usually DNS caching on their check servers. Wait a few minutes and retry.
API Permission Errors
Each provider needs its own scope:
- Cloudflare: The API token must have
Zone:DNS:Edit(not justZone:DNS:Read) scoped to your specific zone. - AWS Route 53: The IAM policy needs
route53:GetChange,route53:ChangeResourceRecordSets,route53:ListHostedZones, androute53:ListHostedZonesByName. - DigitalOcean: The personal access token must have read and write scope.
- Google Cloud DNS: The service account needs the
dns.adminrole on the project containing your zone.
Stale TXT Records
If a past challenge died mid-way, the _acme-challenge TXT record can linger with stale data. Certbot plugins usually clean up on their own, but you may need to remove it by hand:
dig -t TXT _acme-challenge.example.comIf a stale record is there, delete it from your DNS dashboard or via the API before you retry.
CAA Record Blocking
If you have a CAA DNS record, it must list Let’s Encrypt’s issuer tag:
0 issue "letsencrypt.org"Check with:
dig -t CAA example.comWith no CAA record, any CA can issue certs for your domain. That’s the default.
Rate Limit Errors
The “too many certificates” error means you hit the 50 certs per registered domain per week cap. Use the staging server for tests so you don’t burn live limits:
--server https://acme-staging-v02.api.letsencrypt.org/directoryStaging certs aren’t trusted by browsers, but they walk the full check flow.
Firewall Considerations
DNS-01 needs no inbound ports, unlike HTTP-01 which needs port 80 open. However, your server must reach two endpoints over outbound HTTPS: your DNS provider’s API and Let’s Encrypt’s ACME servers.
Free Wildcard Certificate Alternatives
Let’s Encrypt isn’t the only choice. Other ACME-friendly CAs issue free wildcard certs:
| CA | Wildcard Support | Certificate Lifetime | Notes |
|---|---|---|---|
| Let’s Encrypt | Yes (DNS-01 only) | 90 days | Most widely used, largest ecosystem |
| ZeroSSL | Yes (DNS-01 only) | 90 days | ACME-compatible, web dashboard available |
| Google Trust Services | Yes (DNS-01 only) | 90 days | Requires Google Cloud account |
Buypass used to offer free ACME certs with 180-day lifetimes but shut the free product down in October 2025. If older guides point to Buypass Go SSL, that service is gone.
All of these CAs work with Certbot and acme.sh under the same DNS-01 flow shown above. For ZeroSSL with Certbot, add the --server flag and point it at their ACME directory URL. With acme.sh, swap the default CA via --set-default-ca --server zerossl.
Quick Reference
Here are the bare-minimum commands to get a wildcard cert with Cloudflare DNS:
# Install Certbot and Cloudflare plugin
sudo snap install certbot --classic
sudo snap install certbot-dns-cloudflare
sudo snap set certbot trust-plugin-with-root=ok
sudo snap connect certbot:plugin certbot-dns-cloudflare

# Save API credentials
echo 'dns_cloudflare_api_token = YOUR_TOKEN' | sudo tee /etc/letsencrypt/cloudflare.ini
sudo chmod 600 /etc/letsencrypt/cloudflare.ini

# Request wildcard + apex certificate
sudo certbot certonly \
  --dns-cloudflare \
  --dns-cloudflare-credentials /etc/letsencrypt/cloudflare.ini \
  -d "*.example.com" \
  -d "example.com"

# Test renewal
sudo certbot renew --dry-run

# Enable automatic renewal
sudo systemctl enable --now certbot-renewal.timer
Your cert files live at /etc/letsencrypt/live/example.com/fullchain.pem and privkey.pem. Point your reverse proxy at those paths, start the systemd timer, and every new subdomain gets HTTPS for free.