Setting Up the Chipsailing CS9711 Fingerprint Reader on Linux Mint

Bought a budget USB fingerprint reader like the Chipsailing CS9711 (USB ID 2541:0236) and Linux Mint can’t see it? You aren’t alone. These “Match-on-Host” devices don’t ship with libfprint support by default. A community driver gets them working in a few steps.
Identifying the Hardware
First, verify your device ID by running lsusb in the terminal. Look for:
Bus XXX Device XXX: ID 2541:0236 Chipsailing CS9711Fingprint
If the device shows up but fails to “enumerate” (no name appears), plug it straight into a motherboard USB port. A USB hub often can’t supply steady power.
Installation Steps
To get the reader working, you’ll build a patched libfprint that ships the CS9711 driver.
Install Dependencies
Open a terminal and pull in the build tools and libraries:
sudo apt update && sudo apt install -y git build-essential meson ninja-build
libnss3-dev libgudev-1.0-dev libgusb-dev libpixman-1-dev libssl-dev
libopencv-dev doctest-dev fprintd libpam-fprintd
Build and Install the Driver
Clone the community repository and compile the source:
git clone https://github.com/archeYR/libfprint-CS9711.git
cd libfprint-CS9711
meson setup build
ninja -C build
sudo ninja -C build install
sudo ldconfig
sudo systemctl restart fprintd
Enrollment and Verification
Once installed, you manage prints from the command line.
- Enroll a finger: Run
fprintd-enroll. Be prepared to touch the sensor ~15 times. - Select a specific finger: Use the
-fflag, e.g.,fprintd-enroll -f right-thumb. - Test verification: Run
fprintd-verifyand scan your finger to confirm a match.
After it verifies in the terminal, turn on “Fingerprint Login” under System Settings > Users. Run sudo pam-auth-update to wire it into sudo prompts.
How It Works (Technical Overview)
Unlike high-end “Match-on-Chip” sensors, the CS9711 is a Match-on-Host device. All the logic runs in software on your PC, not on a chip inside the sensor. Here’s the full pipeline from touch to login:
Image Capture (USB HID)
When you press your finger on the sensor, the CS9711 grabs a small grayscale bitmap: about 80×80 pixels at roughly 500 DPI. The raw image streams over the USB HID (Human Interface Device) protocol to the host. The CS9711 does no on-device work and no encryption. Pixel data goes over the wire in plaintext.
The libfprint driver talks to the device with a vendor-specific HID report format. It handles the USB control transfers
that trigger a scan and read back the image frame.
Image Enhancement (OpenCV)
Raw prints from budget sensors are noisy and low-contrast, and they smear easily. The driver runs the bitmap through an OpenCV pipeline that applies:
- Histogram equalization to even out contrast across the image
- Gaussian blur and unsharp masking to cut noise and sharpen ridge detail
- Binarization (gray image to black-and-white ridges) via adaptive thresholding
The goal is a clean ridge map, sharp enough for feature extraction.
Minutiae Extraction (NBIS / MINDTCT)
Once enhanced, the image flows into the NBIS (NIST Biometric Image Software) toolkit, specifically its MINDTCT (Minutiae Detector) component. It’s the same open-source library used in law enforcement and government biometrics.
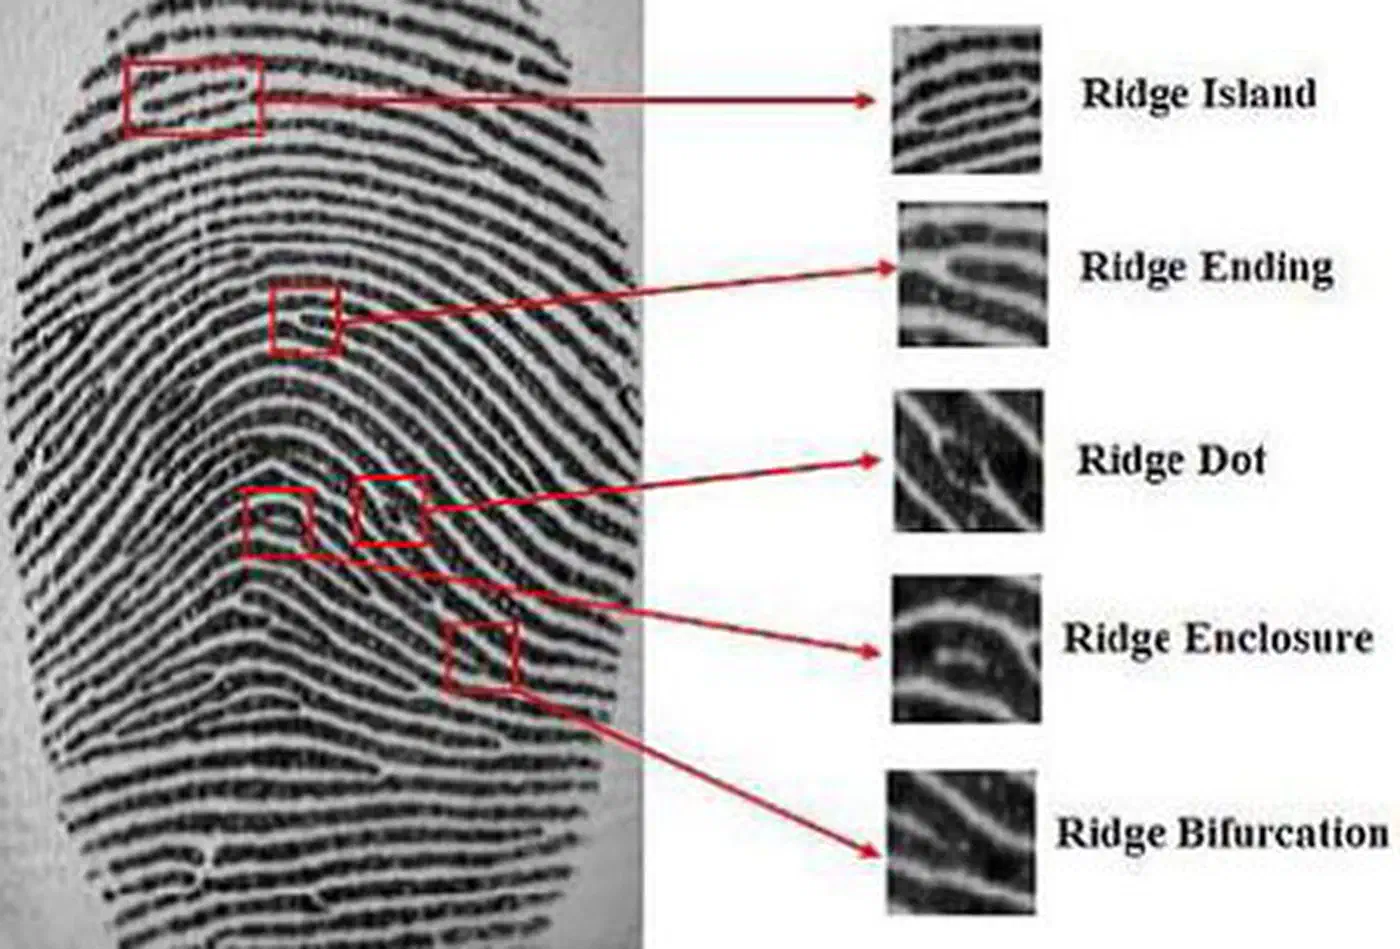
MINDTCT scans the ridge map and picks out minutiae points. These are spots where a ridge line either ends (a “ridge ending”) or forks into two (a “bifurcation”). For each minutia, it records:
- X/Y coordinates in the image
- Ridge angle at that point
- A quality score
A typical print yields 20 to 80 minutiae. Together they form a sparse geometric map unique to that finger.
Template Storage
The minutiae map, never the original image, is packed into a binary template and saved to /var/lib/fprint/<username>/<device>/. The file is owned by root and readable only by fprintd, the fingerprint daemon. No photo is kept, so the template alone can’t be turned back into your fingerprint image.
Each enrolled finger gets its own template file. List them with fprintd-list <username>.
Verification and Matching
At login (or when sudo prompts you), fprintd grabs a fresh scan and runs it through the same enhancement and extraction steps. That produces a new minutiae set. It then runs point-pattern matching against the stored template, with a tolerance budget for:
- Translation: your finger never lands in the same spot twice
- Rotation: the finger tilts a little each time
- Elastic distortion: skin stretches and compresses under pressure
The matcher scores how well the live minutiae overlap the stored template. If the score clears the threshold set in fprintd’s config, the login passes. Matching runs inside the fprintd daemon over a D-Bus interface. PAM (pam_fprintd) is the bridge between the system login stack and the daemon.
Security Considerations
All the work runs on the host CPU with no hardware-level encryption. The attack surface is wider than on a “Match-on-Chip” sensor. The raw USB image is in the clear, and a hijacked fprintd process could grab scans in flight. For a home desktop or personal laptop, that trade-off is fine. It is not the right pick for high-security setups.
It’s less secure than a hardware-encrypted reader, but a big convenience win for Linux Mint users on a budget. For another layer of defense, running Wayland instead of X11 isolates input events from other apps. That cuts the risk of a rogue process sniffing prints at the compositor.