Better Presence Detection with Bayesian Sensors in Home Assistant

Bayesian sensors in Home Assistant
give you one reliable presence signal by fusing weak ones: phone Wi-Fi, GPS zones, motion, power draw, and more. The bayesian platform doesn’t ask “is this one sensor on?” It asks “given everything I can see right now, how sure am I that someone is home?” The result is a presence system that tolerates dropouts, handles sleeping occupants, and stops the lights clicking off while you’re still on the couch.
Why Single-Source Presence Detection Fails
Every single-source setup teaches you its failure mode. Router-based Wi-Fi tracking is the common starting point. It works fine until modern phones start dropping Wi-Fi when the screen is off to save battery. iOS does this by design. Many Android phones running strict power profiles do the same. Home Assistant sees the phone go offline, decides the occupant has left, and fires the “goodbye” scene while you’re still watching TV in the living room.
GPS tracking via the Home Assistant Companion App is better for arrivals, but it has the opposite timing problem. After you walk in and your phone joins the local network, the GPS zone update can take anywhere from 30 seconds to two minutes to land in HA. That delay kills the “welcome home” lighting scene you want the moment you step through the door.
Motion sensors are great for room-level awareness, but they can’t confirm absence. A PIR sensor sees movement. The moment you stop moving (reading, working at a desk, sleeping), it sees nothing. After a timeout of 30 to 120 seconds, it reports “no motion,” and any automation tied to that signal wrongly decides the room is empty. If you’ve ever had overhead lights snap off while you were deep in a book, that’s the cause.
Multi-person homes add another failure mode: the “spouse problem.” When one phone drops off Wi-Fi, an automation keyed to that one device will shut the house down while the other person is still inside. You could stitch person entities together with OR conditions, but now you’ve built a fragile web of branches instead of a clean model.
The root issue with all of these is that they treat a probability question, “is someone home?”, as a binary fact you can read off one sensor. Bayes’ theorem gives us the right way to combine shaky evidence into a confident answer.
Understanding the Bayesian Sensor
Thomas Bayes described a way to update beliefs in light of new evidence. In plain terms: you start with a prior belief, you see something new, and you work out how much that should shift your confidence. You repeat this for each new clue until you land on a posterior probability, your updated degree of belief.
The Home Assistant bayesian platform builds this in as a binary_sensor. You set a prior: your baseline belief that someone is home when you know nothing else. If your home is occupied about 35% of the day (work, school, errands), set prior: 0.35. Then you list observations. Each one maps a sensor state to two probabilities: prob_given_true (how likely is this when someone IS home?) and prob_given_false (how likely when no one is). HA multiplies these odds as each observation fires, and it tracks a running posterior on the sensor as an attribute. When the posterior crosses probability_threshold (default 0.5), the sensor turns on and reports “home.”
The nice part is graceful degradation. If the Wi-Fi scanner misses your phone, the probability drops a bit but doesn’t crash to zero, because motion and power draw still vote. The sensor is much harder to fool than any single-source setup.
It helps to know how Bayesian sensors relate to Home Assistant’s built-in person entity. The person entity rolls up device_tracker entries with its own priority logic. It’s a great data source for Bayesian observations, but it doesn’t replace the probability layer. Your Bayesian sensor sits above person, treating each one as one observation among many, not the final word. In a multi-person home, run one Bayesian sensor per person (each with its own Wi-Fi tracker, GPS zone, and personal device observations). Then combine them into an anyone_home binary sensor with a template sensor or a group.
Choosing Your Observation Sources
Accuracy hinges on picking well-tuned probability values. The table below lists values road-tested on the Home Assistant forums. Treat them as starting points before you tune against your own logbook data.
| Observation Source | prob_given_true | prob_given_false | Notes |
|---|---|---|---|
| Phone Wi-Fi (network scanner) | 0.95 | 0.10 | Phones sometimes drop Wi-Fi while sleeping |
| HA Mobile App GPS zone | 0.90 | 0.05 | Reliable when updated; can lag |
| Motion sensor (common room) | 0.60 | 0.02 | Only useful during waking hours |
| TV / media player active | 0.75 | 0.05 | Strong “someone is awake” signal |
| Home power draw > 300W | 0.85 | 0.15 | HVAC cycles can raise false positives |
| Garage door opened (last 30 min) | 0.80 | 0.01 | Near-perfect arrival indicator |
Phone Wi-Fi via network scanner is the backbone of most setups. The nmap integration
or a dedicated router integration (see below) creates one device_tracker entity per device. The prob_given_false of 0.10 covers the rare case where a phone rejoins a saved network at a neighbor’s house. In practice that almost never happens.
Router integrations are more reliable than nmap polling because they get instant association events instead of scanning on a timer. If you run UniFi Network
, the UniFi integration
exposes device_tracker entities with near-real-time presence. Fritz!Box
users can use the native HA integration for the same effect. OPNsense
users can install the os-haproxy package and expose ARP table data through the OPNsense HA integration or a custom REST sensor. All three skip the multi-minute polling lag that makes nmap shaky.
GPS zone observations that read person.john state (home or not) are useful because GPS errors in the other direction, reporting “not home” when you are, are rare. Once the Companion App has checked in, you can trust it.
Power draw above a threshold is a surprisingly strong signal. An empty house draws only standby power from idle gear. The moment someone wakes up, starts the coffee maker, keeps opening the fridge, or boots a workstation, total draw spikes. A Shelly EM
or similar whole-home energy monitor feeds a sensor.total_power_draw entity. From there, you define a template binary sensor: on when power tops 300W (tune to your baseline). The prob_given_false is fairly high (0.15) because HVAC compressors and water heaters sometimes cross that line in an empty home.
Garage door history is a great high-confidence arrival cue. A history_stats binary sensor that reports whether the garage door opened in the last 30 minutes has a near-zero prob_given_false. Your garage door doesn’t open itself.
Writing the Bayesian Sensor Configuration
Place the following in your configuration.yaml under binary_sensor:, or in a dedicated binary_sensors.yaml file if you use !include:
binary_sensor:
  - platform: bayesian
    name: "John Home"
    unique_id: bayesian_john_home
    device_class: presence
    prior: 0.35
    probability_threshold: 0.75
    observations:
      # Phone Wi-Fi presence via nmap or router integration
      - platform: state
        entity_id: device_tracker.johns_iphone
        to_state: "home"
        prob_given_true: 0.95
        prob_given_false: 0.10

      # HA Mobile App GPS zone
      - platform: state
        entity_id: person.john
        to_state: "home"
        prob_given_true: 0.90
        prob_given_false: 0.05

      # Motion in living room or kitchen (waking hours)
      - platform: template
        value_template: >
          {{ is_state('binary_sensor.living_room_motion', 'on') or
             is_state('binary_sensor.kitchen_motion', 'on') }}
        prob_given_true: 0.60
        prob_given_false: 0.02

      # TV or media player active
      - platform: state
        entity_id: media_player.living_room_tv
        to_state: "playing"
        prob_given_true: 0.75
        prob_given_false: 0.05

      # Home power draw above baseline
      - platform: numeric_state
        entity_id: sensor.total_power_draw
        above: 300
        prob_given_true: 0.85
        prob_given_false: 0.15

      # Garage door opened in the last 30 minutes
      - platform: state
        entity_id: binary_sensor.garage_opened_recently
        to_state: "on"
        prob_given_true: 0.80
        prob_given_false: 0.01
A few config details worth unpacking. The probability_threshold: 0.75 is intentionally cautious, well above the default 0.5. False positives (HA thinking you’re home when you’re not) waste energy and block your “away” automations. You want the system to demand strong evidence before it says “home.” The device_class: presence field tells HA to draw this as a proper presence entity in the UI, showing “Detected” and “Not Detected” instead of “On” and “Off.”
The template observation type is the most flexible. You can express any check that returns true or false: combining room sensors, asking whether a media player has been active in the last hour via states.media_player.tv.last_changed, or testing time-of-day rules. For tricky time logic, a sidecar binary_sensor using history_stats or a template with as_timestamp is cleaner than packing all of it into the Bayesian observation.
The garage_opened_recently sensor referenced above can be created with:
binary_sensor:
  - platform: history_stats
    name: "Garage Opened Recently"
    entity_id: binary_sensor.garage_door
    state: "on"
    type: count
    start: "{{ now() - timedelta(minutes=30) }}"
    end: "{{ now() }}"
Then use a template to expose it as a boolean: on when the count is greater than zero.
For a multi-person household, replicate the entire bayesian block for each person, substituting their device trackers and person entities. Then create an “anyone home” sensor:
template:
  - binary_sensor:
      - name: "Anyone Home"
        device_class: presence
        state: >
          {{ is_state('binary_sensor.john_home', 'on') or
             is_state('binary_sensor.jane_home', 'on') }}
This anyone_home sensor drives whole-home automations like thermostat setback and security arming. The per-person sensors drive personal touches like favorite lighting scenes and media playlists.
Per-Room Presence with mmWave Sensors
Whole-home presence is only half the puzzle. Room-level occupancy, knowing if someone’s in the office versus the bedroom, opens a new tier of automations: lights that follow you room to room, HVAC zone control, and audio that fades out as you leave. PIR sensors can’t deliver this on their own. They go blind the moment you sit still.
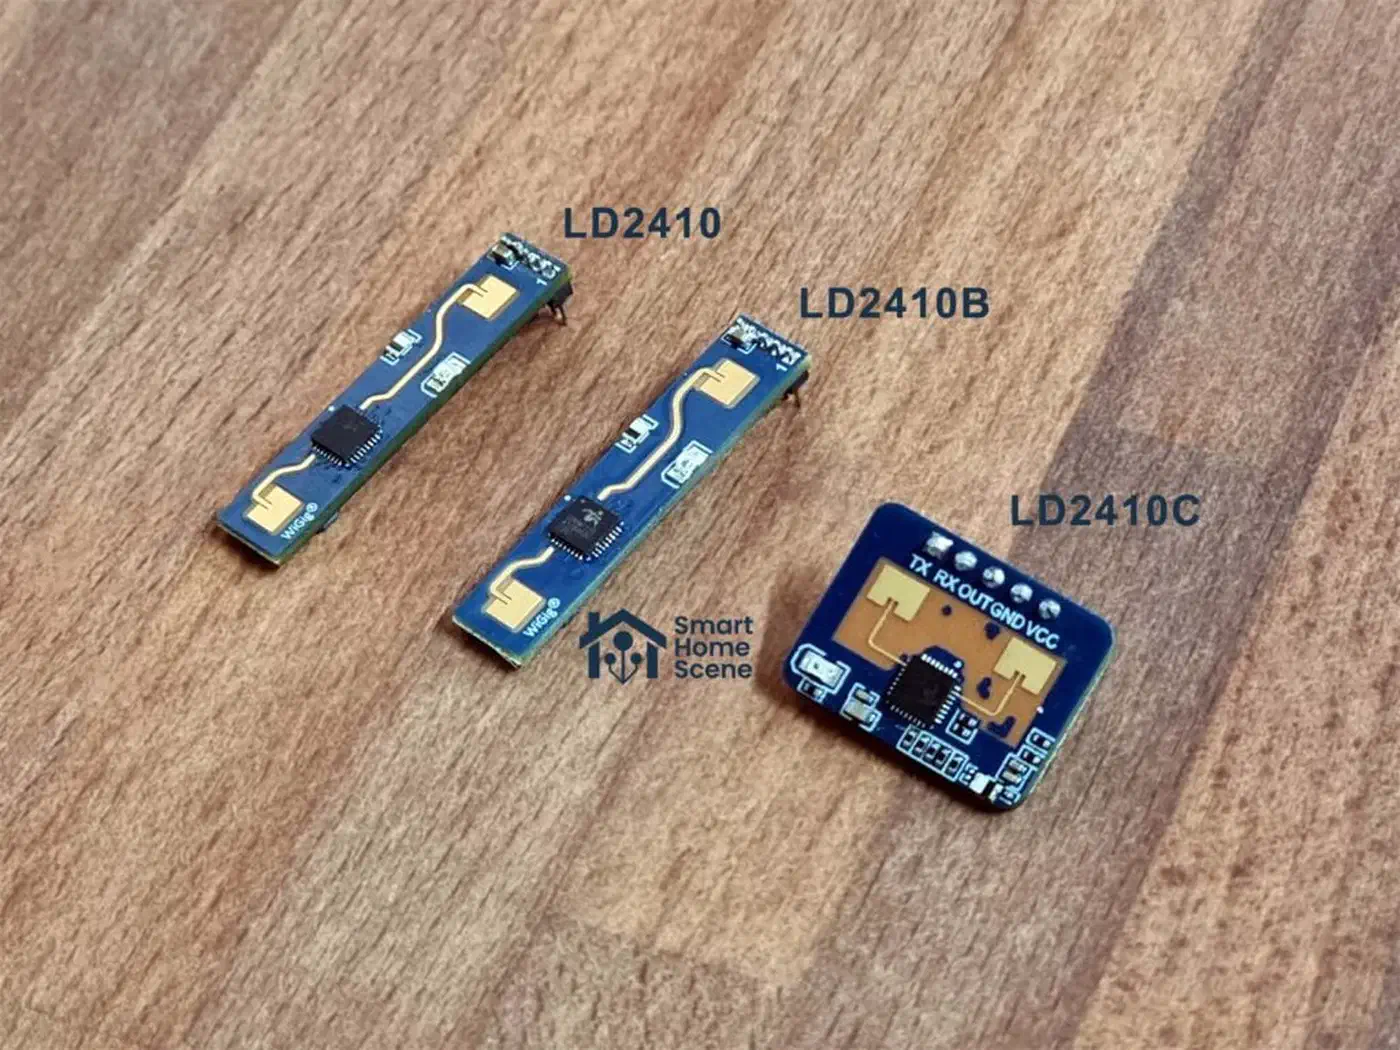
Millimeter-wave radar sensors solve the still-sitter problem. The LD2410 ($5 shipped) and the beefier LD2450 ($10, tracks multiple targets) emit 24 GHz radar. They pick up the tiny motions of breathing and a heartbeat from a person sitting dead still. They see through thin furniture, and they don’t care about heat differences the way PIR does.

Flash them with ESPHome firmware and pair them with an ESP32 for full Home Assistant integration. If you’re new to ESPHome sensor nodes, this particulate monitor project walks through the same ESP32 plus ESPHome flow end to end. An ESPHome config for the LD2410 looks like this:
sensor:
  - platform: ld2410
    moving_distance:
      name: "Office Moving Distance"
    still_distance:
      name: "Office Still Distance"
    moving_energy:
      name: "Office Moving Energy"
    still_energy:
      name: "Office Still Energy"

binary_sensor:
  - platform: ld2410
    has_target:
      name: "Office Has Target"
    has_moving_target:
      name: "Office Has Moving Target"
    has_still_target:
      name: "Office Has Still Target"
The has_still_target binary sensor is the key output. It reports on even when the occupant is motionless. Combine it with the PIR in a room-level Bayesian sensor. PIR acts as the fast trigger (high prob_given_true when firing, near-instant response), and mmWave holds the steady confirmation:
binary_sensor:
  - platform: bayesian
    name: "Office Occupied"
    unique_id: bayesian_office_occupied
    device_class: occupancy
    prior: 0.20
    probability_threshold: 0.70
    observations:
      - platform: state
        entity_id: binary_sensor.office_pir
        to_state: "on"
        prob_given_true: 0.70
        prob_given_false: 0.05

      - platform: state
        entity_id: binary_sensor.office_mmwave_still
        to_state: "on"
        prob_given_true: 0.90
        prob_given_false: 0.05

      - platform: state
        entity_id: binary_sensor.office_light_switch
        to_state: "on"
        prob_given_true: 0.65
        prob_given_false: 0.10
The light switch state is a cheap but useful third clue. If someone flipped the light on by hand, they likely plan to stay.
Practical Automation Patterns
With reliable presence sensors in place, four automation patterns become straightforward to implement safely.
Last Person Leaves. Trigger when binary_sensor.anyone_home flips from on to off. Add a five-minute delay so it doesn’t fire when someone briefly steps outside. The action runs your “goodbye” scene: lights off all over, thermostat drops to setback (65°F in winter), smart locks engage, and streaming media pauses. This swaps a cascade of per-device automations for a single solid trigger.
Room Lighting Follow. For each room, build an automation that turns the lights on when the room’s Bayesian occupancy sensor goes on, and off five minutes after it goes off. The five-minute buffer stops the lights cutting out during brief stillness like reading. Since the mmWave sensor keeps the occupancy sensor alive through still presence, the light stays on as long as you are. Pair this with adaptive lighting schedules to shift color temperature and brightness through the day alongside occupancy changes.
Adaptive Thermostat. When binary_sensor.anyone_home flips from off to on, move the thermostat from “away” (65°F) to “home” (70°F). Add a 15-minute confirmation delay before you change the setpoint. That stops rapid HVAC cycling if someone briefly comes home and leaves again. On the flip back to “away,” apply a 10-minute delay for the same reason. Both delays sit inside the automation via wait_for_trigger or the for: clause on the trigger.
Welcome Home Scene. When binary_sensor.john_home flips from off to on for the first time after 10:00 AM (so the scene doesn’t fire on a midnight bathroom trip), run the arrival scene. Entryway lights at 80% warm white, the favorite music playlist starts in the kitchen, and the thermostat jumps to “home” right away without the usual delay.
A Reusable Blueprint
Rather than hand-write this YAML from scratch, search the HA Blueprints Exchange for community Bayesian presence blueprints. Several ship with tuned probability values pre-filled and input fields for your own entity IDs. Import one via Settings, Automations & Scenes, Blueprints, Import Blueprint, and paste the blueprint URL. The best blueprints bundle the Bayesian binary sensor with a paired “last person leaves” automation in one importable package.
Privacy Considerations
The GPS observations in this setup depend on the Home Assistant Companion App reporting your phone’s location. It’s worth being clear about what that means for privacy. All location data flows from your phone straight to your Home Assistant instance over your local network. If you use HA Cloud for remote access, it can also travel via Nabu Casa . None of it goes to Anthropic, Apple, Google, or any third party. With Nabu Casa, location pings cross their relay servers end-to-end encrypted. Nabu Casa doesn’t log or store the data.
If you want zero cloud involvement, drop the GPS/zone observation. Lean on local signals only: Wi-Fi device trackers via your router, ESPHome mmWave sensors, and energy monitoring. Accuracy will be a touch lower, but still far better than any single-source setup.
Calibrating and Improving Over Time
After a week of running the Bayesian sensor, open the HA Logbook and filter for your binary_sensor.john_home entity. Match each on/off event against when you actually arrived or left. Common mismatches: the sensor stays “home” for 20+ minutes after you left (hint: prob_given_false is too low for a steady observation like power draw). Or the sensor flips “away” and back inside five minutes of a bathroom trip (hint: the probability threshold is too low).
The Bayesian sensor exposes a probability attribute on the entity, viewable in the Developer Tools, States panel. Add a history graph card to your dashboard that plots this value over time. You’ll see how each arrival and departure shapes the curve. Some sensors pull it up (high prob_given_true), some drag it down when they fire at night (motion sensors during sleep hours become noise), and you can see exactly when the threshold lags reality.
If the sensor reacts too slowly to arrivals, bump prob_given_true for your fastest observation (usually the router-based Wi-Fi tracker), or drop probability_threshold a bit. If you get too many false “home” readings on empty days, tighten prob_given_false on your stickiest observations (power draw, TV state).
Add an override for edge cases. An input_boolean.override_away entity that forces an “away” reading no matter what the observations say. Trigger it from an NFC tag near your door or a mobile app widget. In the Bayesian sensor, do this by setting the threshold very high and adding a template observation with prob_given_true: 0.001 when the boolean is active. That zeroes out the posterior.
The Home Assistant community thread at https://community.home-assistant.io/ holds years of crowd-sourced tuning data, edge cases, and refined probability values for specific devices. Cross-checking your values against community experience, especially for your router brand, your phone model, and your routines, is the fastest path to a system you can trust fully.
Building a presence system around Bayesian inference is a one-time setup that keeps paying off. Automations behave when your phone misbehaves. Lights know you’re still in the room. Your thermostat tracks where you are, not where your phone thinks you might be.