 Botmonster Tech
Create "what is my IP" site on Cloudflare in 2 minutes

You can build a what is my IP page on a Cloudflare Worker in about two minutes and 40 lines of code. The Worker reads the visitor’s address from the CF-Connecting-IP header and reads country, city, and network owner from request.cf. This post reports which of those fields populate on the free plan, first-hand. See the working example: What is my IP?
Key Takeaways
- One Cloudflare Worker gives you an IP page with no third-party lookup service.
- The visitor’s real address arrives in the CF-Connecting-IP header, not the socket.
- The request.cf object hands you country, city, network, and TLS details for free.
- Sniff the User-Agent so curl gets plain text and browsers get HTML.
- The free plan’s 100,000 daily requests dwarf what a personal IP page needs.
What is my IP and why does a Worker answer it better?
Your public IP is the address your router shows to the internet. Every device in your home shares it, and your ISP can change it without warning. You usually check it to confirm a VPN is working: if the page shows the VPN’s address and not your own, the tunnel is up. When you want to see it, you usually type “what is my IP” into a search box and land on a lookup site.
Those sites work, but they come with baggage. Most run ad networks and third-party trackers, and the page that tells you your address often profiles you at the same time. You also have no idea what they log.
A Cloudflare Worker on your own domain answers the same question with code you wrote. Cloudflare already knows the answer before your Worker runs. Every request first hits a Cloudflare data center. That edge records the source address, resolves its network owner, and places it on a map. The Worker just reads those values and formats them, with no database, external API, or origin server.
The uses go past curiosity. You can check whether a VPN or WireGuard tunnel carries your traffic. You can confirm a home IP changed after a router reboot, or script an allowlist update from the plain-text output. Just keep the scope in mind. This is an edge echo endpoint rather than a geolocation database, so its accuracy is Cloudflare’s.
How the visitor IP reaches your Worker
The most common mistake in a Worker IP page is reading the wrong source. Cloudflare is a reverse proxy, so the connecting socket belongs to Cloudflare, not the visitor. Read the socket and you get a Cloudflare edge address every time.
The correct source is the CF-Connecting-IP header. Cloudflare sets it on every proxied request and overwrites any value a client tries to spoof, so you can trust it without extra validation. The Cloudflare HTTP headers reference documents the full set.
A few nearby headers look tempting but are traps:
X-Forwarded-Foralso arrives, but it is a client-controllable list that Cloudflare appends to. Never parse it for identity.True-Client-IPcarries the same value, however it is an Enterprise-plan header. Do not build on it on the free plan.CF-IPCountryholds the two-letter country code, yet it only duplicates one field fromrequest.cf, which carries much more.
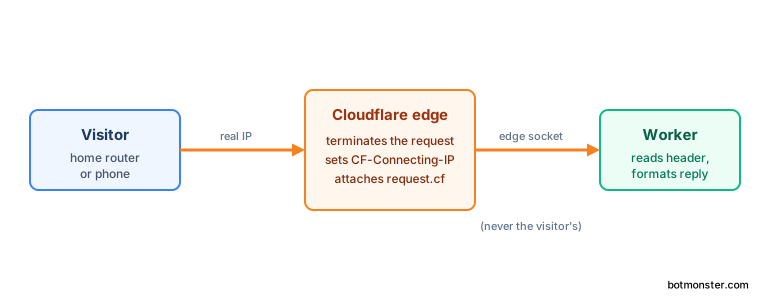
One more thing to expect: IPv6 arrives as often as IPv4 on consumer connections, so the value may be a long colon-separated address rather than a dotted quad. Handle both. The read itself is three lines, with a fallback for the local-dev case where the header is missing.
const ip = request.headers.get("CF-Connecting-IP") ?? "unknown";
const cf = request.cf ?? {};
What request.cf gives you for free
The Cloudflare docs list the request.cf fields but do not tell you which ones carry a value on a free-plan Worker in production. This is a field-by-field report from the deployed ip.botmonster.com endpoint, taken from its own JSON output. Compare it against your own.
| Field | Example value | Populated on free plan |
|---|---|---|
asn | 24940 | yes |
asOrganization | Hetzner Online | yes |
colo | WAW | yes |
country | PL | yes |
city | Warsaw | yes |
region | Mazovia | yes |
postalCode | 00-001 | yes |
timezone | Europe/Warsaw | yes |
latitude | 52.22977 | yes |
longitude | 21.01178 | yes |
tlsVersion | TLSv1.3 | yes |
tlsCipher | AEAD-AES128-GCM-SHA256 | yes |
clientTcpRtt | 14 | yes |
botManagement | (undefined) | Bot Management add-on only |
clientQuicRtt | (undefined) | QUIC connections only |
The request.cf properties reference lists every field name. The fields that came back empty need a paid add-on or a specific transport.
Accuracy varied by connection. Hitting the endpoint from a home fibre line gave a correct city; from a phone on mobile data, the best it managed was the right region. The asn and asOrganization were correct in both cases, and colo named the nearest Cloudflare data center by its airport code.
One trap can waste an hour. Running wrangler dev fills request.cf with stub values, so latitude and longitude look like placeholders until you deploy or pass --remote. Any odd geolocation you see in local dev comes from those stubs, so do not chase it.
A privacy note belongs on the page itself. Latitude and longitude give an approximate city centroid rather than the visitor’s real address, so say so where people can read it.
The Worker code, in full
Here is the complete src/index.js. It is one file with no dependencies and no build step.
export default {
  async fetch(request) {
    const ip = request.headers.get("CF-Connecting-IP") ?? "unknown";
    const cf = request.cf ?? {};
    const url = new URL(request.url);
    const ua = (request.headers.get("User-Agent") ?? "").toLowerCase();
    const accept = request.headers.get("Accept") ?? "";

    const headers = {
      "Cache-Control": "no-store",
      "Vary": "Accept, User-Agent",
      "Access-Control-Allow-Origin": "*",
    };

    if (request.method === "OPTIONS") return new Response(null, { headers });

    const wantsJson =
      accept.includes("application/json") ||
      url.searchParams.get("format") === "json" ||
      url.pathname === "/json";

    const wantsText =
      url.searchParams.get("format") === "text" ||
      url.pathname === "/text" ||
      /curl|wget|httpie|python-requests|go-http/.test(ua);

    if (wantsJson) {
      const body = JSON.stringify({ ip, ...cf }, null, 2);
      return new Response(body, {
        headers: { ...headers, "Content-Type": "application/json" },
      });
    }

    if (wantsText) {
      return new Response(ip + "\n", {
        headers: { ...headers, "Content-Type": "text/plain" },
      });
    }

    const html = `<!doctype html>
<html lang="en">
<meta charset="utf-8">
<meta name="viewport" content="width=device-width, initial-scale=1">
<title>Your IP address</title>
<style>
  body { font-family: system-ui, sans-serif; max-width: 40rem; margin: 4rem auto; padding: 0 1rem; }
  .ip { font-family: ui-monospace, monospace; font-size: 2rem; }
  dt { font-weight: 600; }
  dd { margin: 0 0 .5rem; }
</style>
<h1>Your IP address</h1>
<p class="ip">${ip}</p>
<dl>
  <dt>Country</dt><dd>${cf.country ?? "unknown"}</dd>
  <dt>City</dt><dd>${cf.city ?? "unknown"}</dd>
  <dt>Network</dt><dd>${cf.asn ?? "?"} ${cf.asOrganization ?? ""}</dd>
  <dt>Data center</dt><dd>${cf.colo ?? "unknown"}</dd>
  <dt>TLS</dt><dd>${cf.tlsVersion ?? "unknown"}</dd>
</dl>`;

    return new Response(html, {
      headers: { ...headers, "Content-Type": "text/html; charset=utf-8" },
    });
  },
};
The plain-text branch returns the bare IP with a trailing newline, so IP=$(curl -s ip.botmonster.com) works in a shell script without trimming. The JSON branch pretty-prints the whole cf object, so reading it does not need jq. And every response sets Cache-Control: no-store, because a cached IP page is a wrong IP page.
The config file is just as short:
name = "whats-my-ip"
main = "src/index.js"
compatibility_date = "2026-08-04"

# Point a subdomain at the Worker from config instead of the dashboard:
# [[routes]]
# pattern = "ip.botmonster.com"
# custom_domain = true
The whole project is four files, nothing else:
whats-my-ip/
├── package.json
├── wrangler.toml
├── .gitignore
└── src/
    └── index.js
Serving curl plain text and browsers HTML from one URL
Content negotiation is the detail that turns a toy into a tool, and it is where hand-rolled versions get it wrong. One URL gives a script the bare address and a browser a readable page.
The decision order in the code above works well in practice. An explicit Accept: application/json header wins first, followed by a ?format= query override or one of the /json and /text paths for people who prefer to be explicit, then a User-Agent test for curl, wget, and friends. HTML is the default when nothing else matches.
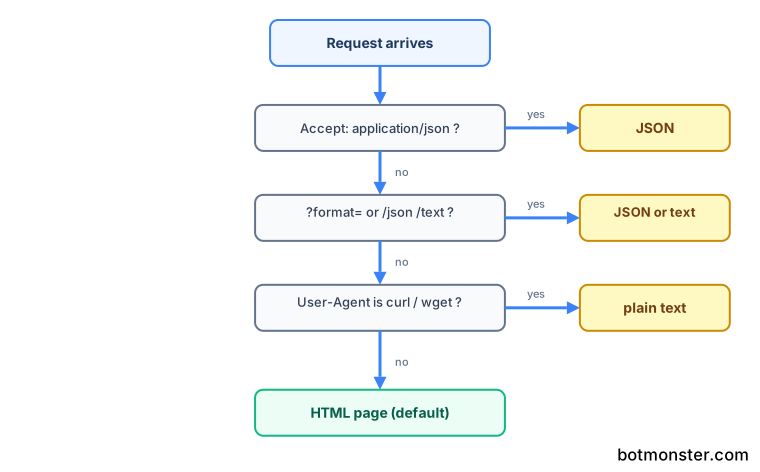
User-Agent sniffing has a bad reputation, but it fits here. The cost of a wrong guess is a slightly odd-looking response, not a broken site, and every alternative forces the caller to type more. Still, guard the caches: the Vary: Accept, User-Agent header stops an intermediate cache from handing the HTML page to a script.
| Caller | Response |
|---|---|
curl ip.botmonster.com | plain text, bare IP |
curl -H "Accept: application/json" | JSON with the full cf object |
| Browser | HTML page |
wget -qO- ip.botmonster.com | plain text, bare IP |
fetch() from another site | JSON, allowed by the CORS header |
The permissive Access-Control-Allow-Origin: * header lets a browser script on another site read the endpoint, and the OPTIONS branch answers the preflight cleanly.
How to deploy the Worker and route your own subdomain
With the two files written, deploying takes four commands and a dashboard visit. Wrangler is the Cloudflare command-line tool that does the work.
Install Wrangler and log in
Run these in the project folder. The second command opens a browser so you can approve access, after which the CLI holds a token for your account.
npm install -D wrangler
npx wrangler login
Test locally with wrangler dev
Start a local server and hit it both ways to confirm the two response shapes.
npx wrangler dev --remote
curl localhost:8787
Pass --remote so request.cf carries real edge values. Without it, the geolocation fields are stubs.
Deploy the Worker
One command pushes the Worker live and prints a *.workers.dev URL.
npx wrangler deployLoad that URL to confirm it returns your address before you attach a domain.
Point a subdomain at it
In the Cloudflare dashboard, open Workers & Pages, pick the Worker, then go to Settings, then Domains & Routes, and add a custom domain such as ip.botmonster.com. Cloudflare creates the proxied DNS record and issues the certificate for you.
Do not create an A or CNAME record by hand first. Doing so causes a conflict you then have to delete. A custom domain beats a route pattern here because it works even when nothing else lives on the subdomain, and the certificate is automatic. Readers who keep everything in git can use the commented routes block in the config instead.
Verify the live endpoint
Check both content types once the certificate is ready.
curl -L ip.botmonster.com
curl -L -H "Accept: application/json" ip.botmonster.com
A handful of errors are normal on the first run. A 525 or 526 right after adding the domain means the certificate is still issuing; it clears within a minute or two. Error 1101 means the Worker threw an exception, so read the log with npx wrangler tail. An empty CF-Connecting-IP under wrangler dev is expected, which is why the code falls back to "unknown".
Limits, cost, and when this is the wrong tool
The free plan covers this build with room to spare. It allows 100,000 requests per day and 10 ms of CPU per request, per the Cloudflare Workers pricing page. This Worker uses a fraction of a millisecond, so CPU is never the binding limit. A personal IP page will not come close to the daily cap either. Past that cap the free plan starts returning errors. The paid tier at $5 per month removes the request ceiling.
Two cautions apply to any public endpoint. First, a public IP echo is a free proxy-detection oracle, so add a rate-limit rule or accept that some script will hammer it. Second, Cloudflare’s own analytics count every request by default. If you want zero retained data, say so on the page and leave Workers Logs and Logpush off.
A Worker is the wrong tool when you need reverse DNS, open-port checks, or a full IP intelligence database. Those need an origin server or a paid data provider, not an edge echo. And if you want the endpoint to also store something, the same Wrangler workflow drives a serverless API on SQLite with Cloudflare D1, which adds a database to the same deploy path.