How to Build a DIY Mailbox Notification Sensor with ESPHome and Home Assistant

Mount an ESP32-C3 Super Mini with a reed switch on the mailbox door (or a VL53L0X time-of-flight distance sensor inside the box), flash it with ESPHome 2026.3, and wire it into Home Assistant - you will get instant push notifications on your phone the moment mail lands. The total parts cost sits under $15, and deep sleep keeps the whole thing alive for months on a single 18650 cell.
This is one of those projects where the payoff-to-effort ratio is absurd. Twenty minutes of soldering, a few lines of YAML, and you never walk to an empty mailbox again.
Choosing Your Sensor - Reed Switch vs. TOF Distance Sensor
The sensor type determines what the device actually detects and directly affects battery life, accuracy, and wiring complexity. Two approaches work well, and combining both gives the best results.
Reed Switch
A normally-open magnetic reed switch paired with a small neodymium magnet on the door frame detects opening events. When the door swings, the magnet moves away from the switch, the circuit opens, and the ESP32 wakes from deep sleep.
Pros: Dirt cheap (about $0.50 per switch), near-zero idle current draw (around 1 uA), dead-simple GPIO reading, and native compatibility with ESP32 deep sleep wake-on-pin.
Cons: It detects door opens, not mail presence. You get a false positive every time someone checks an empty box or the wind rattles the door.
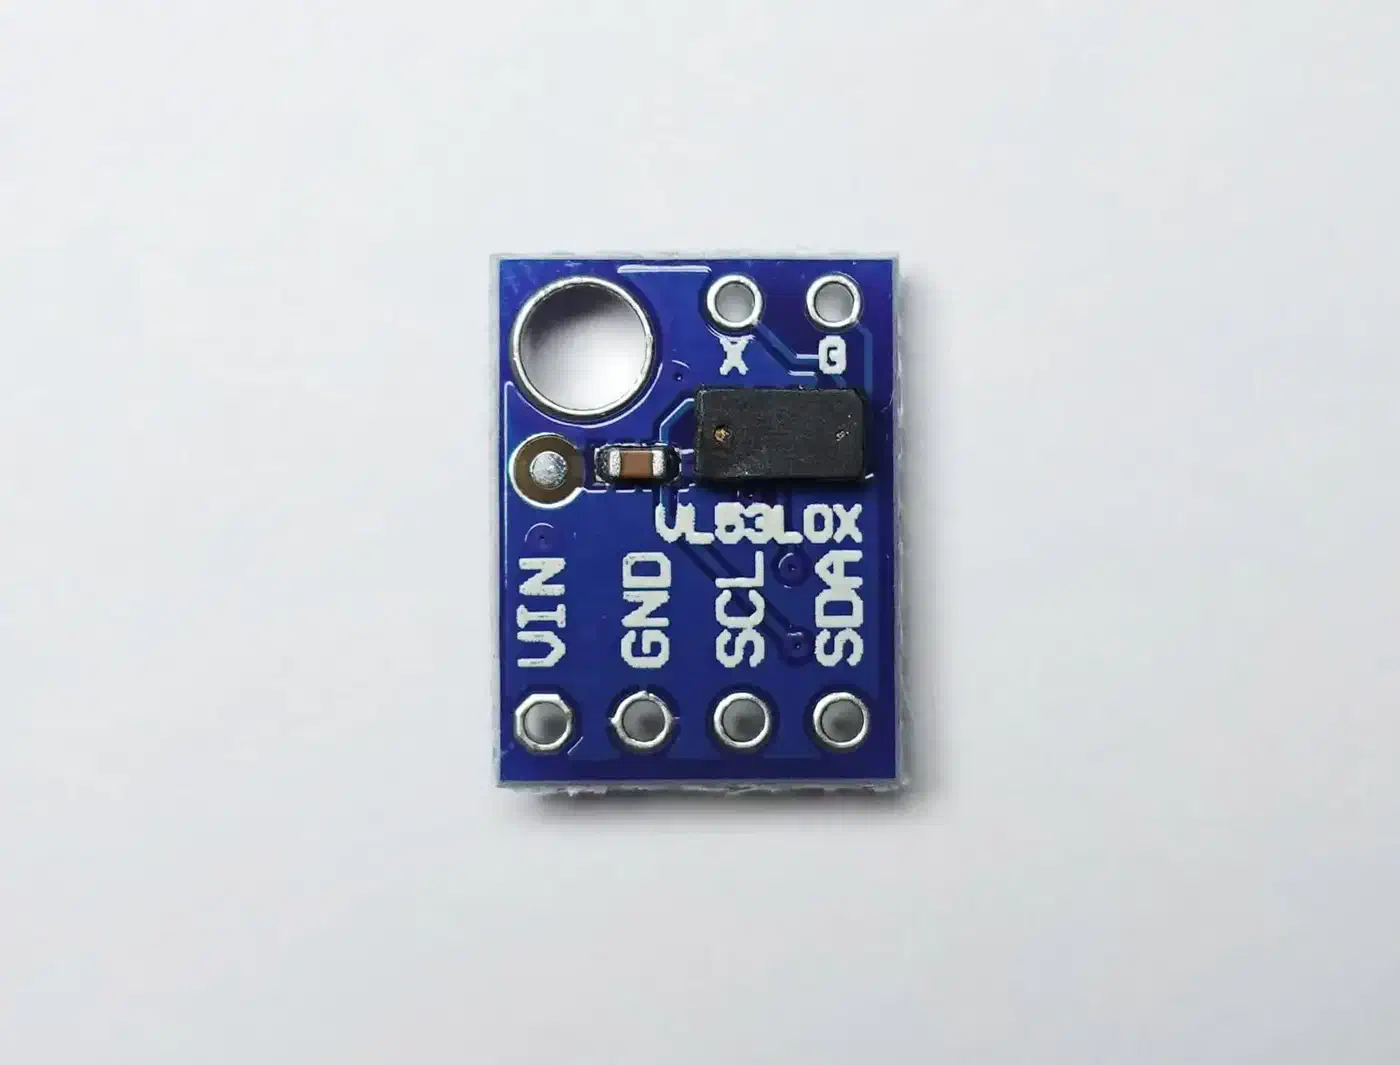
VL53L0X Time-of-Flight Sensor
The VL53L0X is a laser-based distance sensor. Mount it on the inside top of the mailbox pointing down, and it measures distance to whatever is below - the mailbox floor when empty (long distance) or the top of a stack of envelopes when mail is present (short distance). You can even differentiate between small letters and large packages by setting distance thresholds.
Pros: Detects actual mail presence rather than just door events; works even if someone opens and closes the door without adding mail.
Cons: Draws around 20 mA during active measurement, costs about $5 for a GY-VL53L0XV2 breakout board, and requires I2C wiring (SDA/SCL plus power).
Hybrid Approach - Best of Both
Use the reed switch as the wake trigger and the VL53L0X as the confirmation. When the door opens, the ESP32 wakes, takes a distance reading, and determines whether mail was deposited or just removed. This eliminates false positives while keeping deep-sleep power consumption at reed-switch levels between events.
Which Board to Buy
| Board | Price | WiFi | Thread/Matter | Deep Sleep Current |
|---|---|---|---|---|
| ESP32-C3 Super Mini | ~$3 | Yes (2.4 GHz) | No | ~43 uA (datasheet), ~600 uA measured |
| ESP32-C6 | ~$5 | Yes (2.4 GHz) | Yes (native) | ~7 uA (datasheet) |
The ESP32-C3 Super Mini is the go-to for most builds due to price and size. The ESP32-C6 adds Thread/Matter support if you want to bypass WiFi entirely for even better battery life, though ESPHome’s Thread support is still maturing.
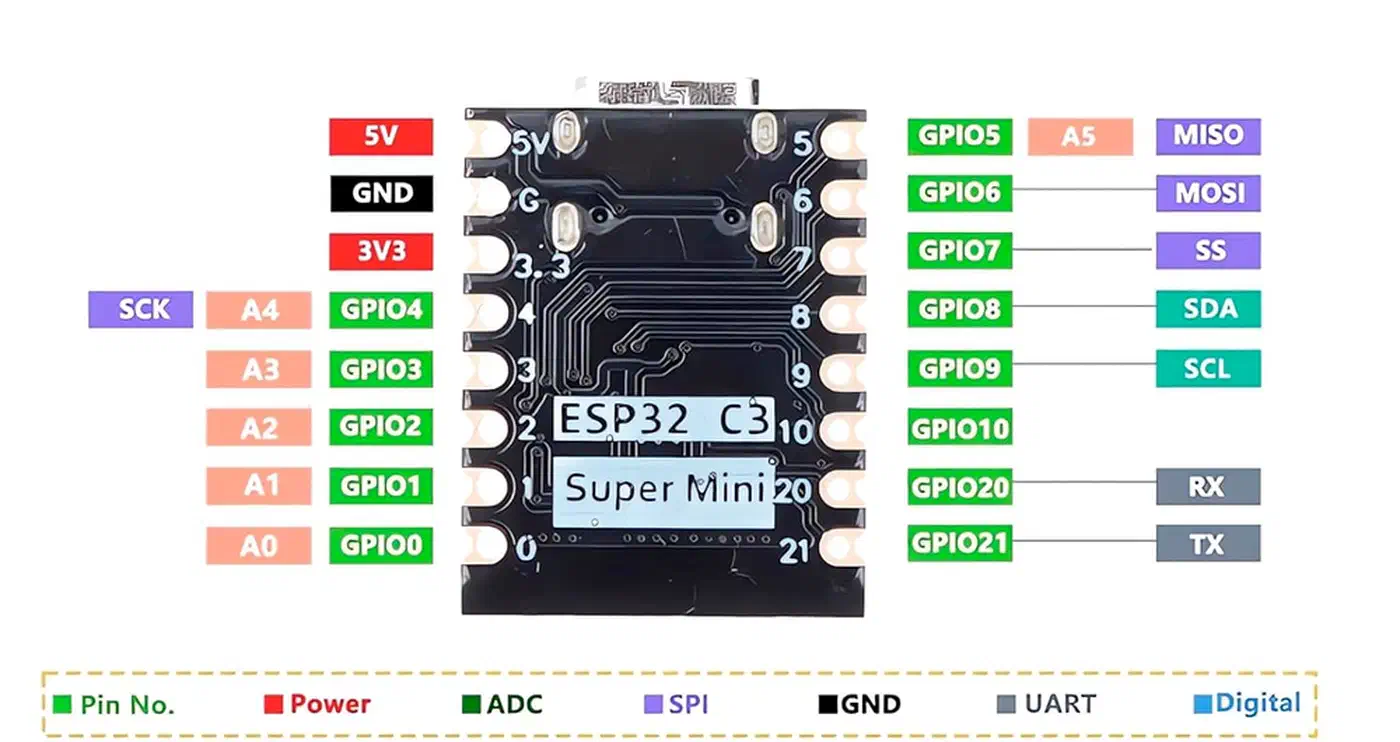
One caveat on the C3 Super Mini: real-world deep sleep measurements often land around 600 uA rather than the datasheet’s 43 uA. This is caused by the onboard LED and voltage regulator. You can cut the LED trace to reduce this, or accept the tradeoff - even at 600 uA, battery life stretches well past several months.
Hardware Assembly and Wiring
Parts List
| Part | Approximate Cost |
|---|---|
| ESP32-C3 Super Mini | $3 |
| VL53L0X breakout (GY-VL53L0XV2) | $5 |
| Magnetic reed switch (normally open) | $0.50 |
| Small neodymium magnet | $0.50 |
| 3.7V 18650 LiPo battery | $3 |
| 18650 battery holder | $0.50 |
| TP4056 USB-C charge board | $1 |
| Weatherproof ABS junction box (IP65, ~83x58x33mm) | $2 |
| Total | ~$15.50 |
Wiring the Reed Switch
Connect one leg of the reed switch to GPIO2 and the other to GND. In the ESPHome config, enable the internal pull-up resistor so the pin reads HIGH when the door is closed (magnet near switch) and LOW when opened (magnet moves away). GPIO2 also serves as the deep sleep wake pin.
Wiring the VL53L0X
The VL53L0X communicates over I2C:
- SDA to GPIO6
- SCL to GPIO7
- VCC to 3.3V (the sensor operates at 2.6-3.5V, so it runs directly from the ESP32’s 3.3V regulator)
- GND to GND
If you go with the hybrid approach and want to power-gate the VL53L0X to save battery, wire its VCC through an N-channel MOSFET controlled by a spare GPIO pin. This cuts its 20 mA idle draw to zero during deep sleep.
Power Circuit
The 18650 battery connects to the TP4056 charge board’s battery terminals. The TP4056 output goes to the ESP32’s VIN pin, which accepts 3.3-5V through the onboard regulator. When the battery needs charging, pull the sensor from the mailbox and plug a USB-C cable into the TP4056.
Weatherproofing and Mounting
Seal all cable entry points on the ABS junction box with silicone. Apply conformal coating spray to the PCB if your mailbox sees temperature swings or humidity. Mount the enclosure inside the mailbox, not directly exposed to rain.
For the antenna: position the ESP32 with its PCB antenna facing toward the mailbox opening (toward the street and your house). Check the WiFi RSSI value in ESPHome logs before you button everything up - anything above -75 dBm is workable, above -60 dBm is comfortable.
Metal mailboxes are the biggest WiFi challenge. A steel mailbox acts as a partial Faraday cage and can knock 15-20 dB off your signal. Three workarounds:
- Mount the ESP32 enclosure on the outside of the mailbox (run wires through a small hole for the sensors inside)
- Use an ESP32 board with an external antenna connector (like the ESP32-C3 WROOM with U.FL) and run a small antenna outside the box
- Switch to a plastic or wooden mailbox if you have the option
ESPHome Firmware Configuration
Here is a complete ESPHome YAML configuration for the hybrid reed switch + VL53L0X approach. Copy this as your starting point and adjust pin numbers and WiFi credentials.
esphome:
  name: mailbox-sensor
  friendly_name: Mailbox Sensor

esp32:
  board: esp32-c3-devkitm-1
  framework:
    type: esp-idf

# WiFi with static IP for fast connection
wifi:
  ssid: !secret wifi_ssid
  password: !secret wifi_password
  fast_connect: true
  manual_ip:
    static_ip: 192.168.1.50
    gateway: 192.168.1.1
    subnet: 255.255.255.0
    dns1: 192.168.1.1

# Home Assistant native API
api:
  encryption:
    key: !secret api_encryption_key

# OTA for wireless updates
ota:
  - platform: esphome
    password: !secret ota_password

# Logging (reduce for battery savings)
logger:
  level: WARN

# I2C bus for VL53L0X
i2c:
  sda: GPIO6
  scl: GPIO7
  scan: false

# Reed switch on the mailbox door
binary_sensor:
  - platform: gpio
    pin:
      number: GPIO2
      mode: INPUT_PULLUP
      inverted: true
    name: "Mailbox Door"
    device_class: door

  - platform: template
    name: "Mailbox Has Mail"
    id: mailbox_has_mail
    device_class: occupancy

# VL53L0X distance sensor
sensor:
  - platform: vl53l0x
    name: "Mailbox Distance"
    address: 0x29
    update_interval: never
    long_range: true
    id: mailbox_distance
    unit_of_measurement: "mm"

  # Battery voltage via ADC
  - platform: adc
    pin: GPIO0
    name: "Mailbox Battery"
    update_interval: never
    id: battery_voltage
    attenuation: 11db
    filters:
      - multiply: 2  # Voltage divider factor
      - calibrate_linear:
          - 3.0 -> 0
          - 4.2 -> 100
    unit_of_measurement: "%"
    device_class: battery

# Deep sleep configuration
deep_sleep:
  id: deep_sleep_control
  run_duration: 15s
  sleep_duration: 0s
  wakeup_pin:
    number: GPIO2
    allow_other_uses: true

# On boot: read sensors, determine mail state, then sleep
esphome:
  on_boot:
    priority: 600
    then:
      - component.update: mailbox_distance
      - component.update: battery_voltage
      - delay: 2s
      - lambda: |-
          float dist = id(mailbox_distance).state;
          if (dist < 250 && dist > 0) {
            id(mailbox_has_mail).publish_state(true);
          } else {
            id(mailbox_has_mail).publish_state(false);
          }
      - delay: 5s  # Allow time for HA to receive the data
A few notes on this configuration:
- The
framework: type: esp-idfline uses the ESP-IDF framework instead of Arduino, which produces lower deep sleep current on C3 boards. fast_connect: truecombined with a static IP cuts WiFi connection time from around 5 seconds to roughly 1.5 seconds, which directly translates to battery savings.update_interval: neveron both sensors means they only take readings when explicitly triggered in theon_bootautomation, not on a polling schedule.- The 15-second
run_durationgives the ESP32 enough time to connect to WiFi, read both sensors, push data to Home Assistant, and go back to sleep. If your WiFi is slow, bump this to 20 seconds. - The
sleep_duration: 0swithwakeup_pinmeans the device sleeps indefinitely until the reed switch triggers.
If you enjoy building ESPHome sensors, the same ESP32 platform works equally well for indoor air quality. The low-cost air quality sensor build walks through wiring a PMS5003 or Sensirion SEN66 to an ESP32 with under $50 in parts.
Home Assistant Integration and Notification Automations
The ESPHome device auto-discovers in Home Assistant via the native API. Once adopted, three entities appear:
binary_sensor.mailbox_sensor_door- door open/closed statebinary_sensor.mailbox_sensor_has_mail- mail presence detectionsensor.mailbox_sensor_battery- battery percentage
Mail Delivery Notification
Create an automation that triggers when mail is detected and sends an actionable notification through the Home Assistant Companion app :
automation:
  - alias: "Mailbox - Mail Delivered"
    trigger:
      - platform: state
        entity_id: binary_sensor.mailbox_sensor_has_mail
        to: "on"
    action:
      - service: notify.mobile_app_your_phone
        data:
          title: "Mail Delivered"
          message: "New mail is in the mailbox."
          data:
            actions:
              - action: "MAIL_COLLECTED"
                title: "Mark as Collected"
Handling the “Collected” Action
A second automation resets the mail-waiting state when you tap the notification button:
  - alias: "Mailbox - Mail Collected"
    trigger:
      - platform: event
        event_type: mobile_app_notification_action
        event_data:
          action: "MAIL_COLLECTED"
    action:
      - service: input_boolean.turn_off
        target:
          entity_id: input_boolean.mail_waiting
You will need to create an input_boolean.mail_waiting helper in Home Assistant (Settings > Devices & Services > Helpers > Toggle) to track the mail state across reboots and multiple users.
Dashboard Card
If you use Mushroom cards (available through HACS), a template card works well for displaying mailbox status at a glance.
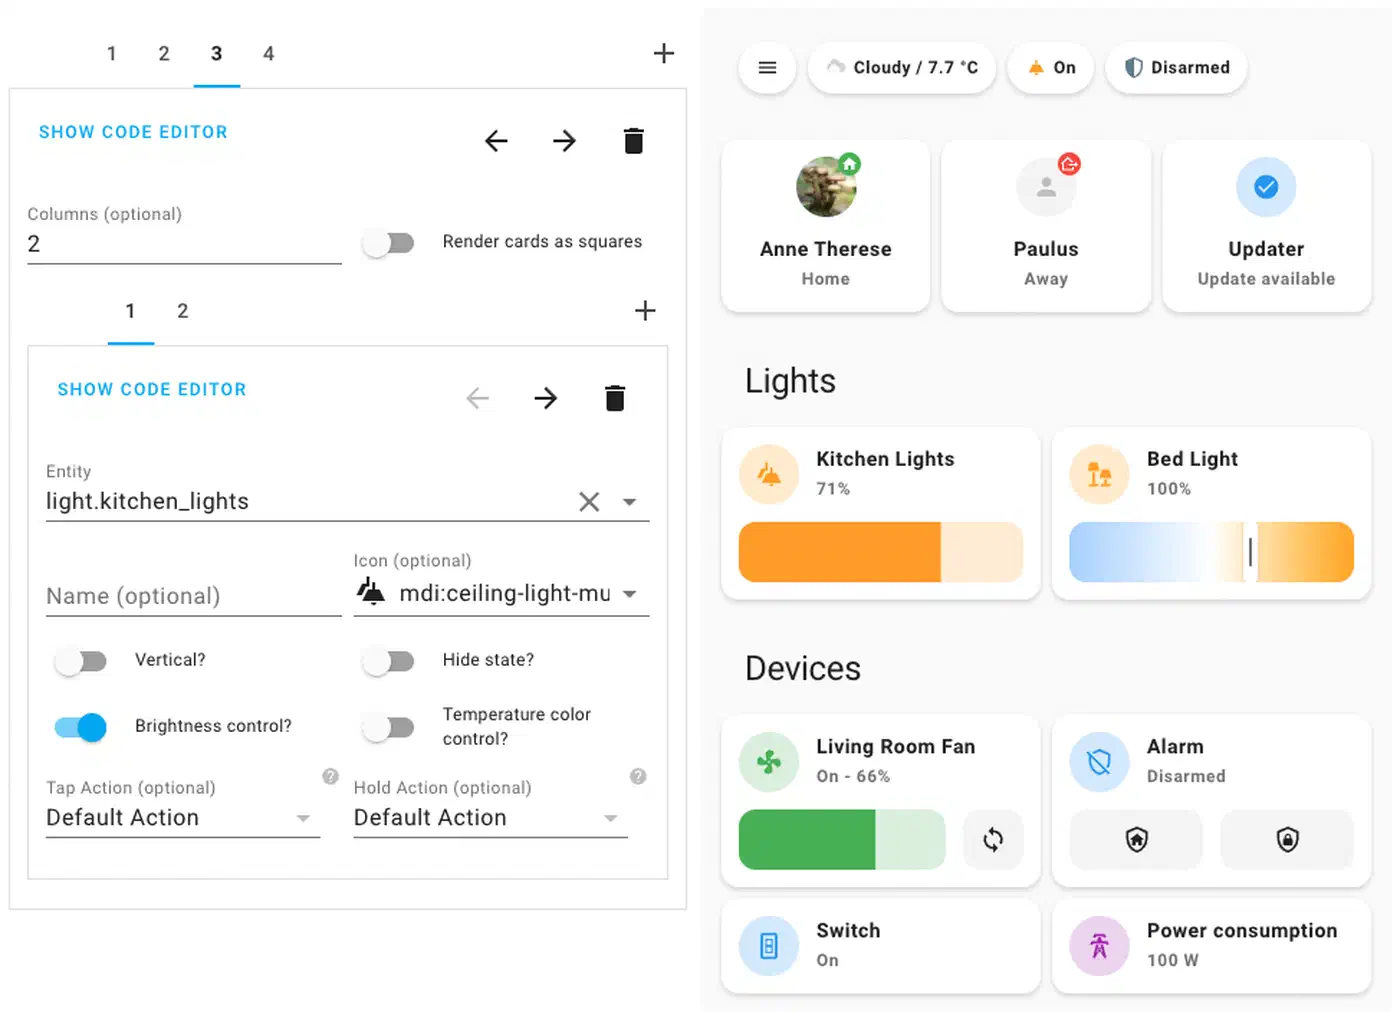
Here is an example card configuration for the mailbox:
type: custom:mushroom-template-card
primary: Mailbox
secondary: "Battery: {{ states('sensor.mailbox_sensor_battery') }}%"
icon: mdi:mailbox
icon_color: >-
  {{ 'red' if is_state('input_boolean.mail_waiting', 'on') else 'green' }}
Battery Alert
Add a low-battery automation so you do not forget to charge:
  - alias: "Mailbox - Low Battery"
    trigger:
      - platform: numeric_state
        entity_id: sensor.mailbox_sensor_battery
        below: 20
    action:
      - service: notify.mobile_app_your_phone
        data:
          title: "Mailbox Sensor Battery Low"
          message: "Battery is at {{ states('sensor.mailbox_sensor_battery') }}%. Bring it inside for charging."
Optimizing Battery Life for Months of Operation
Deep sleep is the single biggest factor in battery life. An ESP32-C3 draws around 30 mA when active but drops to microamps in deep sleep. With the hybrid approach - where the device only wakes when the door opens, stays awake for 15 seconds to read sensors and report to Home Assistant, then immediately sleeps again - active time per day is minimal.
Battery Life Estimate
Assume 2 door events per day and a 3000 mAh 18650 cell:
| Parameter | Value |
|---|---|
| Active current | ~30 mA |
| Active time per event | 15 seconds |
| Events per day | 2 |
| Total active time per day | 30 seconds |
| Active consumption per day | 0.25 mAh |
| Deep sleep current (C3 Super Mini) | ~600 uA |
| Deep sleep consumption per day | 14.4 mAh |
| Total daily consumption | ~14.65 mAh |
| Battery capacity | 3000 mAh |
| Estimated battery life | ~205 days (~7 months) |
In practice, expect 4-8 months depending on WiFi retry frequency, ambient temperature, and battery self-discharge. Cold weather reduces effective battery capacity, so winter performance will be shorter.
Reducing WiFi Connection Time
Every second spent connecting to WiFi burns 30 mA. Two settings help a lot:
- Static IP (
manual_ipin the WiFi config): skips DHCP negotiation entirely - fast_connect: true: connects to the AP without scanning all channels first
Together these cut connection time from roughly 5 seconds to about 1.5 seconds, saving around 30 mAh per month at 2 events per day.
Power-Gating the VL53L0X
If you leave the VL53L0X connected directly to 3.3V, it draws about 20 mA even when idle. Wire its VCC through an N-channel MOSFET (like a 2N7000) controlled by a GPIO pin set HIGH only during measurement. In ESPHome, toggle that pin on before reading and off after:
switch:
  - platform: gpio
    pin: GPIO3
    id: tof_power
    restore_mode: ALWAYS_OFF

# In the on_boot section, before reading:
# - switch.turn_on: tof_power
# - delay: 50ms  # Let sensor stabilize
# - component.update: mailbox_distance
# - switch.turn_off: tof_power
Other Power Savings
- Use the ESP-IDF framework instead of Arduino - it produces better deep sleep behavior on C3 chips
- Set logger level to
WARNorERRORto reduce serial output overhead - Omit all Bluetooth components entirely - even including unused BLE libraries can add overhead
Simpler Alternative - Zigbee Contact Sensor
If soldering and YAML are not your thing, the Aqara Door and Window Sensor (MCCGQ11LM, about $10) paired with a Zigbee2MQTT coordinator or ZHA in Home Assistant gives you door-open detection with zero coding. Stick the sensor on the mailbox door and the magnet on the frame, and it reports open/close events over Zigbee.
The tradeoffs compared to the ESPHome build:
- No mail-presence confirmation (same limitation as the reed switch alone)
- Battery life of roughly 2 years on a CR1632 coin cell (much better than WiFi)
- No customization - you get open/close and that is it
- Zigbee range can be extended with routers, but you still need a Zigbee coordinator (USB stick or hub)
- Aqara devices do not fully comply with the Zigbee standard, which occasionally causes disconnections if your mesh is based on non-Aqara routers
For most people who just want a “mail arrived” ping without fussing over firmware, this is the fastest path. If you are weighing whether to stay on Zigbee long-term, the Zigbee2MQTT versus Matter comparison breaks down the protocol tradeoffs in detail.
Troubleshooting Common Issues
WiFi won’t connect from inside a metal mailbox
Steel and aluminum mailboxes attenuate 2.4 GHz WiFi signals heavily. Try mounting the ESP32 on the outside of the mailbox, use a board with an external antenna connector, or drill a small hole and route a pigtail antenna outside.
VL53L0X reads “nan” or fails to initialize
Check your I2C wiring. The sensor needs clean connections - loose jumper wires on a breadboard are the most common culprit. Also verify that the sensor’s XSHUT pin is not floating (connect it to 3.3V or a GPIO pin to keep it enabled).
Battery drains in days instead of months
This is almost always a deep-sleep issue. Flash with the ESP-IDF framework, confirm the device actually enters deep sleep (check with a multimeter on the battery leads - you should see microamps, not milliamps), and make sure no component is preventing sleep.
Sensor triggers multiple times per delivery
The mail carrier opening and closing the door produces one event. But if the door bounces or does not latch cleanly, you might get two or three wake events. Add a delayed_on: 500ms filter to the reed switch binary sensor to debounce this, and use a cooldown in your Home Assistant automation (condition: last triggered more than 60 seconds ago).
OTA updates fail because the device sleeps too quickly
ESPHome’s deep sleep component blocks OTA during the run window, but 15 seconds may not be enough for a full firmware upload. Two options: temporarily increase run_duration to 120 seconds and trigger a wake event, or add a deep_sleep.prevent action tied to a Home Assistant switch so you can hold the device awake remotely.