Home Assistant Blueprints: 3 Domains, Hundreds of Templates

Home Assistant Blueprints are reusable automation templates that separate the logic from device-specific configuration. You define a pattern once - say, “motion-activated light with timeout and brightness” - and then instantiate it for every room by filling in a simple form. No YAML duplication, no maintaining ten nearly identical automations. As of Home Assistant 2026.4, blueprints support three domains (automation, script, and template), offer dozens of selector types for user-friendly input forms, and have collapsible input sections for organizing complex configurations. They are the most efficient way to standardize smart home behavior across dozens of devices.
Why Blueprints Exist: The Copy-Paste Problem
A typical smart home has five to fifteen motion-activated lights. Without blueprints, each one requires its own automation with the same trigger logic, the same conditions, and the same actions - only the entity IDs change. You copy the YAML, swap out the entity names, and now you have fifteen nearly-identical automation blocks to maintain. When you find a bug or want to adjust the timeout logic, you edit all fifteen. Miss one and you get inconsistent behavior that is painful to debug.
Blueprints eliminate this by turning the repeated pattern into a template with configurable inputs. If you have programming experience, a blueprint is analogous to a function definition, and each automation created from it is a function call. The blueprint defines the trigger/condition/action structure with placeholder variables. When you create an automation from that blueprint, you fill in the variables (which motion sensor, which light, what timeout) and Home Assistant generates a concrete automation. One blueprint can produce unlimited automation instances, and a change to the blueprint propagates to every instance on the next reload.
This is different from scripts. Scripts are reusable action sequences, but they do not include triggers or conditions - they only define what to do, not when to do it. Blueprints define complete automations including triggers, conditions, and actions. Since Home Assistant 2024.4, blueprints can also define reusable scripts (using domain: script), and as of 2024.x template entity blueprints joined as a third domain.
When blueprints make sense:
- Any automation pattern you instantiate three or more times
- Standardized behavior across rooms (consistent motion lights , consistent climate schedules)
- Automations you want to share with the community or across multiple HA instances
- Organizational templates for households with multiple contributors who prefer forms over YAML
When blueprints are overkill:
- One-off automations unique to a single room or scenario
- Automations where each instance needs fundamentally different trigger/action structures
- Highly complex automations with extensive conditional logic that varies per instance - Node-RED may be a better fit for those
The Blueprint Exchange
The Home Assistant community maintains a library of tested blueprints at the Blueprint Exchange
. To import one, navigate to Settings > Automations & Scenes > Blueprints, click Import Blueprint, paste the URL from the Exchange post, and click Preview. The blueprint downloads into your /config/blueprints/ directory, and you can immediately create automations from it.

A few community blueprints worth highlighting:
| Blueprint | What It Does | Why It’s Useful |
|---|---|---|
| Low Battery Notifications & Actions | Scans all battery-powered devices and sends notifications when any drop below a configurable threshold | Essential for maintaining Zigbee/Z-Wave sensor networks. Uses device_class: battery for automatic discovery. |
| Motion Lights | Triggers lights on motion with configurable timeout, brightness, and ambient light thresholds | The most common blueprint pattern. Multiple variants exist for different sensor types. |
| Humidity-based Bathroom Fan | Activates exhaust fan based on humidity rate-of-change rather than absolute thresholds | Avoids false triggers from normal humidity fluctuations across different baseline levels. |
| Climate Schedule | Configures thermostat with home/away/sleep temperature targets based on time and presence | Supports per-day schedules (weekday vs. weekend). One of the most complex community blueprints. |
| Zigbee2MQTT IKEA Remote Control | Handles button press, double-press, and long-press events from IKEA Zigbee remotes | Configurable actions for each button event. One of the most-imported blueprints for Z2M users. |
When evaluating Exchange blueprints, check the last update date - blueprints from 2022-2023 may not support newer features like input sections or template domains. Read the comment thread for known issues. Test in a non-critical automation first. Prefer blueprints that define all inputs with selectors (not raw YAML templates) for full UI compatibility.
Anatomy of a Blueprint YAML File
Custom blueprints live in /config/blueprints/automation/ (or /config/blueprints/script/ for script blueprints). Imported blueprints from the Exchange are stored in /config/blueprints/automation/homeassistant/ and should not be manually edited since re-importing would overwrite your changes. If you manage a large HA setup, pairing blueprints with Home Assistant’s package system
lets you keep custom blueprints alongside the scripts and helpers they depend on in one version-controlled directory.
A blueprint file has two main parts: the metadata block and the automation (or script) body. Here is a stripped-down example:
blueprint:
  name: "Motion-Activated Light"
  description: "Turn on a light when motion is detected, turn off after timeout."
  domain: automation
  author: "Your Name"
  homeassistant:
    min_version: "2024.6.0"
  input:
    motion_sensor:
      name: "Motion Sensor"
      description: "The binary sensor that detects motion."
      selector:
        entity:
          domain: binary_sensor
          device_class: motion
    target_light:
      name: "Light"
      description: "The light to control."
      selector:
        entity:
          domain: light
    timeout:
      name: "Timeout"
      description: "Seconds to wait after motion stops before turning off."
      default: 300
      selector:
        number:
          min: 30
          max: 3600
          unit_of_measurement: seconds

trigger:
  - platform: state
    entity_id: !input motion_sensor
    to: "on"

action:
  - service: light.turn_on
    target:
      entity_id: !input target_light
  - wait_for_trigger:
      - platform: state
        entity_id: !input motion_sensor
        to: "off"
  - delay:
      seconds: !input timeout
  - service: light.turn_off
    target:
      entity_id: !input target_light
The key pieces:
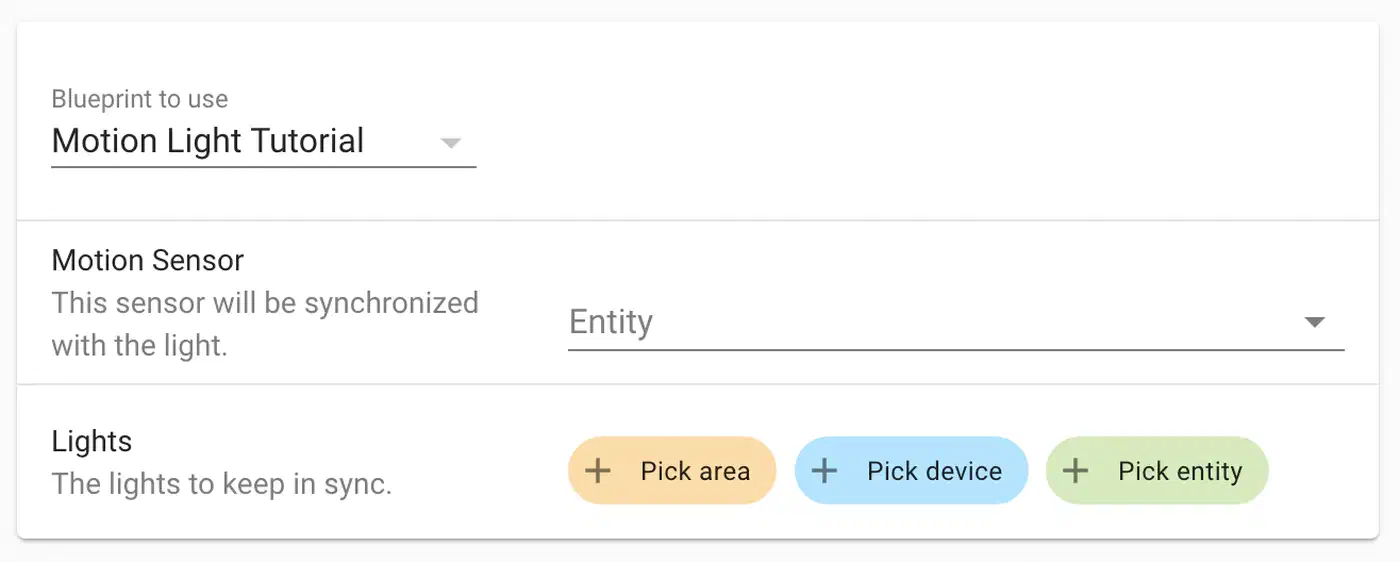
The metadata block (blueprint:) contains name, description, domain (automation, script, or template), optional author, optional homeassistant.min_version, optional source_url (links back to the Exchange post for update tracking), and the input definitions.
Each input defines a selector that controls how the input appears in the UI. Common selector types:
| Selector | Purpose | Example Usage |
|---|---|---|
entity | Pick an entity, optionally filtered by domain/device_class | Motion sensors, lights, climate devices |
device | Pick a device rather than a specific entity | When you need all entities from one device |
number | Numeric value with min/max/step | Timeout durations, brightness percentages, thresholds |
time | Time-of-day picker | Start/end times for time-restricted automations |
boolean | Toggle switch | Feature flags, enable/disable optional behavior |
select | Dropdown with predefined options | Mode selection (home/away/sleep) |
area | Room/area picker | Target all devices in an area |
target | Combined entity/device/area picker | Flexible targeting for actions |
action | User-defined action sequence | Let users define their own notification method |
Input sections (added in Home Assistant 2024.8) let you group related inputs under collapsible sections using input: sections:. This is especially useful for blueprints with many inputs:
blueprint:
  name: "Advanced Motion Light"
  domain: automation
  input:
    sections:
      required_settings:
        name: "Required Settings"
        input:
          motion_sensor:
            name: "Motion Sensor"
            selector:
              entity:
                domain: binary_sensor
                device_class: motion
          target_light:
            name: "Light"
            selector:
              entity:
                domain: light
      optional_settings:
        name: "Optional Settings"
        collapsed: true
        input:
          timeout:
            name: "Timeout"
            default: 300
            selector:
              number:
                min: 30
                max: 3600
          brightness_pct:
            name: "Brightness"
            default: 80
            selector:
              number:
                min: 1
                max: 100
To use inputs in the automation body, reference them with !input input_name anywhere in triggers, conditions, or actions. When a user creates an automation from this blueprint, each !input reference is resolved to the value they selected.
Building a Production-Quality Motion Light Blueprint
Start from a working concrete automation. Write it for one room, test it, then extract the variable parts into blueprint inputs. Here is a more complete motion light blueprint that adds ambient light checking and time-of-day restrictions:
blueprint:
name: "Motion Light with Ambient and Schedule"
description: >
Turns on a light when motion is detected, with optional ambient light
threshold and time-of-day restrictions. Turns off after configurable timeout.
domain: automation
input:
sections:
required_settings:
name: "Required"
input:
motion_sensor:
name: "Motion Sensor"
selector:
entity:
domain: binary_sensor
device_class: motion
target_light:
name: "Light to Control"
selector:
entity:
domain: light
timing:
name: "Timing"
input:
timeout:
name: "Motion Timeout (seconds)"
default: 300
selector:
number:
min: 30
max: 3600
unit_of_measurement: seconds
brightness_pct:
name: "Brightness (%)"
default: 80
selector:
number:
min: 1
max: 100
unit_of_measurement: "%"
optional_conditions:
name: "Optional Conditions"
collapsed: true
input:
ambient_light_sensor:
name: "Ambient Light Sensor (optional)"
default: []
selector:
entity:
domain: sensor
device_class: illuminance
ambient_threshold:
name: "Ambient Light Threshold (lux)"
default: 20
selector:
number:
min: 1
max: 500
unit_of_measurement: lux
start_time:
name: "Start Time (optional)"
default: "00:00:00"
selector:
time: {}
end_time:
name: "End Time (optional)"
default: "23:59:59"
selector:
time: {}
trigger:
- platform: state
entity_id: !input motion_sensor
to: "on"
condition:
- condition: time
after: !input start_time
before: !input end_time
action:
- service: light.turn_on
target:
entity_id: !input target_light
data:
brightness_pct: !input brightness_pct
- wait_for_trigger:
- platform: state
entity_id: !input motion_sensor
to: "off"
- delay:
seconds: !input timeout
- service: light.turn_off
target:
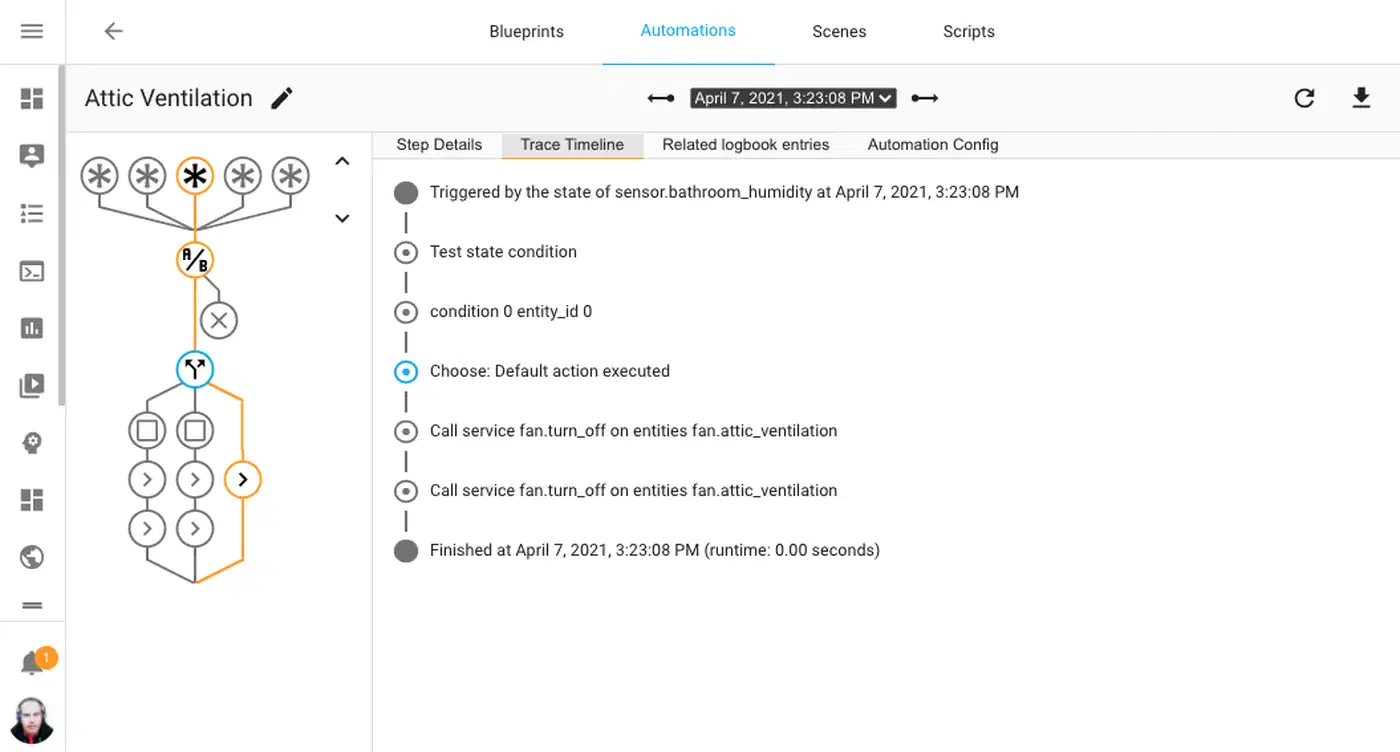
entity_id: !input target_lightTo test it, instantiate the blueprint for two different rooms from the UI. Verify that changing inputs in one instance does not affect the other. Test the edge case where motion is re-triggered during the timeout countdown - the wait_for_trigger should handle this by resetting the wait. Check the automation traces (under Settings > Automations > [your automation] > Traces) to walk through each step’s execution and see where inputs were resolved.
Advanced Patterns
Beyond simple entity substitution, blueprints support several patterns that show up in the better community blueprints.
Multi-trigger blueprints use the id field on each trigger and reference trigger.id in conditions or actions to differentiate which event fired. A hallway light blueprint might have one trigger for motion detected and another for a door opening, with different brightness levels for each.
Action selectors let the user define their own action sequence as a blueprint input. A “doorbell notification” blueprint could accept an action input where the user configures any notification method - push notification, TTS announcement, chime activation, or a combination. Reference it with action: !input notification_action. This makes blueprints composable without the author needing to anticipate every possible notification platform.
Target selectors (selector: target:) let users pick any combination of entities, devices, and areas. This is more flexible than a single entity selector when the blueprint should affect a group, like “turn off all lights in the selected area.”
Template conditions with inputs combine Jinja2 templates with !input values for complex conditional logic. For example, checking if an ambient light sensor reading is below a user-specified threshold:
condition:
  - condition: template
    value_template: >
      {{ states(ambient_sensor) | float(0) < (threshold | float) }}
This lets the blueprint accept user-configurable thresholds while still performing the comparison dynamically.
Blueprint versioning is worth considering for shared blueprints. Include a version number in your blueprint description or as a comment. When you update the blueprint, increment the version. Users who imported from the Exchange can re-import to get the updated version. Existing automation instances continue using the old blueprint logic until the file is updated and automations are reloaded. Home Assistant 2026.x has improved this with update notifications in the UI.
Debugging Blueprint-Generated Automations
Blueprint automations generate traces like any other automation. Navigate to Settings > Automations & Scenes, find the automation instance, and click Traces. The trace shows an interactive graph of the automation run: which trigger fired, which conditions passed or failed, which actions executed, and any errors. Each node can be expanded to see the resolved input values, timestamps, and state changes.
Common debugging scenarios:
If the automation never triggers, check the trigger entity
in Developer Tools > States. Verify the entity ID matches what you selected in the blueprint form. If the blueprint uses to: "on", confirm your sensor actually transitions to that state (some sensors use detected instead).
If a condition blocks execution, expand the condition node in the trace. You will see the evaluated template or state comparison and whether it returned true or false. For time conditions, verify your HA instance timezone is correct.
If the timeout does not work as expected, look at the wait_for_trigger plus delay pattern. If motion is re-detected during the delay, the automation may not restart depending on the mode setting. Set mode: restart on the automation to ensure re-triggering resets the countdown.
For performance, blueprint-instantiated automations are no different from hand-written ones at runtime. Home Assistant resolves the !input references when the automation loads, not on every trigger. Fifty automations from one blueprint have the same performance characteristics as fifty manually-written automations. The startup cost is proportional to the total number of automations, not the number of blueprints.
Migrating Existing Automations to Blueprints
If you already have five copy-pasted motion light automations, converting them to blueprint instances is straightforward:
- Pick the most complete automation as your template
- Identify which values differ between instances - these become your blueprint inputs
- Replace those values with
!inputreferences and add corresponding input definitions - Save the file in
/config/blueprints/automation/custom/ - Create new automation instances from the blueprint, filling in the per-room values
- Disable or delete the old standalone automations
- Test each new instance by triggering it and checking the trace
You do not need to migrate everything at once. Start with the most duplicated pattern, build the blueprint, and expand from there.
Blueprint Limitations
Blueprints work best for automations that share the same structure with different parameters. They are not the right tool for everything.
Blueprints cannot dynamically generate triggers based on inputs - you cannot say “create a trigger for each entity in this list.” The trigger structure is fixed in the blueprint; only the entity IDs and values within that structure are configurable.
Complex branching logic that differs between instances does not translate well to blueprints. If room A needs three conditional branches and room B needs five different ones, forcing them into a single blueprint creates a tangled mess. Consider Node-RED for flow-based visual programming, or write separate YAML automations.
Blueprints also cannot call other blueprints. There is no composition or inheritance - each blueprint is self-contained. If you find yourself wanting to nest blueprints, the complexity may have outgrown the blueprint model.
Finally, when you “take control” of a blueprint-generated automation (converting it to a standalone automation for manual editing), you cannot convert it back. The link to the blueprint is severed permanently. Make sure you actually need to break away before doing so.