How to Monitor Your 3D Printer Remotely with Home Assistant

Yes, you can monitor and control your 3D printer from anywhere by connecting OctoPrint or Moonraker to Home Assistant . Both print servers expose APIs that Home Assistant can poll for real-time data - print progress, temperatures, camera feeds, error states - and from there you can build dashboards, fire notifications on your phone when a print finishes, detect failures with AI-powered camera analysis, and even kill power to a runaway printer through a smart plug. The whole setup takes about an hour once you have a print server running on a Raspberry Pi, and the result is a 3D printer that behaves like any other smart device in your home.
This guide covers the full integration path from choosing a print server through building dashboards and automations, using Home Assistant 2026.4 with OctoPrint 1.11.7 and the Moonraker custom integration.
OctoPrint vs. Moonraker: Picking Your Print Server
Before connecting anything to Home Assistant, you need a print management server running on a small computer (usually a Raspberry Pi) connected to your printer. There are two serious options, and the choice depends on what firmware your printer runs.
OctoPrint is the universal option. It connects over USB serial to virtually any FDM printer running stock Marlin firmware - Creality Ender 3 series, Prusa MK3/MK4 (in Marlin mode), Anycubic, Elegoo Neptune, and pretty much anything else with a USB port. OctoPrint runs a REST API on port 5000, has over 2,000 community plugins, and the current stable version (1.11.7, released February 2026) works reliably on a Raspberry Pi 4 with 2GB of RAM. A Pi Zero 2W can run it too, though it will stutter on complex G-code streaming for very detailed prints.
Moonraker is the API server for Klipper firmware. If you’ve flashed Klipper onto your printer (common with Voron builds, Ender 3 V3 KE, and Prusa MK4 with custom firmware), Moonraker is what exposes the printer’s state over a JSON-RPC and REST API on port 7125. You can’t use Moonraker without Klipper - it’s not a standalone print server like OctoPrint. A Raspberry Pi 4 or 5 is recommended for Klipper + Moonraker since the Pi handles all the motion planning computation.
| Feature | OctoPrint | Moonraker (Klipper) |
|---|---|---|
| Firmware required | Stock Marlin (any) | Klipper only |
| API port | 5000 (REST) | 7125 (JSON-RPC + REST) |
| Authentication | API key from settings | API key or trusted client |
| HA integration | Native (built-in) | Custom via HACS |
| Plugin ecosystem | 2,000+ plugins | Klipper macros + extensions |
| Minimum hardware | Pi 4 2GB (Pi Zero 2W possible) | Pi 4 2GB+ recommended |
| Webcam support | mjpg-streamer / crowsnest | crowsnest (standard) |
Both options expose webcam feeds that Home Assistant can consume as camera entities. If you already run Klipper, use Moonraker. If you want plug-and-play with stock firmware, go with OctoPrint. The Home Assistant integration quality is comparable for both.
Setting Up the Home Assistant Integrations
OctoPrint (Native Integration)
The OctoPrint integration is built into Home Assistant - no HACS required. To set it up:
- In Home Assistant, go to Settings > Devices & Services > Add Integration and search for “OctoPrint”
- Enter the IP address of your Raspberry Pi (e.g.,
192.168.1.50), port5000, and a username - Generate an API key in OctoPrint’s web UI under Settings > API > Global API Key and paste it in
- Make sure the Discovery Plugin is enabled in OctoPrint (it is by default)
Home Assistant may also auto-discover OctoPrint instances on your network, which skips the manual IP entry.
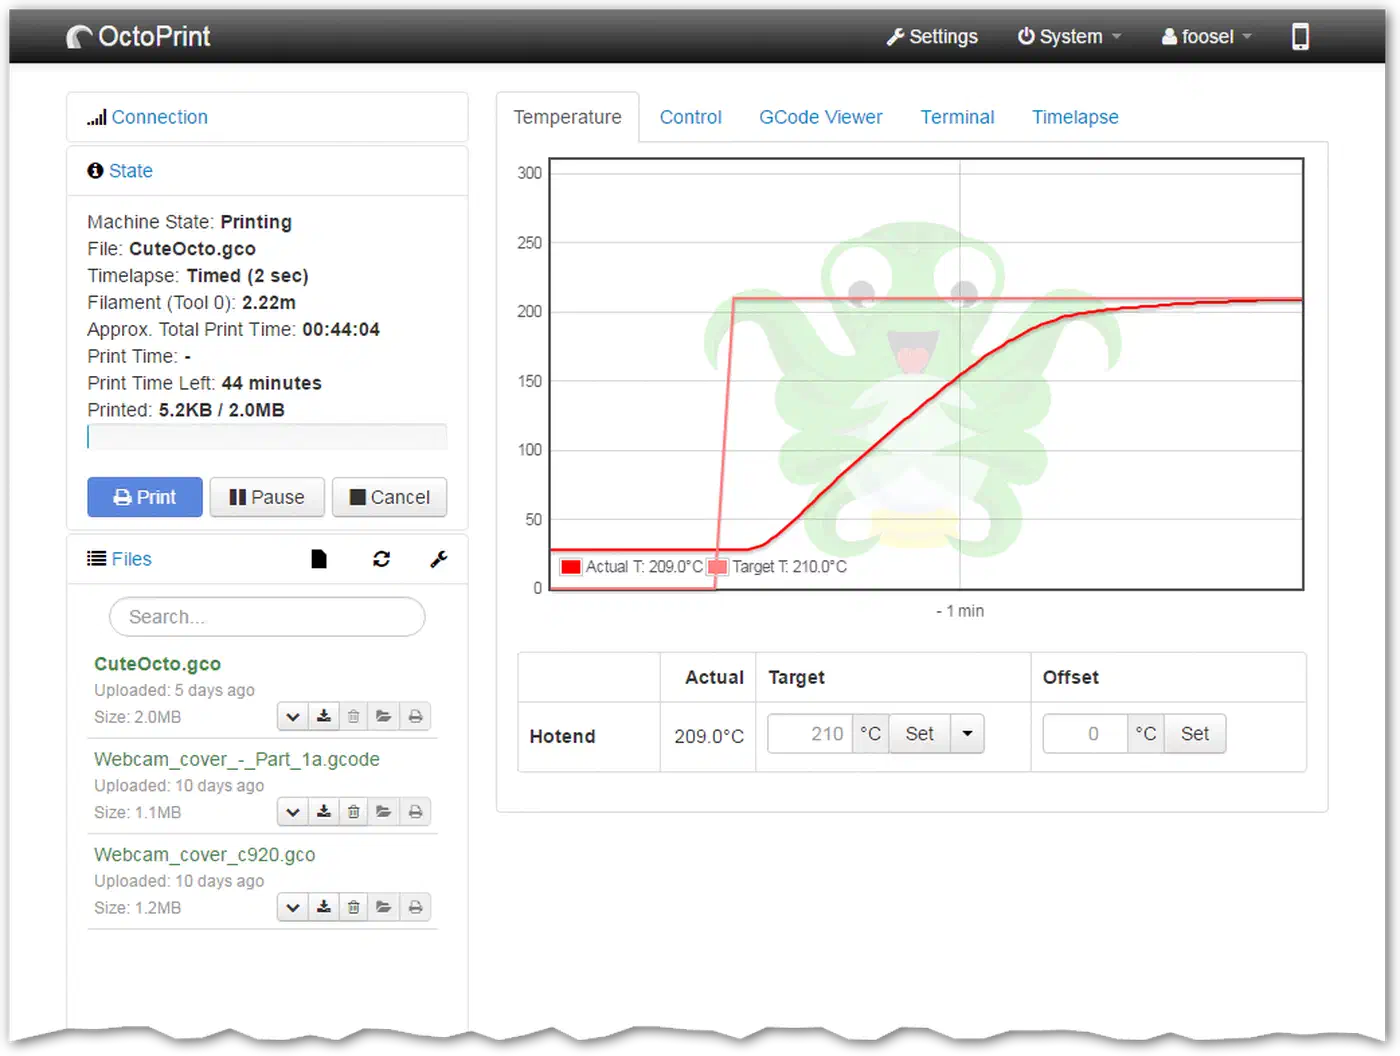
Once connected, the integration creates these entities:
- Sensors:
sensor.octoprint_current_state(Printing, Operational, Error),sensor.octoprint_print_progress(0-100%),sensor.octoprint_print_time_left,sensor.octoprint_bed_temperature,sensor.octoprint_tool_0_temperature - Camera:
camera.octoprintfor the live webcam feed - Buttons: Pause Job, Resume Job, Stop Job
- Number: Target bed and tool temperatures (writable - you can preheat from Home Assistant)
Moonraker (HACS Custom Integration)
The Moonraker integration is a custom component maintained by marcolivierarsenault on GitHub . Install it through HACS:
- In HACS, go to Integrations > Explore & Download and search for “Moonraker”
- Install the integration and restart Home Assistant
- Go to Settings > Devices & Services > Add Integration and search for “Moonraker”
- Enter the Moonraker IP address and port
7125. If you’ve configured an API key in Moonraker, provide it; otherwise trusted client authentication works for same-network setups
Moonraker entities include:
- Sensors:
sensor.moonraker_print_state,sensor.moonraker_progress,sensor.moonraker_filename,sensor.moonraker_estimated_time,sensor.moonraker_filament_used,sensor.moonraker_extruder_temperature,sensor.moonraker_heater_bed_temperature - Camera: Live webcam feed and thumbnail preview of the current print
- Controls: Emergency stop button and macro trigger buttons

Polling Interval
Both integrations poll every 30 seconds by default. For more responsive dashboards, reduce the scan interval to 10 seconds in the integration’s configuration options. This won’t overload the API on a Pi 4 but makes temperature graphs and progress updates noticeably smoother.
Security Considerations
If your printer sits on a different VLAN or you want to monitor prints away from home, resist the urge to port-forward OctoPrint or Moonraker directly. Neither is hardened for internet exposure. Instead, use Home Assistant’s built-in remote access (Nabu Casa), a WireGuard VPN tunnel, or a reverse proxy with proper authentication. Home Assistant itself handles the remote access piece well - you just need to get the data into HA securely on the local network.
Building a 3D Printer Dashboard
Raw sensor entities work fine for automations, but a purpose-built Lovelace dashboard makes remote monitoring practical. Here’s a layout that works well:
Camera Feed and Print Status
Start with a Picture Glance card using the printer camera entity as the background image. Overlay the print progress percentage, printer state, and current filename as entities. This gives you a single card where you can see the actual print, how far along it is, and what’s printing - all at a glance.
For a more detailed view, add a separate Gauge card for print progress (min 0, max 100) and an Entity card showing estimated time remaining. Wrap these in a Conditional card that only appears when the printer state is “Printing” so you don’t see empty gauges when the printer is idle.
Temperature Graphs
Use a History Graph card plotting sensor.octoprint_tool_0_temperature and sensor.octoprint_bed_temperature (or the Moonraker equivalents) over the last 2 hours. This graph pulls its weight - you can spot heating failures, thermal runaway, or a heat block that’s slowly losing its grip before it ruins a 12-hour print. Look for sudden temperature drops during a print, which indicate a loose thermistor or a failed heater cartridge.
Filament Usage
If you’re using Moonraker, the filament_used sensor reports millimeters of filament consumed during the current print. For OctoPrint, filament estimates come from G-code analysis. Display this alongside a helper entity (more on that in the filament tracking section below) to see how much remains on your current spool.
Mobile Layout
If you monitor prints from your phone while away from home, install the layout-card custom card from HACS and create a single-column layout. Stack the camera card on top, followed by the status cards, then temperatures. On a phone screen, horizontal layouts compress too much to be readable.
Failure Detection and Safety Automations
Watching gauges is fine, but the reason to put a 3D printer in Home Assistant is automated responses to printer events. A failed print that nobody notices wastes hours of time and filament. A thermal runaway event is a fire hazard.
Print Completion Notifications
The simplest automation: when sensor.octoprint_current_state changes from Printing to Operational (or Moonraker’s state changes to standby), fire a push notification through the Home Assistant Companion app
. Include the filename and total print time in the message so you know what finished.
automation:
  - alias: "3D Print Complete"
    trigger:
      - platform: state
        entity_id: sensor.octoprint_current_state
        from: "Printing"
        to: "Operational"
    action:
      - service: notify.mobile_app_your_phone
        data:
          title: "Print Complete"
          message: >
            {{ state_attr('sensor.octoprint_job_percentage', 'friendly_name') }}
            finished after {{ states('sensor.octoprint_print_time') }}.
AI-Powered Failure Detection with Obico
Obico (formerly The Spaghetti Detective) uses computer vision to watch your webcam feed and detect print failures in real-time - spaghetti extrusion, layer shifts, adhesion failures, and other problems. It was trained on hundreds of thousands of 3D printing images and calculates a failure probability score continuously.
Obico runs as a plugin for both OctoPrint and Moonraker/Klipper. You can use their cloud service or self-host the Obico server. When it detects a failure, it can automatically pause the print and send alerts.
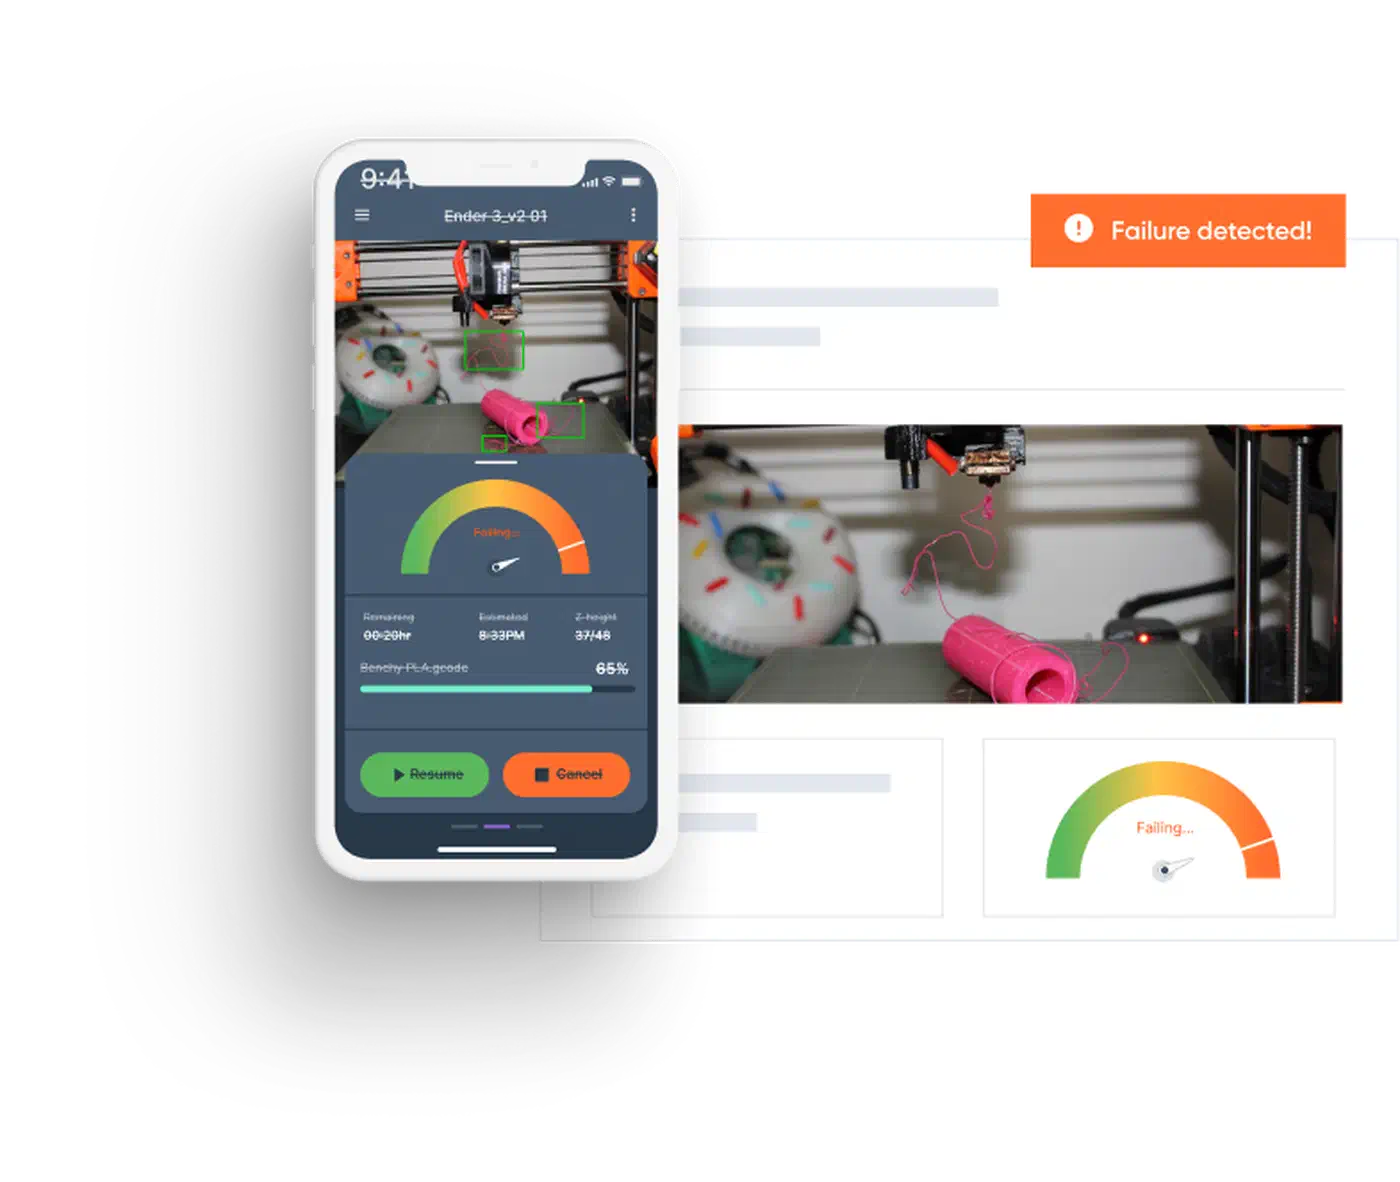
For Home Assistant integration, the Obico ML HA integration turns any HA camera entity into a source for Obico’s AI detection. It provides:
- A camera entity that overlays detected errors on the image
- A binary sensor that flips to
onwhen errors are detected - A sensor reporting the failure confidence as a percentage
You can trigger automations on that binary sensor - if spaghetti is detected with high confidence, pause the print through OctoPrint’s API and send a critical notification with a camera snapshot attached.
Remote Power Control
Wire your printer through a smart plug with energy monitoring - a Shelly Plug S or a Zigbee smart plug like the Sonoff S31 works well. This gives you two capabilities:
First, auto power-off after prints: create an automation that waits 5 minutes after print completion (allowing cooldown), then turns off the smart plug. This keeps the printer from sitting powered on all night after an unattended print.
Second, an emergency power cut: if the bed temperature exceeds 120C or the extruder exceeds 260C unexpectedly (outside of a print), cut power immediately via the smart plug and send a critical notification. This acts as a last-resort safety net below the printer’s own thermal runaway protection.
Thermal Runaway Rate-of-Change Monitor
Firmware-level thermal runaway protection exists on most modern printers, but you can add an extra layer with a Home Assistant template sensor that monitors how fast temperatures change:
template:
  - sensor:
      - name: "Extruder Temp Rate of Change"
        unit_of_measurement: "°C/min"
        state: >
          {% set current = states('sensor.octoprint_tool_0_temperature') | float %}
          {% set old = state_attr('sensor.extruder_temp_rate_of_change', 'previous') | float(current) %}
          {{ ((current - old) * 2) | round(1) }}
        attributes:
          previous: "{{ states('sensor.octoprint_tool_0_temperature') }}"
If the extruder temperature drops more than 15 degrees in 30 seconds during an active print, that usually means the heater cartridge failed or the thermistor disconnected. Trigger an automation that sends an emergency stop command (M112) via the OctoPrint API and cuts power through the smart plug.
Filament Inventory and Print History Tracking
Home Assistant can also track filament inventory and print history over time. Two approaches work here, depending on how much complexity you want.
Manual Spool Tracking with Helper Entities
Create input_number helpers for each filament spool you own. Set the initial value to the spool weight (typically 1000g for a standard spool), then create an automation that subtracts the filament used after each completed print. This requires converting the filament length reported by OctoPrint/Moonraker to weight (multiply by filament cross-section area and material density - about 1.24 g/cm3 for PLA).
Add a notification automation that fires when any spool helper drops below 100g remaining. Include the spool name and a rough estimate of how many more prints you can run based on your average filament usage.
This approach is manual and requires you to switch the “active spool” helper when you load a different roll, but it works without any additional software.
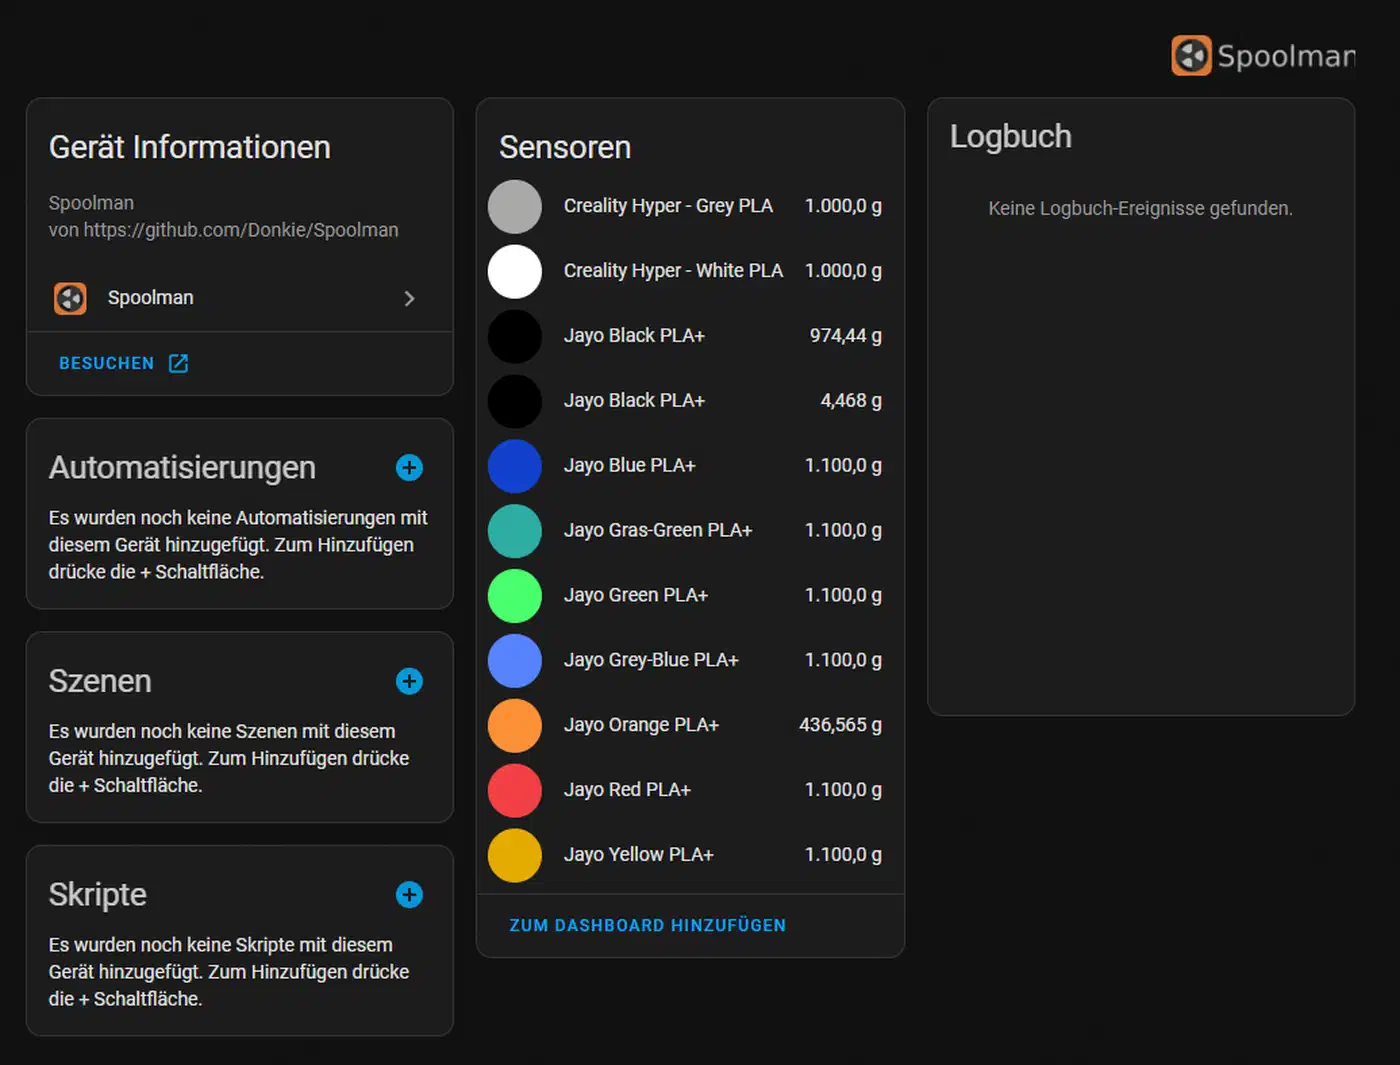
Spoolman for Serious Filament Management
For a more robust solution, Spoolman is a dedicated filament inventory manager that integrates natively with Moonraker/Klipper and has a Home Assistant integration via HACS . Spoolman runs as a small web server (it can run on the same Pi as your print server or in a Docker container) and tracks every spool in your inventory with material type, color, weight remaining, and usage history.
The HA integration creates a device for each spool with sensors for remaining weight, remaining length, and configurable thresholds for low-filament warnings. Each spool also gets a location selector, which is handy if you have multiple printers. Spoolman communicates directly with Moonraker, so filament consumption is logged automatically - no manual subtraction needed.
Energy Cost Tracking
If your smart plug has energy monitoring (the Shelly Plug S does), Home Assistant’s Energy Dashboard
can track electricity consumption per print. The sensor.3d_printer_energy entity feeds into the utility meter system, letting you calculate the actual electricity cost of each print. For a typical FDM printer drawing 200-350W, a 10-hour print costs roughly $0.30-0.50 USD depending on your electricity rate. Not a huge expense, but useful data if you sell prints or want to track total operating costs.
Print History and Statistics
Create a counter helper that increments on each print completion. Pair it with a utility meter entity to get weekly and monthly print counts. For longer-term analytics, set up Home Assistant’s InfluxDB or MariaDB long-term statistics integration and export print data - success rates, average print times, filament consumption trends - to a Grafana dashboard for visualization over months of printing.
Multi-Printer Setup
If you run multiple printers (and many makers do), duplicate the dashboard and automations for each, using device-specific entity prefixes to keep them separate. For polishing the visual design beyond the defaults, see the guide on professional Home Assistant dashboard layouts . Use a tabbed-card from HACS to organize multiple printers in a single dashboard view with one tab per printer. Each printer gets its own camera feed, temperature graphs, progress tracking, and automation set.
What This Guide Doesn’t Cover
This post focuses on the Home Assistant integration layer, not the underlying print server setup. You’ll need a working OctoPrint or Klipper/Moonraker installation before starting. If you need help with that part: for OctoPrint, flash the OctoPi image to an SD card and boot your Pi - the first-run wizard handles the rest. For Klipper, KIAUH (Klipper Installation And Update Helper) is the easiest installer for Klipper + Moonraker + a web frontend like Mainsail or Fluidd.
We also skipped YAML examples for every automation described above. The completion notification and thermal runaway examples should give you enough of a pattern to build the rest. The Home Assistant automation editor’s visual mode can handle most of these without writing YAML at all.
For multi-camera setups (top-down for time-lapses, side profile for monitoring), both OctoPrint and crowsnest support multiple USB cameras - you just need to configure each as a separate MJPEG stream and add multiple camera entities in Home Assistant.
The combination of a print server, Home Assistant, and a few smart plugs turns a 3D printer from something you have to babysit into something you can start remotely and walk away from with confidence. The investment is a Raspberry Pi you probably already have and an hour of configuration time.