PCIe Bifurcation: Add 4 NVMe Drives for $25-50 per Adapter

PCIe bifurcation splits one physical PCIe x16 slot into several independent x4 (or x8) logical slots. That lets you fit two to four NVMe drives on one cheap adapter card, often just $20 to $50 for a passive model. Bifurcation is a CPU-level feature, not the job of an extra chip, so each drive gets its own lanes with zero overhead. A Gen4 x4 link delivers around 7 GB/s per drive , the same bandwidth as a standard motherboard M.2 slot. Out of M.2 slots but still have a free x16 PCIe slot? Bifurcation is one of the cheapest ways to add more NVMe storage.
What PCIe Bifurcation Actually Does
A standard PCIe x16 slot has 16 lanes of bandwidth, all routed to one device by default. Bifurcation tells the CPU’s PCIe root complex to treat those 16 lanes as several separate groups instead of one big link. The most common setups are:
| Bifurcation Mode | Devices Supported | Lanes per Device | Typical Use Case |
|---|---|---|---|
| x16 (default) | 1 | 16 | Single GPU or add-in card |
| x8+x8 | 2 | 8 each | Two NVMe drives or GPU + NVMe |
| x4+x4+x4+x4 | 4 | 4 each | Four NVMe drives |
| x8+x4+x4 | 3 | 8+4+4 | Mixed device configurations |
The modes you can pick depend on your CPU and motherboard BIOS. The split happens at the CPU’s PCIe root complex. So the drives show up as separate NVMe controllers in the OS, just as if you had plugged them into their own M.2 slots. No driver overhead, no extra layer, no performance penalty.
Bifurcation vs. PCIe Switch Adapters
Buy the wrong type of adapter and you waste real money, so the difference is worth knowing. A bifurcation adapter is a passive PCB. It just routes the PCIe traces from the x16 connector to several M.2 slots, with no active parts beyond maybe a power regulator. The CPU does all the lane splitting in silicon. These adapters cost $20 to $50.
A PCIe switch adapter is different. It holds an active chip (historically the Broadcom PEX8747, or newer Broadcom and Microchip parts) that splits the lanes in hardware. This works in any x16 slot, with or without BIOS support, but the adapter itself costs $100 to $300 or more. Switch adapters also add a little latency, often 100-200 nanoseconds per request, since every request runs through the switch fabric.
| Feature | Bifurcation Adapter | PCIe Switch Adapter |
|---|---|---|
| Price range | $20-50 | $100-300+ |
| Requires BIOS support | Yes | No |
| Added latency | None | ~100-200ns |
| Power draw (adapter) | ~0-2W | ~5-15W |
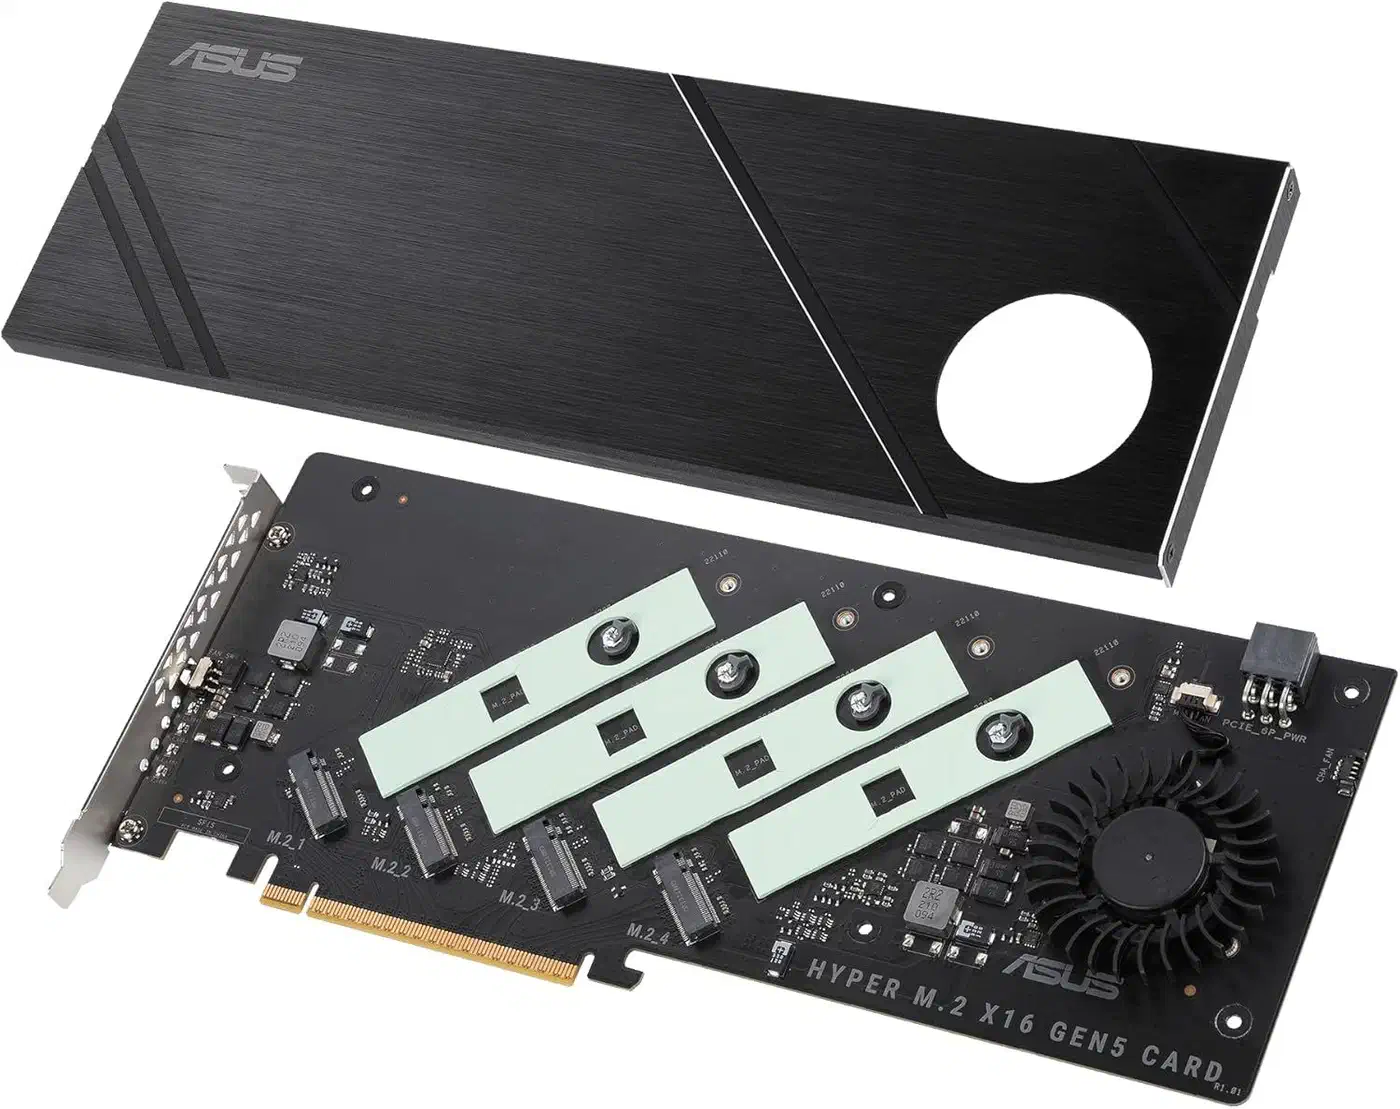
| Example products | IOCREST SI-PEX40129 ( | ASUS Hyper M.2 x16 Gen5 (~$80), HighPoint SSD7505 |
| Boot support | Depends on BIOS | Generally better |
If your motherboard supports bifurcation, pick the passive adapter. You save money, skip the extra heat and power draw, and get the same or better speed.
Hardware Requirements and Compatibility
Not every motherboard supports bifurcation. The BIOS option is often buried in a submenu, or missing outright. Check all of the following before you buy an adapter.
CPU and Platform Support
On Intel, most Z690, Z790, B660, and B760 boards support bifurcation on the CPU-direct x16 slot. All X299, C621, C741, and W-series server and workstation boards support it, with per-slot control. The BIOS setting usually sits under Advanced > PCIe Configuration or a similar submenu.
On AMD, AM5 boards (X670E, X670, B650E, B650) tend to support bifurcation on the top CPU-direct x16 slot. Support is less even across vendors than on Intel. Some boards, in particular ASUS ProArt models, have well-documented bifurcation support, while budget B650 boards may drop the option entirely. AM4 boards with X570 or B550 chipsets support bifurcation on the top x16 slot, but may need a BIOS update first. The Level1Techs forum runs active threads with user-verified AM5 compatibility data.
Server and workstation boards (Intel Xeon with C621/C741 chipsets, AMD EPYC with SP3/SP5 sockets) almost always support bifurcation, with fine-grained lane control per slot. If you build a homelab on used server hardware, bifurcation will almost certainly be there.
Finding the BIOS Setting
The setting moves around by vendor, and it is almost never called “bifurcation” in a consumer BIOS:
- ASUS: Advanced > Onboard Device Configuration, or sometimes Advanced > PCIe Configuration
- Gigabyte: Settings > IO Ports > PCIe Slot Configuration
- MSI: Settings > Advanced > PCI Subsystem Settings
- ASRock: Advanced > Chipset Configuration
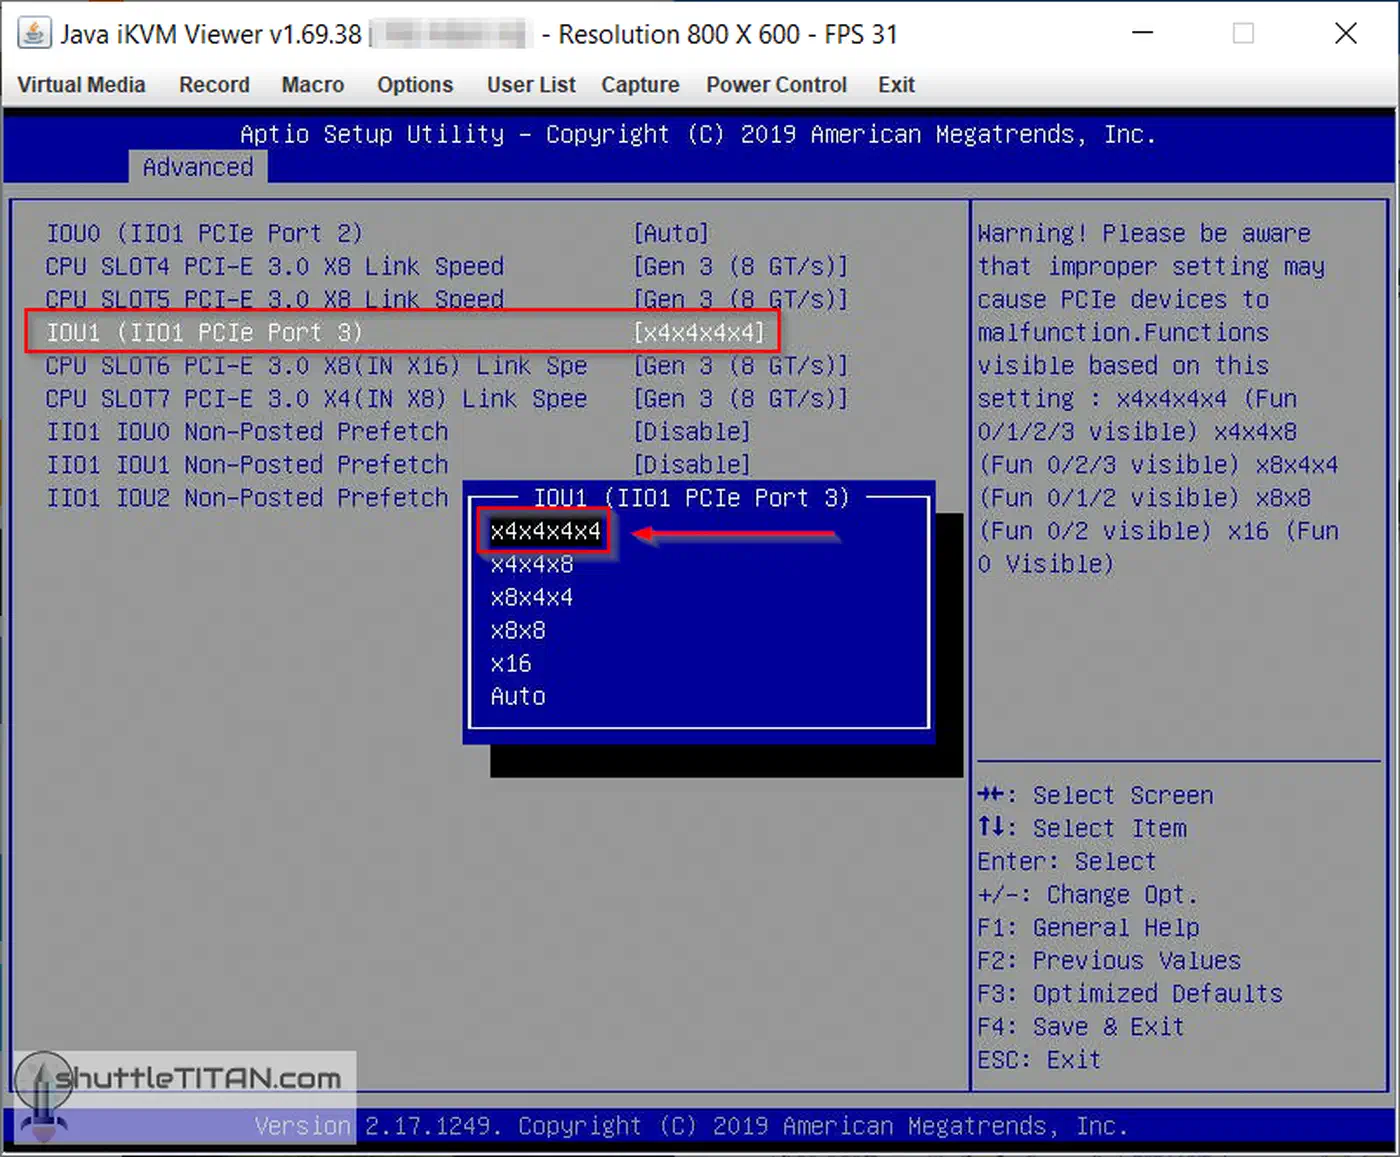
Look for options like “PCIe x16 Slot Mode,” “M.2/SSD Configuration,” or “PCIe Lane Allocation.” Switch the slot you care about from “Auto” or “x16” to “4x4” for four drives, or “2x8” for two.
If your BIOS has no bifurcation option at all, you will need either a PCIe switch adapter or a different motherboard. Check the ASUS PCIe Bifurcation Compatibility FAQ for verified ASUS board support, or your own maker’s support pages.
Choosing an Adapter Card
For passive bifurcation adapters, the two things to check are PCIe generation and physical form factor. Popular options include:
- The IOCREST SI-PEX40129 (~$25) is a basic 4x M.2 adapter, Gen3 and Gen4 ready, with no heatsink. Good budget pick.
- The GLOTRENDS PA54 (~$30) adds Gen5 support and aluminum heatsink standoffs for a few dollars more.
- The Sabrent EC-P4BF (~$100) is the premium pick: full aluminum housing, thermal pads for all four slots, and a switchable cooling fan. It fits 2230/2242/2260/2280 drives. Worth it if you care about thermals.
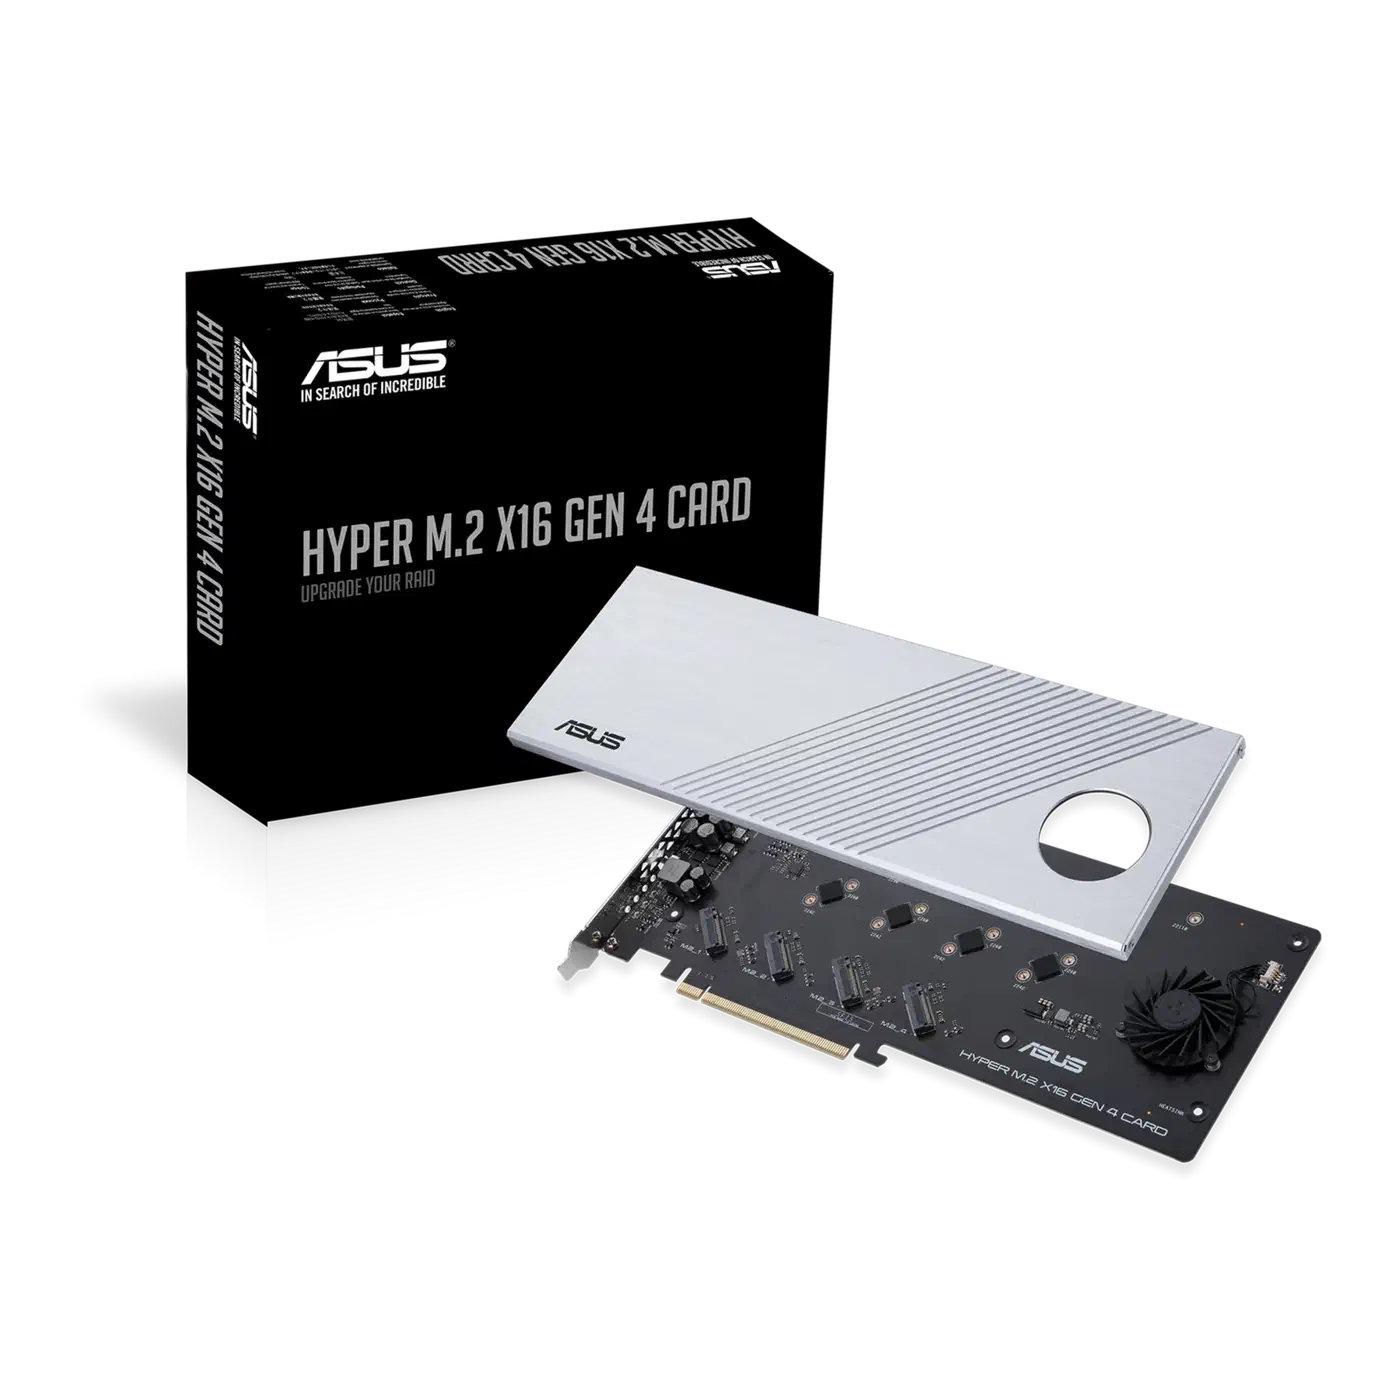
- The ASUS Hyper M.2 x16 Gen4 (~$50-70) has a built-in fan and also works as a PCIe switch adapter on select ASUS boards via Intel VROC.
Match the adapter to your PCIe generation. A Gen3 adapter in a Gen4 slot works, but it caps your bandwidth. A Gen5 adapter in a Gen3 slot works too, but you just wasted money.
Important Limitation: CPU-Direct Slots Only
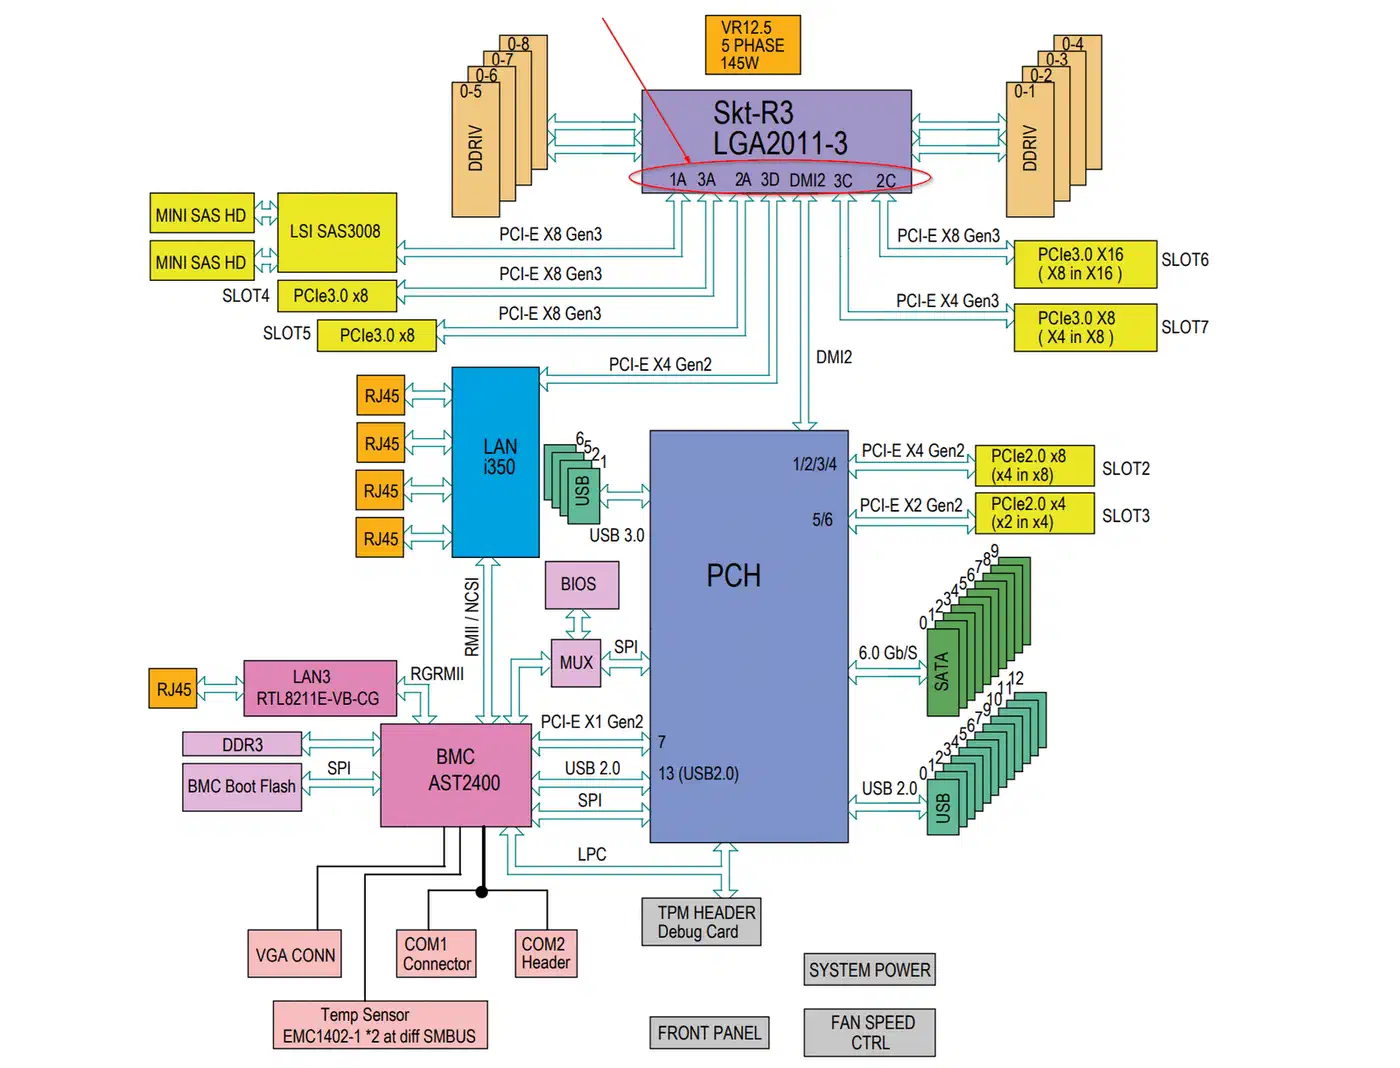
Bifurcation only works on PCIe slots wired straight to the CPU. Most motherboards route the top x16 slot, the one closest to the CPU socket, directly from the CPU. Lower slots may route through the chipset (Intel PCH or AMD chipset). On most platforms, chipset-connected slots do not support bifurcation. Your motherboard manual has a block diagram showing which slots connect to the CPU and which go through the chipset. Check it before you insert the adapter.
Step-by-Step Setup Guide
Once you have checked hardware compatibility, the install takes about 15 minutes.
Physical installation:
- Power off and unplug the system. Slot your NVMe drives into the adapter card’s M.2 slots. Check the key notch as you go: NVMe drives use M-key connectors. B+M key (SATA M.2) drives will not work in most bifurcation adapters.
- Insert the loaded adapter card into the CPU-direct PCIe x16 slot. This is usually the top slot, closest to the CPU socket. A chipset-connected slot will either miss the extra drives or fall back to single-device mode.
- Secure the adapter with the bracket screw and plug power back in.
BIOS configuration:
- Enter BIOS/UEFI on boot (usually Delete or F2). Go to the PCIe configuration section for the slot you are using.
- Change the slot mode from “Auto” or “x16” to “4x4” for four drives, or “2x8” for two.
- Save settings and reboot.
Linux verification:
- After boot, verify drive detection:
lspci | grep NVMeYou should see four separate NVMe controllers if you set a 4x4 mode. Then check the link speed:
sudo lspci -vv | grep -A 15 "NVMe" | grep "LnkSta"The output should show the expected speed. For Gen4 x4 links, that is Speed 16GT/s, Width x4. Finally, confirm the block devices are there:
lsblkAll four NVMe drives should appear as separate block devices (/dev/nvme0n1, /dev/nvme1n1, etc.).
Troubleshooting
If only one drive shows up, the bifurcation setting likely did not take. Common fixes:
- Clear CMOS and set the BIOS option again from scratch
- Update to the latest BIOS firmware: some boards gained bifurcation support in later updates
- Double-check that your adapter sits in the CPU-direct slot, not a chipset-connected one
- Reseat the NVMe drives in the adapter: a poor contact on one drive can block all of them from showing up
Can You Boot from a Bifurcated Adapter?
This varies by BIOS. Many modern UEFI builds let you boot from an NVMe drive on a bifurcated adapter, but some do not. Server and workstation boards tend to handle this better than consumer boards. If boot support is key for you, test it before you go all-in on bifurcation-only storage. A small SATA or onboard M.2 boot drive is a common workaround.
Linux Configuration and Performance Optimization
Linux finds bifurcated NVMe drives on its own through the standard nvme kernel driver, with no extra setup. Each drive shows up as its own block device. The bigger question is what you do with several fast drives in one system.
Software RAID with mdadm
For raw throughput, stripe four Gen4 NVMe drives into a RAID0 array:
sudo mdadm --create /dev/md0 --level=0 --raid-devices=4 \
  /dev/nvme0n1 /dev/nvme1n1 /dev/nvme2n1 /dev/nvme3n1
Four Gen4 x4 drives in RAID0 can hit around 25-28 GB/s sequential reads in ideal conditions. For redundancy, at the cost of write speed, use RAID5 or RAID6 instead.
ZFS Pool
ZFS is a favorite in homelab NAS builds. Create a single-parity raidz pool across all four drives:
sudo zpool create tank raidz /dev/nvme0n1 /dev/nvme1n1 /dev/nvme2n1 /dev/nvme3n1The ZFS ARC cache and inline compression make this a strong backend for a homelab NAS , above all when paired with 10GbE or 25GbE networking.
Btrfs RAID
Btrfs offers RAID10 (striped + mirrored) across four drives:
sudo mkfs.btrfs -d raid10 -m raid10 \
  /dev/nvme0n1 /dev/nvme1n1 /dev/nvme2n1 /dev/nvme3n1
Note that Btrfs RAID5/6 is still experimental in 2026 and not safe for production data. Stick with RAID1 or RAID10 for Btrfs if you need redundancy.
I/O Scheduler Tuning
For NVMe drives, the default Linux I/O scheduler often just adds overhead. Set it to none and let the NVMe hardware queue handle scheduling on its own:
echo none | sudo tee /sys/block/nvme0n1/queue/schedulerRepeat for each NVMe device. To keep this across reboots, add a udev rule:
# /etc/udev/rules.d/60-nvme-scheduler.rules
ACTION=="add|change", KERNEL=="nvme[0-9]*n[0-9]*", ATTR{queue/scheduler}="none"
NUMA Awareness for Multi-Socket Servers
On dual-socket servers, put the bifurcation adapter in a PCIe slot tied to the same NUMA node as the CPU that runs your storage-heavy workloads. Use lstopo or numactl --hardware to read the NUMA layout and confirm the placement. Put the adapter on the wrong NUMA node and you add real latency to every I/O.
Thermal Management and Power Considerations
Stack four NVMe drives in one PCIe slot and you pack a lot of heat into a small space. Gen4 NVMe drives draw 5-8W under sustained load, while Gen5 drives can pull 10-14W each. Four Gen4 drives means 20-32W of heat in a space about the size of a playing card.
Passive adapters like the IOCREST and GLOTRENDS models lean entirely on case airflow. If your server has decent front-to-back airflow, as most rackmount chassis do, this is usually enough. Tower cases with weak airflow may see thermal throttling on the inner drives.
Active adapters like the Sabrent EC-P4BF add a small fan and a full aluminum housing with thermal pads. These hold lower temperatures under sustained load. They are worth the extra cost if you plan to run heavy sequential workloads like large file transfers or video editing.
A few things help in practice. With a passive card, point a 40mm or 80mm case fan straight at the bifurcation adapter. Watch drive temperatures with sudo nvme smart-log /dev/nvme0n1 | grep temperature, and look out for sustained readings above 70C, which usually triggers thermal throttling. If you only need three drives, leave one M.2 slot empty: the air gap cools the rest. Also check that your PSU has enough headroom, since four NVMe drives plus the adapter add 20-40W of draw, which adds up in dense homelab builds.
Use Cases: Why Homelab Builders Use Bifurcation
Proxmox VM Storage
Run VM disk images on a RAID10 array of four NVMe drives for fast boot times, live migration, and snappy snapshots. Bifurcation gives you this without a $500+ NVMe RAID card. On most platforms, each bifurcated drive also gets its own IOMMU group. So you can pass single NVMe drives straight to VMs with VFIO passthrough for near-native storage speed.
To use VFIO passthrough with bifurcated drives, turn on IOMMU in your BIOS (Intel VT-d or AMD-Vi). Add intel_iommu=on or amd_iommu=on to your kernel command line. Then check that each NVMe controller has its own IOMMU group with find /sys/kernel/iommu_groups/ -type l. If drives share a group, you may need to pass all of them to one VM or use ACS override patches.
TrueNAS SCALE All-Flash NAS
Build a high-performance ZFS NAS with 4-8 NVMe drives (two bifurcation adapters in two x16 slots) for a fraction of the cost of enterprise NVMe JBOFs. This is ideal for saturating 10GbE or 25GbE links, where spinning disks simply cannot keep up.
Ceph OSD Nodes
In a Ceph cluster, each NVMe drive becomes its own OSD. Bifurcation lets a single-socket server add four or more OSDs without dedicated PCIe expansion cards. That is key for building dense, low-cost Ceph clusters.
Database Servers
Split database files and WAL/journal across separate physical NVMe drives for the best PostgreSQL or MySQL performance. Give one drive to WAL writes and another to data reads, and the two workloads stop fighting over I/O. Bifurcation supplies these dedicated drives without eating up all your motherboard M.2 slots.
Tiered Storage
Use one fast NVMe drive as a hot cache tier and three capacity drives as the storage tier, all from one PCIe slot. Linux bcache or dm-cache handles the tiering on its own. It keeps hot data on the fast drive and parks bulk data on the capacity tier.
Cost Comparison
For a four-drive NVMe setup, here is what each route costs (adapter only, drives not counted):
| Approach | Adapter Cost | Requires BIOS Support | Notes |
|---|---|---|---|
| Passive bifurcation adapter | $20-50 | Yes | Best value if supported |
| Active bifurcation adapter (with cooling) | $80-110 | Yes | Better thermals |
| PCIe switch adapter | $150-300+ | No | Works in any x16 slot |
| Dedicated NVMe HBA/RAID card | $300-800+ | No | Enterprise features, battery backup |
For most homelab builders, a $25 passive bifurcation adapter does the same job as a $200 PCIe switch card, as long as your motherboard cooperates. That $175 you save buys another NVMe drive.
Is Bifurcation Right for Your Build?
PCIe bifurcation solves an annoying hardware problem, too few M.2 slots and too many drives, for very little money. It comes down to three things: a CPU-direct PCIe x16 slot, BIOS support for lane splitting, and a compatible passive adapter. Check those three boxes and you can add four NVMe drives to your homelab for under $30 in adapter costs.
The main gotcha is checking BIOS support before you buy. Read your motherboard manual, search forums for your exact board model plus “bifurcation,” and check maker compatibility pages like the ASUS bifurcation FAQ . If your board does not support it, a PCIe switch adapter works instead. It costs more, but it runs in any slot.
Four NVMe drives, full bandwidth each, no special drivers, no performance penalty, one PCIe slot. Hard to beat that for homelab storage growth.