 Botmonster Tech
Build a self-hosted CI/CD pipeline with Gitea Actions and Docker

Running CI/CD through GitHub Actions or GitLab CI is handy until it isn’t. Free tier minute limits run out fast. Private repos cost more than you’d expect. And if your code is sensitive, you’re sending every push through someone else’s servers. Self-hosting your pipeline sidesteps all of that.
Gitea is a light, self-hosted Git service. It has added GitHub Actions-compatible workflow support through a piece called act_runner. The workflow YAML syntax is near-identical to GitHub Actions. So teams who already know that ecosystem can move over with little friction. Forgejo, the community fork, ships the same Actions engine, so if you have not settled on one yet, weigh them in our comparison of the two Git servers. This guide walks through a complete, production-ready CI/CD stack on Linux using Docker Compose.
Why Self-Host Your Pipeline
The case for self-hosting CI/CD comes down to three things: control, cost, and speed.
GitHub Actions gives free accounts 2,000 minutes per month for private repos. A test suite that takes 8 minutes per run burns through that in about four days of active work. After that, you pay per minute or wait until the month resets. GitLab CI has similar limits.
Control is important for a different reason. Say your codebase holds private algorithms, client data, or security tools. Pushing code through a third-party runner means it runs on hardware you don’t own, by processes you can’t inspect. A self-hosted runner keeps your source and build files on your own network.
Speed is often an underrated win. Cloud runners are shared. Your build competes for CPU time with thousands of other jobs. On your own hardware, builds that took 6-8 minutes on cloud runners often finish in 2-3 minutes. An NVMe-backed Docker cache and a local container registry help a lot here.
Setting Up Gitea with Docker Compose
Before you write any workflow files, you need a running Gitea instance with Actions on. The fastest path is Docker Compose.
Create a project directory and a docker-compose.yaml:
version: "3.8"

networks:
  gitea:
    external: false

services:
  gitea:
    image: gitea/gitea:latest
    container_name: gitea
    environment:
      - USER_UID=1000
      - USER_GID=1000
      - GITEA__database__DB_TYPE=sqlite3
      - GITEA__server__ROOT_URL=http://your-server-ip:3000/
      - GITEA__server__SSH_DOMAIN=your-server-ip
      - GITEA__actions__ENABLED=true
    volumes:
      - ./gitea-data:/data
      - /etc/timezone:/etc/timezone:ro
      - /etc/localtime:/etc/localtime:ro
    ports:
      - "3000:3000"
      - "222:22"
    networks:
      - gitea
    restart: unless-stopped
The key environment variable here is GITEA__actions__ENABLED=true. Without it, the Actions tab won’t show in the Gitea UI and act_runner can’t register.
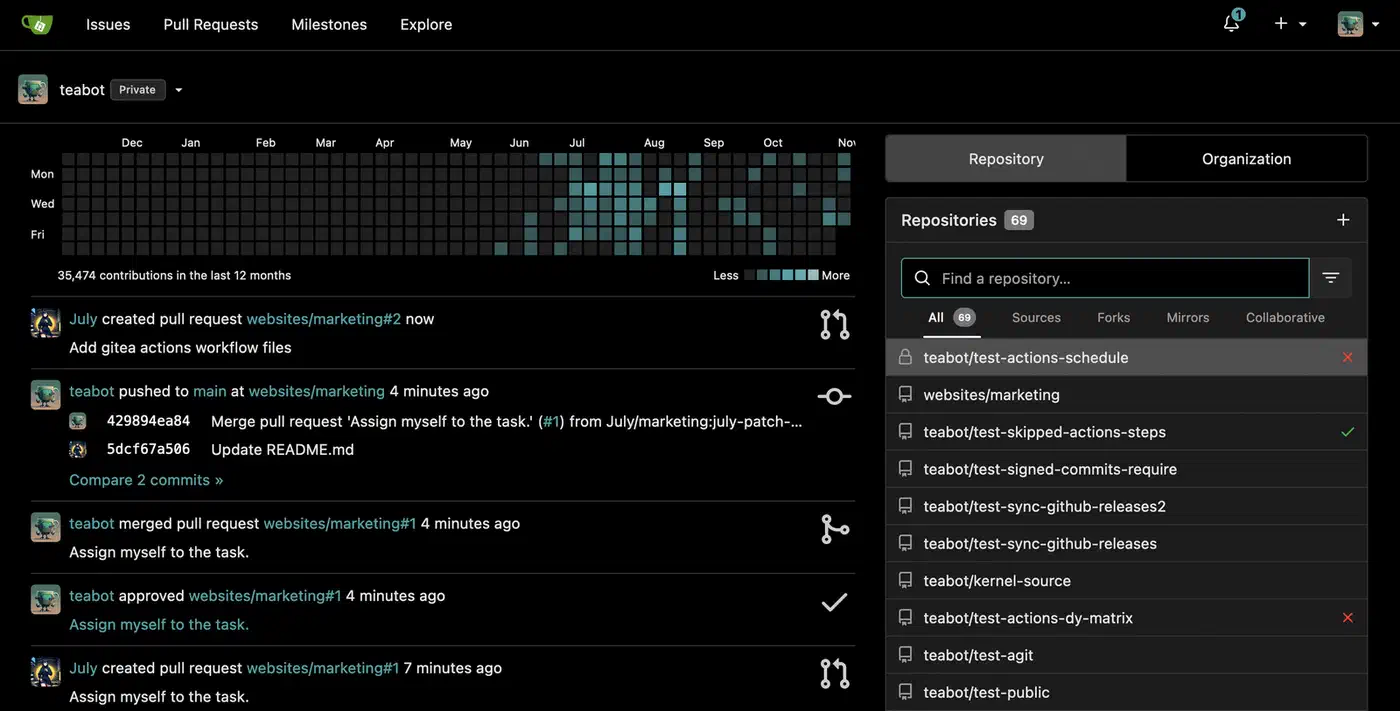
Start the stack with docker compose up -d, then go to http://your-server-ip:3000. The first-run wizard asks you to create an admin account and set basic server options. Once you’re logged in, create a repo and check that the Actions tab appears.
For production use, swap the SQLite database for PostgreSQL. Add a db service and update the database environment variables to match (GITEA__database__DB_TYPE=postgres, GITEA__database__HOST=db:5432, and so on).
Installing and Configuring act_runner
act_runner is Gitea’s official runner daemon. It polls your Gitea instance for pending jobs. Then it spins up Docker containers to run workflow steps and reports results back. Add it to your Docker Compose file:
  runner:
    image: gitea/act_runner:latest
    container_name: act_runner
    environment:
      - GITEA_INSTANCE_URL=http://gitea:3000
      - GITEA_RUNNER_REGISTRATION_TOKEN=${RUNNER_TOKEN}
    volumes:
      - ./runner-data:/data
      - /var/run/docker.sock:/var/run/docker.sock
    networks:
      - gitea
    depends_on:
      - gitea
    restart: unless-stopped
The docker.sock mount lets the runner spawn sibling containers for each job. This is a real privilege: the runner can launch any Docker container on your host. So keep your Gitea instance private, or limit runner registration to set orgs and repos.
To get the registration token, open your Gitea admin panel under Site Administration > Runners. Copy the token, then add it to a .env file next to your docker-compose.yaml:
RUNNER_TOKEN=your_token_hereThen restart the stack. The runner registers itself on first boot. Confirm it’s online in the Gitea admin panel under Runners. It should show a green status dot.
By default, act_runner accepts jobs tagged ubuntu-latest, ubuntu-22.04, and ubuntu-20.04. These labels map the runner to workflows that use the same runs-on: values. You can add custom labels in the runner’s config.yaml to target jobs more tightly.
Writing Your First Workflow
Gitea Actions workflow files live in .gitea/workflows/ inside your repo. The syntax mirrors GitHub Actions almost exactly. You get the same on:, jobs:, and steps: keys, plus the same uses: directive for third-party actions.
Here’s a full workflow for a Python project that runs tests on every push:
name: CI

on:
  push:
    branches: [main, develop]
  pull_request:
    branches: [main]

jobs:
  test:
    runs-on: ubuntu-latest

    steps:
      - name: Checkout
        uses: actions/checkout@v4

      - name: Set up Python
        uses: actions/setup-python@v5
        with:
          python-version: "3.12"

      - name: Cache pip dependencies
        uses: actions/cache@v4
        with:
          path: ~/.cache/pip
          key: ${{ runner.os }}-pip-${{ hashFiles('requirements.txt') }}

      - name: Install dependencies
        run: pip install -r requirements.txt

      - name: Run tests
        run: pytest tests/ -v --tb=short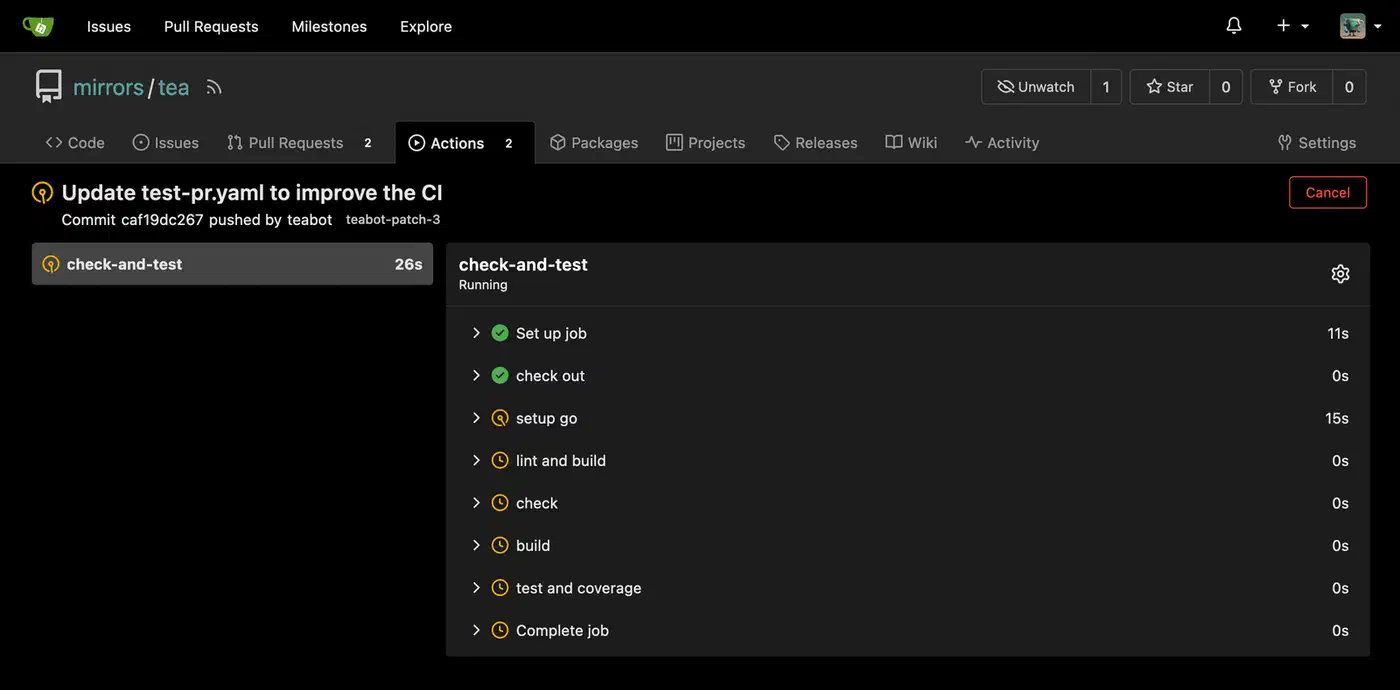
One thing to know: third-party actions from GitHub Marketplace don’t work directly with Gitea. But the popular ones like actions/checkout, actions/setup-python, and actions/cache are mirrored on gitea.com. They work as-is when you reference them as shown above. act_runner fetches them once and caches them locally.
For other languages, swap the Python steps for whatever fits your stack: actions/setup-node, a Go toolchain setup, or a plain Docker container via container: at the job level.
Building and Pushing Docker Images
A common CI/CD task is building a Docker image and pushing it to a registry once tests pass. Gitea ships with a built-in OCI-compatible container registry, on by default. So you can push images to your own server with no separate Harbor or Docker Registry setup.
Log in to the Gitea registry with docker login your-server-ip:3000. Your image names follow the pattern your-server-ip:3000/username/repo/image-name:tag. Before you push, make sure your images follow good security habits: run as non-root, use small base images, and pin dependencies. See our Docker image hardening checklist for the full rundown.
Here’s a workflow that builds and pushes after a clean test run:
  build-and-push:
    runs-on: ubuntu-latest
    needs: test

    steps:
      - name: Checkout
        uses: actions/checkout@v4

      - name: Login to Gitea Registry
        uses: docker/login-action@v3
        with:
          registry: ${{ secrets.REGISTRY_URL }}
          username: ${{ secrets.REGISTRY_USER }}
          password: ${{ secrets.REGISTRY_PASSWORD }}

      - name: Build and push
        uses: docker/build-push-action@v6
        with:
          context: .
          push: true
          tags: |
            ${{ secrets.REGISTRY_URL }}/myapp:latest
            ${{ secrets.REGISTRY_URL }}/myapp:${{ github.sha }}
Set REGISTRY_URL, REGISTRY_USER, and REGISTRY_PASSWORD in your repo’s Settings > Secrets > Actions. The runner swaps them in when the job runs, and they never show up in logs.
Automating Deployment via SSH
A build pipeline that doesn’t deploy is just a test runner. The last step is getting your fresh image onto the target server. The appleboy/ssh-action works with Gitea Actions. It handles the SSH connection, login, and remote commands.
  deploy:
    runs-on: ubuntu-latest
    needs: build-and-push
    if: github.ref == 'refs/heads/main'

    steps:
      - name: Deploy to production
        uses: appleboy/ssh-action@v1
        with:
          host: ${{ secrets.DEPLOY_HOST }}
          username: ${{ secrets.DEPLOY_USER }}
          key: ${{ secrets.DEPLOY_SSH_KEY }}
          script: |
            docker pull ${{ secrets.REGISTRY_URL }}/myapp:latest
            docker compose -f /opt/myapp/docker-compose.yaml up -d
Store your SSH private key as a secret (DEPLOY_SSH_KEY). The matching public key should sit in ~/.ssh/authorized_keys on the deploy target. Use a dedicated, low-privilege deploy user, not root or your personal account.
The if: github.ref == 'refs/heads/main' condition limits deploys to the main branch. Pushes to develop or feature branches run tests and builds, but only main triggers the real deploy.
For a zero-downtime pattern, swap docker compose up -d for a blue-green switch. Bring up the new container on a different port, wait for a health check to pass, update your reverse proxy config, then stop the old container.
Keeping Your Runner Secure and Efficient
A few habits separate a reliable self-hosted runner from a liability.
Scope your runner. A globally registered runner can pick up jobs from any repo on your Gitea instance. Unless you need that, register the runner to one org or repo. This limits the blast radius if a bad workflow tries something it shouldn’t.
Set resource limits. With no limits, a runaway build can eat all the CPU and memory on your host. That takes down Gitea and every other service next to it. Add Docker resource limits to the runner container:
    deploy:
      resources:
        limits:
          cpus: "2.0"
          memory: 4G
You can also set per-job container limits in the runner’s config.yaml under the container: key.
Cache hard. Use actions/cache to keep compiled assets, package manager caches, and Docker layer caches across runs. For Docker builds, the docker/build-push-action supports cache-from and cache-to options. These can halve build times after the first run.
Keep act_runner in sync with Gitea. The runner and server version numbers are linked. Running a much older act_runner against a newer Gitea version can cause odd job failures. Pin both to the same release in your Compose file and update them together.
Log and alert. act_runner logs to stdout by default. Forward those logs to a log stack like Loki and Grafana, and set up alerts for failed runs. A CI pipeline you can’t watch isn’t much of a safety net. Once monitoring is in place, you can grow the pipeline further. One example: add automated code reviews with a local LLM that posts feedback on every pull request.
Handling Multi-Environment Workflows
Most real projects need more than one target. You want a staging environment that gets every commit to develop, and a production environment that only gets tagged releases. Gitea Actions handles this with conditional logic and environment protection rules.
Here’s a pattern that deploys to staging on its own and needs a manual approval step before production:
name: Deploy

on:
  push:
    branches: [develop, main]
  create:
    tags:
      - "v*"

jobs:
  deploy-staging:
    runs-on: ubuntu-latest
    if: github.ref == 'refs/heads/develop'
    environment: staging
    steps:
      - name: Deploy to staging
        uses: appleboy/ssh-action@v1
        with:
          host: ${{ secrets.STAGING_HOST }}
          username: deploy
          key: ${{ secrets.DEPLOY_SSH_KEY }}
          script: |
            docker pull ${{ secrets.REGISTRY_URL }}/myapp:develop
            docker compose -f /opt/myapp/docker-compose.yaml up -d

  deploy-production:
    runs-on: ubuntu-latest
    if: startsWith(github.ref, 'refs/tags/v')
    environment: production
    steps:
      - name: Deploy to production
        uses: appleboy/ssh-action@v1
        with:
          host: ${{ secrets.PROD_HOST }}
          username: deploy
          key: ${{ secrets.DEPLOY_SSH_KEY }}
          script: |
            docker pull ${{ secrets.REGISTRY_URL }}/myapp:${{ github.ref_name }}
            docker compose -f /opt/myapp/docker-compose.yaml up -d
Environments in Gitea can have required reviewers, set under repo Settings > Environments. When a job targets an environment with reviewers, Gitea pauses the job and sends a notice. Someone on the review list approves or rejects the deploy before the job goes on. This gives you a light gate with no separate deploy tool.
Tagging a release and letting the pipeline handle promotion beats SSHing into production servers by hand. It also creates a log of every deploy: who triggered it, when it ran, what image went out, and whether it worked.
Debugging Failed Runs
Pipelines fail. Knowing where to look when they do saves time.
In a fresh self-hosted setup, the top failure points are runner connectivity and Docker socket permissions. If jobs queue but never start, check that act_runner is running and registered. docker logs act_runner shows whether it’s polling Gitea or hitting connection errors.
If a job starts but fails right away with permission errors inside the container, the Docker socket mount may belong to a group the runner user isn’t in. On the host, run ls -la /var/run/docker.sock to see the owning group, then check that the container user has access.
For workflow logic bugs, act_runner logs each step’s output in real time. The Gitea Actions UI shows the full log per step with exit codes. You can also turn on debug logging for a run. Add ACTIONS_STEP_DEBUG: true to the workflow’s env: block. This gives verbose output from most actions and helps you trace where the logic goes wrong.
When you test workflow changes, don’t commit again and again just to trigger the pipeline. Instead, use act, a local workflow runner that simulates Gitea and GitHub Actions on your own machine. It isn’t a perfect copy, but it catches syntax errors, missing secrets, and basic step failures before you push.
Moving from GitHub Actions
If you have repos on GitHub with Actions workflows, batch-migrate them from GitHub first, then the workflow move is simple for most projects. Copy your .github/workflows/ directory to .gitea/workflows/. The YAML syntax matches for all basic patterns.
The main things to review:
- Actions that pull
github.com-hosted resources directly (like marketplace actions withuses: some-org/action@v1) may need a Docker-based swap or a mirrored Gitea action. It depends on whether the action maintainer has published togitea.com. GITHUB_TOKENbecomesGITEA_TOKENfor API access to the current repo.- Some GitHub-specific contexts (
github.event.pull_request.head.repo.fork,github.event.repository.default_branch) have Gitea equivalents, but the names or support may differ. - Matrix strategies, service containers, and artifact upload and download all work. Gitea handles artifact storage instead of GitHub’s separate artifact service.
For most app CI pipelines (build, test, containerize, deploy) the workflow file needs no changes at all beyond moving the directory. The gaps show up mainly in workflows that lean on GitHub-specific features like GitHub Pages deploys or Packages.
For teams running internal infrastructure, Gitea’s code hosting, its built-in container registry, and act_runner let you fold several managed services into one self-hosted stack you control. Pair it with a reverse proxy like Caddy or Nginx and a DNS-validated certificate that covers every subdomain. The whole setup runs fine on an N100-class desktop replacement or a modest VPS. Analytics is another good thing to fold in: you can deploy Plausible with the same Docker Compose approach.