Deploy Ceph with cephadm: 3-node, 12 OSD storage cluster

Yes, you can build a self-healing, redundant distributed storage cluster using Ceph
across three Linux nodes. It’s less painful than its reputation suggests, thanks to the modern cephadm tool. You get block storage (RBD) for VMs, a shared POSIX filesystem (CephFS) for many clients, and S3-compatible object storage if you want it. Your data survives the loss of any node, rebalances on its own when hardware changes, and scales from a homelab to petabyte production by adding more disks.
This guide walks through the full process: how Ceph works, choosing hardware, bootstrap with cephadm, setting up storage, and keeping it healthy. The steps target Ceph Squid (v19.2.x) and Tentacle (v20.2.x), but the workflow applies to any recent release.
Ceph Architecture: Understanding the Components Before You Build
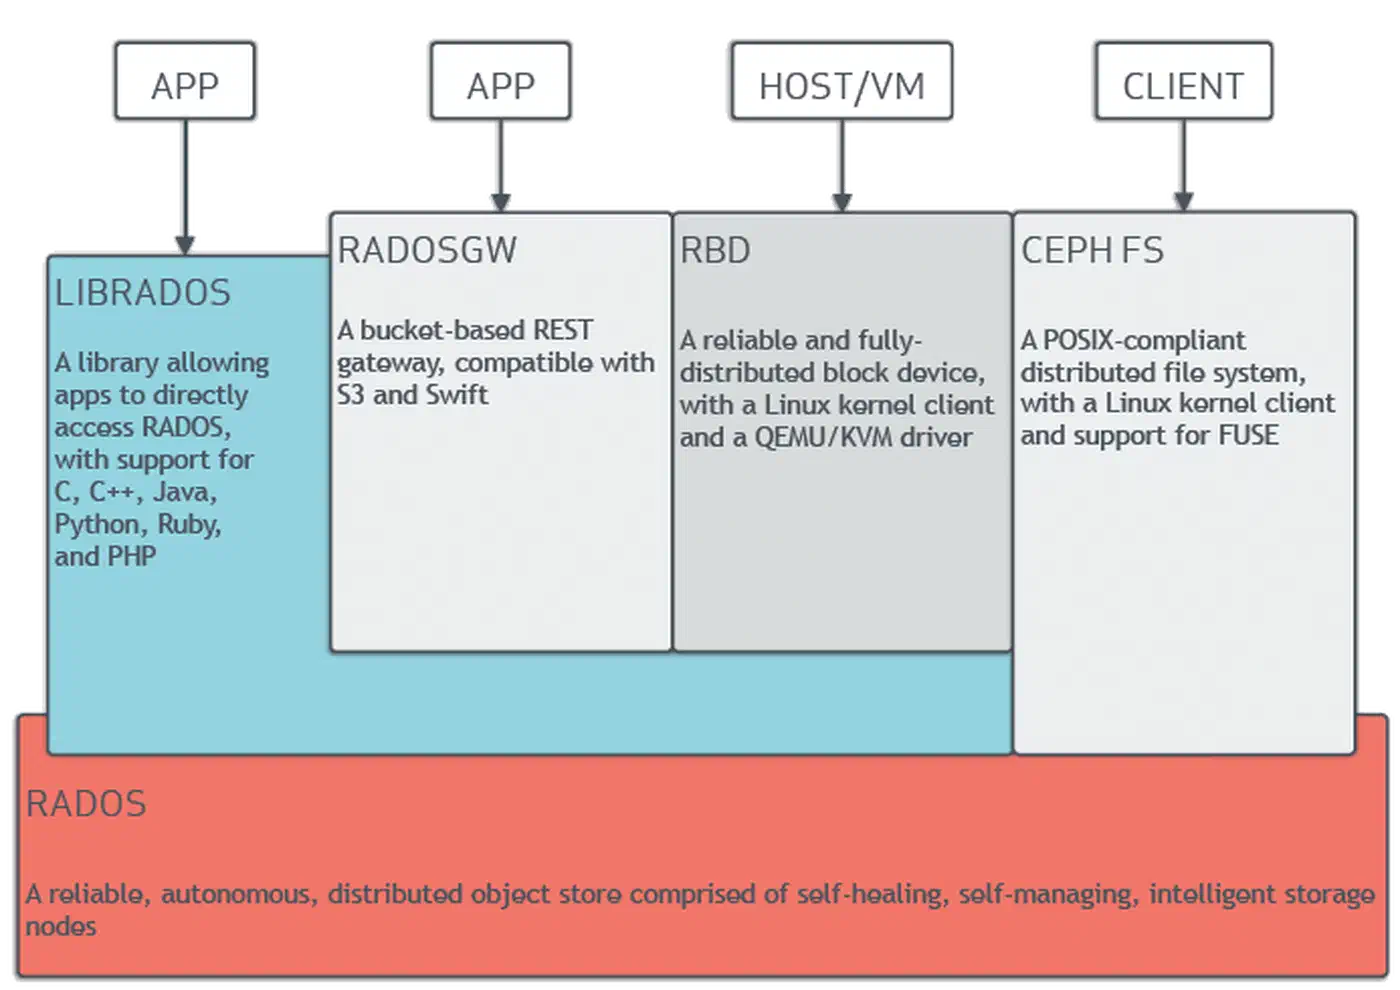
Ceph has several moving parts. Knowing what each daemon does before you start saves you from most setup mistakes. Every piece of data in Ceph lives as an object in RADOS (Reliable Autonomic Distributed Object Store). All the higher-level services (block storage, filesystems, object gateways) sit on top of RADOS.
The core components:
- OSD (Object Storage Daemon): One OSD runs per physical disk or partition. OSDs handle data replication, recovery, rebalance, and periodic scrubbing. A 3-node cluster with 4 disks each gives you 12 OSDs.
- MON (Monitor): Holds the cluster map: the OSD map, PG (Placement Group) map, CRUSH map, and monitor map. Monitors use Paxos consensus, so you need an odd number for quorum. Three monitors across three nodes is the floor for a production setup.
- MGR (Manager): Runs the dashboard, the Prometheus metrics endpoint, and the orchestrator. It lives next to the monitors. At least two (active and standby) for high availability.
- MDS (Metadata Server): You only need it with CephFS. It handles POSIX filesystem metadata: directory tree, permissions, and file sizes. At least one active plus one standby for CephFS.
- CRUSH map: The algorithm that picks which OSDs store which data. There’s no central lookup table. Clients compute placement on their own, which is why Ceph scales in a straight line. You set failure domains (host, rack, datacenter) so replicas never land on the same node.
Ceph manages itself at the data layer. When an OSD goes down, the other OSDs spot the failure through heartbeats. The CRUSH algorithm then redoes placement to restore the wanted replica count, with no hand-holding from you.
Hardware Requirements and Network Planning
Ceph speed and reliability lean hard on hardware choice and network layout. Weak hardware or a flat network leads to poor speed and painful recovery times.
Minimum Homelab Specs (per node)
| Component | Minimum | Recommended |
|---|---|---|
| CPU | 4 cores | 8+ cores |
| RAM | 8 GB (2 GB base + ~1 GB per OSD) | 32 GB (~8 GB per OSD) |
| System disk | 1x SSD (OS, monitors, managers) | 1x NVMe |
| Data disks | 2-4x HDD or SSD for OSDs | 4x HDD + NVMe for WAL/DB |
| Network | 1 GbE (functional but slow) | 10 GbE or 25 GbE |
The Ceph docs suggest about 8 GB of RAM per BlueStore OSD. The default osd_memory_target is 4 GB, plus headroom for the OS and recovery spikes. Monitors and managers don’t eat much memory on small clusters. 64 GB per node handles hundreds of OSDs. A three-node Ceph cluster maps cleanly onto a trio of quiet, NVMe-equipped mini PCs, since an N305 box with 32 GB of RAM and dual NVMe slots covers one node without the noise of rack gear.
Network Design
Split the public network (client to cluster traffic) from the cluster network (OSD to OSD replica traffic). Use two NICs or VLANs. For example:
- Public network (
192.168.1.0/24): clients connect here to read and write data - Cluster network (
10.0.1.0/24): OSDs use this for replicas, recovery, and scrubbing
Why split them? During recovery, after a node reboot or disk failure, OSDs flood the cluster network with rebalance traffic. Without a split, client I/O fights with recovery traffic and speed falls off a cliff.
The numbers back 10 GbE as the floor. Copying 1 TB of data takes about 3 hours on 1 GbE versus 20 minutes on 10 GbE. A 3 TB HDD failure on 1 GbE means 9 hours of slow service during recovery. On 10 GbE, that drops to about 1 hour. For all-NVMe clusters, even 10 GbE chokes. Reach for 25 GbE or faster.
Disk Selection and BlueStore
BlueStore has been Ceph’s default storage backend since the Luminous release. It writes straight to raw block devices, so OSD disks need no filesystem. That kills the double-write penalty that hurt the older FileStore backend.
For mixed workloads, a common pattern is:
- HDDs for bulk capacity tiers (backups, media, cold data)
- SSDs or NVMe for fast tiers (VM images, databases)
- A separate NVMe for WAL/DB: put BlueStore’s write-ahead log (WAL, 2 to 4 GB) and RocksDB metadata database (DB, at least 30 GB or about 4% of data device capacity) on a fast NVMe shared across many HDDs. Cap each NVMe at 6 OSD WAL/DB pairs to avoid contention. If your board has few M.2 slots, splitting one x16 slot into several drives can add the extra NVMe devices your OSDs need.
Time Synchronization
Ceph monitors need tight time sync, under 0.05 seconds of skew. Install chrony on every node and point them at the same NTP source:
sudo apt install chrony   # Debian/Ubuntu
sudo dnf install chrony   # RHEL/Fedora
chronyc tracking           # verify sync status
Deploying Ceph with cephadm on Three Nodes
cephadm
is the modern, container-based tool that replaced ceph-deploy and hand-rolled package work. It uses Podman
or one of the other Linux container runtimes
to run Ceph daemons as containers. That makes setup and upgrades far simpler than managing packages by hand.
Prerequisites on All Nodes
Before bootstrap, set up every node:
- Install Podman (preferred) or Docker
- Install Python 3 and
chrony - Set up passwordless SSH from the admin node (node1) to all the others
- Set hostnames and
/etc/hostsentries so every node can resolve the others
# /etc/hosts on all nodes
192.168.1.10  node1
192.168.1.11  node2
192.168.1.12  node3
Bootstrap the First Node
On your first node (node1), download and run cephadm:
# For RHEL/CentOS-based systems
curl --silent --remote-name --location \
  https://download.ceph.com/rpm-squid/el9/noarch/cephadm
chmod +x cephadm

# For Debian/Ubuntu
sudo apt install cephadm

# Bootstrap the cluster
sudo ./cephadm bootstrap \
  --mon-ip 192.168.1.10 \
  --cluster-network 10.0.1.0/24 \
  --initial-dashboard-admin-password=changeme
The bootstrap creates a monitor, a manager, a crash handler, and the Ceph Dashboard (web UI) on port 8443. It also writes /etc/ceph/ceph.conf and /etc/ceph/ceph.client.admin.keyring for CLI access. You can install the ceph CLI tools inside the cephadm shell or on the host:
sudo cephadm install ceph-commonAdd Remaining Nodes
# Copy the SSH public key to the other nodes
ssh-copy-id -f -i /etc/ceph/ceph.pub root@node2
ssh-copy-id -f -i /etc/ceph/ceph.pub root@node3

# Add hosts to the cluster
ceph orch host add node2 192.168.1.11 --labels _admin
ceph orch host add node3 192.168.1.12 --labels _admin
The _admin label tells cephadm to push the admin keyring and config out to these hosts. Once added, cephadm rolls out monitor, manager, and OSD containers on the new nodes on its own.
Provision OSDs
The simplest path lets cephadm grab any unused, unmounted disk on every node:
ceph orch apply osd --all-available-devicesFor more control, pick the devices you want:
ceph orch daemon add osd node1:/dev/sdb
ceph orch daemon add osd node2:/dev/sdb
ceph orch daemon add osd node3:/dev/sdb
Verify the OSD topology:
ceph osd treeThis shows which OSDs sit on which hosts and whether they’re up and in.
Verify Cluster Health
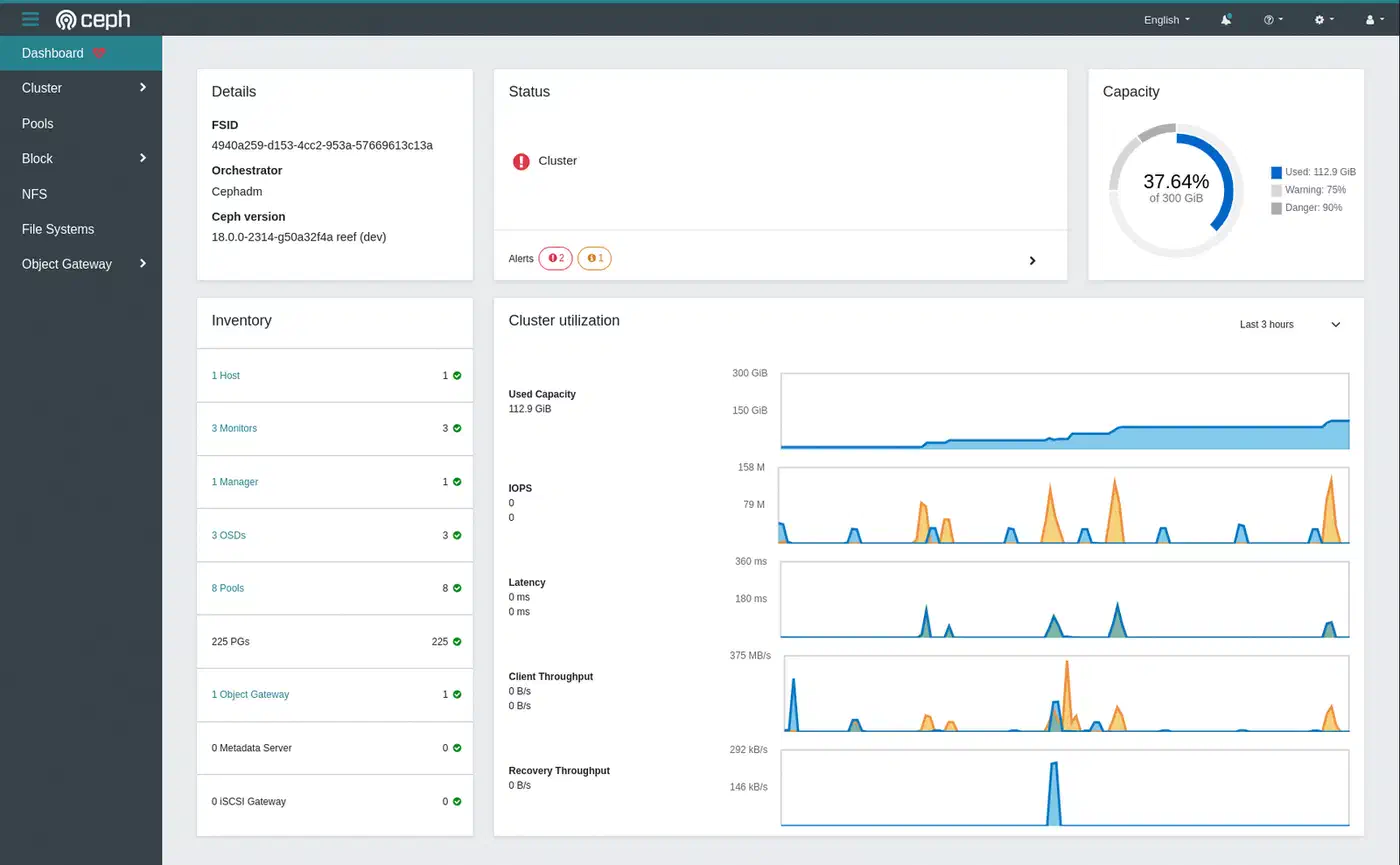
ceph statusYou want HEALTH_OK with every monitor in quorum, every OSD up/in, and PGs (Placement Groups) shown as active+clean. Check total and free storage with:
ceph dfThe Dashboard at https://node1:8443 shows the same data with live charts and alerts.
Configuring RBD Block Storage and CephFS
With the cluster running, you need to create storage pools and access methods. RBD (RADOS Block Device) gives you virtual block devices for VMs and containers. CephFS gives you a POSIX-compliant shared filesystem that many clients can mount at once.
RBD Block Storage
Create a replicated pool and enable it for RBD:
# Create pool with 64 PGs (appropriate for a small cluster)
ceph osd pool create rbd-pool 64 64 replicated
ceph osd pool application enable rbd-pool rbd

# Create a 50 GB block device image
rbd create --size 50G --pool rbd-pool my-vm-disk

# Map it on a client machine
sudo rbd map rbd-pool/my-vm-disk
# Creates /dev/rbd0

# Format and mount
sudo mkfs.ext4 /dev/rbd0
sudo mount /dev/rbd0 /mnt/rbd
RBD images are thin-provisioned. A 50 GB image only uses as much raw space as the data you’ve actually written. You also get snapshots (rbd snap create rbd-pool/my-vm-disk@snap1), clones (instant writable copies from snapshots, handy for spinning up VMs from a golden image), and live moves between pools with no downtime.
CephFS Shared Filesystem
CephFS needs its own metadata and data pools, plus at least one MDS daemon (cephadm spins it up for you):
# Create the pools
ceph osd pool create cephfs_meta 32
ceph osd pool create cephfs_data 64

# Create the filesystem
ceph fs new myfs cephfs_meta cephfs_data
Mount CephFS on client machines using the kernel driver (faster) or FUSE (more portable):
# Kernel mount
sudo mount -t ceph node1:/ /mnt/cephfs \
  -o name=admin,secret=$(ceph auth get-key client.admin)

# FUSE mount (install ceph-fuse first)
sudo ceph-fuse /mnt/cephfs
CephFS supports the usual POSIX commands (ls, chmod, chown), directory quotas, and snapshots through a hidden .snap directory. You can set per-directory storage limits:
# Set a 100 GB quota on a project directory
setfattr -n ceph.quota.max_bytes -v 107374182400 /mnt/cephfs/project-a
Erasure Coding for Cost-Efficient Storage
If raw capacity is a worry, pools with 3x replicas eat three times the raw storage of your actual data. Erasure coding offers a middle ground.
A common profile is k=4, m=2 (4 data chunks plus 2 parity chunks). It survives 2 failures at once while using only 1.5x raw storage instead of 3x:
# Create an erasure coding profile
ceph osd erasure-code-profile set ec-42-profile k=4 m=2 \
  crush-failure-domain=host

# Create an EC pool using the profile
ceph osd pool create ec-data-pool erasure ec-42-profile
The tradeoff: erasure coded pools cost more CPU (encoding and decoding) and add latency for small random writes. They shine on large sequential workloads like backups, media storage, and data lakes. RBD on top of erasure coded pools needs a replicated metadata pool in front, which adds some moving parts.
Monitoring, Maintenance, and Surviving Node Failures
A running Ceph cluster needs ongoing care. The good news: Ceph ships solid built-in tools for monitoring, and it handles most failures on its own.
Essential Monitoring Commands
ceph health detail       # Explains any warnings in plain English
ceph osd df              # Per-OSD disk utilization
ceph pg stat             # Placement group health summary
ceph osd perf            # Per-OSD commit and apply latency
For integration with Prometheus and Grafana :
ceph mgr module enable prometheus
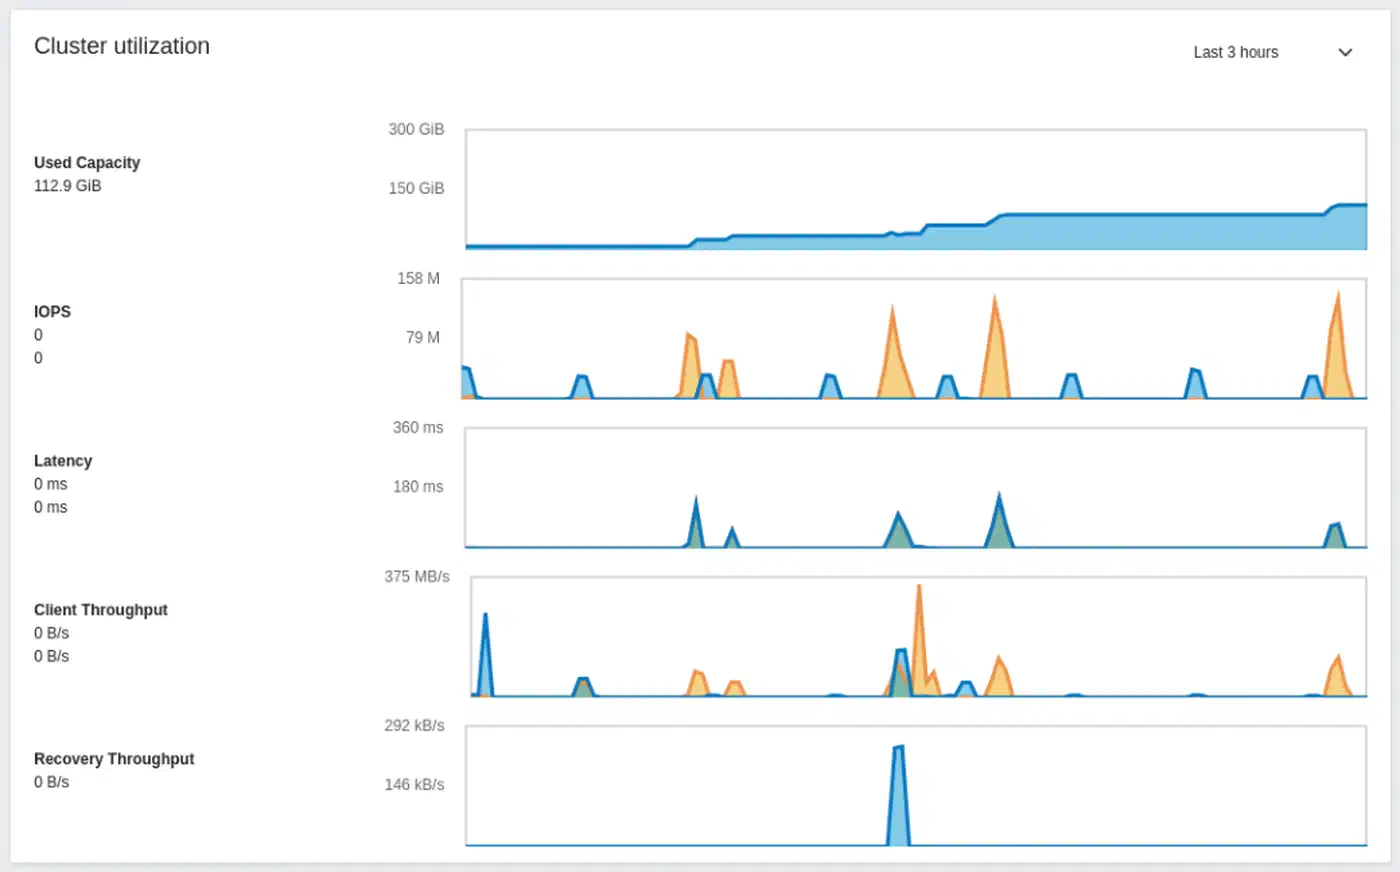
# Scrape metrics at http://node1:9283/metricsThe built-in Dashboard at https://node1:8443 shows a live cluster overview, OSD status, pool usage, and performance graphs. It also wires into Prometheus Alertmanager for alerts. The Dashboard ships with a self-signed cert that browsers reject, so put it behind a properly signed wildcard from Let’s Encrypt
to drop the warning page.
What Happens When a Node Dies
When a node goes offline:
- Its OSDs are marked
downafter about 5 minutes (you can tune this) - After 10 minutes (the
mon_osd_down_out_intervaldefault), they are markedout - Ceph starts re-copying the data from those OSDs to the surviving ones
- With 3x replicas, the cluster stays fully available the whole time
Recovery is hands-off. Your job is to bring the node back or swap the failed hardware. Once the node returns, its OSDs rejoin and the cluster rebalances again.
Disk Replacement Procedure
# Mark the failed OSD out
ceph osd out osd.5

# Remove it via the orchestrator
ceph orch osd rm 5

# Physically replace the disk
# cephadm auto-provisions the new disk as a new OSD
Rolling Upgrades
cephadm handles upgrades one daemon at a time. It waits for cluster health to return to HEALTH_OK between each restart:
ceph orch upgrade start --ceph-version 19.2.3
ceph orch upgrade status   # Monitor progress
Capacity Planning
Ceph fires warnings at these usage thresholds:
nearfullat 85%: a heads-up that the cluster is running low on spacefullat 95%: Ceph blocks all writes to keep data safe
Plan to add OSDs before you hit 70% usage. That leaves headroom for rebalancing. Use ceph df and ceph osd df often to track capacity trends.
Integrating Ceph with Proxmox, Kubernetes, and OpenStack
Ceph plugs in natively to the major VM and orchestration platforms. That’s part of why it has such wide reach.
Proxmox VE has built-in Ceph support. You can roll Ceph out right from the Proxmox web UI. Use RBD pools as VM disk storage and CephFS for shared container storage, with no extra software needed.
Kubernetes uses Rook as the most common Ceph operator. Rook deploys and runs Ceph inside a Kubernetes cluster, exposing RBD as persistent volumes via CSI. If you already have a Ceph cluster, the ceph-csi driver wires Kubernetes to it directly. That keeps the Ceph daemons outside the Kubernetes cluster.

OpenStack ties into Ceph through its Cinder (block storage), Glance (image service), and Nova (compute) components. Ceph is the de facto standard backend for production OpenStack setups.
Wrapping Up
A three-node Ceph cluster with cephadm is a fair weekend project for anyone at home in Linux. The first setup (bootstrap, add nodes, provision OSDs) takes a couple of hours. The ongoing work is mostly tracking capacity and now and then swapping failed disks. Ceph makes both of these easy.
Start with replicated pools. Add erasure coding later when you need to save space. Split your networks from day one. It costs almost nothing up front and saves you real pain during recovery. And keep an eye on capacity: a healthy cluster slips into a nearfull warning faster than you’d think when VMs and backups fight for the same pool. For single-node storage, the Btrfs versus ZFS comparison
covers how each filesystem handles checksumming, RAID, and snapshots without the distributed overhead.