Windows 11 + Linux: Shared exFAT, systemd-boot Bootloader

Install Windows first. Then install Linux with systemd-boot as the bootloader on a shared EFI System Partition. Add a dedicated exFAT partition for cross-OS file sharing. This setup avoids the classic problem of Windows Update wiping out GRUB , since systemd-boot entries sit next to Windows Boot Manager in the ESP without a fight. Both systems read and write exFAT out of the box, with no risk of corruption.
This guide walks through the full process. Partition strategy, install order, bootloader setup, shared storage, and what to do when Windows decides your boot order is wrong.
Key Takeaways
- Installing Windows first, then Linux, stops the two systems from fighting over the bootloader.
- systemd-boot survives Windows updates that would normally erase GRUB.
- A shared exFAT partition lets both systems read and write the same files with no extra drivers.
- Turning off Fast Startup and saving your BitLocker recovery key prevents lockouts and failed mounts.
- The dual-boot clock mismatch is fixable with one setting change in either system.
Pre-Installation: Partitioning Strategy and Disk Layout
Getting the partition layout right is the most important step. A bad scheme leads to data loss, boot failures, and hours of pain. Plan it all out before you touch an installer.
Use GPT, Not MBR
Every machine from the last decade ships with UEFI firmware, so your disk needs GPT (GUID Partition Table). MBR-based legacy BIOS dual-boot is dead, and this guide skips it. If you’re buying or building a new machine in 2026, you already have UEFI. No exceptions.
Recommended Partition Layout
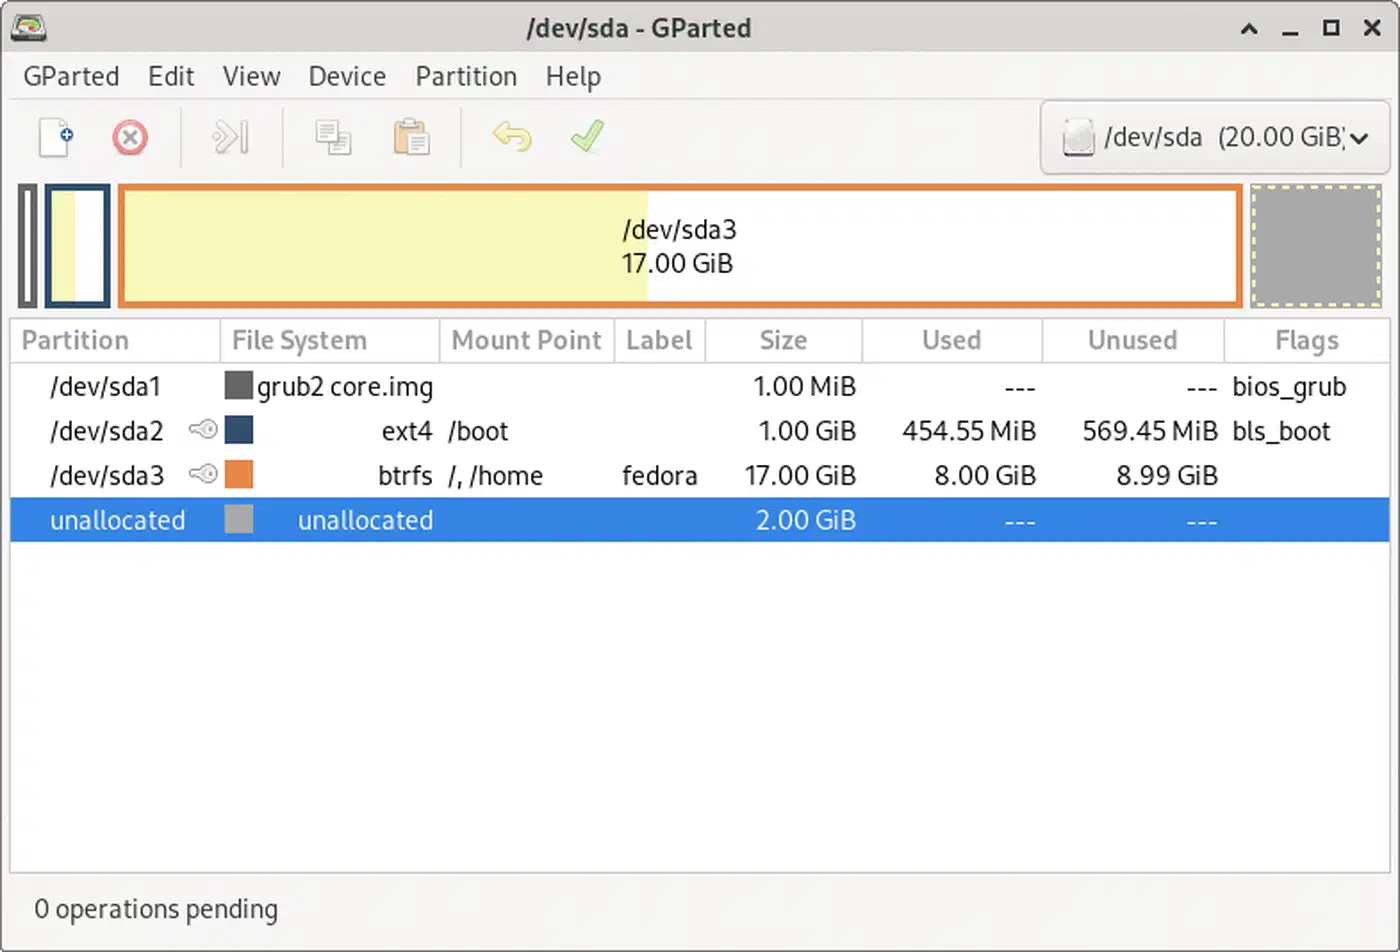
For a single 1TB NVMe drive, here is a proven layout:
| Partition | Filesystem | Size | Purpose |
|---|---|---|---|
| EFI System Partition | FAT32 | 512 MB | Shared by both OSes for bootloaders |
| Windows | NTFS | 200 GB | Windows 11 system drive |
| Linux root | ext4 | 200 GB | Linux system and home |
| Swap | Linux swap | 16 GB | Matches RAM, enables hibernation |
| Shared data | exFAT | ~550 GB | Cross-OS file sharing |
Two drives are safer. Put Windows on Drive 1 with its own ESP. Put Linux on Drive 2 with its own ESP. Put the shared exFAT partition on whichever drive has more free space. With two drives, neither OS can wreck the other’s boot partition by mistake.
Creating the Partitions
Create the exFAT partition with GParted from a Linux live USB, or use Windows Disk Management. Format as exFAT with a 1 MB allocation unit size. That size works well for large files like video, game saves, and project folders. Smaller units waste throughput on big files; larger ones waste space on small files. 1 MB is a solid middle ground for mixed work.
Disable Windows Fast Startup
Fast Startup has been on by default since Windows 8. It puts NTFS into a hibernated state at shutdown. If Linux tries to mount that volume read-write, it will either refuse or wreck the hibernation image. Windows then can’t resume.
Disable it before installing Linux:
- Open Control Panel > Power Options > Choose what the power buttons do
- Click Change settings that are currently unavailable
- Uncheck Turn on fast startup
- Save changes
Without this step, you’ll hit “Windows is hibernated, refused to mount” errors every time you try to open NTFS from Linux.
Secure Boot and BitLocker Warnings
Turn off Secure Boot during Linux install if your distro doesn’t auto-enroll MOK (Machine Owner Key) keys. Turn it back on after install and enroll the distro’s shim/MOK key with mokutil --import.
One critical warning for Windows 11 24H2 and later. Fresh installs now turn on BitLocker by default when you sign in with a Microsoft Account during setup. This includes Windows 11 Home. If BitLocker is on, changing the boot order or touching the ESP can trip recovery mode. You’ll be locked out until you type in a 48-digit recovery key.
Before making any changes to the ESP or boot configuration:
- Check if BitLocker is active: open a PowerShell window and run
manage-bde -status - Save your recovery key from account.microsoft.com/devices/recoverykey
- If you have not set up a Microsoft Account, export the key with
manage-bde -protectors -get C:
Installing Windows First, Then Linux with systemd-boot
Install order is critical. Windows always assumes it owns the bootloader and will overwrite anything that isn’t its own during updates. Install Windows first and Linux second with systemd-boot, and you get a boot manager that lives side by side with Windows Boot Manager on the shared ESP.
Step 1: Install Windows 11
Install Windows 11 (24H2 or later) from a standard USB installer. Let it create its own EFI partition, or use the one you made during the partition step. Finish setup, run Windows Update until no more updates pop up, then shut the machine down. Not restart, not sleep. A full shutdown, with Fast Startup already off.
Step 2: Boot the Linux Installer
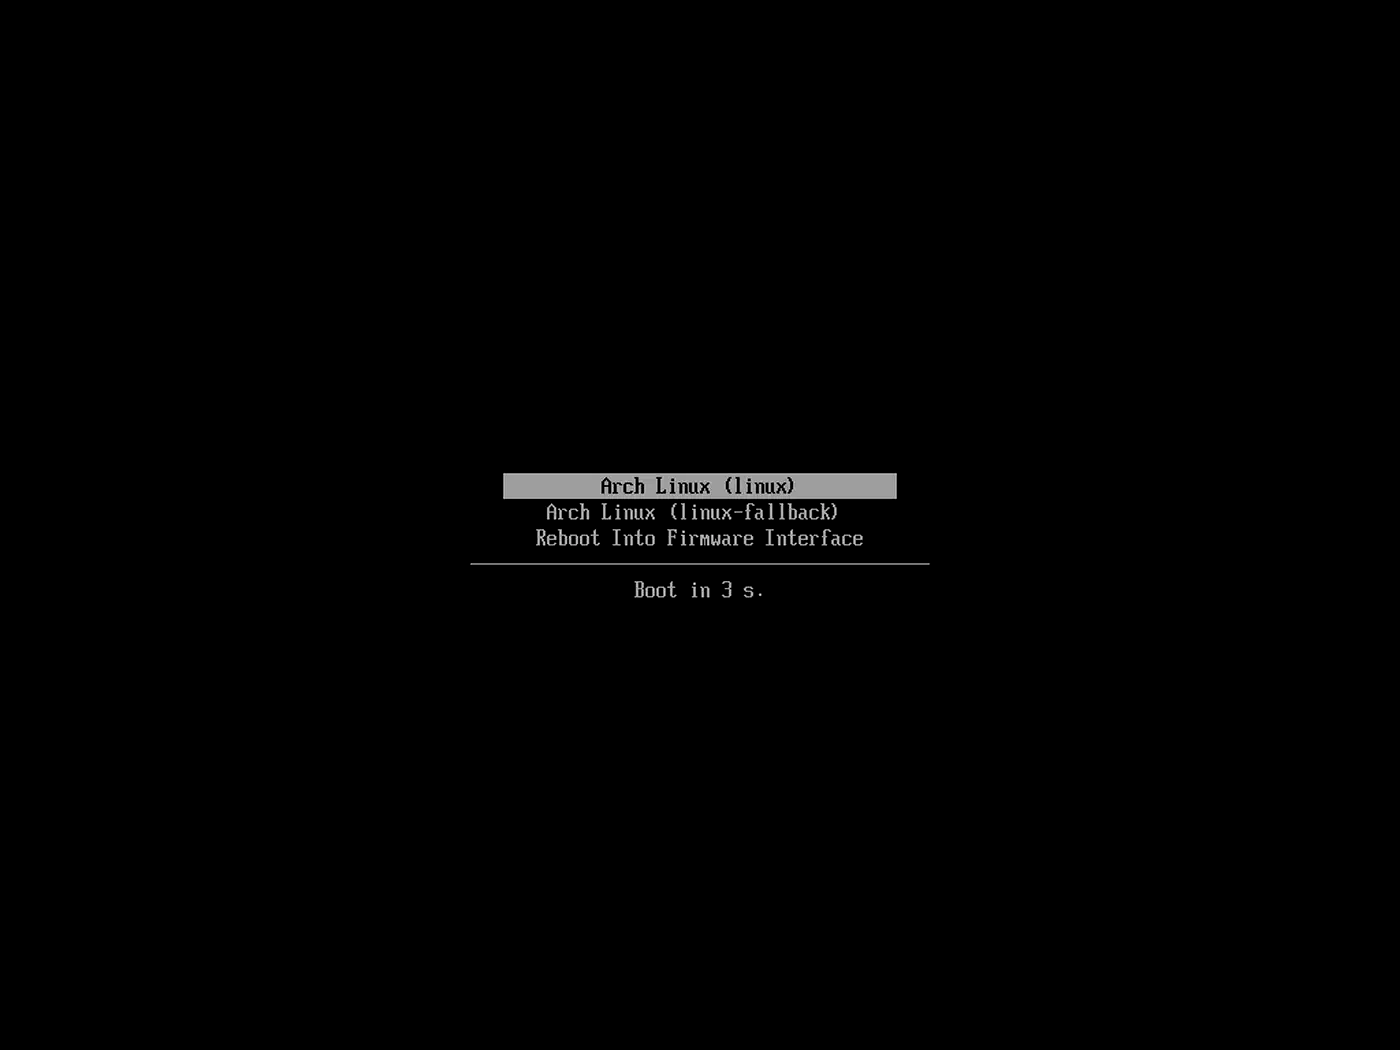
Boot from a Linux USB installer. Three distros work well with systemd-boot:
- Fedora
42+: Lets you pick systemd-boot as the bootloader during install. Add
inst.sdbootto the kernel command line to switch it on. Fedora 42 still uses GRUB by default, but the systemd-boot path is well-tested. - Ubuntu
24.10+: You pick systemd-boot in the advanced installer, or run
bootctl installafter install. - Arch Linux
: Run
bootctl installduring the chroot step. Arch’s wiki has the deepest docs for this.
Step 3: Mount the Existing ESP
During Linux install, mount the existing EFI System Partition at /boot/efi (or /efi on Arch). Do not format it. Just mount it. This puts Linux boot entries next to Windows entries on the same ESP, which is what you want.
Step 4: Configure systemd-boot
systemd-boot stores boot entries as plain-text .conf files in /boot/efi/loader/entries/, so they’re easy to edit. A typical entry looks like this:
title   Fedora Linux
linux   /vmlinuz-linux
initrd  /initramfs-linux.img
options root=UUID=xxxx-xxxx rw quiet
Windows Boot Manager lives at /boot/efi/EFI/Microsoft/Boot/bootmgfw.efi. systemd-boot finds it on its own. You don’t need to add a manual entry for it.
After installation, set the default boot entry:
bootctl set-default fedora.confOr use the timeout menu by pressing Space during boot to select an OS manually.
Why systemd-boot Instead of GRUB
The core upside is staying out of each other’s way. GRUB installs to the ESP in a way that clashes with Windows Boot Manager, and Windows Update tends to wipe it. systemd-boot keeps its entries in a separate loader/ folder that Windows never touches.
systemd-boot is also faster than GRUB. It loads fewer modules and leans on UEFI services rather than its own driver stack. On a modern NVMe drive , the gap is about 1-2 seconds. Small, but you feel it on every boot.
The trade-off is range. GRUB supports legacy BIOS, custom themes, and complex boot setups. systemd-boot is UEFI-only with a plain text menu. For a clean dual-boot setup, that simplicity is a feature, not a flaw.
Setting Up the Shared exFAT Storage Partition
A shared data partition that both systems can reach kills the need to copy files between installs. exFAT is the best pick in 2026. Both Windows and Linux read it out of the box (kernel 5.7+, via the in-kernel exfat module). No third-party drivers. It handles files larger than 4 GB and skips journaling overhead.
Linux Configuration
Verify exFAT support is loaded:
modprobe exfat
dmesg | tail -5
No errors mean you’re good. Every major distro shipping kernel 5.7 or later (all of them in 2026) bakes in this module. You don’t need the old exfat-fuse or exfat-utils packages anymore.
Add an auto-mount entry to /etc/fstab:
UUID=XXXX-XXXX /mnt/shared exfat defaults,uid=1000,gid=1000,umask=022 0 0Swap XXXX-XXXX for the real UUID from blkid. The uid and gid flags set your user as the owner, since exFAT can’t store Linux file permissions on its own.
Windows Configuration
The exFAT partition shows up in File Explorer on its own. Pin a steady drive letter (like D:) via Disk Management so Windows doesn’t shuffle letters after updates. Right-click the partition, pick Change Drive Letter and Paths, and assign one.
Symlink Strategy
Create symlinks from your home folders to the shared partition so both systems use the same files:
Linux:
ln -s /mnt/shared/Documents ~/Documents
ln -s /mnt/shared/Projects ~/Projects
ln -s /mnt/shared/Downloads ~/Downloads
Windows (run as Administrator):
mklink /D C:\Users\YourName\Documents D:\Documents
mklink /D C:\Users\YourName\Projects D:\Projects
mklink /D C:\Users\YourName\Downloads D:\Downloads
Now, saving a file to “Documents” in either OS drops it on the shared partition.
Accessing Windows NTFS Partitions from Linux
If you need to reach files on the Windows NTFS system partition (not just the shared exFAT one), Linux has the ntfs3 kernel driver built in since kernel 5.15. It’s a full read-write NTFS driver from Paragon Software
, merged into the mainline kernel.
Mount an NTFS partition with:
mount -t ntfs3 /dev/nvme0n1p2 /mnt/windowsIt’s handy for grabbing Windows-only files or app data. Just keep Fast Startup off (as covered earlier), or the partition will mount read-only.
exFAT Limitations
exFAT can’t store Linux file permissions, symlinks, or POSIX attributes. Everything on the partition is owned by the uid/gid you set in fstab. What that means:
- Don’t use it for git repos that rely on the executable bit. Keep those on ext4 and sync changes via the shared partition
- File timestamps may drift slightly between the two systems
- No hard links or special files
For dev work, keep your repos on the native filesystem (ext4 on Linux , NTFS on Windows). Use the shared partition for docs, media, and other data files.
Surviving Windows Updates Without Breaking Your Bootloader
The most common dual-boot failure is Windows Update wiping or breaking the Linux bootloader. Here’s why systemd-boot handles this better than GRUB, and what to do when Windows still breaks things.
Why systemd-boot Is Resilient
Windows Update mainly wipes the default EFI boot entry at \EFI\Boot\bootx64.efi. systemd-boot installs itself there, but also adds a separate named EFI entry via efibootmgr. Even if Windows overwrites the fallback file, the named entry stays.
Windows Update only touches its own EFI/Microsoft/ folder and the default fallback path. systemd-boot’s config lives in loader/ and its own EFI/systemd/ folder, which Windows has no reason to touch. If your Linux boot feels slow after a Windows Update, you can flag the services adding lag to the startup chain
.
After a Major Windows Update
After a major Windows feature update (for example, 24H2 to 25H2), check the boot order:
efibootmgr -vIf Linux got pushed down the list, restore it:
efibootmgr -o 0001,0000Swap the numbers for the real entry IDs from efibootmgr -v. The first number becomes the default.
Recovery Procedure
If systemd-boot is gone after a rough Windows Update, recovery takes about 30 seconds:
- Boot from a Linux live USB
- Mount the ESP:
mount /dev/nvme0n1p1 /mnt/efi - Mount your Linux root:
mount /dev/nvme0n1p3 /mnt/linux - Chroot in:
arch-chroot /mnt/linux(or equivalent for your distro) - Reinstall systemd-boot:
bootctl install - Reboot
Compare that to GRUB recovery. It usually means grub-install, grub-mkconfig, debugging config files, and sometimes a full reinstall from scratch.
Manual Fallback
Turn on the UEFI firmware’s built-in boot menu (usually F12 or F9 at POST) as a manual fallback. This menu always shows every EFI boot entry, no matter what any OS has done to the default boot order. Even if systemd-boot and Windows Boot Manager are fighting over the default, you can pick the one you want straight from the firmware menu.
Fixing the Dual-Boot Time Zone Conflict
When you dual-boot, the clock will end up wrong in one OS after you boot from the other. The reason: Linux thinks the hardware clock (RTC) holds UTC, while Windows thinks it holds local time. Each OS “fixes” the clock based on its own view, and the two get out of sync.
There are two fixes. Pick one:
Option A: Tell Linux to use local time (easier, slightly less correct):
timedatectl set-local-rtc 1 --adjust-system-clockThis tells Linux to treat the hardware clock as local time, lining up with Windows. The downside: timedatectl warns that this mode is not fully supported, and daylight saving switches can get a bit rough.
Option B: Tell Windows to use UTC (cleaner, recommended):
Open Registry Editor and navigate to:
HKEY_LOCAL_MACHINE\SYSTEM\CurrentControlSet\Control\TimeZoneInformationCreate a new DWORD (32-bit) value named RealTimeIsUniversal and set it to 1. This tells Windows to treat the RTC as UTC, the same as Linux. It’s the cleaner option, since UTC is the right standard for hardware clocks. The catch: a few rare Windows apps that read the RTC straight may show the wrong time.
After either fix, reboot both systems to check the clocks line up.
Quick Reference: Complete Installation Checklist
The full process condensed:
- Back up all important data before starting
- Disable Windows Fast Startup
- Check if BitLocker is active; save recovery key if so
- Create partition layout (ESP, Windows, Linux, swap, exFAT)
- Install Windows 11, run all updates, full shutdown
- Boot Linux installer, mount existing ESP (do not format)
- Install Linux with systemd-boot as bootloader
- Set default boot entry with
bootctl set-default - Configure exFAT auto-mount in
/etc/fstab - Assign persistent drive letter to exFAT partition in Windows
- Set up symlinks in both operating systems
- Fix time zone conflict (Option A or B)
- Enable UEFI firmware boot menu (F12/F9) as fallback
- Test booting into both operating systems
- Verify shared partition is accessible from both sides
This setup has held up through several Windows feature updates on more than one machine. systemd-boot and exFAT together give you a dual-boot rig that needs almost no upkeep. Set it up once and leave it alone.