 Botmonster Tech
Tailscale mesh VPN with WireGuard: 100 devices, zero config
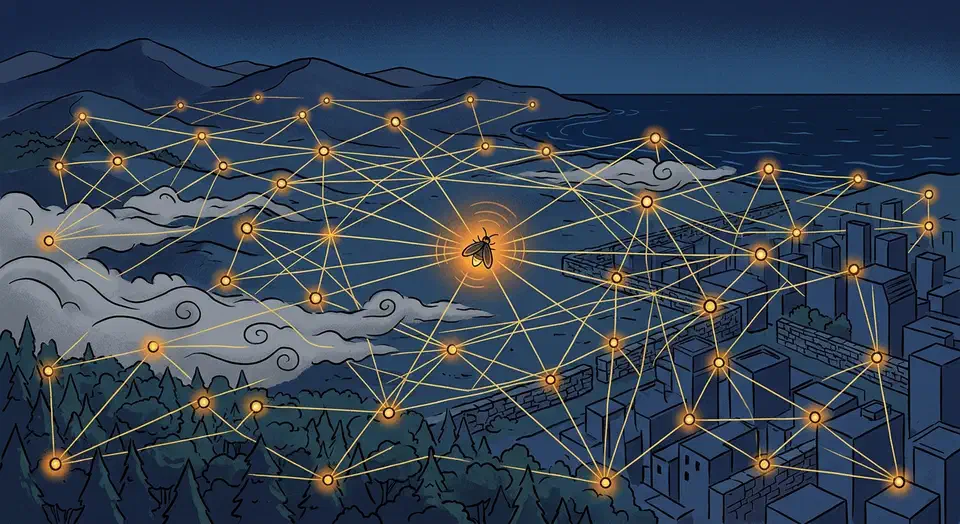
Tailscale builds a private WireGuard-based mesh VPN across all your devices with almost no setup. You install the client on each machine and sign in with your identity provider. Every device then gets a stable 100.x.y.z IP that works no matter the NAT, firewalls, or network changes. Tailscale adds ACL tags for per-device policy, exit nodes, subnet routers, and MagicDNS for hostname lookups. For homelabbers, it is the easiest way to link a server, cloud VPS, phone, and laptop into one network.
Below, we walk through how Tailscale differs from raw WireGuard. You will see how to install it on Linux, Docker, NAS, and firewall platforms, how to write ACL rules, and how to go fully independent by self-hosting the control plane with Headscale.
What Tailscale Actually Is (and How It Differs from Raw WireGuard)
People mix up Tailscale and WireGuard all the time. They are not the same thing. WireGuard is the transport layer: a fast, modern VPN protocol that uses ChaCha20-Poly1305 encryption. Every Tailscale connection is a standard WireGuard tunnel under the hood. The encryption and speed are the same as what you would get running raw WireGuard. What Tailscale adds is the control plane that WireGuard leaves out: key exchange, NAT traversal, and peer discovery.
The Coordination Server
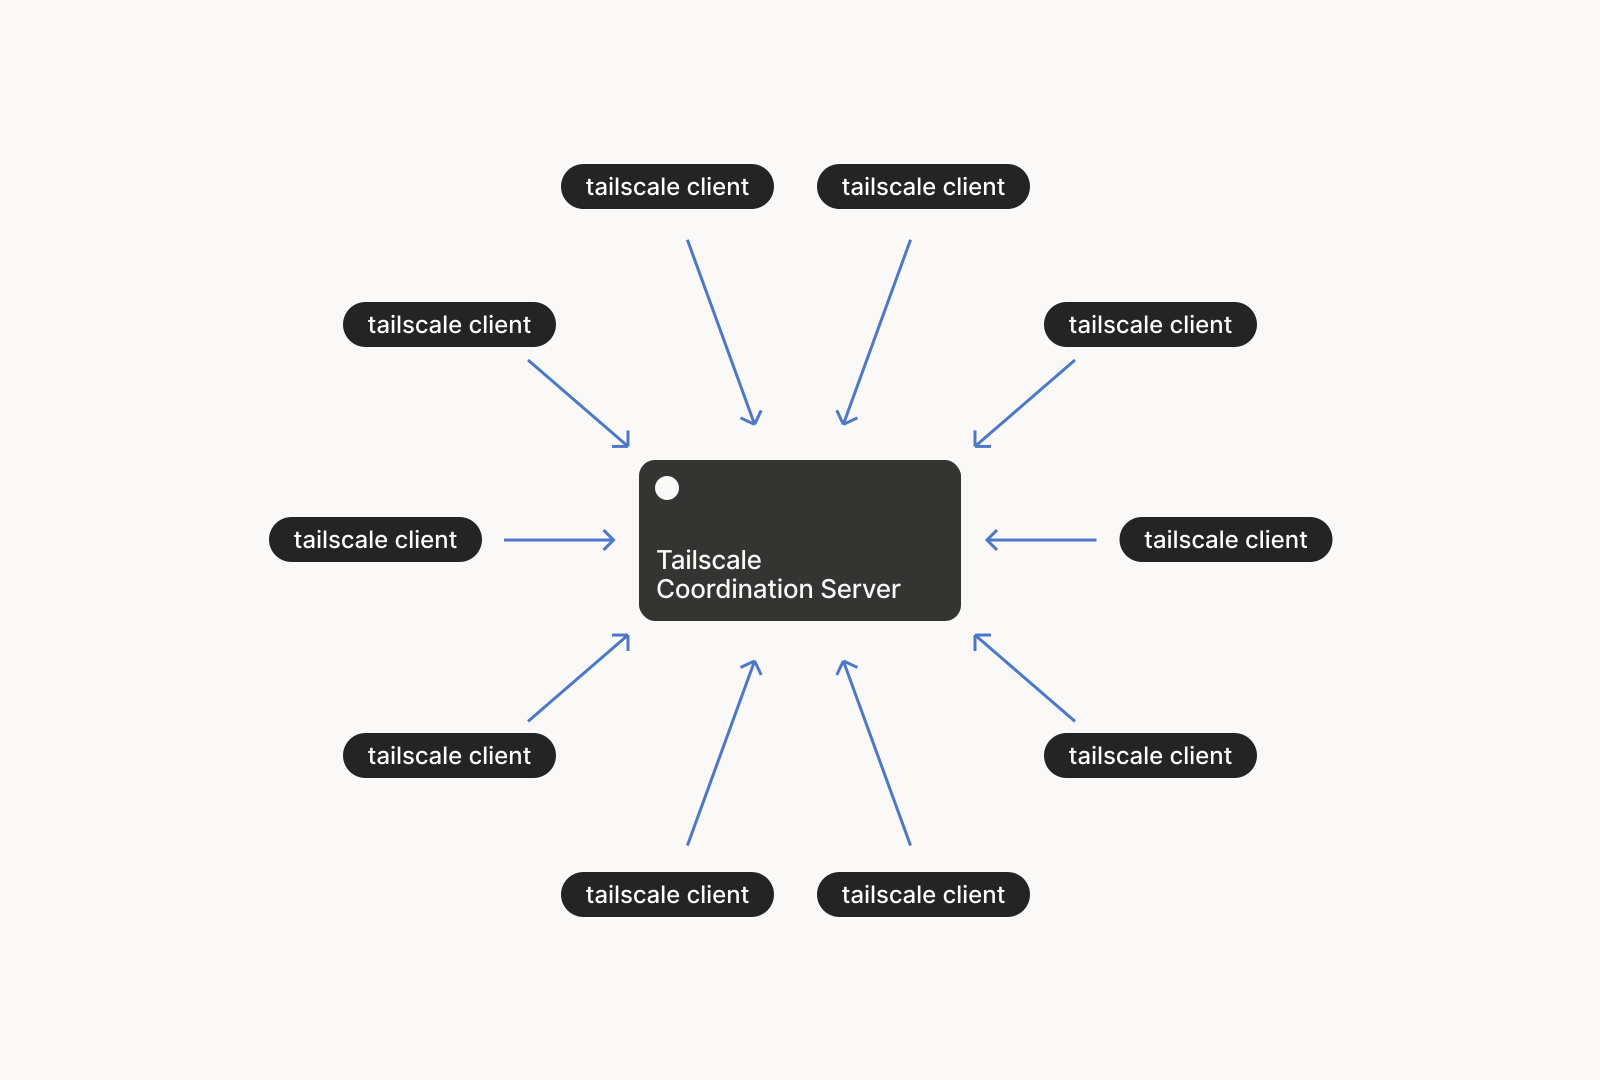
Tailscale’s coordination server sends public keys and endpoint info to all nodes in your network (called a “tailnet”). It never sees your actual traffic. It only sees metadata about which devices exist and their network endpoints. All data flows peer-to-peer via WireGuard. If you do not want even that metadata going to Tailscale’s servers, Headscale is an open-source replacement you can self-host (more on that later). Cutting the coordination server out entirely is a harder problem: apps that chat over Bluetooth mesh drop the internet altogether and still leak device identifiers.
NAT Traversal with DERP
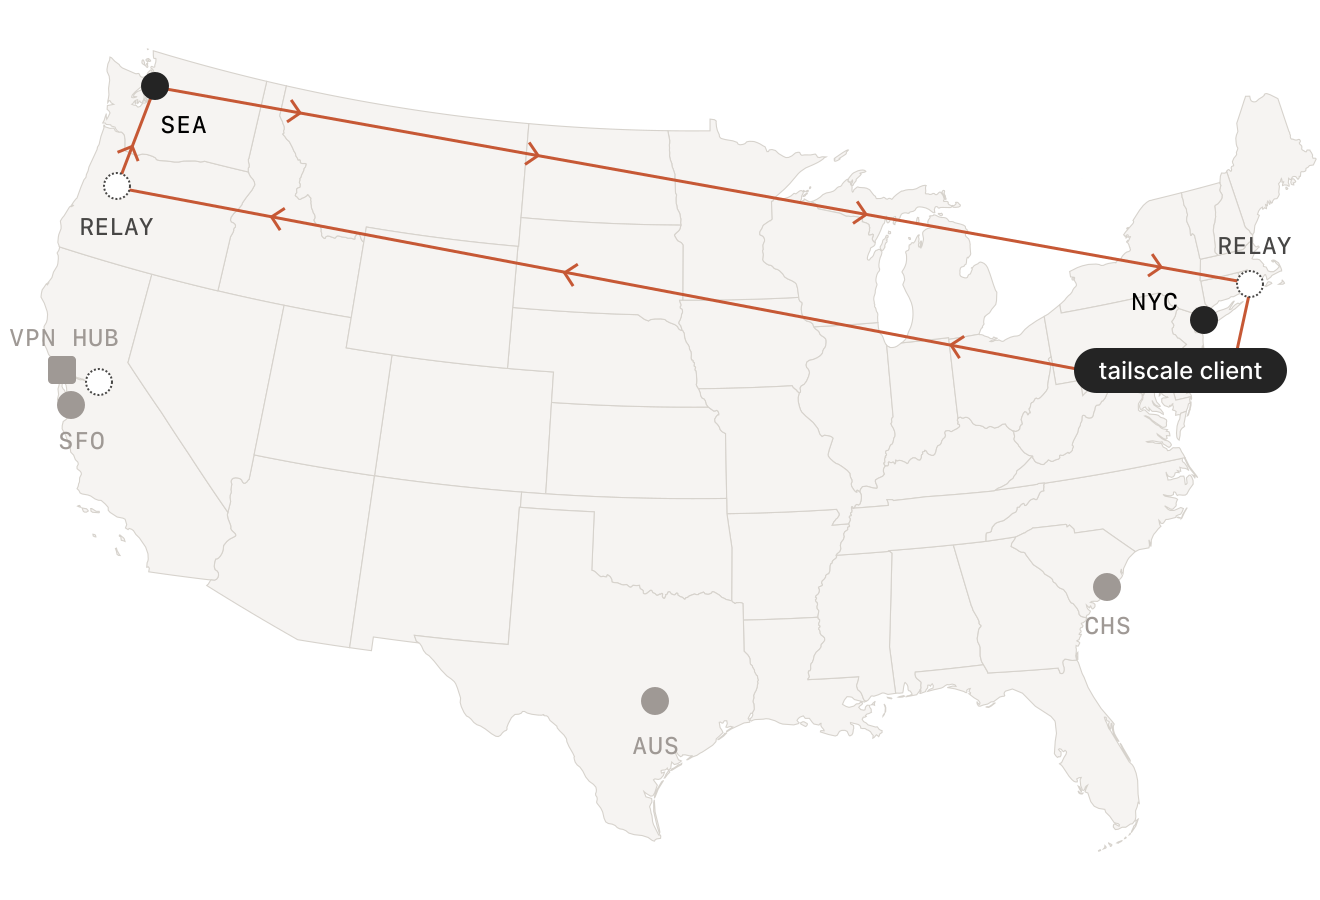
Sometimes direct peer-to-peer UDP connections fail. The cause might be symmetric NAT, a strict corporate firewall, or CGNAT. When that happens, traffic relays through DERP (Designated Encrypted Relay for Packets) servers. DERP traffic is encrypted end-to-end, so Tailscale cannot read relayed packets. You can check your connection with tailscale netcheck. It reports the latency to each DERP region and whether direct connections are possible. It says nothing about the address the wider internet sees you on, which an IP lookup page answers in one load.
In practice, most connections end up being direct peer-to-peer. DERP is a fallback, not the norm.
Tailscale vs. Raw WireGuard for Homelabbers
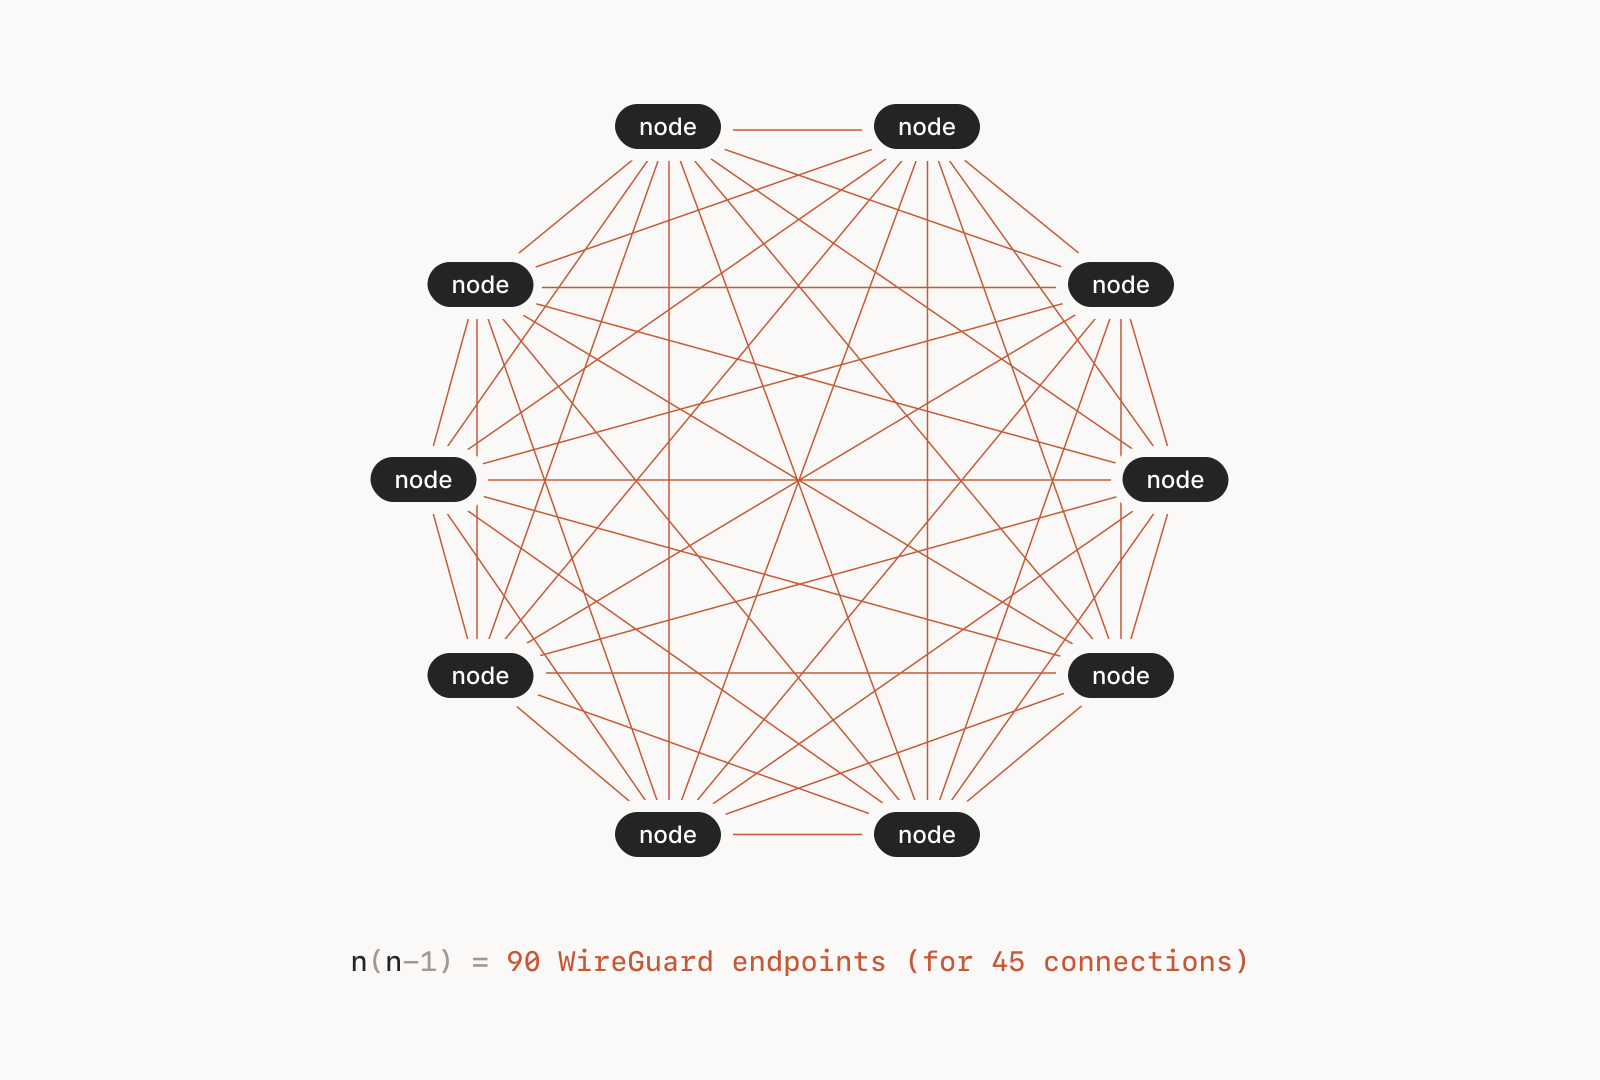
Raw WireGuard makes you manage keys, endpoints, and AllowedIPs by hand on every peer. Adding a new device means editing configs on all the other peers. With 3 devices this is annoying. With 15 it is a maintenance nightmare. Tailscale automates the whole process. The trade-off is that you depend on the coordination server, but Headscale removes that dependency for self-hosters. Neither one hides the tunnel, though. On a network that blocks WireGuard by its handshake, Amnezia’s masked tunnels reshape the packets so the filter misses them.
Tailscale vs. Nebula vs. ZeroTier
Other mesh VPN options exist. Nebula (first built at Slack) uses its own encryption protocol. It also needs a lighthouse server for peer discovery. ZeroTier offers a similar mesh, but it uses its own virtual network layer instead of WireGuard. In benchmarks, Tailscale and ZeroTier have about the same throughput. Both are roughly twice as fast as Nebula and Tinc. For most users, Tailscale wins on ease of use, and it gains from WireGuard’s kernel-level speed on Linux.
| Feature | Tailscale | ZeroTier | Nebula |
|---|---|---|---|
| Encryption | WireGuard (ChaCha20-Poly1305) | Custom (ChaCha20-Poly1305) | Custom (Noise protocol) |
| NAT Traversal | DERP relays | Root servers | Lighthouse servers |
| Free Tier | 100 devices, 3 users | 25 devices | Unlimited (self-hosted) |
| Kernel Mode (Linux) | Yes | No | No |
| Self-hostable Control Plane | Yes (Headscale) | Yes (ZeroTier controller) | Yes (built-in) |
Pricing in 2026
Tailscale’s free Personal plan covers 100 devices and 3 users. That is plenty for most homelabs. Personal Plus runs $5/month and raises the user limit to 6. The Starter plan ($6/user/month billed annually) and Premium ($18/user/month) add longer log retention, custom OIDC, and SCIM provisioning. No tier has a bandwidth limit.
Installing Tailscale on Every Platform
Tailscale runs on Linux, macOS, Windows, iOS, Android, and several NAS platforms. Setup is quick on all of them.
Linux (Debian, Ubuntu, Fedora)
The one-liner install script adds the official repository and installs both the tailscale CLI and the tailscaled daemon:
curl -fsSL https://tailscale.com/install.sh | shAuthenticate with:
sudo tailscale upThe client runs as a systemd service (tailscaled.service). Once you sign in, your machine gets a 100.x.y.z address and can reach every other device in your tailnet.
Headless Linux Servers
For servers without a browser, use a pre-generated auth key from the Tailscale admin console:
sudo tailscale up --authkey=tskey-auth-XXXX --advertise-tags=tag:serverAuth keys can be reusable (for automated provisioning), ephemeral (the device is removed when it goes offline), or single-use. The --advertise-tags flag assigns ACL tags at sign-up time, which is what your policy rules act on.
Docker Containers
Run the official tailscale/tailscale:latest image as a sidecar container:
docker run -d \
  --name tailscale \
  --cap-add=NET_ADMIN \
  --device=/dev/net/tun \
  -e TS_AUTHKEY=tskey-auth-XXXX \
  tailscale/tailscale:latest
When TUN device access is blocked, set TS_USERSPACE=true to run in userspace networking mode. This is slower, but it works in unprivileged containers and on platforms like Fly.io.
Synology NAS
Install the Tailscale package from the Synology Package Center (it needs DSM 7.0+). Once it is installed, you can turn on subnet routing to expose the NAS’s LAN. That makes every device on that network reachable through Tailscale, with no client on each one. Subnet routes need admin approval in the Tailscale console after you advertise them.
Proxmox
You have two options on Proxmox. Install it on the host to reach the management web UI (port 8006) over Tailscale. Or install it inside each VM and LXC container so every one gets its own Tailscale identity. For LXC containers, make sure the container has the TUN device:
lxc.cgroup2.devices.allow: c 10:200 rwm
lxc.mount.entry: /dev/net/tun dev/net/tun none bind,create=file
OPNsense and pfSense
Both OPNsense and pfSense have official Tailscale plugins. On OPNsense v24.7, the os-tailscale plugin installs from the UI with no command-line steps. On pfSense, the Tailscale package lets you turn on subnet routing so remote tailnet devices can reach hosts behind the firewall. Running Tailscale on your router is an option instead of dedicated subnet routers. It works well when you want the firewall itself to act as the gateway to the local network. A consumer router works the same way once you flash it with OpenWrt, since tailscale is a regular package there.
For BIOS-level remote access before the OS boots, pair Tailscale with a KVM-over-IP device like PiKVM.
Mobile and Desktop
The macOS, iOS, and Android clients are in their app stores. The macOS client uses a network extension, so it needs no kernel module. Mobile clients support exit nodes, which is handy for encrypting traffic on public Wi-Fi.
ACLs, Tags, and Policy Configuration
Tailscale’s ACL (Access Control List) system controls which devices can talk to each other. Instead of firewall rules based on IP addresses, you write rules based on device tags and user identities. If you are used to iptables or pf rules, this takes some getting used to.
Where ACLs Live
You define ACLs in the Tailscale admin console under Access Controls as a HuJSON (human-readable JSON) file. Changes reach all nodes within seconds. For version control, copy the ACL file to a Git repository. Tailscale does not keep revision history itself.
Tag-Based Access Control
You assign tags like tag:server, tag:iot, and tag:admin to devices through auth keys or the admin console. ACL rules then point at these tags:
{
  "action": "accept",
  "src": ["tag:admin"],
  "dst": ["tag:server:*"]
}
This rule lets any device tagged admin reach any port on devices tagged server.
A Practical Homelab ACL Example
Here is a complete ACL policy for a homelab with three user roles and ten devices:
{
  "tagOwners": {
    "tag:server":  ["autogroup:admin"],
    "tag:iot":     ["autogroup:admin"],
    "tag:admin":   ["autogroup:admin"]
  },
  "acls": [
    // Admin devices can reach everything
    {"action": "accept", "src": ["tag:admin"], "dst": ["*:*"]},
    // Servers can reach each other on specific ports
    {"action": "accept", "src": ["tag:server"],
     "dst": ["tag:server:5432,6443,8080,443"]},
    // IoT devices can only reach Home Assistant
    {"action": "accept", "src": ["tag:iot"],
     "dst": ["home-assistant:8123"]},
    // Family members get access to shared services
    {"action": "accept", "src": ["group:family"],
     "dst": ["home-assistant:8123", "jellyfin:8096", "nas:445"]}
  ],
  "groups": {
    "group:family": ["user1@example.com", "user2@example.com"]
  }
}
The default-deny rule means anything you do not allow is blocked. IoT devices are boxed in to the Home Assistant port. Family members reach media and file sharing, but they cannot SSH into your servers.
Tailscale SSH
Turn on Tailscale SSH on target machines with tailscale up --ssh. Tailscale then handles SSH login through your identity provider, so there are no SSH keys to hand out or rotate. ACLs control who can SSH to which machines, and the admin console logs all access. It works well for shared homelabs where a few people need server access now and then.
Autogroups
Tailscale ships built-in autogroups. There is autogroup:internet for exit node traffic, autogroup:self for device-to-self rules, and autogroup:member for all human users (as opposed to tagged devices). These cover common cases without you defining a group.
Exit Nodes, Subnet Routers, and MagicDNS
Beyond basic device-to-device links, Tailscale has three features for bigger networking jobs. It can route all your internet traffic through a chosen machine, bridge whole LANs into the mesh, and resolve hostnames for you.
Exit Nodes
An exit node routes all of a client’s internet traffic through a specific device. On a VPS or home server:
tailscale up --advertise-exit-nodeOn client devices:
tailscale up --exit-node=<hostname>All internet traffic now flows through that exit node. Use it to encrypt traffic on public Wi-Fi, appear from your home IP while traveling, or route through a chosen location.
Mullvad Integration: Tailscale has a deal with Mullvad VPN that lets you use Mullvad’s global server network as exit nodes inside your tailnet. The add-on costs $5/month per 5 devices. You set it up in the admin console, and Mullvad exit nodes show up next to your own devices in the picker. It is handy for private internet routing without running your own VPS in many regions.
Subnet Routers
A subnet router exposes an entire LAN to your tailnet without installing Tailscale on every device in that LAN:
tailscale up --advertise-routes=192.168.1.0/24Approve the route in the admin console, and all Tailscale peers can reach 192.168.1.x devices directly. This is how you make printers, IoT devices, NAS appliances, and IP cameras reachable from anywhere. The subnet router acts as a gateway. Traffic enters the Tailscale mesh, hits the subnet router, and then goes out to the local network.
MagicDNS
Turn on MagicDNS in the admin console under DNS settings. Every device then becomes reachable by hostname:
ssh pi-homelab
# instead of
ssh 100.64.0.5
Set a custom search domain so pi-homelab.your-tailnet.ts.net resolves from any device. You can also set up split DNS. That forwards .home.lan queries to your local DNS server at 192.168.1.1 through the subnet router, so Tailscale peers can resolve local hostnames even when off-site.
Tailscale Funnel
Tailscale Funnel opens a chosen port on a Tailscale node to the public internet through a *.ts.net HTTPS URL. You need no port forwarding and no dynamic DNS:
tailscale funnel --bg 8080It is handy for sharing a dev server, setting up a webhook endpoint, or opening Home Assistant to family members who do not have Tailscale. Funnel handles TLS termination for you. For a private admin panel like a self-hosted metrics dashboard, skip Funnel and keep the node reachable only inside your tailnet.
Performance Expectations
Direct peer-to-peer connections add about 1ms of latency over no VPN at all. DERP-relayed connections add 10-50ms, based on how close the relay server is. On a gigabit LAN, Tailscale’s userspace WireGuard reaches 250-300 Mbps in iperf3 tests. With kernel-level tuning and UDP segmentation offload on Linux, throughput can top 7 Gbps. Run tailscale ping <hostname> to check whether a connection is direct or relayed.
| Connection Type | Added Latency | Typical Throughput (Gigabit Link) |
|---|---|---|
| Direct P2P | ~1ms | 250-900 Mbps (userspace vs. kernel) |
| DERP Relayed | 10-50ms | Limited by relay bandwidth |
| Subnet Routed | +1 hop | Same as direct minus routing overhead |
| Exit Node | Varies by location | Same as direct to exit node |
Self-Hosting with Headscale
If you want to run everything yourself and not lean on Tailscale’s cloud, Headscale is an open-source build of the Tailscale coordination server.
What Headscale Replaces
Headscale speaks the Tailscale coordination API. Your devices still run the official Tailscale client, but they point to your Headscale server instead of controlplane.tailscale.com. Key sharing, peer discovery, and ACL checks all run on your own servers. All traffic stays peer-to-peer WireGuard. The coordination server never touches data plane traffic.
Deployment
Run Headscale as a Docker container or systemd service on a VPS with a public IP. It needs a database (SQLite for small setups, PostgreSQL for larger ones) and TLS. Get TLS through a reverse proxy like Caddy, or directly with a wildcard cert from Let’s Encrypt using DNS validation. Open it on port 443 so clients can connect.
docker run -d \
  --name headscale \
  -v /etc/headscale:/etc/headscale \
  -v /var/lib/headscale:/var/lib/headscale \
  -p 443:443 \
  headscale/headscale:0.26 \
  serve
Client Configuration
Point each device to your Headscale instance:
tailscale up --login-server=https://headscale.example.comGenerate auth keys with the Headscale CLI:
headscale preauthkeys create --user myuserCurrent Tailscale users have to sign in again when they switch to Headscale. There is no smooth migration path. Each device has to log out of the Tailscale control plane and re-register with Headscale.
What You Lose with Headscale
Headscale covers the core feature set: MagicDNS, ACLs (via a local acl.yaml file), tagging, and OIDC login. Here is what it lacks next to the Tailscale SaaS:
- No Funnel or Serve features
- No built-in admin web UI (use the
headscaleCLI or the community Headscale-UI project) - No Tailscale SSH integration
- DERP relays must be self-hosted (or you can use Tailscale’s public DERP servers, which still work with Headscale)
Running Your Own DERP Relay
Deploy derper (from the Tailscale GitHub repository) on a VPS in each region you need. Point Headscale’s derp.yaml at your own DERP servers. This drops any need for Tailscale infrastructure and gives you a fully self-contained mesh.
When to Self-Host
Self-host with Headscale if you need full data control, have compliance rules to meet, or just want zero outside dependencies. Stick with Tailscale SaaS if you value the web UI, Funnel, Tailscale SSH, and automatic DERP servers. The free tier’s 100-device limit is plenty for most homelabs, so the choice usually comes down to principle, not practical limits.
Troubleshooting Common Issues
A few problems come up regularly when running Tailscale.
Connections Show “Relayed” When They Should Be Direct
Run tailscale netcheck to diagnose it. The usual causes are a firewall blocking UDP port 41641, symmetric NAT on both ends (a direct connection is then impossible), or a corporate firewall doing deep packet inspection. Opening UDP 41641 inbound on at least one side usually fixes it.
DNS Resolution Failures with MagicDNS
If MagicDNS names do not resolve, check that your global nameservers in the admin console are reachable from all devices. If you use an exit node, DNS queries route through it, so the exit node must be able to reach those nameservers. DNS rebinding protection on some home routers can also get in the way. MagicDNS itself is fine with rebinding protection, but split DNS pointing to local resolvers can trip it.
Tailscale on Home Assistant
Install the Tailscale add-on from the Home Assistant add-on store. Once it connects, your Home Assistant instance is reachable at its 100.x.y.z address on port 8123 from any device in your tailnet. For family members without Tailscale, use Funnel to open Home Assistant through a public *.ts.net HTTPS URL. Add homeassistant to the trusted_proxies config to avoid login issues when it is reached through Tailscale.
Subnet Routes Not Working
After you advertise routes with --advertise-routes, you have to approve them in the admin console under the machine’s route settings. On the subnet router itself, IP forwarding must be on (sysctl net.ipv4.ip_forward=1). If traffic still does not flow, check that the target devices have a route back to the subnet router. Also check that the subnet router does NAT (masquerade) for the Tailscale traffic.