Automate Your Pool or Hot Tub with Home Assistant and ESPHome Sensors

Pool and hot tub chemistry can swing from safe to damaging in a few hours. A paper strip you dip once a week will not catch it. The fix is cheap: a waterproof ESPHome sensor built around an ESP32 , reading water temperature, pH, and ORP, piped into Home Assistant for pump schedules, chemical alerts, and cover reminders. A full setup runs under $80. It replaces guesswork with a live dashboard and push alerts that fire before your heater corrodes.
This guide walks through the key metrics, sensors that survive chlorinated water, the ESPHome YAML to wire them up, and the Home Assistant automations worth building on top.
What to Monitor and Why
Four numbers tell you almost all you need to know about whether pool or spa water is safe, comfortable, and not quietly destroying your gear.
Water temperature sets the ceiling for everything else. Reactions run faster in warm water, so chlorine burns off quicker and pH drifts harder. A pool is comfortable between 78 and 82°F; a hot tub usually sits at 100 to 104°F. Tracking temperature also shows how much heat you lose overnight. That is the first signal a cover has gone missing or is failing.
pH tells you how acidic or basic the water is, and the target range is 7.2 to 7.6. Drop below 7.0 and the water starts eating metal: heat exchangers, pump seals, and ladder hardware all pay the price. A corroded heat exchanger on a gas heater is a $2,000 replacement, and weeks of low pH can do it. Go above 7.8 and chlorine loses most of its sanitizing power, scale forms on pipes, and bathers complain about cloudy water and itchy skin.
ORP (Oxidation Reduction Potential) is the metric most DIY pool owners never hear about, and it is the one that drives sanitation. ORP shows the water’s actual oxidizing power in millivolts, not the level of any single chemical. According to Atlas Scientific’s ORP guide , a reading of 650 to 750 mV signals effective sanitation. That is why many state health codes use 650 mV as the floor for public pools. ORP beats free chlorine as a germ-kill proxy because it folds in pH, cyanuric acid, and temperature at once.
TDS (Total Dissolved Solids) is optional but handy. Rising TDS tells you when to partly drain and refill the pool, usually once a year or after heavy bather loads and chemical use.
The case for continuous monitoring comes down to how fast things shift. A thunderstorm can drop pool pH by half a point in an afternoon and thin sanitizer to useless levels. Test strips only catch these events if you happen to be there with one. A $30 pH probe reporting to Home Assistant catches it in real time and pings your phone.
| Metric | Pool Target | Hot Tub Target | What It Controls |
|---|---|---|---|
| Temperature | 78-82°F | 100-104°F | Comfort, reaction rates |
| pH | 7.2-7.6 | 7.2-7.8 | Corrosion, chlorine effectiveness |
| ORP | 650-750 mV | 700-750 mV | Actual sanitizing power |
| TDS | < 1500 ppm | < 1500 ppm over fill | Drain-and-refill timing |
Hardware: Sensors and Waterproofing
Pool electronics face chlorinated water, direct sun, and heat swings that make plastic brittle. The safe plan is to keep the electronics dry and only expose the probes.
Use an ESP32-DevKitC board, or any ESP32 with an external antenna connector if the equipment pad sits far from your WiFi router. Mount it inside an IP65-rated junction box on the pump shed wall, with cable glands where the sensor wires exit. Power it from a 5V USB brick plugged into a weatherproof outdoor outlet. Ideally use the same circuit as the pump, so a tripped GFCI tells you right away.
For temperature, a waterproof DS18B20 probe with a stainless steel tip and a 3 meter cable is the default pick. It’s cheap, stable, accurate to about 0.5°C out of the box, and lasts for years in pool water. Drop it through the skimmer basket, or better, strap it to the return pipe right after the filter with thermal paste and insulating foam.
For pH, you have two tiers. The DFRobot Gravity Analog pH Sensor V2 costs around $30 and gives you decent accuracy after two-point calibration. The Atlas Scientific EZO-pH kit runs about $60 and adds auto temperature compensation, better noise rejection, and an I2C link that sidesteps the ESP32 ADC issue. For a spa or a pool you actually care about, spend the extra $30.
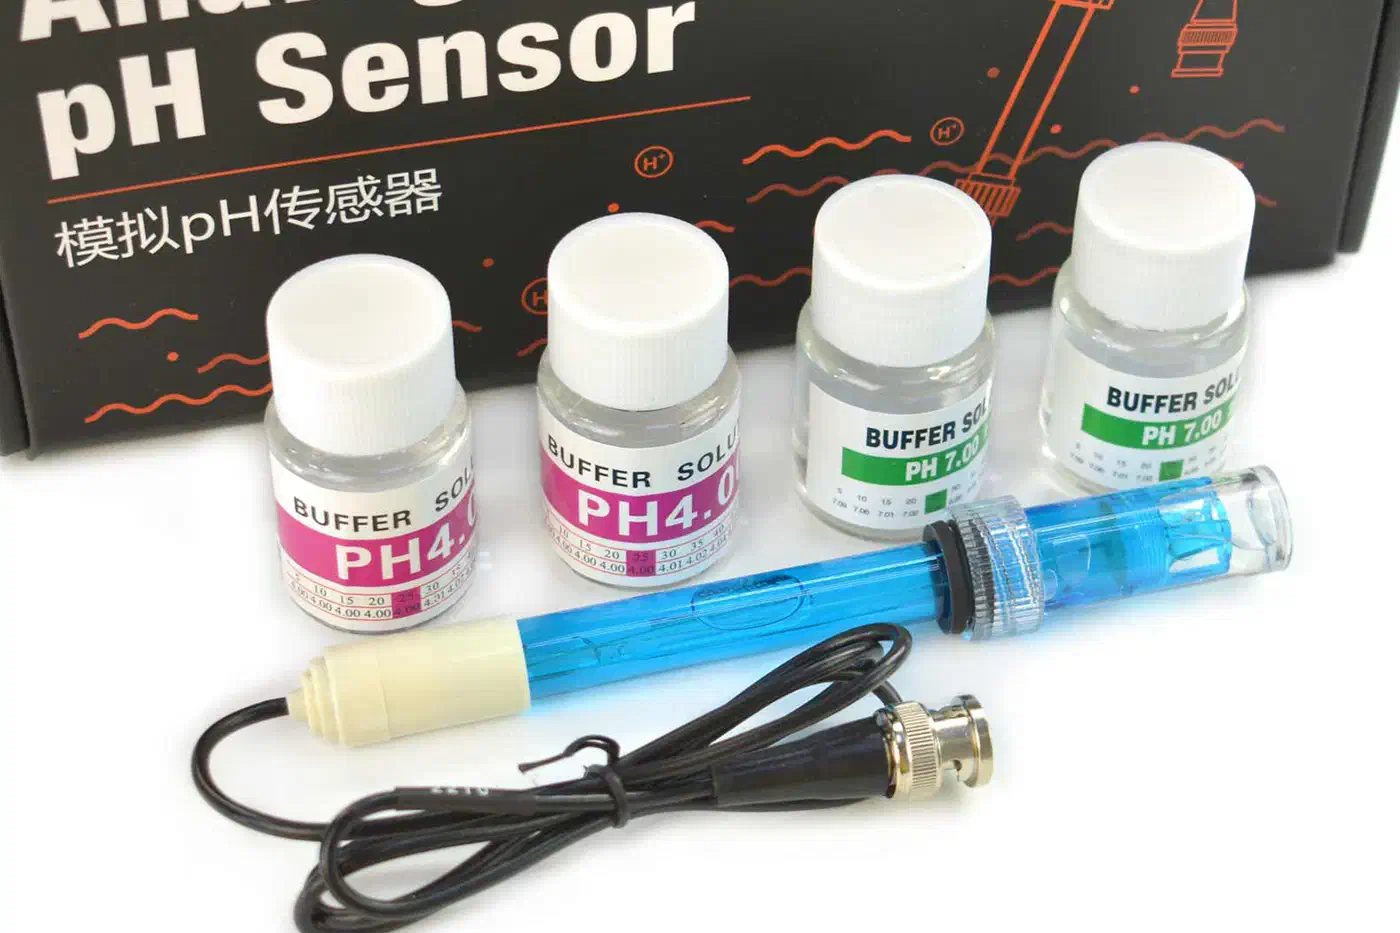
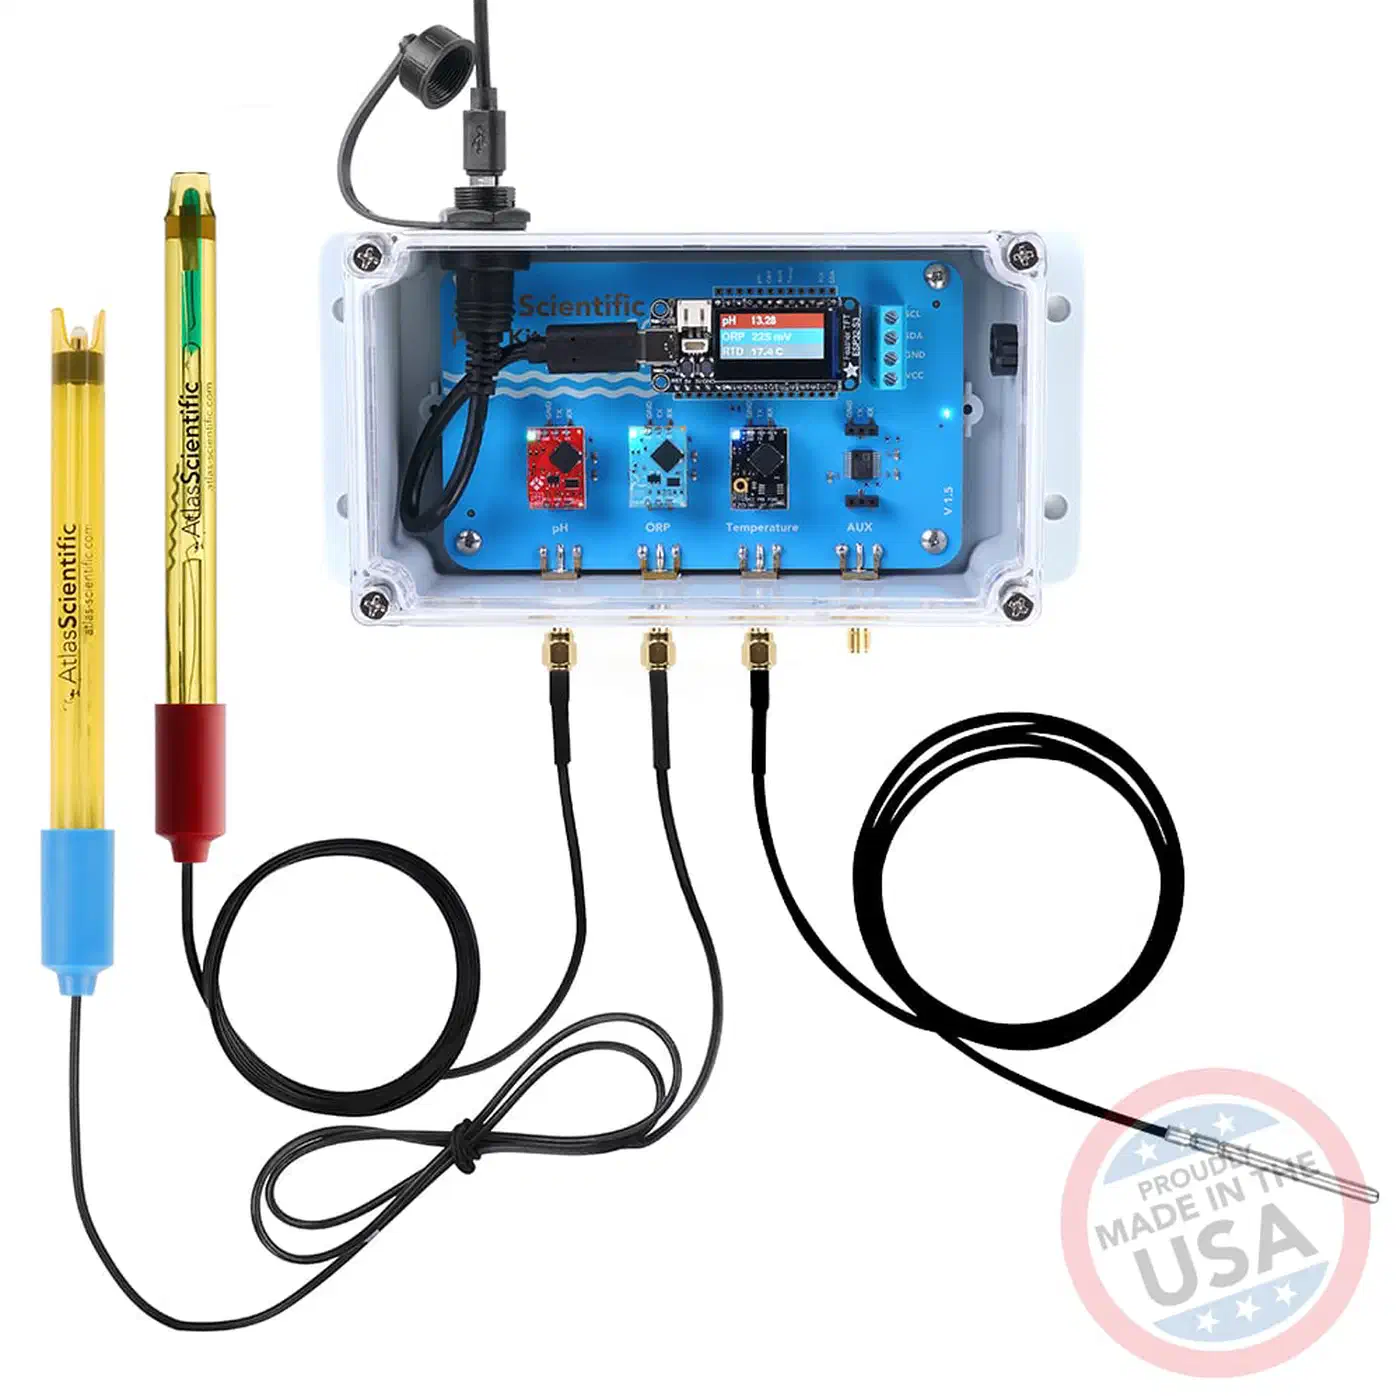
The Atlas Scientific Wi-Fi Pool Kit bundles the EZO-pH and EZO-ORP circuits with the matching probes and an enclosure. It’s a good shortcut if you want one part number that covers the whole chemistry side of the build.
For ORP, the DFRobot Gravity analog ORP probe is around $25 and the Atlas Scientific EZO-ORP is around $60. The same logic holds: the Atlas kit is more reliable over time, and ORP probes drift fast enough that reliability is the deciding factor.
Probe placement is the hardware call that decides whether any of this works. Put the pH and ORP probes in the return line after the filter and before the heater, using a T-fitting with threaded ports built for 12mm probes. This gives you steady flow across the probe tips whenever the pump runs, which is what the sensors need to stay accurate. Drop a probe into the skimmer or let it float in the pool, and you get noisy readings and a dead probe in a couple of months.
If you want a plug-and-play option just for temperature, the Apollo Automation TEMP-1 is a pre-flashed ESP32 with optional waterproof probes and a clean ESPHome config out of the box. It runs about 36 to 40 euros and is a fine way to start temperature monitoring before you commit to the full chemistry build.
ESPHome Configuration
ESPHome reads the sensors and smooths the data locally before anything hits Home Assistant. Here is a working config for the ESP32 with a DS18B20 on GPIO4, a DFRobot analog pH sensor on GPIO34, and an analog ORP sensor on GPIO35.
esphome:
  name: pool-monitor
  friendly_name: Pool Monitor

esp32:
  board: esp32dev
  framework:
    type: arduino

wifi:
  ssid: !secret wifi_ssid
  password: !secret wifi_password

api:
  encryption:
    key: !secret api_key

ota:
  - platform: esphome

logger:

one_wire:
  - platform: gpio
    pin: GPIO4

globals:
  - id: ph_offset
    type: float
    restore_value: yes
    initial_value: '0.0'
  - id: ph_slope
    type: float
    restore_value: yes
    initial_value: '-5.70'

sensor:
  - platform: dallas_temp
    name: "Pool Water Temperature"
    update_interval: 60s
    filters:
      - sliding_window_moving_average:
          window_size: 10
          send_every: 5

  - platform: adc
    pin: GPIO34
    name: "Pool pH"
    update_interval: 10s
    attenuation: 12db
    accuracy_decimals: 2
    filters:
      - sliding_window_moving_average:
          window_size: 15
          send_every: 5
      - lambda: |-
          return (x * id(ph_slope)) + id(ph_offset) + 7.0;

  - platform: adc
    pin: GPIO35
    name: "Pool ORP"
    unit_of_measurement: "mV"
    update_interval: 10s
    attenuation: 12db
    filters:
      - sliding_window_moving_average:
          window_size: 15
          send_every: 5
      - lambda: 'return (2.5 - x) * 1000.0;'

binary_sensor:
  - platform: template
    name: "Pool pH Out of Range"
    lambda: |-
      if (id(pool_ph).state < 7.0 || id(pool_ph).state > 7.8) {
        return true;
      } else {
        return false;
      }

  - platform: template
    name: "Pool Low Sanitizer"
    lambda: |-
      return id(pool_orp).state < 650.0;
The sliding_window_moving_average filter does more work than it looks. Raw analog pH and ORP readings jump by tenths of a pH unit between samples. A window of 10 to 15 samples smooths that to something useful without hiding real changes.
The pH calibration values live in globals so they survive reboots. After each two-point calibration with pH 4.0 and pH 7.0 buffer solutions, update the ph_offset and ph_slope constants, reflash, and the new curve takes hold. For in-field calibration without reflashing, move it into a pair of button entities that capture current voltage into the globals. Good examples of this pattern live on the Home Assistant community forum pool sensor thread
.
One note on recent ESPHome changes: the old dallas platform was removed in early 2025, in favor of the one_wire bus with a dallas_temp sensor platform. The config above uses the new syntax. If you’re copying older examples from the web, watch for this.
For anything more ambitious, the AquaPi project is a full ESPHome-based build designed for Atlas Scientific EZO sensors over I2C. It handles calibration, temperature compensation, and multi-probe setups cleanly. The same ESPHome-on-ESP32 pattern scales to other rooms: see this indoor PM2.5 and CO2 tracking build for a parallel project.
Home Assistant Automations
Sensors on their own don’t fix a pool. Home Assistant is where raw numbers turn into pump schedules, push alerts, and the kind of warnings that hit your phone before a cover-off night turns into a $2,000 heater bill.
Pump Scheduling
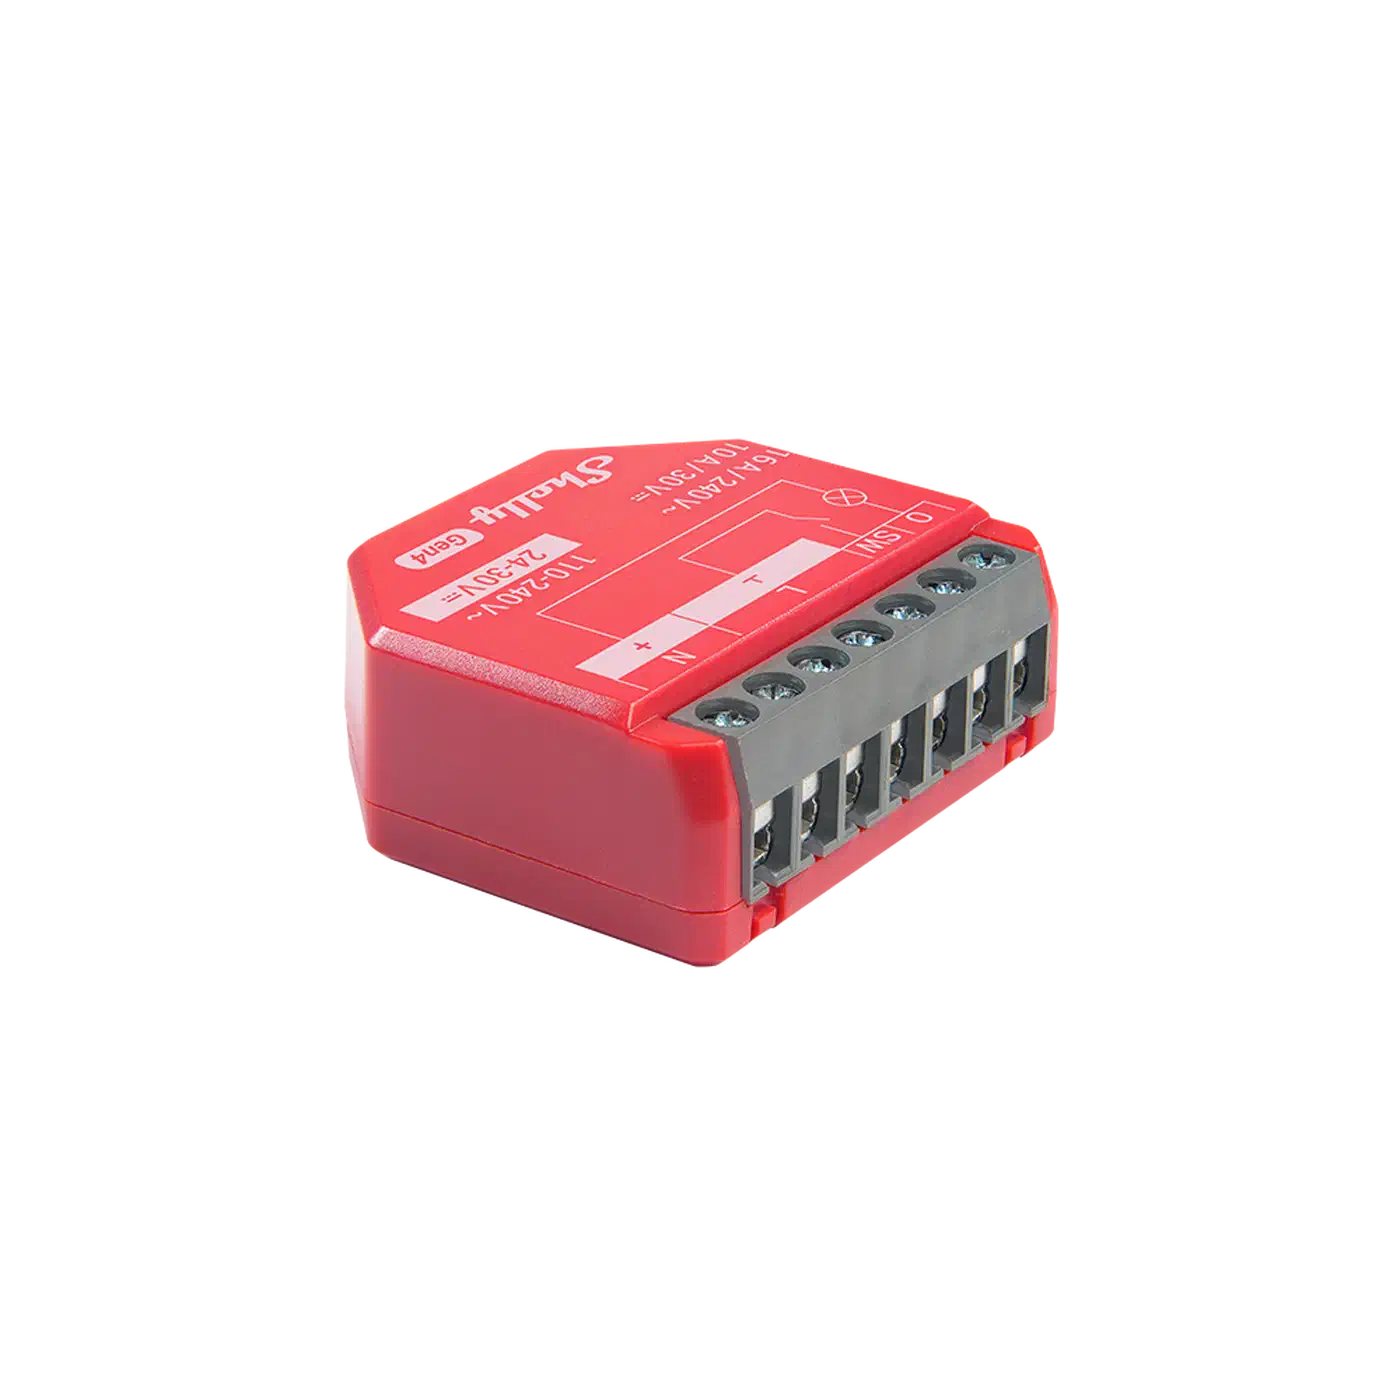
Pump scheduling is both the biggest automation win and the biggest energy saving. Turn over the full water volume once per day in winter and one to two times per day in summer, all during off-peak electricity hours. Drive a Shelly 1PM Gen4 wired to the pump contactor. That gives you on/off control and per-minute energy tracking.
A simple rule of thumb for pool pump runtime is one hour per ten degrees Fahrenheit of water. At 80°F run the pump for 8 hours, at 90°F run it for 9 hours, and so on. Home Assistant can pull the water temperature from your DS18B20 and set the runtime for you.
automation:
  - alias: "Pool Pump Daily Schedule"
    trigger:
      - platform: time
        at: "22:00:00"
    action:
      - service: switch.turn_on
        target:
          entity_id: switch.pool_pump
      - delay:
          hours: "{{ (states('sensor.pool_water_temperature') | float / 10) | round(0) }}"
      - service: switch.turn_off
        target:
          entity_id: switch.pool_pump
The energy data turns out to be useful in its own right. A pool pump pulling much less wattage than baseline usually means air in the lines, a clogged skimmer basket, a low water level, or a cracked suction fitting. A sudden spike usually points to a blocked impeller. Both deserve a notification before they turn into an emergency service call. Feeding the Shelly’s metering into the dashboard that puts every circuit next to your solar and grid totals also shows the pump’s share of total household consumption. For other high-current loads that benefit from the same Shelly relay approach, automating a garage door with a Shelly relay and Home Assistant covers the wiring, reed switches, and auto-close logic you can lift right into a pool build.
Chemical and Temperature Alerts
Alerts should never fire on a single reading. Analog probes spike for all sorts of reasons, and a 30-second blip of pH 6.8 means nothing. Require the condition to hold for 30 minutes before notifying.
  - alias: "Pool Low Sanitizer Alert"
    trigger:
      - platform: numeric_state
        entity_id: sensor.pool_orp
        below: 650
        for:
          minutes: 30
    action:
      - service: notify.mobile_app_pixel
        data:
          title: "Pool sanitizer low"
          message: "ORP is {{ states('sensor.pool_orp') }} mV. Add chlorine within 4 hours."
For the hot tub, a readiness alert (“Ready at 102°F”) is one of the most-used automations you’ll build. A second alert watches for the cover being left off. If the water drops more than 5°F in two hours and nobody is in the tub, ping you to check the cover. Both use the same pattern as above with different triggers.
Weather-Triggered Actions
Pull in a weather service (the free Met.no integration works fine) and watch for heavy rain events . After a downpour, push a note to test and adjust pool chemistry. Rain is mildly acidic, so it both lowers pH and thins out whatever sanitizer was in the water. Paired with an ORP alert, this is usually enough to head off an algae bloom after a storm.
Dashboard
Build the default view as a Mushroom card dashboard with current pH, ORP, and temperature, plus 24-hour history graphs. Color the pH and ORP tiles red when they leave their target ranges and green when they’re inside. Wrap the chemistry warnings in conditional cards that show or hide content based on state so they only surface when a reading is actually out of range. The goal is a dashboard you actually glance at, not a wall of numbers you ignore.
Calibration and Maintenance
Water probes drift, and this is the biggest caveat to the whole setup. A pH probe that was dead accurate last month can be off by 0.3 units today. An uncalibrated probe is worse than no probe at all, because it gives you confident-looking wrong answers.
Plan for pH calibration every four to six weeks using pH 4.0 and pH 7.0 buffer solutions. The steps are quick: rinse the probe in distilled water, dip it in pH 7.0 buffer, wait for the reading to settle, record the voltage, then repeat with pH 4.0 buffer. Plug the two voltages into your slope and offset globals and reflash. A Home Assistant automation can ping you on a six-week schedule.
ORP probes need calibration every two to three months with a 225 mV or 475 mV calibration solution. The steps mirror pH calibration: rinse, dip, wait, record, update.
Probe cleaning is nearly as critical as calibration. Inspect both probes monthly for calcium deposits and chloramine buildup. Clean with a soft brush and a 1:4 diluted white vinegar solution. Never use a stiff brush on the glass bulb of a pH probe; you’ll scratch the reference junction and kill the sensor.
Budget for yearly probe replacement. pH probes last 12 to 24 months in pool water before the reference junction clogs, and ORP probes last 18 to 36 months. The DS18B20 temperature probe is basically immortal and needs no calibration, though checking it against a reference thermometer once a year is good practice.
Cross-check your live readings against a quality test kit like the Taylor K-2006 every month or two. Drift between the probe reading and the reference kit is the earliest sign that a calibration is due. If the drift tops 0.3 pH units or 50 mV ORP, recalibrate right away.
Once calibrated and running, pool chemistry stops being a weekly chore and turns into background telemetry. The dashboard tells you when something needs a look, and most of the time the answer is “nothing”, which is exactly what you want from a pool.