Plant Monitor System ESP32: Under $10 Per Plant

Yes, you can monitor every houseplant in your home for under $10 per plant. A single ESP32 board running ESPHome (currently at version 2026.3.0) reads capacitive soil moisture sensors, a BH1750 light sensor, and an AHT20 temperature/humidity sensor, then feeds everything straight into Home Assistant . From there, automations send you a notification when a plant needs water, dashboards show moisture trends over weeks, and you stop guessing whether that fern in the corner is actually happy. This guide covers sensor selection, wiring a 4-plant monitoring hub, the complete ESPHome YAML configuration, Home Assistant dashboards, and tips for long-term reliability.
Choosing the Right Sensors
Not all soil moisture sensors are equal. The cheap resistive probes you find in starter kits have two exposed metal traces that sit directly in wet soil. Electrolysis eats through them within weeks, and readings drift long before that. Capacitive soil moisture sensors avoid this problem entirely. They measure changes in capacitance through a sealed PCB surface - no exposed metal contacts touching the soil.
Buy the v2.0 capacitive sensors with the onboard voltage regulator and NE555 timer chip. The older v1.0 boards have exposed PCB traces near the top that still corrode when moisture wicks upward. If you can only find v1.0 boards, coat the electronics portion (everything above the soil line) with clear nail polish or MG Chemicals 419D conformal coating spray. Either works fine.
Each capacitive sensor outputs an analog voltage between 0 and 3.3V, inversely proportional to moisture: dry soil reads around 2.8V, saturated soil around 1.2V. The exact values vary by sensor and soil type, so per-plant calibration is mandatory (covered in the configuration section below).
For light measurement, the BH1750 is hard to beat at $2 per module. It measures ambient illuminance from 0 to 65,535 lux over I2C, which is more than enough range for indoor plants. Mount it at canopy height for the most relevant reading - placing it above the plant or on a shelf below gives misleading numbers.
For temperature and humidity, the AHT20 ($2-3) connects over I2C alongside the BH1750 on the same two wires. Tropical plants that need humidity above 50% benefit from having this data tracked, and it costs nearly nothing to add. If you want to extend environmental monitoring beyond plants, the same ESP32 and ESPHome approach scales to air quality sensors measuring CO2, VOCs, and particulates.
How many plants per ESP32? The ESP32-WROOM-32 has 8 ADC1 channels on GPIOs 32 through 39. When WiFi is active (and it always is for an ESPHome device), ADC2 pins are unavailable - the WiFi driver claims them. That leaves the ADC1 pins. A couple of those (GPIO36 and GPIO39, labeled VP and VN) are input-only and work fine for sensors. In practice, a single ESP32 handles 6-8 moisture sensors comfortably, with the BH1750 and AHT20 shared across all plants on a single I2C bus. The same build runs on cheaper or lower-power silicon; picking an ESP32 comes down to radio fit and deep-sleep draw.
Commercial Sensors vs. DIY
A commercial sensor like the Xiaomi Mi Flora (around $8-10 per unit) is the obvious alternative. The comparison shakes out like this:
| Feature | DIY ESP32 + Capacitive | Xiaomi Mi Flora |
|---|---|---|
| Cost per plant | $3-5 (sensor + share of ESP32) | $8-10 per sensor |
| Connectivity | WiFi (always connected) | BLE (needs BT proxy or phone) |
| Battery | USB powered (no batteries) | CR2032 coin cell, ~1 year |
| Accuracy | Excellent after calibration | Decent, inconsistent across soil types |
| Customization | Full ESPHome/HA control | Limited to app or BLE proxy |
| Scalability | 6-8 plants per ESP32 | 1 sensor per plant, needs BT range |
| Maintenance | Occasional recalibration | Battery replacement |
The DIY route costs less per plant, gives you full control over update intervals and automations, and stays permanently connected over WiFi. The Mi Flora wins on portability (no wires) and zero soldering, but its BLE connectivity requires either a Bluetooth proxy or keeping your phone nearby. For a dedicated indoor monitoring setup, the ESP32 approach is more capable and cheaper at scale.
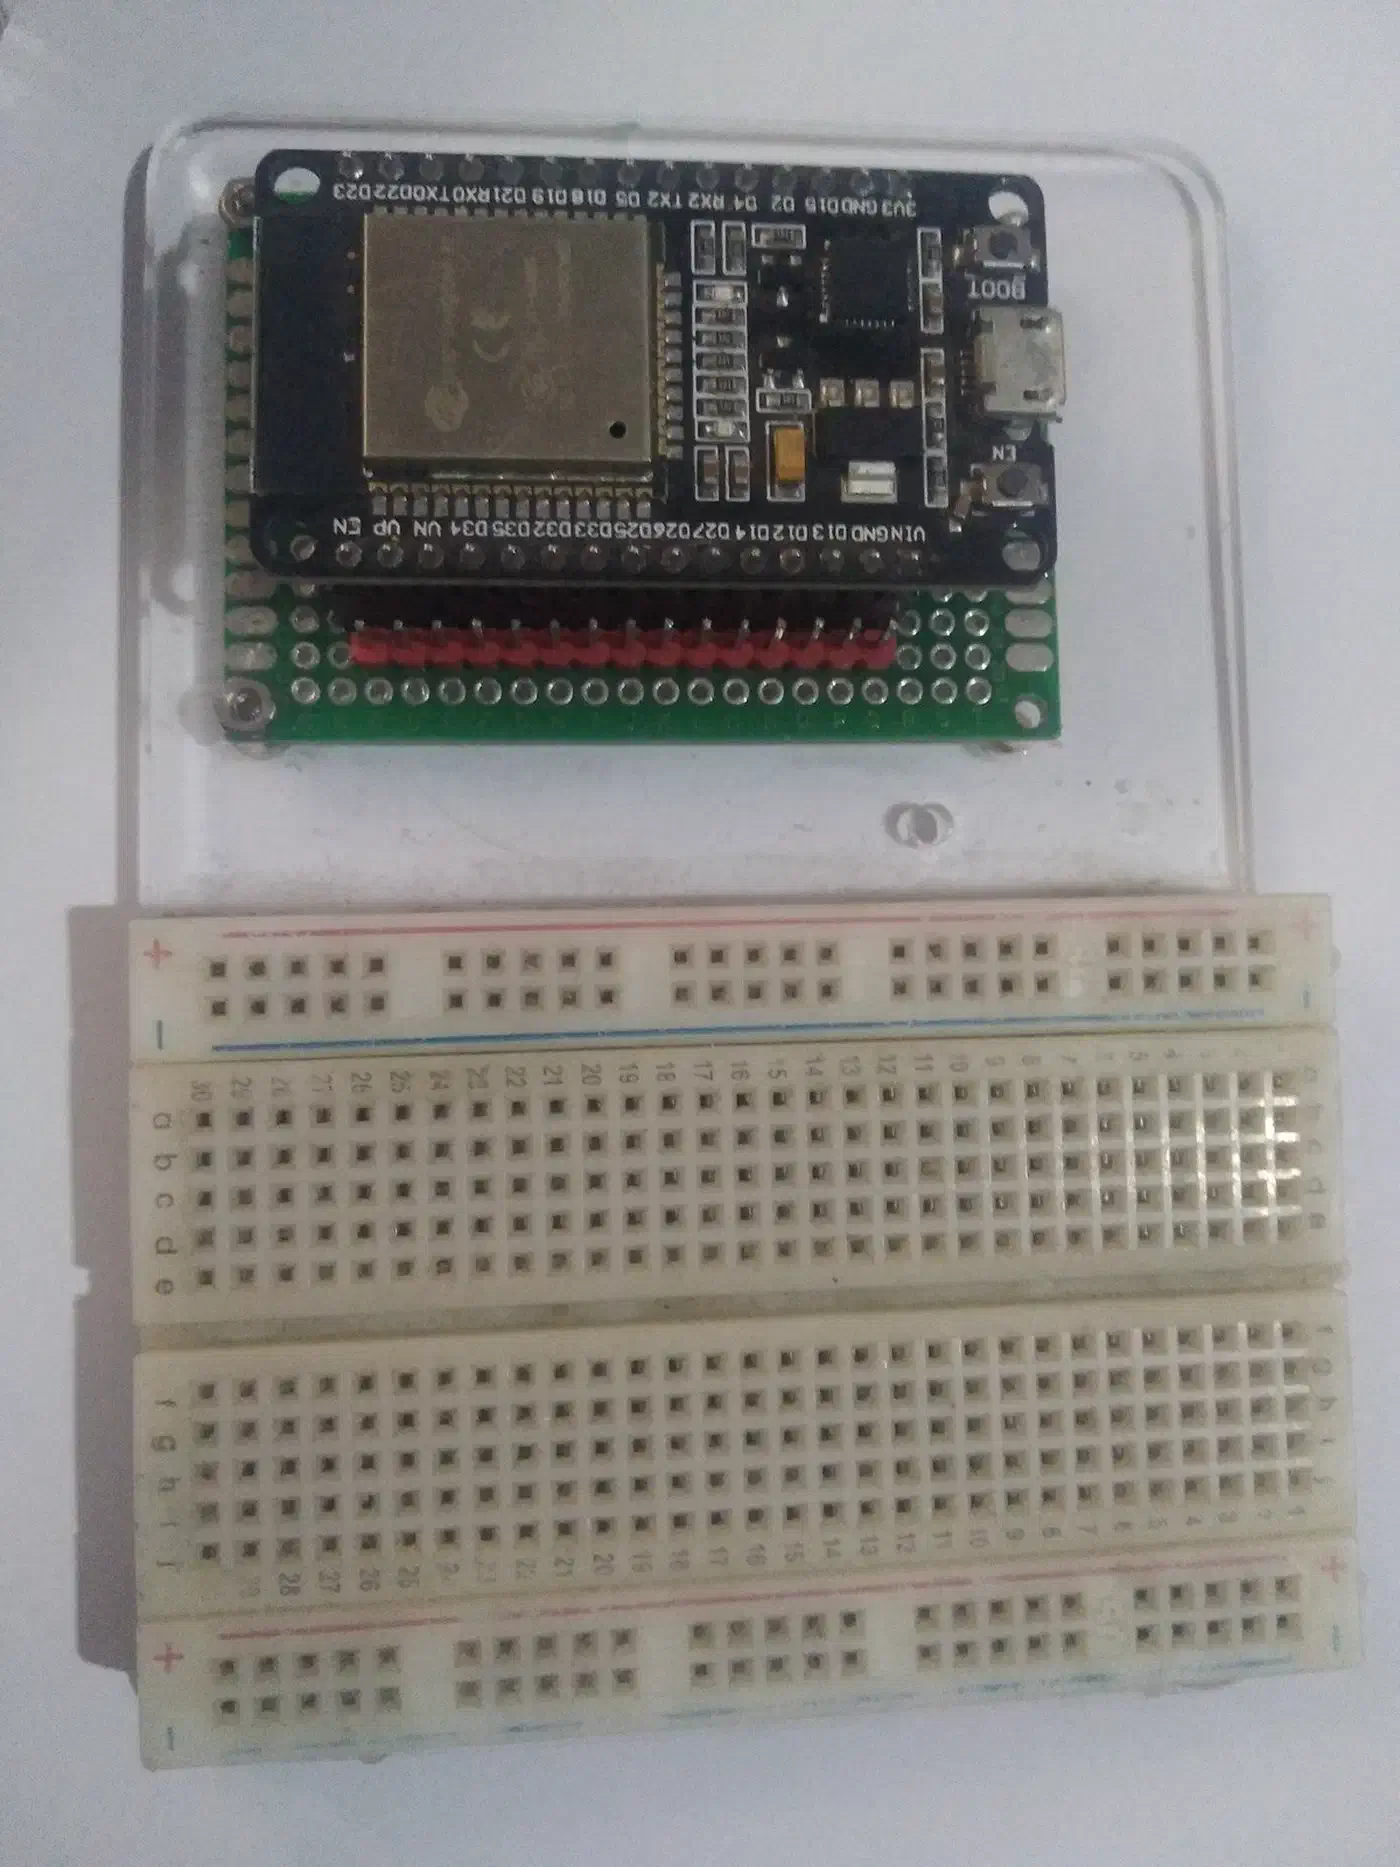
Hardware Setup and Wiring for a 4-Plant Hub
Bill of materials for monitoring four plants from a single ESP32:
| Component | Quantity | Approximate Cost |
|---|---|---|
| ESP32-WROOM-32 DevKit | 1 | $5 |
| Capacitive soil moisture sensor v2.0 | 4 | $8 total |
| BH1750 light sensor (GY-302 breakout) | 1 | $2 |
| AHT20 temperature/humidity sensor | 1 | $2 |
| USB-C cable + 5V power supply | 1 | $5 |
| Jumper wires / JST-XH connectors | assorted | $3 |
| Total | ~$25 |
That works out to roughly $6.25 per plant, and the per-plant cost drops further as you add sensors 5 through 8 on the same board.
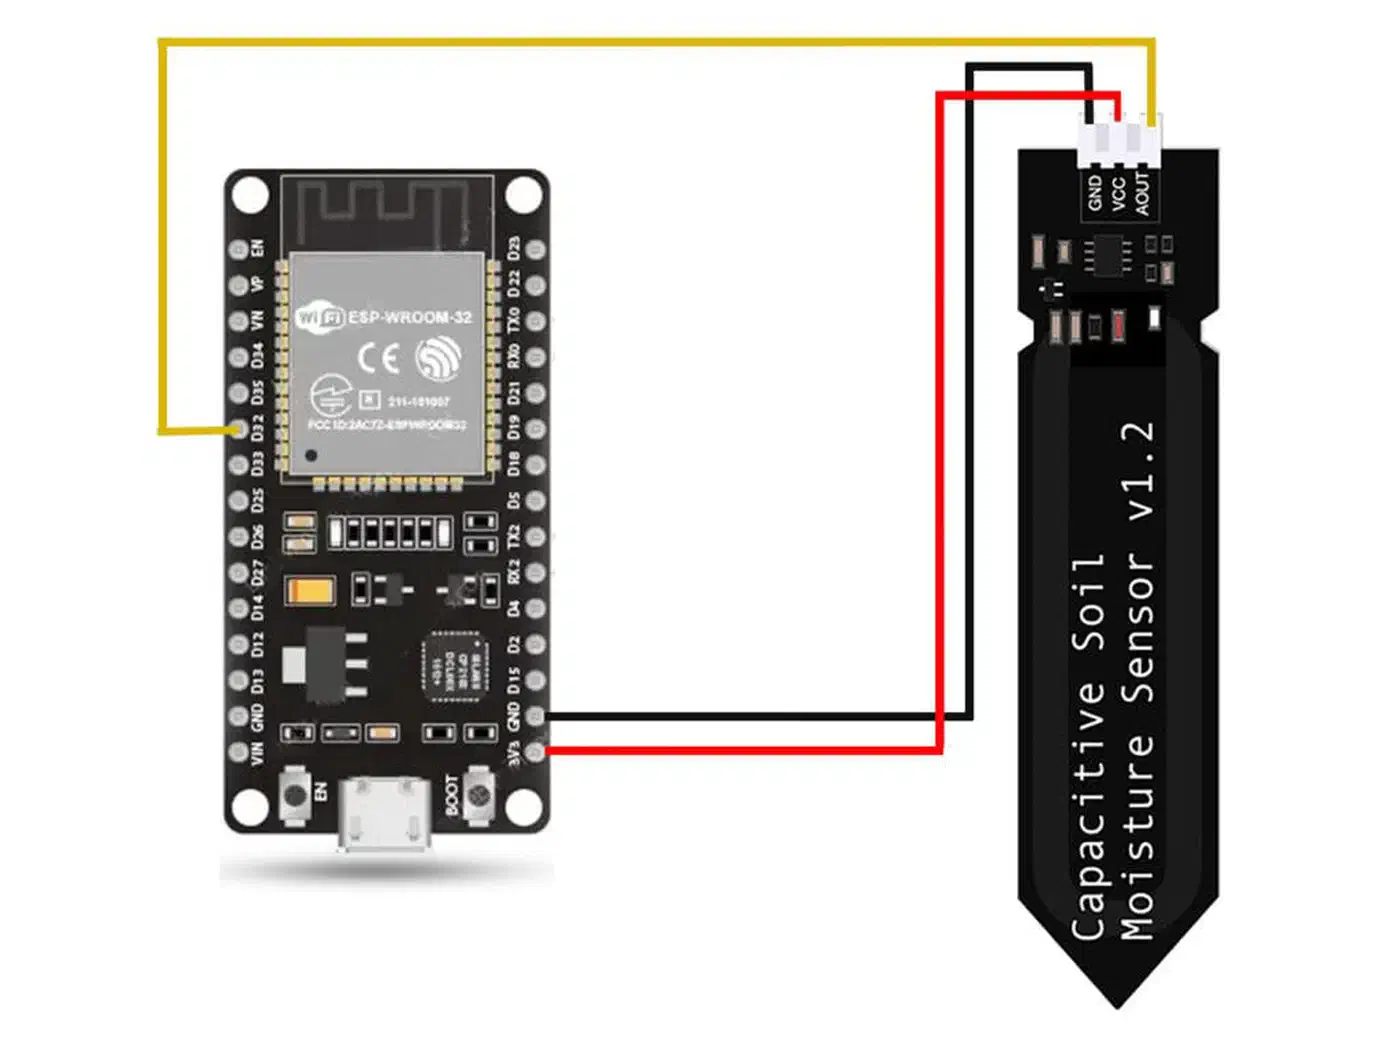
Wiring Diagram
Moisture sensors - connect each sensor’s AOUT pin to a separate ADC1 channel:
- Plant 1: AOUT to GPIO32 (ADC1_CH4)
- Plant 2: AOUT to GPIO33 (ADC1_CH5)
- Plant 3: AOUT to GPIO34 (ADC1_CH6)
- Plant 4: AOUT to GPIO35 (ADC1_CH7)
- All sensors: VCC to 3.3V, GND to GND
BH1750 light sensor - connects to the default I2C bus:
- SDA to GPIO21
- SCL to GPIO22
- VCC to 3.3V, GND to GND
- ADDR pin left floating or pulled LOW for address 0x23 (pull HIGH for 0x5C if you need two BH1750 sensors)
AHT20 temperature/humidity sensor - shares the same I2C bus:
- SDA to GPIO21
- SCL to GPIO22
- VCC to 3.3V, GND to GND
- Default I2C address: 0x38 (no conflict with BH1750 at 0x23)
Both I2C sensors share the exact same two data wires. No additional pins required.
Cable and Mounting Tips
Run 3-wire ribbon cable (VCC, GND, AOUT) from the ESP32 to each plant’s soil sensor. Keep cable runs under 2 meters to avoid analog signal degradation on the ADC readings. JST-XH connectors on each end make it painless to replace a sensor without resoldering.
Place the ESP32 hub centrally among your plants - middle of a windowsill or center of a plant shelf works well. Insert each moisture sensor about two-thirds of its length into the soil, and keep the insertion depth consistent across plants. Small binder clips or 3D-printed stakes hold sensors at a fixed depth so readings stay comparable over time.
ESPHome Configuration
Below is the complete ESPHome YAML for the 4-plant monitoring hub. Copy-paste it and update the WiFi credentials, API encryption key, and calibration values for your sensors.
esphome:
  name: plant-monitor
  friendly_name: Plant Monitor

esp32:
  board: esp32dev

wifi:
  ssid: !secret wifi_ssid
  password: !secret wifi_password
  manual_ip:
    static_ip: 192.168.1.50
    gateway: 192.168.1.1
    subnet: 255.255.255.0

api:
  encryption:
    key: !secret api_key

ota:
  - platform: esphome
    password: !secret ota_password

logger:

i2c:
  sda: GPIO21
  scl: GPIO22
  scan: true

# -- Light Sensor --
sensor:
  - platform: bh1750
    name: "Plant Area Light"
    address: 0x23
    update_interval: 60s

  # -- Temperature & Humidity --
  - platform: aht10
    variant: AHT20
    temperature:
      name: "Plant Area Temperature"
    humidity:
      name: "Plant Area Humidity"
    update_interval: 300s

  # -- Plant 1 Moisture --
  - platform: adc
    pin: GPIO32
    name: "Plant 1 Moisture"
    id: plant_1_moisture
    attenuation: 12db
    update_interval: 300s
    unit_of_measurement: "%"
    accuracy_decimals: 0
    filters:
      - calibrate_linear:
          - 2.85 -> 0
          - 1.15 -> 100
      - clamp:
          min_value: 0
          max_value: 100

  # -- Plant 2 Moisture --
  - platform: adc
    pin: GPIO33
    name: "Plant 2 Moisture"
    id: plant_2_moisture
    attenuation: 12db
    update_interval: 300s
    unit_of_measurement: "%"
    accuracy_decimals: 0
    filters:
      - calibrate_linear:
          - 2.85 -> 0
          - 1.15 -> 100
      - clamp:
          min_value: 0
          max_value: 100

  # -- Plant 3 Moisture --
  - platform: adc
    pin: GPIO34
    name: "Plant 3 Moisture"
    id: plant_3_moisture
    attenuation: 12db
    update_interval: 300s
    unit_of_measurement: "%"
    accuracy_decimals: 0
    filters:
      - calibrate_linear:
          - 2.85 -> 0
          - 1.15 -> 100
      - clamp:
          min_value: 0
          max_value: 100

  # -- Plant 4 Moisture --
  - platform: adc
    pin: GPIO35
    name: "Plant 4 Moisture"
    id: plant_4_moisture
    attenuation: 12db
    update_interval: 300s
    unit_of_measurement: "%"
    accuracy_decimals: 0
    filters:
      - calibrate_linear:
          - 2.85 -> 0
          - 1.15 -> 100
      - clamp:
          min_value: 0
          max_value: 100

# -- Plant Health Status --
text_sensor:
  - platform: template
    name: "Plant 1 Status"
    lambda: |-
      float moisture = id(plant_1_moisture).state;
      if (moisture < 15) return {"Critical"};
      if (moisture < 30) return {"Needs Water"};
      if (moisture > 85) return {"Overwatered"};
      return {"Healthy"};
    update_interval: 300s

  - platform: template
    name: "Plant 2 Status"
    lambda: |-
      float moisture = id(plant_2_moisture).state;
      if (moisture < 15) return {"Critical"};
      if (moisture < 30) return {"Needs Water"};
      if (moisture > 85) return {"Overwatered"};
      return {"Healthy"};
    update_interval: 300s

  - platform: template
    name: "Plant 3 Status"
    lambda: |-
      float moisture = id(plant_3_moisture).state;
      if (moisture < 15) return {"Critical"};
      if (moisture < 30) return {"Needs Water"};
      if (moisture > 85) return {"Overwatered"};
      return {"Healthy"};
    update_interval: 300s

  - platform: template
    name: "Plant 4 Status"
    lambda: |-
      float moisture = id(plant_4_moisture).state;
      if (moisture < 15) return {"Critical"};
      if (moisture < 30) return {"Needs Water"};
      if (moisture > 85) return {"Overwatered"};
      return {"Healthy"};
    update_interval: 300s
Calibrating Your Sensors
The calibrate_linear values above (2.85V = 0%, 1.15V = 100%) are starting points. Every capacitive sensor varies slightly, and different soil mixes affect readings. To calibrate properly:
- Flash the config with generic values first.
- Hold each sensor in open air and note the voltage reading in the ESPHome logs (this is your 0% dry point).
- Submerge the sensor portion in a glass of water and note that voltage (this is your 100% wet point).
- Update the
calibrate_linearmapping for each sensor individually.
For example, if Plant 1’s sensor reads 2.72V in air and 1.22V in water, that sensor’s calibration becomes:
filters:
  - calibrate_linear:
      - 2.72 -> 0
      - 1.22 -> 100
The clamp filter keeps values between 0 and 100% so you never see -3% or 107% on your dashboard from sensor noise.
Recommended Moisture Thresholds by Plant Type
Different plants have different watering needs. Here are reasonable starting thresholds for the status template sensors:
| Plant Type | “Needs Water” Below | “Optimal” Range | “Overwatered” Above |
|---|---|---|---|
| Succulents & Cacti | 10% | 10-35% | 50% |
| Snake Plant | 15% | 15-40% | 55% |
| Pothos / Philodendron | 25% | 25-60% | 75% |
| Ferns | 35% | 35-70% | 85% |
| Peace Lily | 30% | 30-65% | 80% |
| Calathea / Tropicals | 40% | 40-70% | 85% |
| Herbs (Basil, Mint) | 30% | 30-65% | 80% |
| Fiddle Leaf Fig | 20% | 20-55% | 70% |
You can customize these thresholds per plant using Home Assistant input_number helpers (covered in the next section), so you don’t need to re-flash the ESP32 every time you adjust a threshold.
Home Assistant Dashboard and Watering Automations
Raw sensor numbers are only useful if you can see them at a glance and act on them without opening the ESPHome logs.
Plant Dashboard
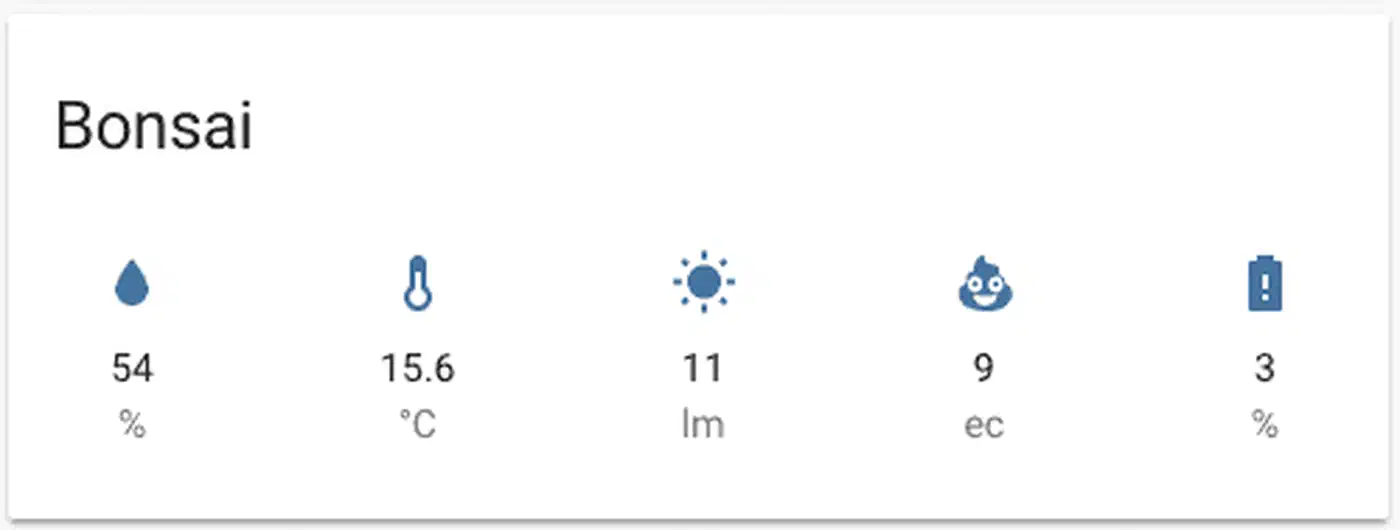
Create a dedicated dashboard view for your plants. The built-in Plant Status card (available in Home Assistant 2026.x) provides a ready-made UI that color-codes plant health.
For historical data, add ApexCharts cards (also HACS) showing 7-day moisture trends per plant. The resulting curve tells you a lot: a healthy watering pattern shows gradual decline interrupted by sharp spikes when you water. You can spot underwatering (the line drops too low before the next spike) and overwatering (the line never drops below 60%) at a glance. To show a “needs water” alert card only for plants below their threshold, wrap each one in dashboard cards that react to a sensor threshold.
Watering Reminder Automation
This Home Assistant automation sends a notification when a plant gets too dry:
automation:
  - alias: "Plant 1 Needs Water"
    trigger:
      - platform: numeric_state
        entity_id: sensor.plant_1_moisture
        below: input_number.plant_1_min_moisture
        for:
          hours: 2
    action:
      - service: notify.mobile_app_your_phone
        data:
          title: "Plant 1 needs water"
          message: >
            Moisture is at {{ states('sensor.plant_1_moisture') }}%.
            Last watered: {{ relative_time(states.sensor.plant_1_moisture.last_changed) }} ago.
The for: hours: 2 clause prevents false alerts from momentary sensor noise. If moisture genuinely stays below the threshold for two hours, you get a notification with the current percentage.
Using input_number helpers for thresholds (instead of hardcoded values) lets you tune watering alerts per plant from the Home Assistant UI. A succulent might trigger at 10%, while a fern triggers at 35%, and you adjust these without editing any YAML.
Smart Watering Time
Combine moisture data with the light sensor to suggest optimal watering times. Watering in the morning when light levels start rising is better for most plants than watering at night, which can promote root rot in some species. A simple automation can suppress evening watering alerts and re-send them at sunrise if the plant still needs water.
Weekly Health Digest
A time-triggered automation (Sunday morning, for example) can compile all your plant readings into a single notification:
automation:
  - alias: "Weekly Plant Health Digest"
    trigger:
      - platform: time
        at: "09:00:00"
    condition:
      - condition: time
        weekday:
          - sun
    action:
      - service: notify.mobile_app_your_phone
        data:
          title: "Weekly Plant Report"
          message: >
            Plant 1: {{ states('sensor.plant_1_moisture') }}% - {{ states('sensor.plant_1_status') }}
            Plant 2: {{ states('sensor.plant_2_moisture') }}% - {{ states('sensor.plant_2_status') }}
            Plant 3: {{ states('sensor.plant_3_moisture') }}% - {{ states('sensor.plant_3_status') }}
            Plant 4: {{ states('sensor.plant_4_moisture') }}% - {{ states('sensor.plant_4_status') }}
            Light: {{ states('sensor.plant_area_light') }} lux
            Temp: {{ states('sensor.plant_area_temperature') }}C
            Humidity: {{ states('sensor.plant_area_humidity') }}%
Long-Term Reliability and Scaling
A plant monitoring system that breaks after a month is worse than no system at all. A few things keep this one running.
Sensor Drift and Recalibration
Capacitive sensors drift slightly over months as the PCB coating ages and soil chemistry changes. Set a monthly reminder (or automate one) to pull a sensor out of the soil, check the air reading against your original calibration, and adjust if it has shifted by more than 0.1V. ESPHome supports a button: entity that you can press from Home Assistant to trigger an air reading, making the process quick.
Waterproofing
The most common failure mode is moisture wicking up the PCB above the soil line. Apply conformal coating (MG Chemicals 419D or clear nail polish) to everything above the marked soil insertion line on the sensor. Pay particular attention to the joint where the sensor board narrows - capillary action pulls moisture right into the electronics section there.
Scaling Beyond One ESP32
When you outgrow 6-8 sensors on a single board, add another ESP32. Use a consistent naming scheme (plant-monitor-1, plant-monitor-2) and ESPHome’s substitutions feature to share a configuration template across boards - only the device name, IP address, and pin assignments differ.
If individual plants need their own light readings (for example, plants in different rooms), a TCA9548A I2C multiplexer ($2) lets you put up to 8 BH1750 sensors on one I2C bus, each on its own multiplexer channel.
Data Retention
Home Assistant’s default recorder keeps about 10 days of sensor history. For plant monitoring, you want longer trends to compare across seasons. Add recorder configuration to keep 90 days for your plant sensors:
recorder:
  purge_keep_days: 10
  include:
    entity_globs:
      - sensor.plant_*
    entities:
      - sensor.plant_area_light
      - sensor.plant_area_temperature
      - sensor.plant_area_humidity
  commit_interval: 30
This keeps 10 days of general history but includes all plant entities so they participate in the extended retention. For 90-day plant-specific history, set purge_keep_days: 90 and restrict the include to only plant entities to keep your database manageable.
Battery-Powered Remote Sensors
For plants far from power outlets, an ESP32-C3 with deep sleep works well. Configure it to wake every 30 minutes, read the sensors, report to Home Assistant over WiFi, and go back to sleep. On a single 18650 lithium cell (3.7V, ~3000mAh), expect 2-3 months of battery life at 30-minute intervals. The trade-off is less granular data, but soil moisture changes slowly enough that half-hourly readings are plenty.
What This System Does Not Cover (Yet)
This build monitors plants but does not water them automatically. Adding automated watering with peristaltic pumps or solenoid valves controlled through ESPHome is a natural next step, and the moisture sensor data you are already collecting provides the trigger logic. Similarly, outdoor garden deployments need weatherproof enclosures and potentially solar power for the ESP32 - a separate project that builds on the same sensor foundation.
For root zone temperature monitoring (useful for propagation and sensitive tropicals), a DS18B20 waterproof probe pushed into the soil alongside the moisture sensor adds soil temperature readings. ESPHome supports the Dallas temperature component for exactly this purpose. The same probe holds up in far harsher water: a chlorinated-water pool monitor uses it to read temperature next to its pH and ORP probes.
Reliable sensors, accurate calibration, a clean dashboard, and automations that ping you before a plant dries out - that is the whole system. At $6 per plant and an afternoon of setup time, it costs less than most commercial alternatives and works better than hoping you remember to check the soil.