Bluetooth Proxies Under $20: Room Detection with ESP32-C3

Drop a few ESP32 boards ($3-8 each) flashed with ESPHome ’s Bluetooth Proxy firmware into rooms where BLE devices drop out. Home Assistant then routes Bluetooth traffic through the nearest proxy on its own. Each proxy adds about 10-15 meters of BLE coverage through interior walls, needs only a USB power cable, and works with HA’s native Bluetooth setup. The BLE devices themselves need no config changes. They have no idea they’re talking through a relay.
A typical three-bedroom house needs two or three proxies for wall-to-wall coverage. Total hardware cost sits under $20. Power draw is under 2 watts for the lot, and the whole thing can be running in under 30 minutes.
Why Bluetooth Falls Short in a Smart Home
Bluetooth Low Energy has a top range over 100 meters in open air. Indoors, the story is much worse. Through standard drywall, real range drops to 5-10 meters. Through brick, concrete, or floors with rebar, expect 3-5 meters at best. A Home Assistant server tucked in a closet or rack may only reach BLE devices in the same room and one room over.
You’ve probably seen the signs if you’ve scattered BLE sensors around the house. Xiaomi LYWSD03MMC thermometers show “unavailable” every few hours. Switchbot
devices time out during commands. Govee sensors get stuck on stale readings. HA logs fill up with BleakError or Connection timeout entries. Presence checks based on phone BLE beacons fail in distant rooms. The signal never makes it back to the server.
The obvious fix is a better antenna. Swapping in a high-gain USB adapter like the TP-Link UB500 (Realtek RTL8761B chipset) does help, but only by about 2-3 meters. BLE is a short-range protocol by design. No single antenna spot can cover a whole house. You need multiple listeners spread across the building, and that’s exactly what Bluetooth proxying provides.
How Bluetooth Proxying Works
An ESP32 running ESPHome’s Bluetooth Proxy component acts as a Wi-Fi-to-BLE bridge. It scans for BLE ads nearby and sends them to Home Assistant over Wi-Fi. For devices that need active links (reading GATT data, writing commands), HA sends the request to the proxy. The proxy runs it on the BLE side and sends back the result. The BLE device never knows a proxy is in the loop.
When multiple proxies can see the same device, Home Assistant picks the one reporting the strongest RSSI (signal strength). If a proxy goes offline, HA falls back to the next-best proxy or the built-in Bluetooth adapter. This happens with no manual failover setup.
One key distinction: a Bluetooth proxy is not a BLE mesh repeater. It doesn’t extend BLE range between devices. It only bridges BLE devices and Home Assistant. BLE mesh, used by some commercial systems, runs at a different protocol layer.
Coverage Planning
For placement, think one proxy per floor or per two to three rooms. An apartment usually needs one or two. A two-story house with a basement might need three or four. The proxy only needs USB power and Wi-Fi. No Ethernet, no special mounting hardware. A short USB-C cable and a phone charger hidden behind a bookshelf works fine.
Choosing the Right ESP32 Board
Not every ESP32 board works as well as a Bluetooth proxy. The chip type sets whether you get passive-only or full active proxying. The board design shapes range and uptime. Our radio-first board picks rank the C3, S3, and C6 by deep-sleep draw.
ESP32 (Original)
The classic ESP32-WROOM-32 and ESP32-DevKitC boards support BLE 4.2. They work for passive (ad-only) proxying. That means they can relay sensor broadcasts from devices like Xiaomi thermometers or Ruuvi tags. But the original ESP32’s Bluetooth stack can’t hold many active links while proxying. So active proxying (linking to devices for reads and writes) is flaky. Use these boards only if all your BLE devices broadcast passively.
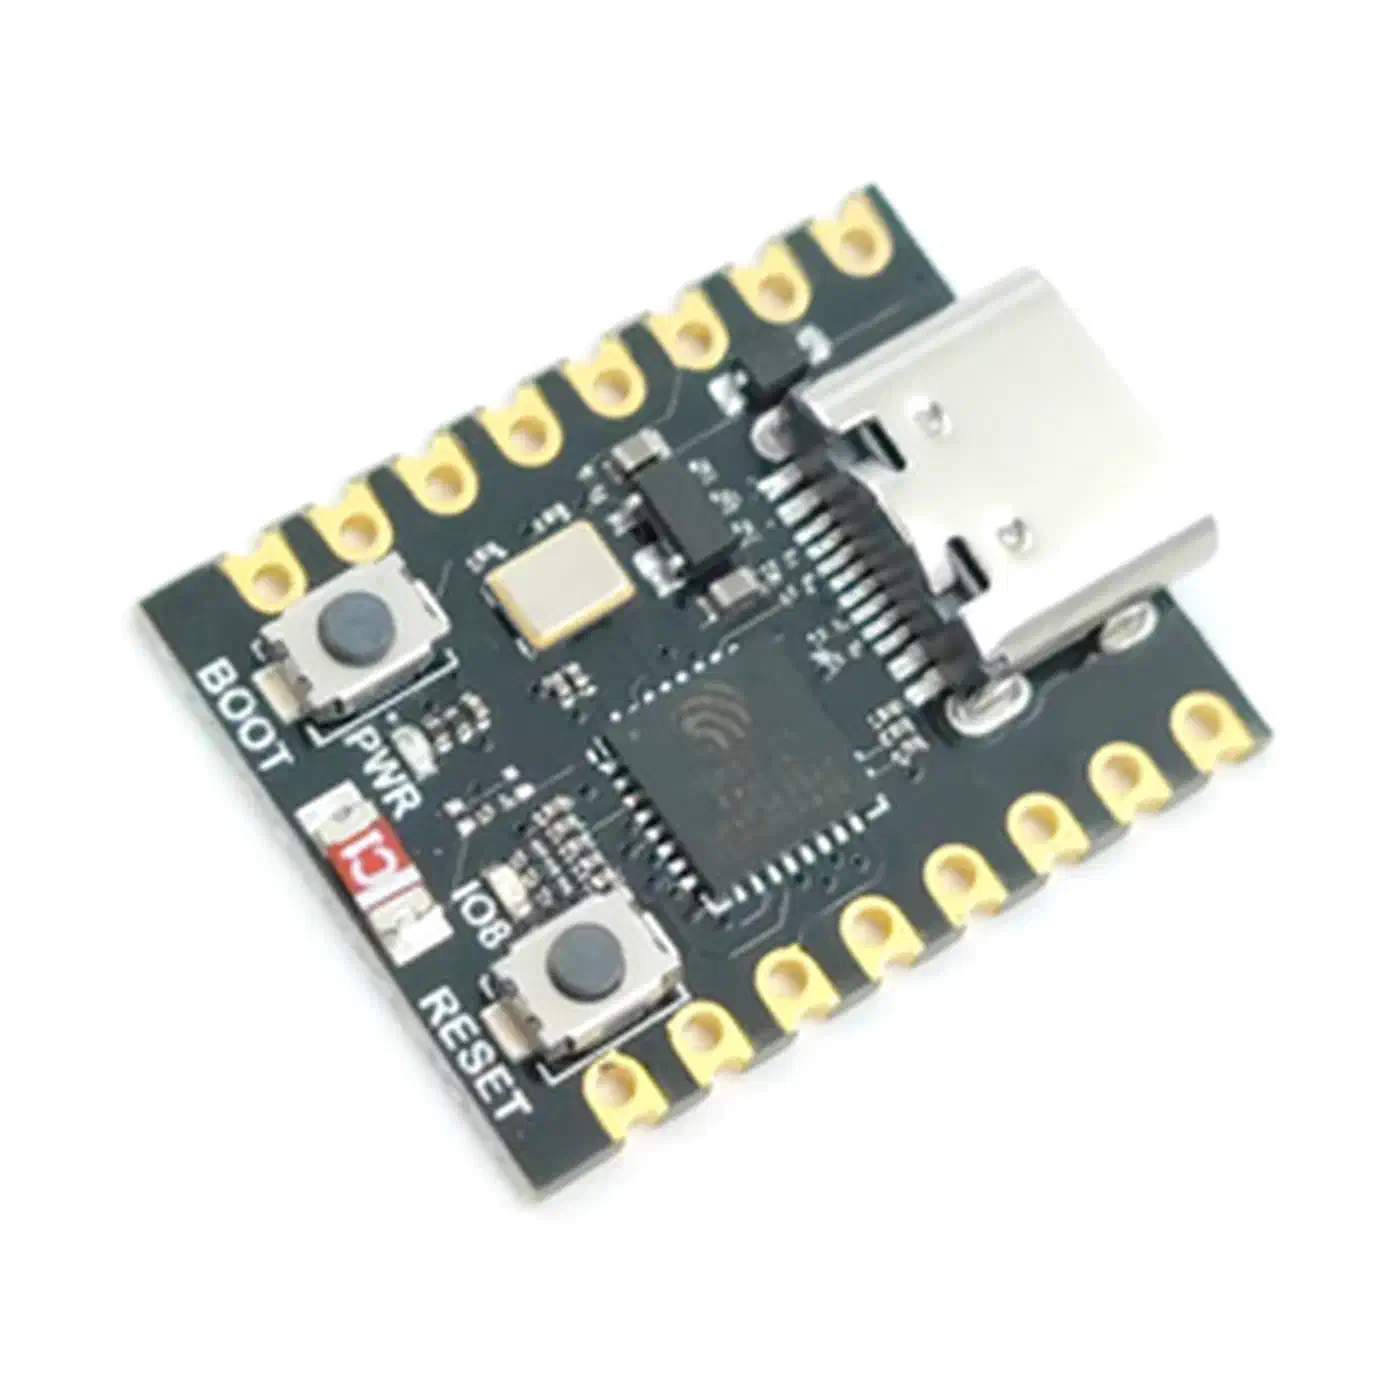
ESP32-C3
The ESP32-C3
supports both passive and active proxying with BLE 5.0. It’s a single-core RISC-V chip that draws less power than the original ESP32. Popular boards include the Seeed XIAO ESP32-C3 ($5) and the ESP32-C3 SuperMini ($2.50-3 on AliExpress). The SuperMini measures just 22.5mm x 18mm, small enough to hide almost anywhere. This is the best starting point for most users.
ESP32-S3
The ESP32-S3
is the best pick when you have many active BLE devices. Think smart locks, Switchbot curtain motors, or BLE plant sensors that need polling. It’s dual-core with BLE 5.0 and handles more concurrent active connections than the C3. The ESP32-S3-DevKitC-1 ($8) or Seeed XIAO ESP32-S3 ($7) are solid choices.
What to Avoid
- ESP8266 has no Bluetooth hardware at all
- ESP32-S2 also lacks Bluetooth
- ESP32-C6 has BLE 5.3 plus Zigbee and 802.15.4 mesh gateway capability, but ESPHome Bluetooth Proxy support is still experimental
- Any board lacking an onboard PCB antenna or U.FL connector will have terrible range
Hardware Comparison
| Board | BLE Version | Active Proxy | Approx. Price | Best For |
|---|---|---|---|---|
| ESP32-WROOM-32 | 4.2 | No | $4-6 | Passive sensors only |
| ESP32-C3 SuperMini | 5.0 | Yes | $2.50-3 | Most users, compact installs |
| Seeed XIAO ESP32-C3 | 5.0 | Yes | $5 | Reliable, well-documented |
| ESP32-S3-DevKitC-1 | 5.0 | Yes | $8 | Many active BLE devices |
| Seeed XIAO ESP32-S3 | 5.0 | Yes | $7 | Active devices, compact |
External Antenna and Power
For top range in garages, basements, or open-plan areas, use an ESP32 board with a U.FL connector (such as the ESP32-WROOM-32U variant) and attach an external 2.4GHz antenna. A 5dBi antenna can boost BLE proxy range by 50-100% over the PCB antenna.
Power draw barely registers. Each proxy pulls 80-150mA at 5V (0.4-0.75W). Any USB phone charger will do. Three proxies running 24/7 cost roughly $1-2 per year in electricity.
Flashing ESPHome Bluetooth Proxy Firmware
ESPHome offers both a zero-code web installer and a custom YAML path for advanced users.
Web Installer (Easiest Method)
- Go to the ESPHome Bluetooth Proxy installer
- Plug the ESP32 into your computer via USB
- Click “Install” and pick the right board (ESP32, C3, or S3)
- Type in your Wi-Fi login when asked
- The browser flashes the firmware via Web Serial API (Chrome or Edge needed)
Total time: under two minutes. After flashing, the device shows up in the ESPHome Dashboard (if you run one). Adopt it from there to manage OTA updates going forward.

Custom ESPHome YAML (Advanced)
For more control, create a custom ESPHome device config. Here’s a minimal working example for an ESP32-C3:
substitutions:
  name: bt-proxy-livingroom

esphome:
  name: ${name}
  name_add_mac_suffix: true

esp32:
  board: esp32-c3-devkitm-1
  framework:
    type: esp-idf

wifi:
  ssid: !secret wifi_ssid
  password: !secret wifi_password

logger:

api:
  encryption:
    key: !secret api_encryption_key

ota:
  platform: esphome

esp32_ble_tracker:

bluetooth_proxy:
  active: true
Key points on the YAML config:
bluetooth_proxy: active: trueturns on link-based proxying for active devices, not just passive ad relays. In ESPHome 2026.3, active links are on by default.- The
esp32_ble_trackerpart is needed. The Bluetooth proxy depends on it. connection_slotsdefaults to 3. Each slot uses about 1KB of RAM, with a max of 9. The ESPHome docs say stay at or below 5 to dodge memory issues. Ethernet-based proxies can usually handle 4 slots.- Use the
esp-idfframework instead of Arduino. It speeds up Bluetooth on all ESP32 boards. - The
api: encryption: key:setting locks all traffic between the proxy and Home Assistant.
For static IP setup, add a manual_ip: block under wifi: if your DHCP server is flaky. The proxy must be on the same network as Home Assistant or at least routable to it.
After the first USB flash, all later updates happen over Wi-Fi via OTA. The ESPHome Dashboard pushes updates on its own, and each one takes 30-60 seconds per proxy.
Monitoring Proxy Health
Each proxy exposes a few useful sensors in Home Assistant:
- A Bluetooth proxy connections count showing active BLE connections held by that proxy
- Wi-Fi signal strength, which flags proxies with poor placement. If the signal is weak, the proxy will drop BLE advertisements.
- An uptime sensor that confirms the device hasn’t rebooted out of the blue
Home Assistant Integration and Device Discovery
Once a Bluetooth Proxy comes online, Home Assistant finds it on its own via the ESPHome API. No manual setup is needed. The proxy shows up under Settings > Devices & Services > ESPHome. HA then starts pulling in BLE advertisements from the proxy’s coverage area.
Discovering BLE Devices Through Proxies
Go to Settings > Devices & Services > Bluetooth. Home Assistant lists all found BLE devices, no matter which proxy spotted them. Devices that used to sit out of range of HA’s built-in Bluetooth but within range of a proxy will show up here for the first time. Click “Configure” to add them.
Supported device groups:
- Passive sensors like Xiaomi LYWSD03MMC, Govee H5075, Ruuvi tags, and BTHome devices are ad-only and work with any ESP32 proxy
- Active devices like Switchbot curtain motors, Switchbot locks, Oral-B toothbrushes, and BLE plant sensors need active proxy support (ESP32-C3 or S3)
- BLE trackers like iBeacon, phone BLE ads, and Tile work with passive proxying for presence detection
Active BLE connections also let you bridge devices like Bluetooth OBD-II car diagnostics adapters straight into Home Assistant.
Proxy Selection and Failover
When multiple proxies can see the same BLE device, Home Assistant picks the one with the strongest RSSI. This happens on its own. In the Bluetooth integration settings, you can see which adapter or proxy is handling each device, and override the assignment if needed.
If a proxy goes offline, HA falls back to the next-best proxy or the built-in adapter. This gives you redundancy with no manual failover setup.
Performance Limits
For passive BLE ads (temperature sensors, beacon broadcasts), a single ESP32 proxy can handle 20-40 devices at once before performance starts to drop. For active connections, the connection_slots setting sets the ceiling. Default is 3, with a suggested max of 5. Devices that connect briefly to swap data and then disconnect free up the slot for others. So you can use more active devices than you have slots. Devices that stay connected all the time (some locks, thermostats) hold a slot the whole time.
Troubleshooting Discovery Issues
If a known BLE device doesn’t show up:
- Check that the proxy’s Wi-Fi signal is strong. Weak Wi-Fi means missed ads forwarded to HA.
- Check HA logs for
bluetooth_proxyentries - Make sure the proxy has
active: trueinesp32_ble_trackerif the device needs active scanning to advertise - Place the proxy at least 3 meters from routers, switches, and other network gear. EMI hurts Bluetooth reception.
Room-Level Presence Detection with BLE Proxies
With a proxy in each room, you can go beyond “is someone home” and answer “which room are they in.” All from the phone they’re already carrying.
How BLE Presence Detection Works
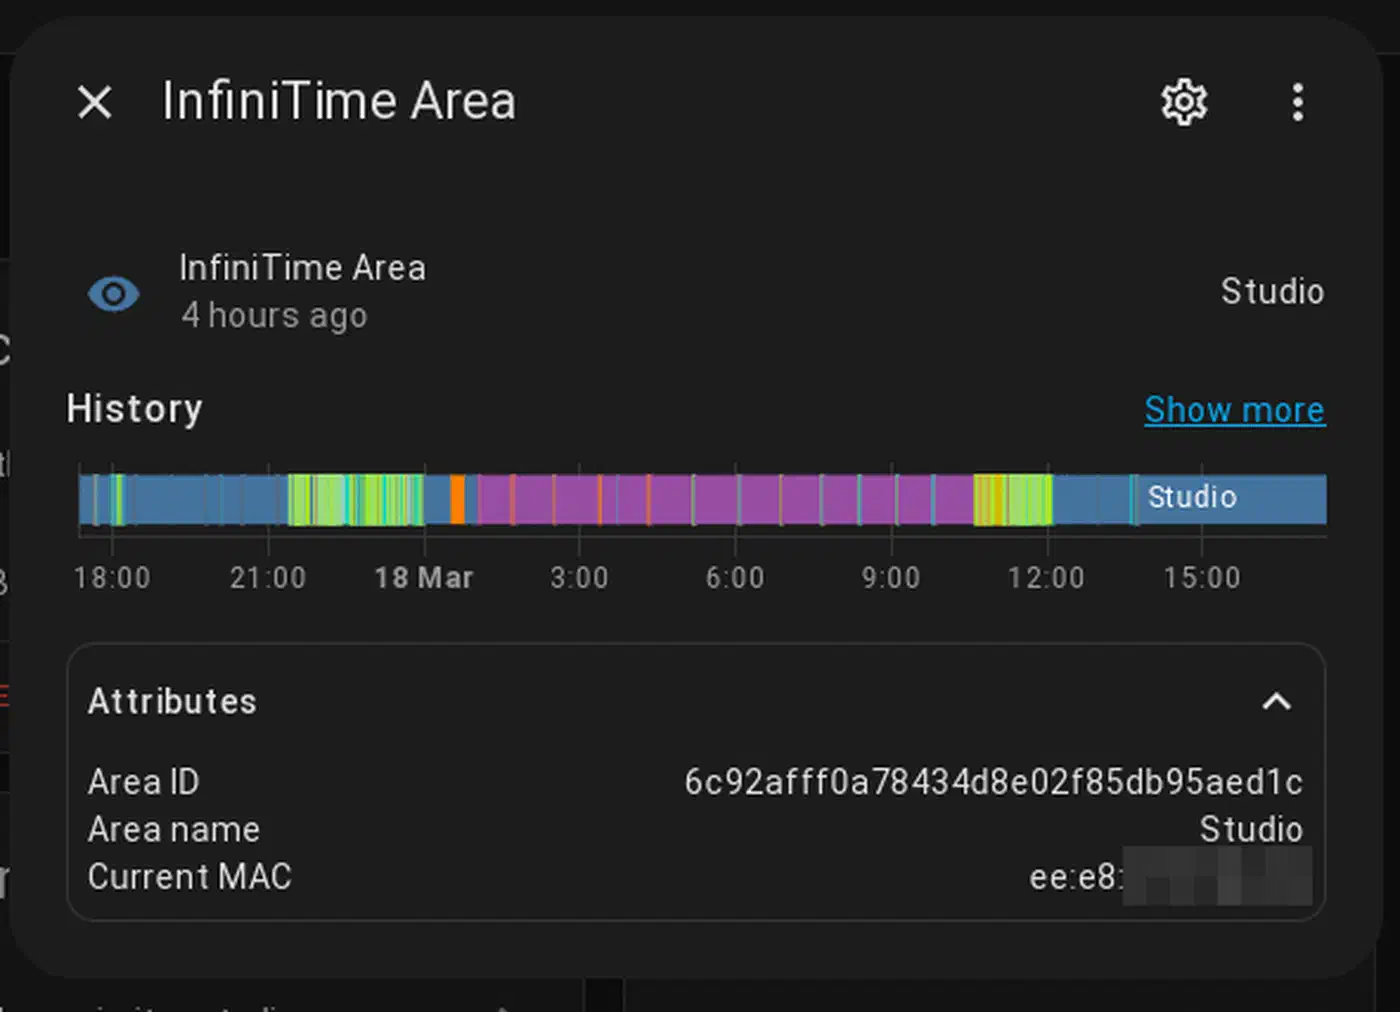
Phones (both iOS and Android) keep broadcasting BLE ads. By measuring the RSSI (signal strength) at each proxy, Home Assistant can guess which room a device is in. The proxy with the strongest RSSI is the closest. This isn’t sub-meter positioning, but it’s reliable enough to tell the living room apart from the bedroom.
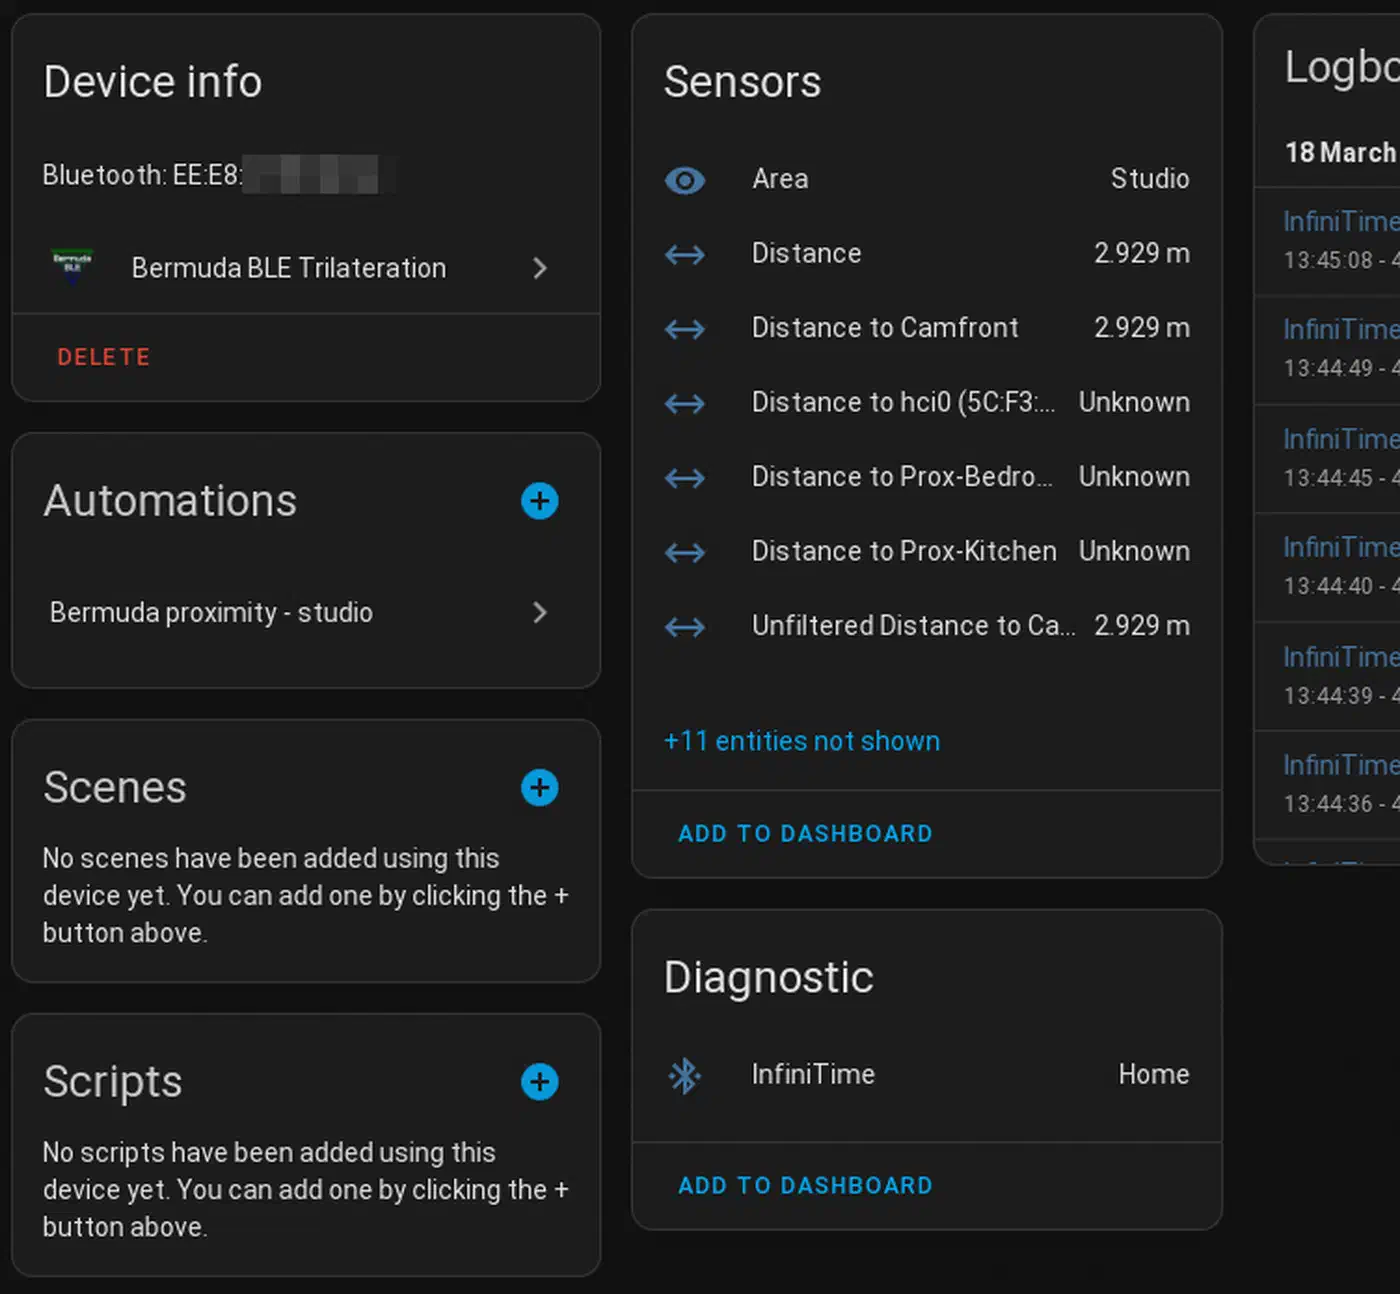
Bermuda Integration
The Bermuda
add-on (via HACS
) pulls BLE RSSI data from all your Bluetooth proxies and guesses device distance and area. After setup, it builds sensor.bermuda_<device>_area entries that show the best-guess room for each tracked device.
Setup steps:
- Install Bermuda via HACS and restart Home Assistant
- Add the integration under Settings > Devices & Services
- Add your tracked devices (phone BLE MAC address or iBeacon UUID)
- Map each proxy to a room/area in HA
- Bermuda picks which proxy has the strongest signal and tags the device to that room
The update interval is tunable. It defaults to one second. Bermuda supports custom RSSI thresholds and area mappings for fine-tuning.
Dealing with MAC Randomization
Android’s BLE MAC randomization rotates the address from time to time, which breaks tracking. Two workarounds:
- Use the Private BLE Device add-on (built into HA since 2023.10). It can resolve random addresses with an Identity Resolving Key (IRK).
- Use the Home Assistant Companion app’s BLE transmitter feature to send a stable ID
iOS devices with the HA Companion app can use iBeacon mode for stable ID.
Improving Accuracy
- Place proxies in the middle of each room, not against shared walls
- The ESP32’s PCB antenna is slightly directional. Point the board toward the room’s center.
- Tune RSSI thresholds by walking through rooms and noting signal levels
- Accuracy is room-level (which room), not precise positioning (where in the room)
Presence Detection Compared
| Method | Detects | Accuracy | Cost per Room | Requires |
|---|---|---|---|---|
| BLE Proxy + Bermuda | Which room a person is in | Room-level | $3-8 | Phone with BLE |
| mmWave Radar (e.g., LD2410B) | Presence, even stationary | Sub-room zones | $5-15 | Nothing (passive) |
| PIR Sensor | Motion only | Room-level | $3-10 | Nothing (passive) |
| BLE + mmWave combined | Both identity and presence | Best overall | $8-20 | Phone for identity |
BLE proxies tell you who is in a room (because they track a specific phone). mmWave and PIR sensors tell you that someone is in a room, but not who. Combining both gives you the full picture. mmWave confirms presence even when someone is sitting still, while BLE names the person.
Automation Examples
Once room-level presence works, automations get more targeted:
- Turn on room-specific lights when
sensor.bermuda_phone_areaflips to “Living Room” - Turn off lights five minutes after the last person leaves a room
- Adjust the thermostat based on which rooms are occupied
- Play music in whatever room you walk into via a multi-room audio system
- Arm a security zone when all tracked phones leave a set area
Practical Tips for Deployment
A few things worth knowing before you order a bag of ESP32-C3 boards.
Flash one proxy first, put it in the room with the worst BLE device, and check that it works before buying more. The web installer makes this a five-minute test.
Give each proxy a clear name in the ESPHome config (bt-proxy-kitchen, bt-proxy-bedroom) rather than the default. It helps when you’re poking around Bluetooth integration settings and trying to spot which proxy handles which device.
The proxy needs solid Wi-Fi to forward BLE data reliably. A proxy reporting -80 dBm Wi-Fi will drop packets. If Wi-Fi is weak in a given room, fix that first (mesh AP, access point) before dropping a BLE proxy there.
Place proxies at least 3 meters from routers, switches, and other network gear. Bluetooth and Wi-Fi share the 2.4GHz band, and nearby transmitters create interference that hurts BLE reception.
When writing custom YAML configs, always use framework: type: esp-idf instead of Arduino. The ESP-IDF Bluetooth stack is more stable and runs better for proxy workloads.
If you enjoy building with ESPHome, the same ESP32 hardware makes a great base for other sensors. A breathable-air sensor for the living room is a fine next project once your BLE proxies are up, and an outdoor build that drives sprinkler valves from an ESP32 puts the same chip to work in the garden. Push it further and the same board runs pH and ORP pool probes from a sealed box on the pump pad.
Keep your proxies updated. ESPHome’s Bluetooth proxy support keeps getting better. The 2026.3.0 release added BLE link parameter tuning. Proxies can now switch linked devices from fast intervals (~7.5ms) to slow ones (~1000ms) after the link forms. This cuts battery drain a lot on always-on devices like Yale and August locks.
The whole setup, from unboxing an ESP32-C3 to seeing distant BLE sensors report data in Home Assistant, takes about 15 minutes per proxy. For under $20 in hardware, you get reliable Bluetooth coverage across the whole house, auto failover between proxies, and the base for room-level presence detection. Not many smart home upgrades give that much return for that little spend.