DIY Smart Doorbell for $25: Skip Ring's $5/month subscription

Yes, you can build a full smart video doorbell for under $25. The parts list: an ESP32-CAM board, a PIR motion sensor, a push button, and ESPHome firmware. It streams MJPEG video to Home Assistant , pushes a snapshot to your phone on button press, and saves motion clips locally. No cloud. No video leaves your network. The build takes about two hours, and every future update flashes over Wi-Fi.
Ring, Google Nest, and Reolink all work fine out of the box. But they carry monthly fees that pile up fast. They also route your front door video through someone else’s servers. If you already run Home Assistant and can solder (or use a breadboard), a DIY doorbell gives you the same core features with full control over your data.
Why Build It Yourself Instead of Buying a Ring
Start with cost. Ring’s Basic plan now costs $4.99/month ($49.99/year) per camera. The Plus plan runs $9.99/month ($99.99/year) and covers all devices. Google Home Premium (formerly Nest Aware) starts at $10/month ($100/year) for the Standard tier, after a 25% price hike in late 2025. Over five years, a Ring Plus plan adds $500 on top of the $100-200 hardware cost. The DIY build here costs about $25 in parts. Zero monthly fees.
Then there’s privacy. Ring has shared video with police without owner consent in documented cases. All Ring and Nest video gets processed and stored on corporate cloud servers. With a DIY doorbell running ESPHome, video stays on your local network. Nothing leaves your home unless you set up remote access yourself.
That said, DIY has real limits. You won’t get 24/7 cloud recording, Ring’s “Neighbors” social feed, or pro monitoring. Video quality tops out at the ESP32-CAM’s OV2640 sensor: 2 megapixels, about 800x600 for streaming. There’s no HDR and no built-in IR night vision, though you can add external IR LEDs for a few dollars. Frame rate sits at 5-10 FPS depending on Wi-Fi signal. If you need a polished plug-and-play box, buy a Ring. If you want full local control at a fraction of the cost, keep reading.
| Feature | Ring Video Doorbell | DIY ESP32-CAM Doorbell |
|---|---|---|
| Hardware cost | $100-200 | ~$25 |
| Monthly subscription | $4.99-$9.99/mo | $0 |
| 5-year total cost | $400-700+ | ~$25 |
| Video storage | Cloud (Amazon servers) | Local (microSD/NAS) |
| Resolution | 1080p-1536p | 800x600 (2MP sensor) |
| Night vision | Built-in IR | Add-on IR LEDs (~$3) |
| Two-way audio | Yes | Possible with add-on modules (~$5) |
| Frame rate | 15-30 FPS | 5-10 FPS |
| Home Assistant integration | Via Ring integration | Native ESPHome API |
| Privacy | Cloud-dependent | Fully local |
Hardware: What You Need and How to Wire It
The parts list stays small on purpose. Every item is available from AliExpress, Amazon, or any electronics shop.
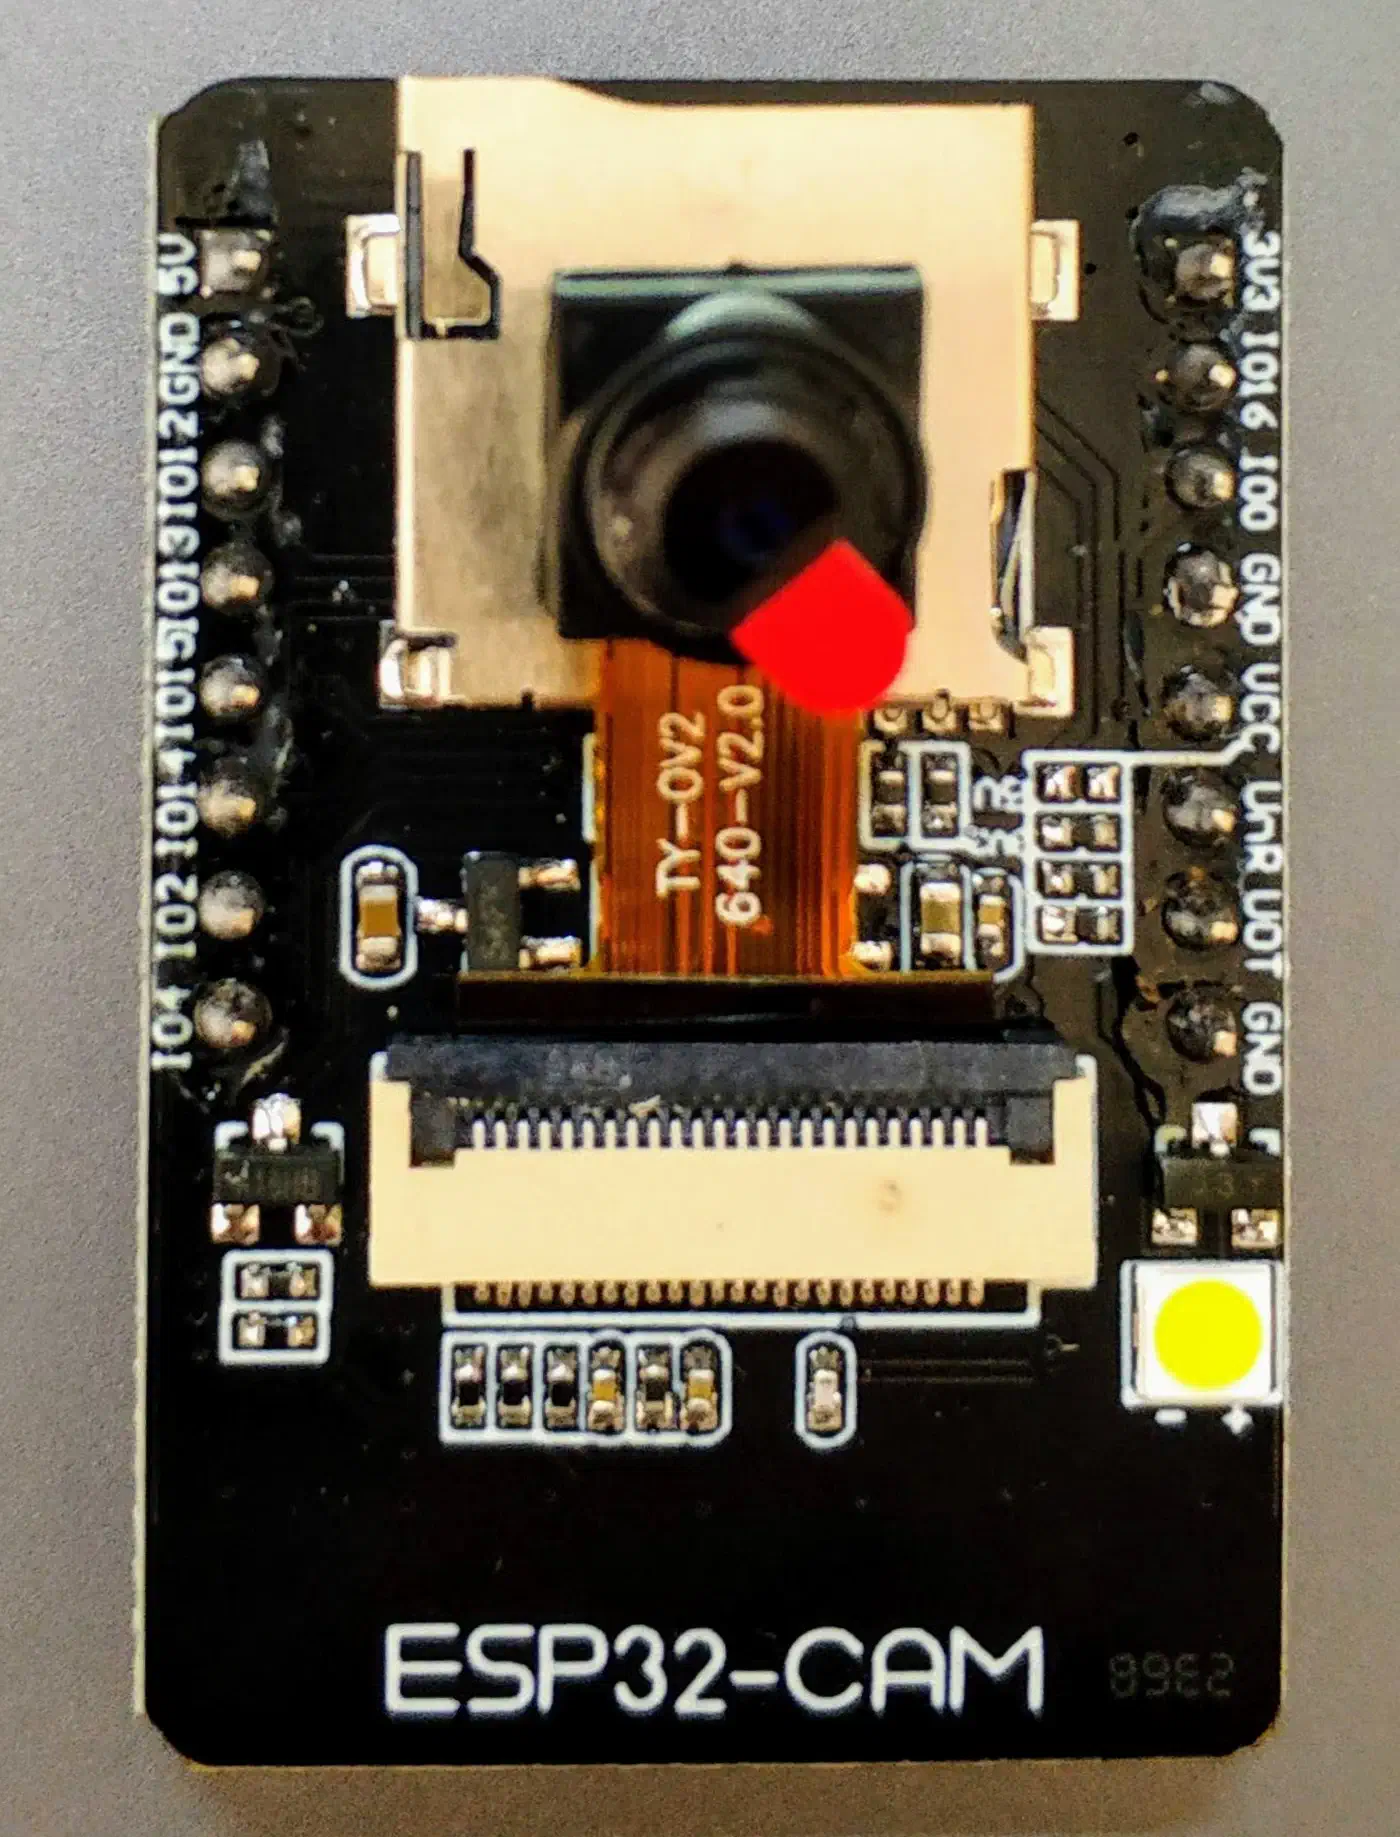
ESP32-CAM (AI-Thinker variant), about $8
This is the core of the build. It packs an ESP32-S module, an OV2640 camera sensor, a microSD slot, and an LED flash onto a board the size of a postage stamp. Power comes in through the 5V pin. The micro-USB port is only for programming through an FTDI adapter. The board runs on 3.3V logic with a built-in regulator.
FTDI USB-to-serial adapter, about $3
You need this for the first firmware flash only. Connect TX to RX, RX to TX, GND to GND, and 5V to 5V. Hold GPIO0 to GND at power-on to enter flash mode. After the first ESPHome flash, all later updates go over Wi-Fi (OTA), so you can stash the FTDI adapter in a drawer.
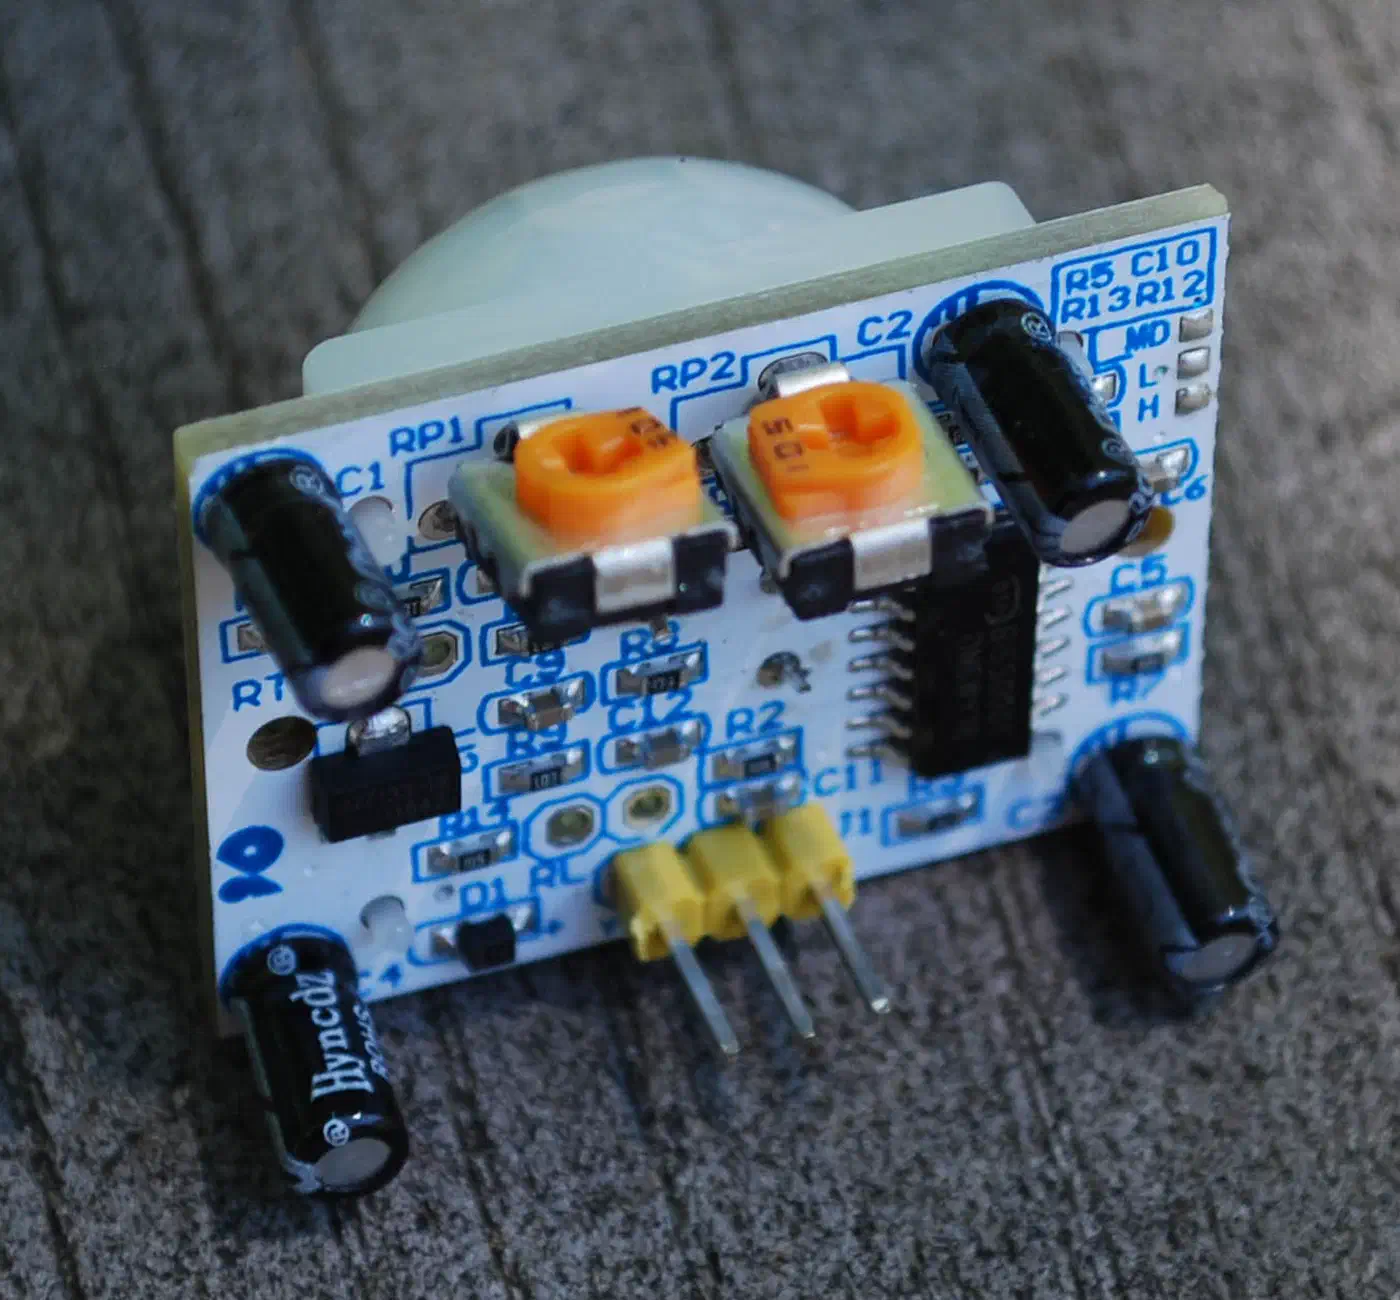
HC-SR501 PIR motion sensor, about $2
This module spots human-sized motion at up to 7 meters. Wire VCC to 5V, GND to GND, and OUT to GPIO13. The two onboard pots set sensitivity and hold time. Set the hold time to the minimum (around 3 seconds). Home Assistant automations handle the rest of the timing.
Momentary push button, about $0.50
Any normally-open momentary switch works. Wire one terminal to GPIO12 and the other to GND. ESPHome sets up the internal pull-up resistor in firmware. If you’re swapping in for a wired doorbell, you can reuse the low-voltage wiring (16-24VAC transformer with a rectifier down to 5VDC).
Power supply
The simple option is a 5V 2A USB adapter with a weatherproof cable run through the wall. To reuse an existing doorbell transformer (16-24VAC), add a buck converter (HLK-PM01 or LM2596) that steps down to 5VDC. The ESP32-CAM draws 200-300mA while streaming. It peaks at around 500mA during heavy Wi-Fi traffic. Don’t try battery power. The ESP32-CAM’s steady draw will drain any normal battery in hours.
Weatherproof enclosure, about $5
You can 3D-print an angled case. Search Thingiverse or Printables for “ESP32-CAM doorbell” and pick a free STL. The other route is a generic IP65 junction box with a hole drilled for the lens. Run silicone sealant around all cable entry points. The ESP32-CAM works from -20C to 70C but has no IP rating, so the enclosure does all the weather work.
Wiring Summary
Here is the pin mapping for the complete build:
| Component | Component Pin | ESP32-CAM Pin |
|---|---|---|
| PIR sensor (HC-SR501) | VCC | 5V |
| PIR sensor (HC-SR501) | GND | GND |
| PIR sensor (HC-SR501) | OUT | GPIO13 |
| Doorbell button | Terminal 1 | GPIO12 |
| Doorbell button | Terminal 2 | GND |
| FTDI adapter (programming only) | TX | U0R (RX) |
| FTDI adapter (programming only) | RX | U0T (TX) |
| FTDI adapter (programming only) | GND | GND |
| FTDI adapter (programming only) | 5V | 5V |
For the initial flash, connect GPIO0 to GND before powering on. Remove this connection after flashing.
ESPHome Firmware Configuration
ESPHome turns the ESP32-CAM into a Home Assistant-native device with camera streaming, button input, motion detection, and status reporting. The 2026.3.0 release adds a zero-copy API that cuts camera streaming latency by about 10%. The same framework powers a wide range of single-purpose builds. We used it recently to build a DIY mailbox notification sensor and a low-cost ESPHome air quality sensor . Both follow the same flashing flow described below.
Here is the complete YAML configuration. Create a new file called front-doorbell.yaml in your ESPHome directory:
esphome:
  name: front-doorbell
  friendly_name: "Front Doorbell"

esp32:
  board: esp32cam
  framework:
    type: arduino

wifi:
  ssid: !secret wifi_ssid
  password: !secret wifi_password
  # Improve Wi-Fi reliability for streaming
  power_save_mode: none

  ap:
    ssid: "Front-Doorbell-AP"
    password: !secret fallback_password

captive_portal:

logger:
  level: INFO
  # Reduce serial logging to avoid camera interference
  baud_rate: 0

api:
  encryption:
    key: !secret api_encryption_key

ota:
  - platform: esphome
    password: !secret ota_password

# Camera configuration for AI-Thinker ESP32-CAM
esp32_camera:
  name: "Front Door Camera"
  external_clock:
    pin: GPIO0
    frequency: 20MHz
  i2c_pins:
    sda: GPIO26
    scl: GPIO27
  data_pins:
    - GPIO5
    - GPIO18
    - GPIO19
    - GPIO21
    - GPIO36
    - GPIO39
    - GPIO34
    - GPIO35
  vsync_pin: GPIO25
  href_pin: GPIO23
  pixel_clock_pin: GPIO22
  resolution: 800x600
  jpeg_quality: 12
  max_framerate: 15fps
  idle_framerate: 0.2fps

# MJPEG stream server
esp32_camera_web_server:
  - port: 8080
    mode: stream
  - port: 8081
    mode: snapshot

# Doorbell button
binary_sensor:
  - platform: gpio
    pin:
      number: GPIO12
      mode: INPUT_PULLUP
      inverted: true
    name: "Doorbell Button"
    device_class: door
    filters:
      - delayed_on: 50ms

  # PIR motion sensor
  - platform: gpio
    pin: GPIO13
    name: "Front Door Motion"
    device_class: motion
    filters:
      - delayed_off: 30s

  # Connection status
  - platform: status
    name: "Doorbell Status"

# Camera flash / status LED
output:
  - platform: gpio
    pin: GPIO4
    id: led_output

light:
  - platform: binary
    output: led_output
    name: "Camera Flash"

# Diagnostic sensors
sensor:
  - platform: wifi_signal
    name: "Doorbell Wi-Fi Signal"
    update_interval: 60s
A few config knobs are worth a closer look:
power_save_mode: nonekeeps the Wi-Fi radio fully active. You need this for steady streaming, but power use goes up.baud_rate: 0turns off serial logging. The ESP32-CAM shares some pins between the serial port and the camera, so serial output can corrupt frames.idle_framerate: 0.2fpsdrops the rate to one frame every 5 seconds when nobody is watching the stream. This cuts power use and heat.jpeg_quality: 12strikes a good balance between image quality and frame size. Lower numbers mean better quality but bigger frames and slower streaming. The range is 10 (best) to 63 (worst).- The
delayed_off: 30sfilter on the PIR sensor holds the motion state “on” for 30 seconds after the last trigger. That stops rapid on/off cycling in automations.
Flashing the Firmware
Install ESPHome on your computer (via the Home Assistant add-on or pip install esphome), then flash the first firmware build:
esphome run front-doorbell.yamlPick the serial port wired to your FTDI adapter. After the first flash, unplug the FTDI adapter and power the board from its permanent supply. Later updates use the same esphome run front-doorbell.yaml command over Wi-Fi.
Home Assistant Automations
Once the ESP32-CAM shows up in Home Assistant, you can start building automations. The ESPHome integration auto-discovers it. The DIY route pays off here: you own every step of what happens when the button is pressed or motion is seen. If you’d rather skip ESPHome and handle the wire protocol yourself, the same hardware can post events via Home Assistant MQTT discovery for custom DIY devices .
Doorbell Press Notification with Snapshot
This automation grabs a camera snapshot on button press and pushes it to your phone through the Home Assistant companion app:
automation:
  - alias: "Doorbell pressed - notify with snapshot"
    trigger:
      - platform: state
        entity_id: binary_sensor.doorbell_button
        to: "on"
    action:
      - service: camera.snapshot
        target:
          entity_id: camera.front_door_camera
        data:
          filename: "/config/www/doorbell_snapshots/front_door_latest.jpg"
      - service: notify.mobile_app_your_phone
        data:
          title: "Doorbell"
          message: "Someone is at the front door"
          data:
            image: "/local/doorbell_snapshots/front_door_latest.jpg"
            actions:
              - action: "UNLOCK_DOOR"
                title: "Unlock Door"
              - action: "IGNORE"
                title: "Ignore"
Motion-Activated Recording
Record a 30-second clip whenever the PIR sensor sees motion, but only at night or when the alarm is armed:
  - alias: "Front door motion - record clip"
    trigger:
      - platform: state
        entity_id: binary_sensor.front_door_motion
        to: "on"
    condition:
      - condition: or
        conditions:
          - condition: sun
            after: sunset
            before: sunrise
          - condition: state
            entity_id: alarm_control_panel.home_alarm
            state: "armed_away"
    action:
      - service: camera.record
        target:
          entity_id: camera.front_door_camera
        data:
          filename: >
            /config/www/doorbell_recordings/front_door_{{ now().strftime('%Y%m%d_%H%M%S') }}.mp4
          duration: 30
Chime on Smart Speakers
Play a doorbell chime sound on all smart speakers when someone rings:
  - alias: "Doorbell pressed - play chime"
    trigger:
      - platform: state
        entity_id: binary_sensor.doorbell_button
        to: "on"
    action:
      - service: media_player.play_media
        target:
          entity_id: media_player.living_room_speaker
        data:
          media_content_id: "/local/sounds/doorbell_chime.mp3"
          media_content_type: "music"
Actionable Notification Response
Handle the “Unlock Door” button tap from the notification:
  - alias: "Doorbell - unlock door from notification"
    trigger:
      - platform: event
        event_type: mobile_app_notification_action
        event_data:
          action: "UNLOCK_DOOR"
    action:
      - service: lock.unlock
        target:
          entity_id: lock.front_door_lock
That gives you the full loop: someone rings, you get a photo on your phone, you tap “Unlock Door,” and the smart lock opens. You can stretch this pattern to turn on porch lights, call out visitors over TTS on smart speakers, or fire any other Home Assistant automation.
Frigate NVR for AI Object Detection
To move past basic PIR motion detection, try Frigate . It’s an open-source NVR that runs AI object detection on your own hardware. It can tell people, packages, cars, and animals apart. That drops false alerts from passing cars or neighborhood cats to near zero.
There’s one catch: Frigate expects an RTSP or RTMP stream, not MJPEG. The ESP32-CAM only puts out MJPEG. The fix is to use a re-streaming tool like go2rtc , which ships with Frigate, to convert MJPEG to RTSP. Add the ESP32-CAM as a source in your Frigate config:
cameras:
  front_doorbell:
    ffmpeg:
      inputs:
        - path: http://front-doorbell.local:8080
          roles:
            - detect
    detect:
      width: 800
      height: 600
      fps: 5
Frigate runs best with a Google Coral TPU for hardware-accelerated inference, but CPU detection works on any modern x86 box. The stack of ESP32-CAM, Frigate, and Home Assistant gives you person detection, object tracking, and event-based recording that rivals commercial systems costing hundreds more. For a full walkthrough of that stack, see our guide to local AI security cameras with Frigate and a Coral TPU .
Outdoor Installation and Long-Term Reliability
A doorbell lives outside. It faces weather, temperature swings, and round-the-clock operation. The install is more important than the firmware config for long-term uptime.
Mount the camera at about 120cm (4 feet) high, tilted a touch down to catch faces. The OV2640’s 66-degree field of view covers a normal doorstep. Avoid direct sun on the lens. It causes washed-out images. A recessed spot under an eave or porch overhang works best.
The ESP32-CAM’s built-in PCB antenna is weak. If the doorbell is more than 5 meters from the nearest access point through walls, you’ll see dropped frames and drop-outs. Three fixes: add an external antenna (IPEX to SMA pigtail, about $2), place a Wi-Fi mesh node near the door, or upgrade to a PoE-powered ESP32 board with Ethernet. Watch the Wi-Fi Signal sensor in Home Assistant. Aim for RSSI better than -65 dBm.
For night vision, the built-in LED flash on GPIO4 is too harsh to leave on. Use 850nm IR LEDs instead. A ring of 6 costs about $3. Wire them to the 5V rail through a 2N2222 transistor switched by a GPIO pin. The OV2640 sensor has no IR cut filter, so it sees infrared light by default. Flip to night mode via an automation tied to sunset or an ambient light sensor.
Format a 32GB microSD card as FAT32 for on-board storage. ESPHome doesn’t rotate files for you. So set up a Home Assistant automation that runs a shell_command once a day to delete clips older than 7 days. You can also store recordings on the HA host or a NAS share via the camera.record service. That gives you tighter control over retention.
The ESP32-CAM is an $8 part, so keep a spare flashed and ready. OTA firmware updates go over Wi-Fi. No physical access needed. In humid climates, the OV2640 lens can fog up. Add a small silica gel packet inside the enclosure and drill one downward-facing vent hole to let moisture escape without letting rain in.
Upgrade Path: ESP32-S3 and Better Cameras
The AI-Thinker ESP32-CAM with the OV2640 sensor is the cheapest and best-documented option, but it isn’t the only one. For better image quality, the ESP32-S3 platform with an OV5640 sensor gives you 5 megapixels, autofocus, and USB-C for easier flashing. Boards like the Freenove ESP32-S3-WROOM CAM and the XIAO ESP32S3 Sense run ESPHome and cost $15-20. Which one fits depends on radio and power budget as much as the camera, and our ESP32 board breakdown tests each variant on deep-sleep current.
| Specification | ESP32-CAM (OV2640) | ESP32-S3 (OV5640) |
|---|---|---|
| Resolution | 2MP (1600x1200 max) | 5MP (2592x1944 max) |
| Streaming resolution | 800x600 practical | 1280x720 practical |
| Autofocus | No | Yes |
| USB programming | FTDI adapter required | USB-C native |
| Price | ~$8 | ~$15-20 |
| ESPHome support | Mature, stable | Supported, improving |
| Heat during streaming | Moderate | Higher (OV5640 runs hot) |
| Best use | Video streaming | Still images and higher-res video |
The OV5640 puts out sharper images, mainly for the snapshots used in notifications. But for live video at doorbell range, the OV2640 is fast, stable, and well-tested. The ESP32-CAM is still the best starting point for a first build. You can swap in an ESP32-S3 board later. The ESPHome config changes are small, and all your Home Assistant automations stay the same.
For $20-25 in parts and a couple hours of work, you get a doorbell that streams live video to your dashboard, sends photos to your phone on a press, records motion clips locally, and hooks into any automation you can think of. No subscription, no cloud, no middleman. The resolution and frame rate won’t match a Ring, and you’ll need to solder a few wires. If that doesn’t bother you, this build will serve you well for years.