Smart Pet Feeder for $20: Ditch $150 commercial feeders

Yes, you can build a smart pet feeder for under $25. It uses an ESP32, a continuous rotation servo, and a 3D-printed auger, driven by ESPHome and Home Assistant . You get scheduled meals, set portion sizes, a “feed now” button on your phone, and a full feeding log. Commercial feeders like PetSafe ($100 to $150) and PETLIBRO ($65 to $160) charge a premium for the same features. This guide covers the hardware, wiring, firmware, and safety steps that make the build reliable.
Hardware Design - Servo Types, Food Hopper, and Dispensing Mechanism
The build side of a pet feeder decides whether food drops cleanly or jams on the second day. Two designs are common. The one you pick depends on how much portion control you need.
The first option is a trap-door with a standard servo like the SG90 or MG996R. The servo turns a flap that opens a chute, and gravity drops food through. The design is simple, but it only dispenses one fixed portion per trigger. You get a binary outcome: open or closed. Portion size shifts with kibble size and how the food settles in the hopper.
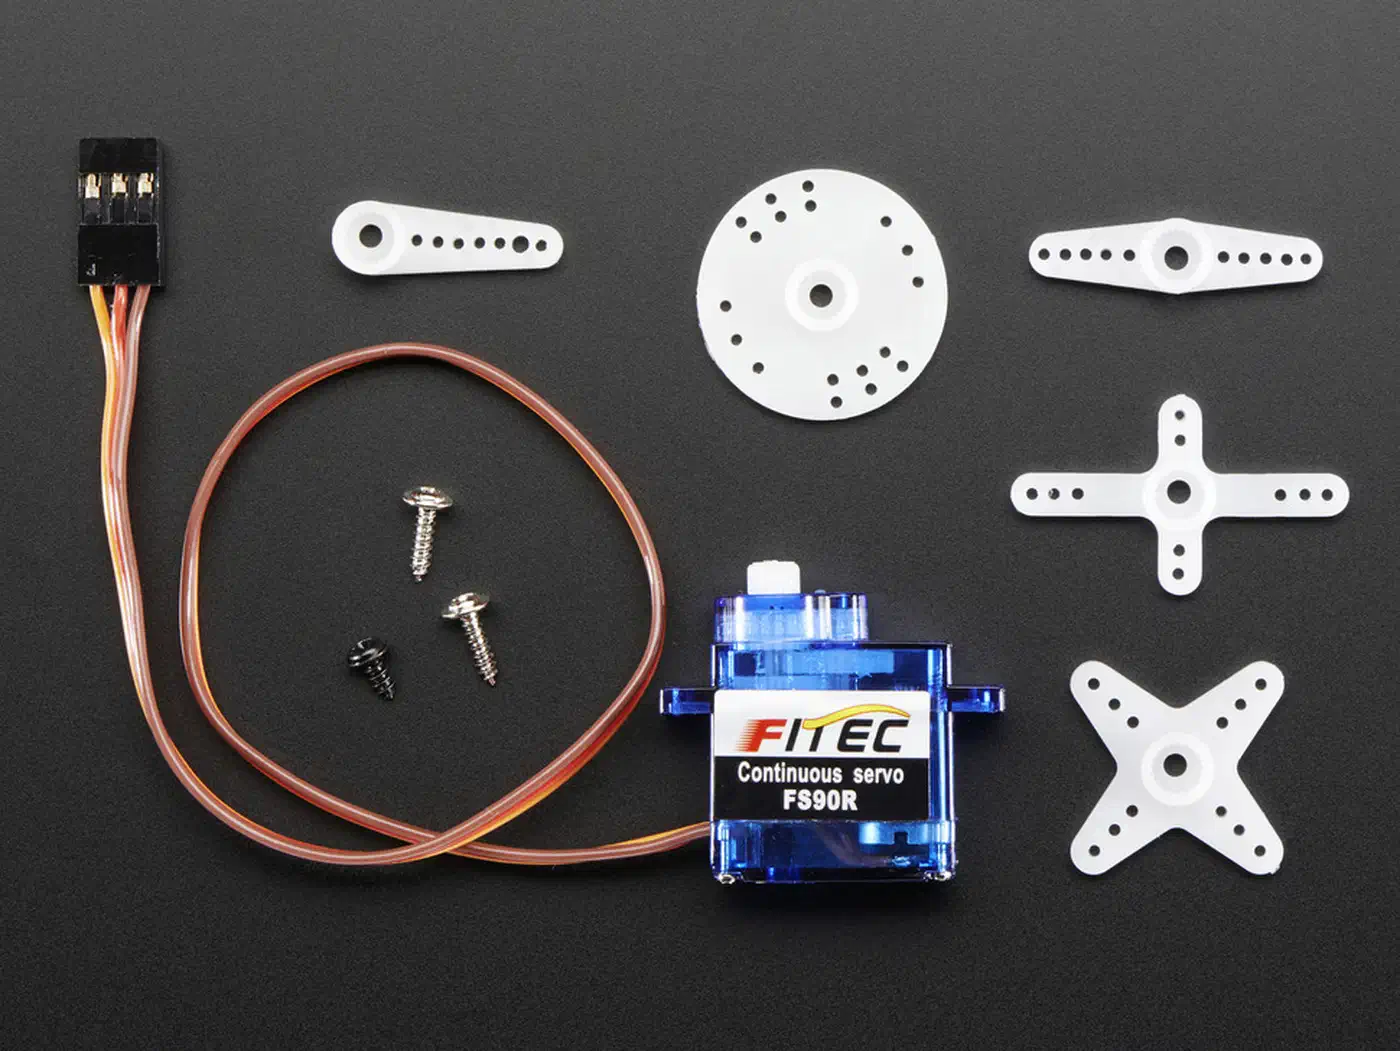
The second option, used in this guide, is an auger screw driven by a continuous rotation servo. A servo like the FS90R spins an Archimedes screw inside a tube. Food moves in step with how long the auger turns. Run it for 2 seconds and you get roughly X grams. Run it for 4 seconds and you get 2X. That clean link between time and food makes calibration easy.
For the auger itself, you can 3D-print a helical screw that fits inside a 25mm PVC pipe. Proven designs exist on Printables and Thingiverse . Search for “pet feeder auger” to find STL files ready to slice. The auger pitch and tube width together set the flow rate. A tighter pitch moves less food per turn, but it gives finer control.
The food hopper can be a flipped 2-liter bottle, a large funnel, or a 3D-printed bin set above the auger inlet. Size it for 2 to 3 days of food: about 500ml for a cat, or 2 liters for a medium dog. The path from hopper to tube must have no ledges or sharp angles. Kibble bridges on those spots and jams.
One key limit: this design works with dry kibble in the 5 to 12mm range. Wet food, soft treats, or odd shapes need a whole different mechanism. They are outside the scope of this build.
Here is the full bill of materials:
| Component | Approximate Cost |
|---|---|
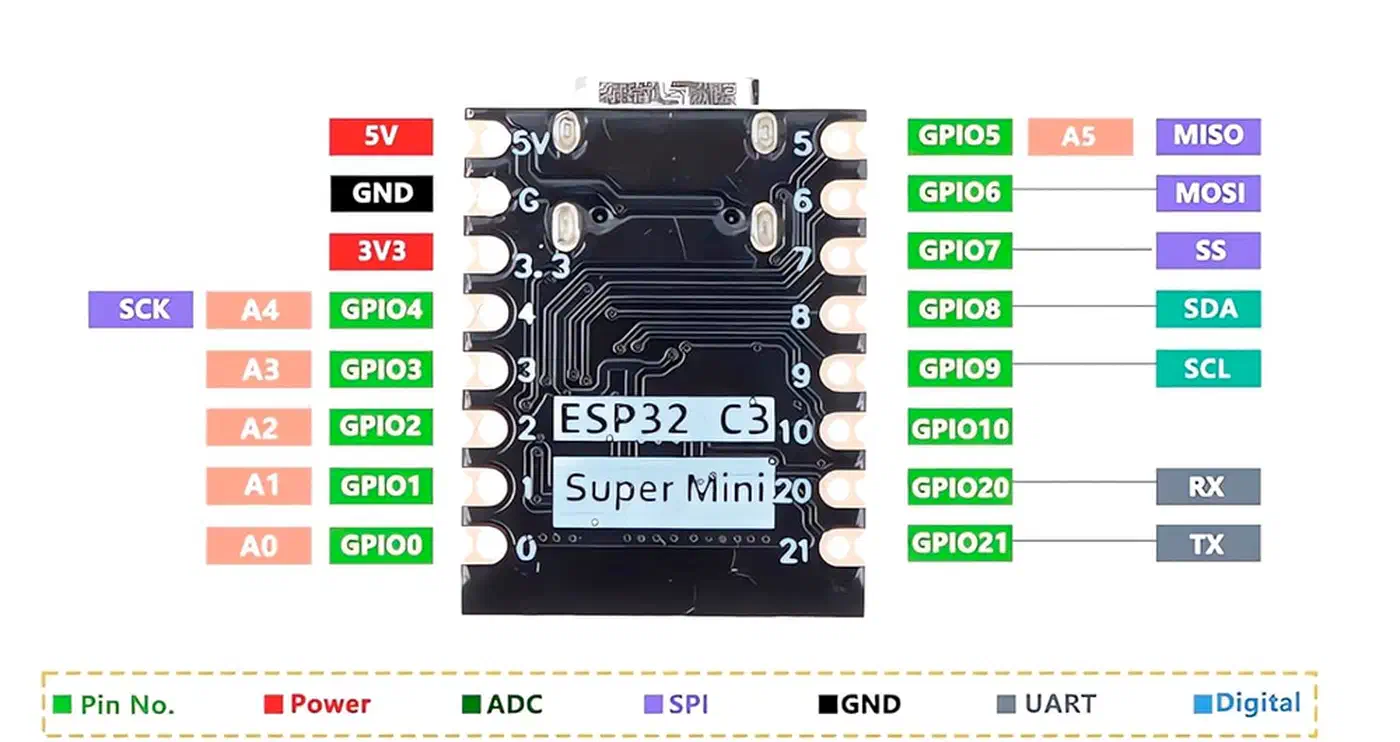
| ESP32-C3 Super Mini | $3 |
| FS90R continuous rotation servo | $5 |
| PVC pipe 25mm x 150mm | $2 |
| 3D-printed auger and hopper (PETG filament) | $2 |
| Jumper wires + USB-C power supply | $5 |
| 100uF capacitor | $0.50 |
| Food-safe container for hopper | $3 |
| Total | ~$20.50 |
The ESP32-C3 Super Mini is a strong board choice. It measures just 22.5 x 18mm. It runs a RISC-V core at 160MHz, supports Wi-Fi and Bluetooth 5.0 LE, and has 11 programmable GPIOs. That is more than enough for a servo signal, I2C sensors, and future add-ons.
How This Compares to Commercial Feeders
| Feature | DIY ESPHome Feeder | PetSafe Smart Feed | PETLIBRO Granary |
|---|---|---|---|
| Price | ~$20 | ~$150 | ~$140 |
| Portion control | Time-based (calibrated) | Up to 12 meals/day | Up to 6 meals/day |
| App control | Home Assistant (local) | PetSafe app (cloud) | PETLIBRO app (cloud) |
| Camera | Optional (add ESP32-CAM ) | No | Yes |
| Works offline | Yes (local schedule) | Limited | Limited |
| Custom automations | Unlimited via HA | None | None |
| Food capacity | Custom hopper size | 24 cups | 5L |
The DIY route wins on cost and flex. Commercial feeders win on polish and support. If you already run Home Assistant, the DIY path makes the most sense.
Wiring and Assembly
Proper wiring blocks the most common failure in DIY pet feeders. That failure is the ESP32 browning out when the servo pulls too much current from the wrong rail.
The FS90R servo has three wires:
- Brown (GND): connects to the ESP32 GND pin
- Red (VCC): connects to a separate 5V power source, NOT the ESP32’s 3.3V pin
- Orange (signal): connects to GPIO5 on the ESP32
The key detail here is power isolation. Servos can pull 500mA or more in use. The ESP32-C3 Super Mini’s onboard regulator cannot supply that. Power the servo straight from the USB supply’s 5V rail. Share only GND between the servo and the ESP32. Add a 100uF cap across the servo’s VCC and GND leads to soak up spikes when the motor starts and stops.
For assembly:
- Insert the 3D-printed auger into the PVC tube with 1 to 2mm clearance on each side
- Attach the servo horn to the auger shaft with a set screw or hot glue
- Mount the servo at one end of the tube with the auger running the full length
- Cut a slot in the bottom of the PVC tube near the drop end. Food falls through this slot into the bowl
- Mount the hopper above the auger inlet (the end opposite the servo) with a gravity feed
The slot width at the drop end sets the max flow rate. Start with a 15mm wide slot. Tune it after testing with your kibble.
For jam detection, add an INA219 current sensor breakout ($3) on the servo’s power line. It tracks draw in real time. If current goes above 400mA while dispensing, the auger is jammed. Stop the servo to save the motor. This step is optional, but worth it if the feeder runs alone for long stretches.
ESPHome Firmware for Servo Control and Scheduling
ESPHome ships native servo support through its servo component . The config below sets up a continuous rotation servo with portion control, local schedules, and a manual feed button.
Here is the complete ESPHome YAML configuration:
esphome:
  name: pet-feeder
  friendly_name: Pet Feeder

esp32:
  board: esp32-c3-devkitm-1
  framework:
    type: esp-idf

wifi:
  ssid: !secret wifi_ssid
  password: !secret wifi_password

api:
  encryption:
    key: !secret api_key

ota:
  - platform: esphome
    password: !secret ota_password

logger:

# Time sync for local scheduling
time:
  - platform: sntp
    id: sntp_time
    timezone: "America/New_York"
    on_time:
      # Morning feeding
      - hours: 7
        minutes: 0
        seconds: 0
        then:
          - script.execute: dispense_food
      # Evening feeding
      - hours: 18
        minutes: 0
        seconds: 0
        then:
          - script.execute: dispense_food

# PWM output for servo
output:
  - platform: ledc
    pin: GPIO5
    id: servo_output
    frequency: 50 Hz

# Servo component
servo:
  - id: feeder_servo
    output: servo_output
    min_level: 3%
    idle_level: 7.5%
    max_level: 12%

# Adjustable portion duration (seconds)
number:
  - platform: template
    name: "Portion Duration"
    id: portion_duration
    optimistic: true
    min_value: 1
    max_value: 10
    step: 0.5
    initial_value: 3
    restore_value: true
    unit_of_measurement: "s"

# Feed now button
button:
  - platform: template
    name: "Feed Now"
    on_press:
      - script.execute: dispense_food

# Dispensing script
script:
  - id: dispense_food
    mode: single
    then:
      - servo.write:
          id: feeder_servo
          level: 100%
      - delay: !lambda "return id(portion_duration).state * 1000;"
      - servo.write:
          id: feeder_servo
          level: 0%
      - homeassistant.event:
          event: esphome.pet_feeder_dispensed
          data:
            duration: !lambda "return to_string(id(portion_duration).state);"
A few things to note about this configuration.
Continuous rotation servo control works in a different way than standard servos. In ESPHome’s servo block, level: 0% maps to the idle duty cycle (7.5%), which stops the motor. level: 100% maps to the max duty cycle (12%), which runs it full speed forward. level: -100% would run it in reverse, which helps clear jams.
The dispense_food script uses mode: single to block overlap. If the button is pressed while a dispense is already running, the second press is ignored.
The portion_duration number entity shows up as a slider in Home Assistant. You can set it from 1 to 10 seconds in 0.5-second steps. The restore_value: true flag keeps the last setting across reboots.
The on_time block runs the dispense script at 7:00 AM and 6:00 PM, even when Home Assistant is offline. The SNTP time sync resets accurate time after any power loss.
Calibrating Portions
Before relying on the feeder, calibrate it:
- Set
portion_durationto 1 second - Place an empty bowl on a kitchen scale
- Press “Feed Now” and record the weight dispensed
- Repeat 5 times and average the result
- Do the same for 2, 3, 4, and 5 seconds
This gives you a grams-per-second rate for your auger and kibble mix. A typical result is 8 to 12g per second for standard cat kibble with a 25mm auger. Record this number. You will need it for Home Assistant automations that turn gram-based portions into servo time.
Home Assistant Integration - Scheduling, Portions, and Tracking
Once ESPHome is flashed and joined to Home Assistant, several entities show up on their own: button.pet_feeder_feed_now, number.pet_feeder_portion_duration, and any sensors you set. The fun part is what you can build on top with Home Assistant automations.
Flexible Scheduling
Create input_datetime helpers for adjustable feeding times:
input_datetime:
  feeding_time_morning:
    name: Morning Feeding Time
    has_date: false
    has_time: true
  feeding_time_evening:
    name: Evening Feeding Time
    has_date: false
    has_time: true
Then build automations that fire at these times and call the feed button. Anyone in the home can shift feeding times from the dashboard. No YAML edits needed.
Per-Meal Portion Sizes
Create input_number helpers for morning and evening portion sizes in grams:
input_number:
  portion_morning:
    name: Morning Portion
    min: 10
    max: 100
    step: 5
    unit_of_measurement: "g"
  portion_evening:
    name: Evening Portion
    min: 10
    max: 100
    step: 5
    unit_of_measurement: "g"
The automation turns grams into servo time using your calibration factor. If your auger drops 10g per second, a 30g portion means setting number.pet_feeder_portion_duration to 3 seconds before pressing the feed button.
Feeding History and Tracking
Use a counter helper that increments with each feeding event and a utility_meter that resets daily:
counter:
  daily_feedings:
    name: Daily Feedings
    initial: 0
    step: 1

utility_meter:
  weekly_feedings:
    source: counter.daily_feedings
    cycle: weekly
A history_stats sensor can track total feedings over longer windows. That gives you a clear view of your pet’s feeding pattern over weeks or months.
Vacation Mode
For times when you are away, create an input_boolean.vacation_mode that adds a midday feeding and bumps portion sizes by 25%. This makes up for the extra food (treats, table scraps) that lands when people are home.
Dashboard Card
Build a Lovelace dashboard card that shows:
- Pet name and photo
- Next scheduled feeding (template sensor with countdown)
- Today’s feeding count
- Portion size slider
- A large “Feed Now” button
- Current food level (if using a hopper sensor)
This gives the whole household a quick view of the feeder’s status. They do not need to know the automations behind it.
Safety Features and Reliability
A pet feeder is one of the few DIY home projects where failure has real cost: your pet goes hungry. Treat it like any safety-critical system and build in backup.
Feeding Confirmation and Alerts
After each dispense, log it with a timestamp and portion size. If no feeding is logged within 30 minutes of a scheduled time, send a critical alert to your phone. This catches servo failures, jams, power outages, and Wi-Fi drops.
Double-Feed Prevention
Add a cooldown with an input_boolean.recently_fed that turns on after each feeding and auto-resets after 30 minutes. All automations check this boolean before they dispense. That blocks double portions from stacked automations, button presses during a scheduled feed, or a Home Assistant restart replaying queued events.
Jam Recovery
If you installed the INA219 current sensor, implement a two-stage recovery:
- If current exceeds 400mA for more than 2 seconds, stop the servo
- Reverse direction briefly (0.5 seconds) to clear the jam
- Retry once at normal speed
- If the second attempt also jams, stop permanently and send an alert
This clears most kibble jams without a human in the loop. It also avoids the damage that comes from a servo stalling against a hard block for minutes.
Power Loss Resilience
The ESPHome local schedule (the on_time block) keeps feedings going even if Wi-Fi drops or Home Assistant crashes. The ESP32’s SNTP time sync resets the clock on reboot. The restore_value flag on the portion duration setting means the feeder remembers its last config.
For longer outages, add a small UPS or a USB power bank with pass-through charging. The ESP32-C3 pulls only about 80mA in normal use. Even a small 2000mAh bank gives hours of backup.
Food Level Monitoring
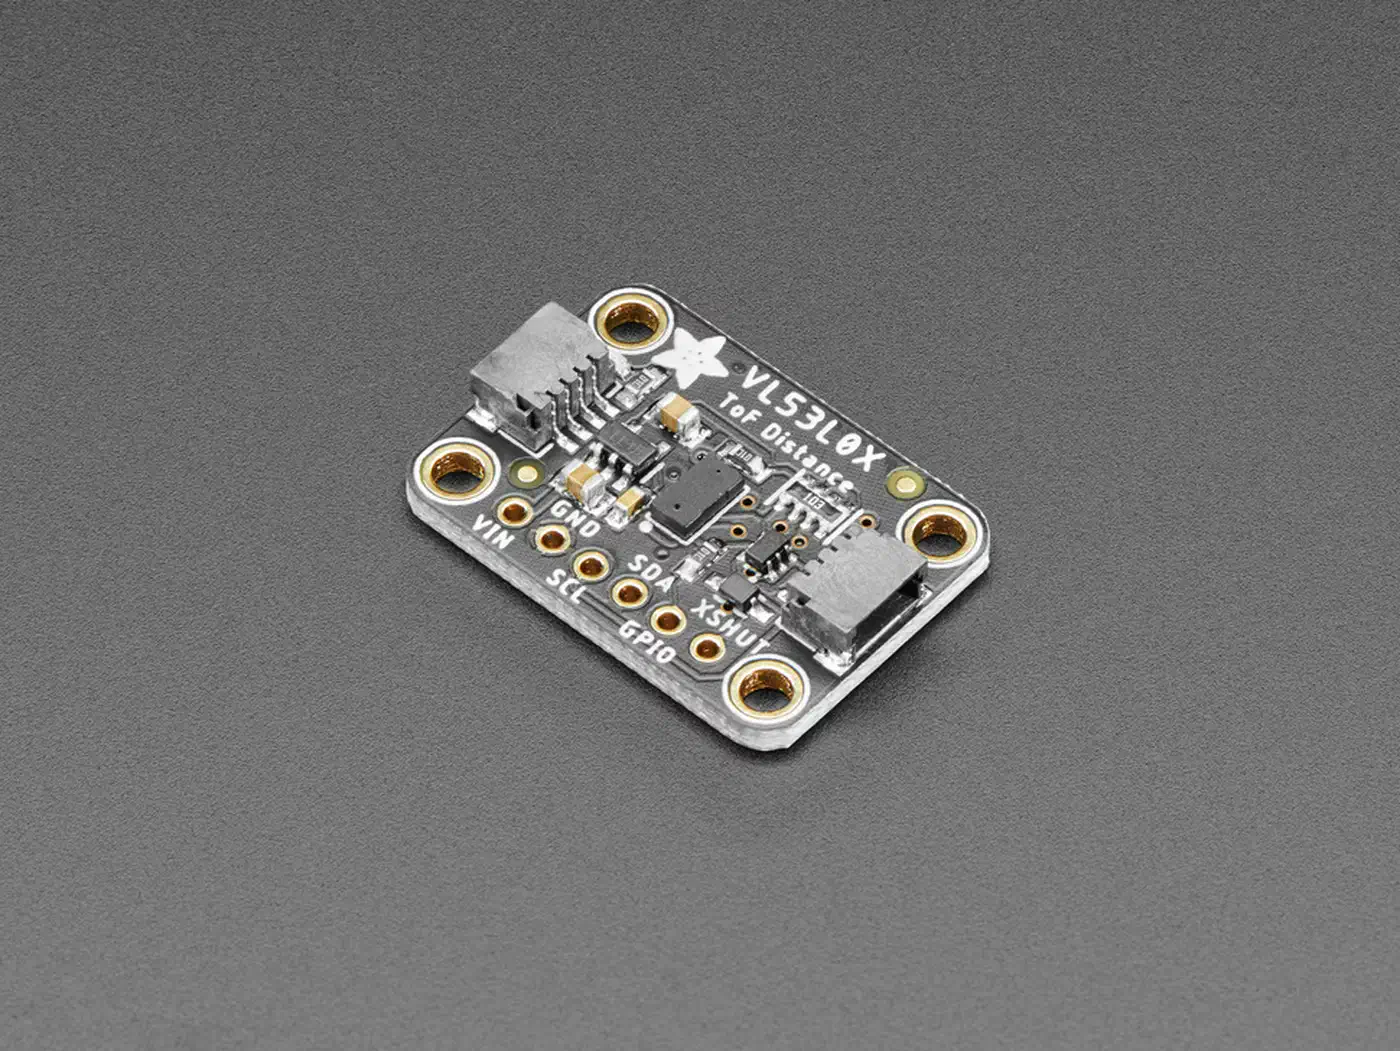
Mount a VL53L0X time-of-flight sensor at the top of the hopper, pointing down. The same sensor shows up in other low-cost ESPHome projects. It is also the main detection option in this DIY mailbox notification sensor build , where it spots mail from inches away. The laser sensor reads distance to the food surface with millimeter precision over a 2-meter range. Score remaining food as a percent of hopper depth. Fire an alert when it drops below 20%.
sensor:
  - platform: vl53l0x
    name: "Food Level"
    address: 0x29
    update_interval: 60s
    unit_of_measurement: "mm"
Map the raw distance reading to a percent in Home Assistant with a template sensor. The min distance (hopper full) maps to 100%. The max distance (hopper empty) maps to 0%.
Hygiene
Design all food-contact parts (auger, tube, hopper) to be removable and washable. Use PETG filament for 3D-printed parts, not PLA. PETG handles moisture better and has safer food-contact traits. Set a weekly cleaning reminder in Home Assistant as a recurring alert so it does not slip.
Going Further
Once the basic feeder runs well, there are a few upgrades worth a look.
The biggest win is weight-based dispensing. Instead of timing portions, place a load cell under the bowl. Wire it to an HX711 amplifier module ($2). The dispense script then runs the auger until the scale hits the target weight, then stops. This kills calibration drift from kibble density shifts or auger wear over time.
If you have many pets, you can wire extra servos to different GPIO pins on the same ESP32. Each servo drives its own auger and hopper, with separate schedules and portion sizes in Home Assistant. The ESP32-C3 Super Mini has enough GPIOs for at least two stand-alone feeders. The same pattern of one ESP32 driving several sensors scales to other pet-care setups, like a DIY plant monitoring system with soil sensors that can share the same hopper-level dashboard. The same time-based dispensing logic also runs outdoor projects: a timed garden watering controller opens each zone for a calibrated number of seconds per cycle.
Adding a water level sensor (a simple float switch, or another VL53L0X pointed at the water bowl) rounds out the remote pet care setup.
For around $20 and an afternoon of work, you end up with a feeder that does what the $150 commercial options do. It runs on your local network. You can shape it with any Home Assistant automation you want.