Fix Zigbee Drops: Routers, Channels, and Placement

The Short Answer
When Zigbee devices keep dropping, the culprit is almost always the mesh topology, not the sensors. Add mains-powered routers every 10 to 15 meters. Move the coordinator away from the WiFi router and any USB 3.0 port. Switch to Zigbee channel 15, 20, or 25 to dodge WiFi. Use the network map in Zigbee2MQTT or ZHA to spot weak links. Roughly 90% of complaints trace back to three things: too few routers, a coordinator in an RF hot zone, and a Zigbee channel that clashes with WiFi.
The rest of this guide walks through how the mesh routes packets, how to read the map, and how to build a network that heals itself with little babysitting.
How a Zigbee Mesh Actually Routes Packets
Zigbee is not a star topology like WiFi. Every message can hop through several devices before reaching the hub. Knowing those hops is the key to fixing drops.
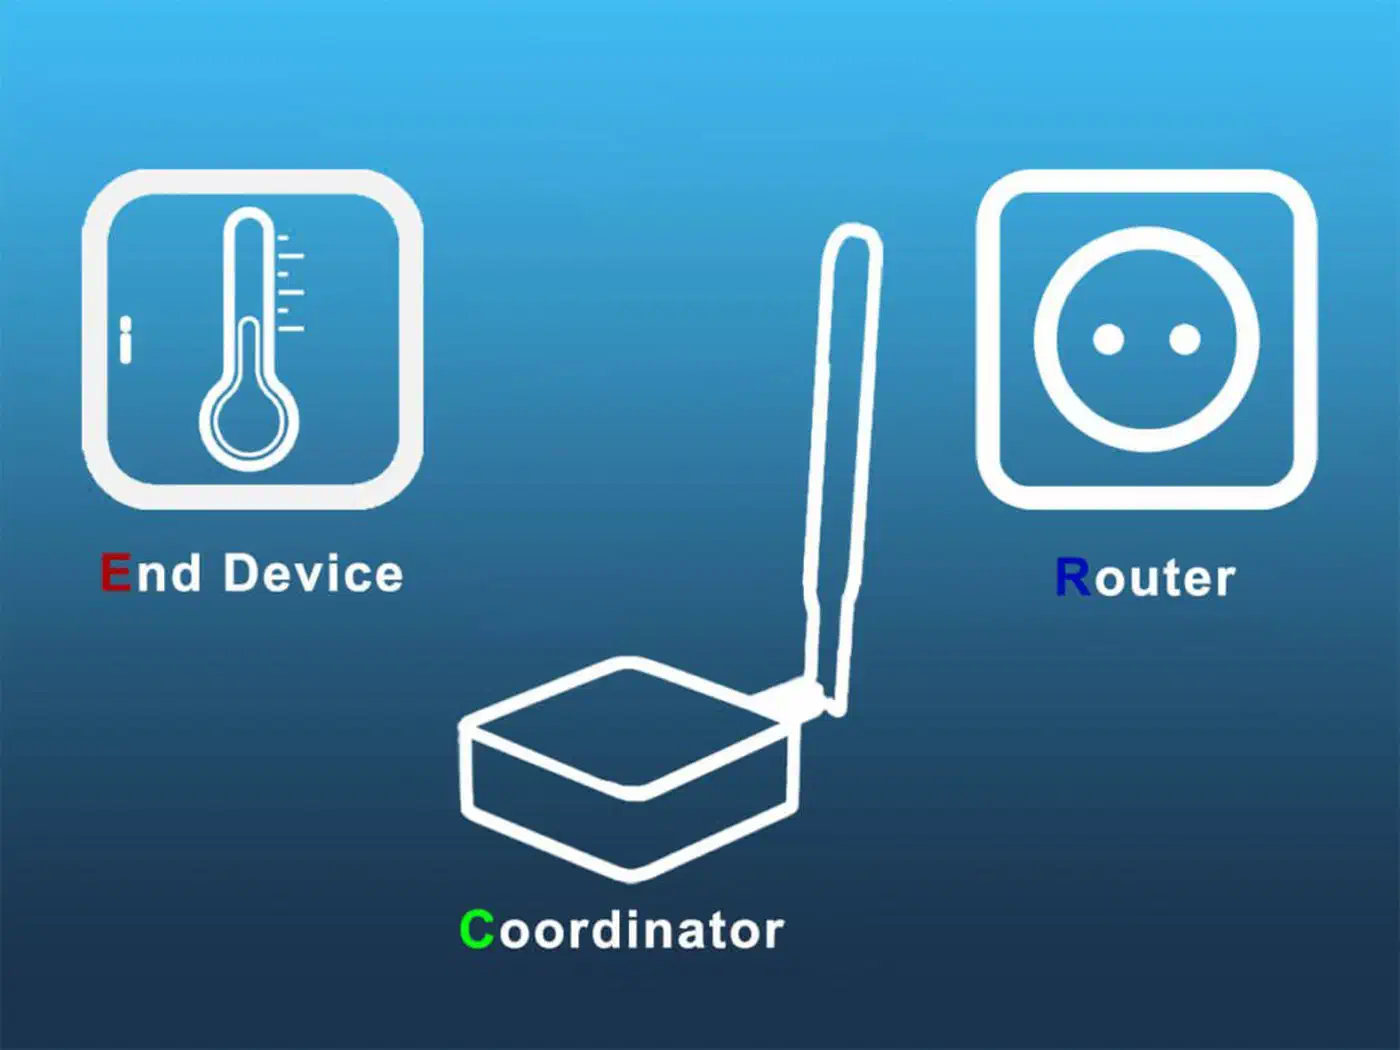
A Zigbee network has three device roles. The coordinator is the single USB dongle or hub, such as a SONOFF ZBDongle-E , ConBee III, or SMLIGHT SLZB-06. It creates the network, assigns 16-bit addresses, and keeps the master routing table. There is exactly one per network.
Routers are any mains-powered device: a smart plug, a Zigbee bulb, or a wired in-wall switch. They relay messages, extend range, and provide backup paths when one route fails.
End devices are the battery-powered sensors (motion, contact, temperature, leak). They sleep most of the time and wake only to send a reading. They always talk through a single parent router.
A message from a battery sensor travels like this: the end device wakes up and sends to its parent router. The parent hands the packet to another router closer to the coordinator, and so on until it arrives. Each hop picks the best next path from the router’s routing table.
The self-healing trait everyone talks about is real but conditional. If a router goes away, the mesh reroutes through another path, but only if another path exists. A single line of routers is a single point of failure. You want a web of overlapping routes instead.
One more thing to know: routing tables do not rebuild instantly. After you add or move a router, expect 1 to 24 hours for the network to settle. As smarthomescene notes , full self-tuning can take a few days to two weeks. Do not judge a fix based on the first hour after you make it.
The Five Root Causes of Dropped Devices
Almost every “my Zigbee is unreliable” report traces back to one of these five issues. Walk through them in order.
Not Enough Routers
Battery sensors need a parent router in range. When that parent goes offline, the end device does not instantly pick a new one. It sleeps through the outage and only finds a new parent on its next rejoin cycle, which can take hours. If the nearest router is 20 meters and three walls away, the link is shaky even when it works.
Rule of thumb: one router for every 6 to 8 end devices, with routers placed every 10 to 15 meters of line-of-sight distance. A Faraday-ish wall (brick, concrete, tile backer) counts as roughly 2 to 3 meters of free-space distance.
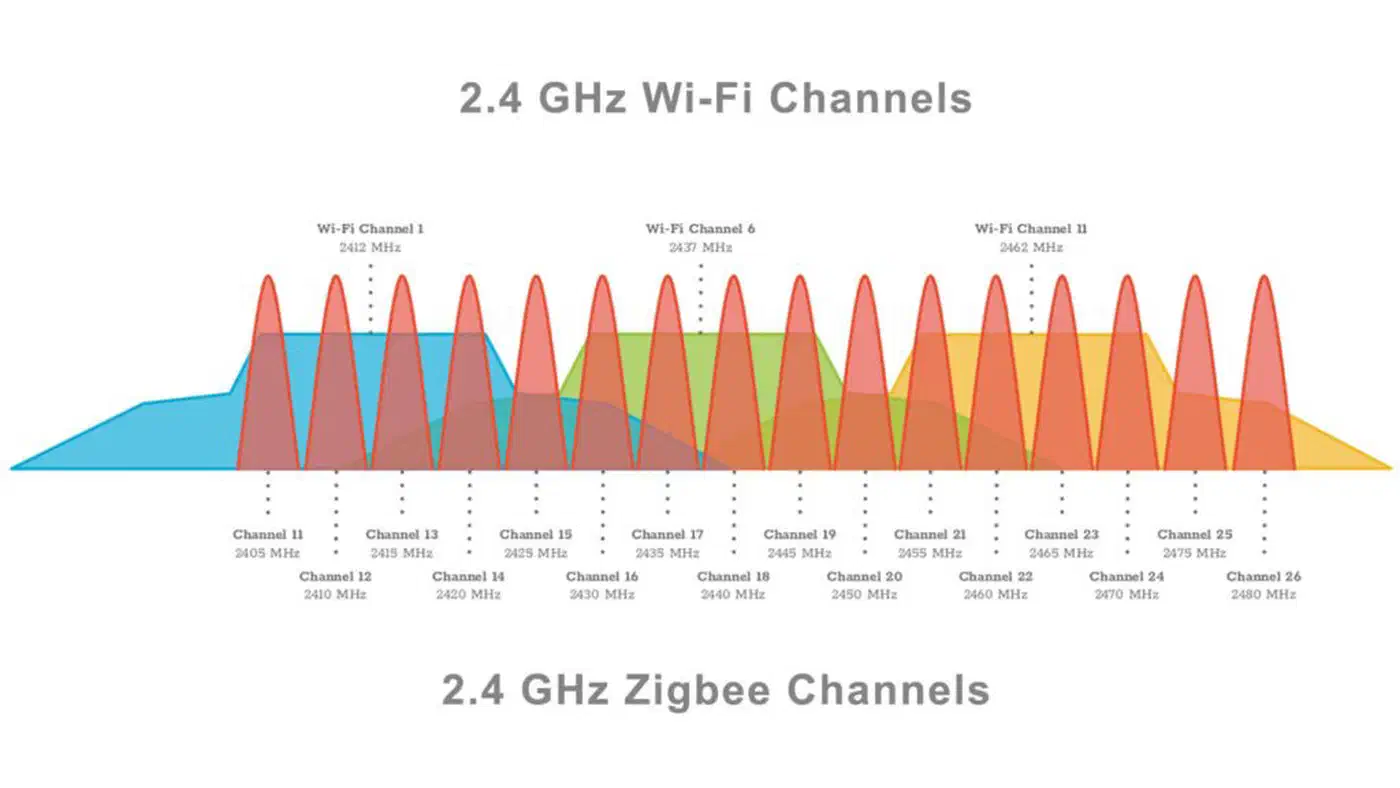
WiFi Interference on the 2.4 GHz Band
Zigbee uses 2.4 GHz and shares the band with WiFi, Bluetooth, and every cheap wireless gadget in the house. When your WiFi access point sits on channel 6, it stomps all over Zigbee channels 15 through 19. Packets get corrupted, retries pile up, and sensors look like they are dropping when they are just getting drowned out.
The good news is that Zigbee only uses 2 MHz per channel while WiFi uses 20 MHz. Pick a Zigbee channel that lands in the gap between two WiFi channels, and the two radios can live side by side.
| Zigbee channel | Safe pairing with WiFi | Notes |
|---|---|---|
| 15 | WiFi 1 or WiFi 11 | Between WiFi 1 and 6 |
| 20 | WiFi 1 or WiFi 11 | Between WiFi 6 and 11 |
| 25 | WiFi 1, 6, or 11 | Above WiFi 11 - usually the cleanest |
| 11 | WiFi 6 or 11 | Zigbee Light Link default, OK but close to WiFi 1 |
Channels 11-14, 16-19, and 21-24 sit right under the WiFi lobes. Avoid them unless you have checked that no local WiFi uses the overlapping channel.
A Coordinator Sitting in an RF Hot Zone
This is one of the most common mistakes, and one of the easiest to fix. The typical setup is a Zigbee dongle plugged into the back of a Raspberry Pi. The Pi sits on top of a WiFi router, next to an SSD, inside a metal case. Every one of those is a 2.4 GHz noise source.
USB 3.0 is the worst offender. Intel’s own whitepaper from the USB-IF shows that USB 3.0 SuperSpeed signaling makes broadband noise in the 2.4-2.5 GHz band. The noise cannot be filtered out: it sits inside the Zigbee and Bluetooth band. A Zigbee dongle plugged straight into a USB 3.0 port on a mini PC can lose half its range.
There are three practical fixes. First, plug the dongle into a USB 2.0 port if your host has one. If the host only has USB 3.0 ports, use a 1 to 2 meter shielded USB extension cable to put space between the dongle and the emitter. Finally, mount the dongle at shelf height or higher, away from the WiFi router, any smart meter, any SSD, and out of metal cabinets.
Non-Standard or Cheap Sensors
Some early Aqara and Xiaomi sensors follow the Zigbee spec loosely. They pick a parent router during pairing and then refuse to move when that parent changes. A network shuffle leaves them orphaned. They are also known for dropping off when a router firmware update forces a reboot.
The workaround: pair these stubborn sensors right next to a dedicated, never-moving router. A Tradfri signal repeater or a cheap SONOFF smart plug pinned to the same outlet forever both work. Accept that they will be picky. If an Aqara device keeps dropping no matter what, swap it for a Zigbee 3.0-certified one from Sonoff, Tuya, or Third Reality.
Network Saturation
A sensor reporting temperature every 30 seconds is almost always pointless. It makes traffic, wakes the parent router, and adds broadcast load on the mesh. The Zigbee2MQTT docs say to keep broadcasts to about one per second across the whole network. If you have 50 sensors each chatting on a short interval, you will blow that budget.
Raise the reporting interval on temperature, humidity, and lux sensors to 5 to 10 minutes. Keep motion, contact, and leak sensors at their default event-driven behavior. They only send on state change anyway.
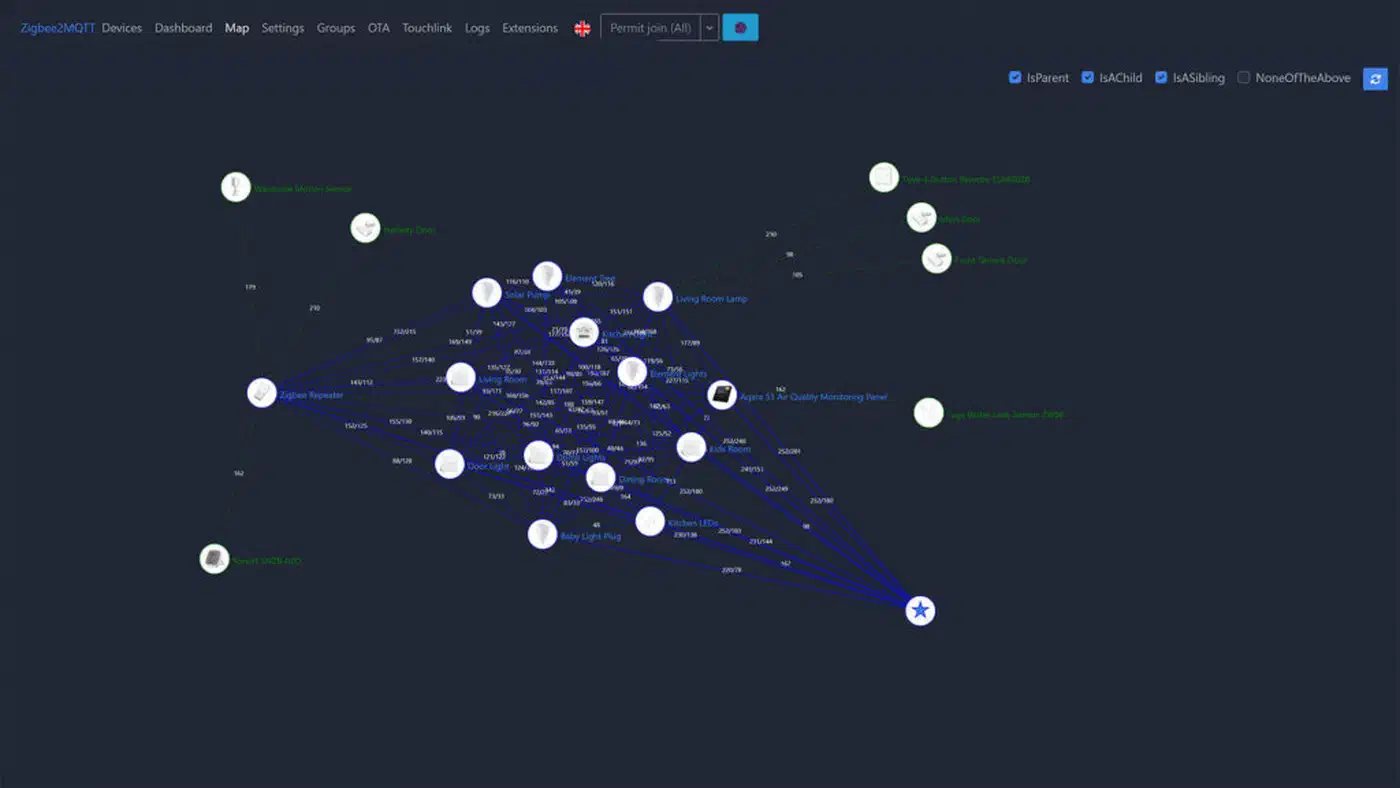
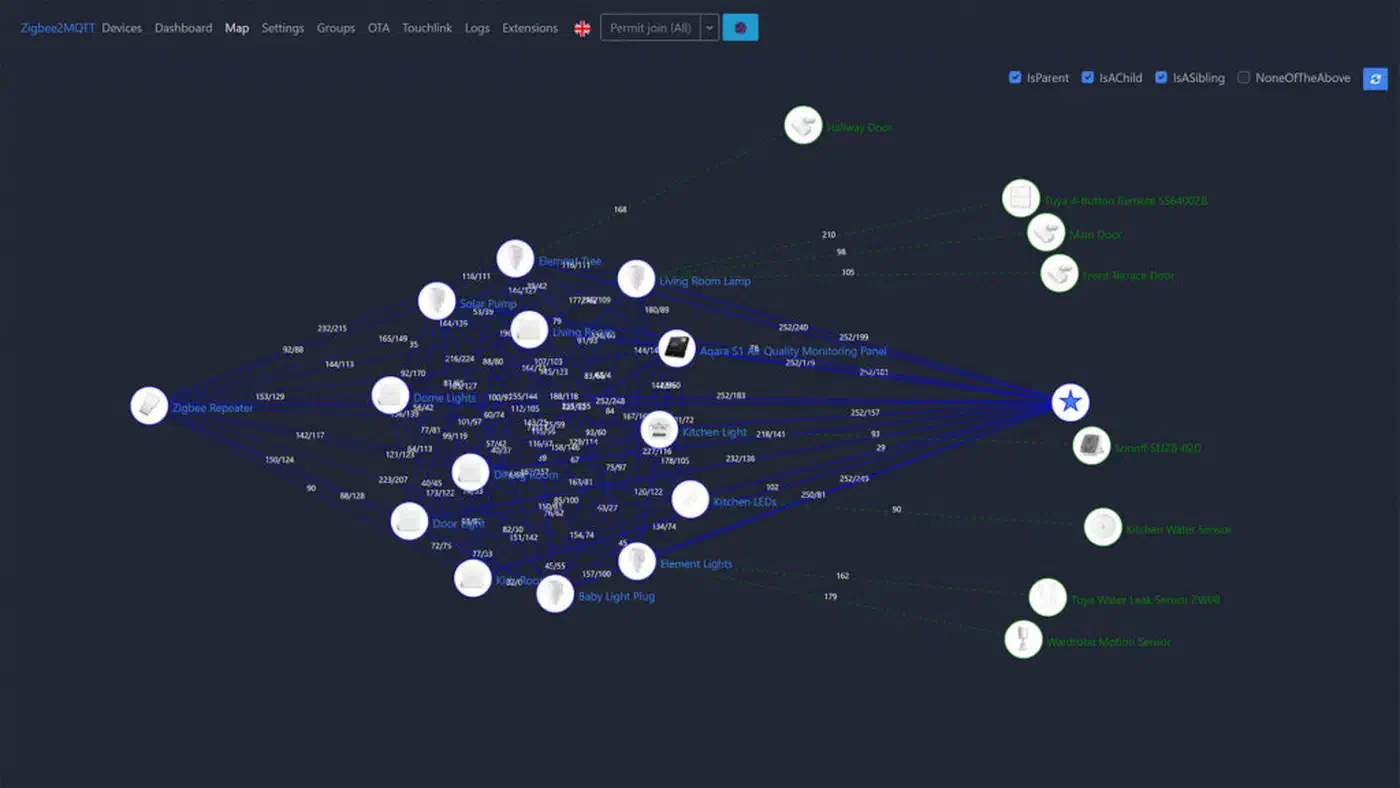
Reading the Network Map Like a Diagnostic Tool
The network map is the single most useful clue when a Zigbee network acts up. Both Zigbee2MQTT and ZHA draw a graph of every device and every routing link, colored by link quality.
In Zigbee2MQTT, open the web UI, click Map in the sidebar, and wait a minute or two for the layout to render. Each line carries an LQI (Link Quality Indicator) score from 0 to 255. Green lines sit above 100. The link is strong and needs no action. Yellow lines fall between 50 and 100. The link is fair, with the odd retry, but it works. Red lines sit below 50 and flag a weak link that will drop and time out. Add a router between the two endpoints.
In ZHA, go to Settings -> Devices & Services -> ZHA -> Configure -> Visualization to see the equivalent graph.
Alongside LQI, the RSSI (received signal strength, in dBm) tells you the raw power of the incoming signal:
| RSSI | Quality |
|---|---|
| -50 dBm or stronger | Excellent, practically touching the coordinator |
| -60 dBm | Good, normal for a same-room link |
| -70 dBm | Acceptable, typical through one wall |
| -80 dBm | Marginal, expect retries |
| -90 dBm or weaker | Unreliable, will drop |
When you open the map, look for three warning patterns. An end device connected straight to the coordinator from across the house should be hopping through a router instead. A direct long-range link usually means there is no router nearby to use. Long single-path chains with no backup routes are brittle. If any router in the chain reboots for a firmware update, everything downstream goes offline with it. Finally, orphan devices showing only one link (especially a red one) are drop candidates.
After you add routers or move things around, wait 24 to 48 hours before re-reading the map. Zigbee will not reshuffle the layout right away. A snapshot taken five minutes after a change is useless. Once your mesh is stable, look into Zigbee binding to let devices talk to each other directly, skipping your home automation hub.
Adding Routers Where They Matter
If you skip every other step in this guide, do this one. Adding routers has more impact on reliability than any other fix.
Good router candidates include any mains-powered Zigbee smart plug. Cheap IKEA Tradfri, recent SONOFF S26R2ZB, and Third Reality plugs all work well. In-wall switches and dimmers that stay powered count too, as do most Zigbee bulbs. One exception worth knowing: some Sengled bulbs do not act as routers on purpose. Check the device page on zigbee2mqtt.io before buying if you plan to use them for range.
For filling dead spots without adding another “smart” device, a dedicated SONOFF ZBDongle-E flashed with router firmware plugged into any USB charger is the cleanest option. Current router firmware images include 7.4.5 and 8.0.2 on the Ember driver. A Tradfri signal repeater is an even simpler fire-and-forget pick if you can find one.
Placement is as important as selection. Put a router between the coordinator and any distant end device that links straight to it. Every floor in a multi-story home needs at least two routers, ideally three. Skip enclosed spots: inside a metal box, behind a large TV, or in a cabinet flush against a brick wall. Lift routers up where you can. A bulb at ceiling height covers more ground than a smart plug at outlet height.
As a rough sizing guide:
| Home size | Recommended router count |
|---|---|
| Studio or small apartment (under 500 sq ft) | 2-3 |
| Typical house (1500-2500 sq ft) | 5-8 |
| Large house (3000+ sq ft) | 10 or more |
| Multi-floor with concrete slabs | Double the count above |
After adding routers, reconfigure or re-pair the sensors that were dropping. They will find the new router paths on their next wake cycle.
Channel Selection and Interference Avoidance
Changing channels is free and takes 10 minutes. But it forces you to re-pair every device. Plan it for a Saturday morning when you do not need your automations.
Before changing anything, find out which WiFi channel your router and your neighbors are on. On Android, WiFi Analyzer
gives you a clean visual. On Linux, iwlist wlan0 scan | grep -i channel works. On macOS, hold Option and click the WiFi icon, then open Wireless Diagnostics -> Scan.
Once you know your WiFi channel, pick a Zigbee channel that does not overlap using the table from earlier. If you can, also move your WiFi router to a fixed non-overlapping channel rather than leaving it on “auto.” Auto-channel routers will sometimes hop into your Zigbee band, and you will spend an hour chasing a ghost outage.
To change the channel in Zigbee2MQTT, stop the service, edit configuration.yaml to set advanced.channel: 25, start the service, and re-pair every device one at a time. In ZHA, go to Settings -> Integrations -> ZHA -> Configure -> Migrate radio (or Change channel in newer versions) and follow the re-pair prompts.
Other 2.4 GHz noise sources are worth ruling out while you are at it. A Thread network counts here too, since it shares the same 802.15.4 spectrum, so anyone running both protocols should keep the Thread radio’s channel assignment at least five channels clear of the Zigbee one. If you are weighing whether to keep expanding the Zigbee mesh at all, our guide on which devices to migrate off Zigbee lays out what to move to Matter and what to leave put. Microwave ovens leak across the whole 2.4 GHz band while running. Drops that cluster around dinner time usually have an obvious cause. Cheap baby monitors and wireless cameras often transmit non-stop on fixed channels and can sit right on top of your Zigbee. Bluetooth audio hops across the band at 1600 hops per second and adds broad noise, mostly near a headset transmitter. And if you can see your neighbor’s WiFi SSID from your couch, you can probably hear their Philips Hue bridge beaconing too.
Monitoring and Keeping the Network Healthy
A Zigbee network that worked fine in January will not always work fine in July. New devices get added, firmware updates reboot routers, batteries fade, and the RF setting around you shifts. A couple of cheap automations let you spot problems before your partner does.
For uptime tracking, Zigbee2MQTT exposes a last_seen attribute for every device. Build a Home Assistant automation that fires if any device has not been seen in two hours. For battery sensors that wake on a slow schedule, bump that threshold to six hours.
For link quality, a sensor template that surfaces the coordinator’s view of each router’s LQI lets you graph quality over time. Sudden drops often point to a new noise source: a neighbor moving in, a new appliance, or a router slowly failing.
Battery alerts are the highest-return automation you can build. Set up a notification when any battery sensor drops below 20%. Dead batteries pose as dropped devices all the time. Catching them early saves hours of ghost debugging.
Firmware updates need care. Zigbee2MQTT supports OTA updates for most mainstream brands. Keep your routers (not your sensors) on current firmware for bug fixes and speed wins. But update them one at a time, with a 24-hour gap in between. A mass update reboots half your mesh at once and confuses every downstream sensor.
A quarterly map review is worth the five minutes it takes. Open the network map every three months. Look for new red links, devices that have shifted to bad routes, and orphans. Add a router anywhere a red link keeps coming back.
A few common mistakes to avoid while you are tending the network. Do not pair 20 devices back to back. Pair two or three, wait 10 minutes for routes to settle, and continue. Do not power-cycle the coordinator every time something goes wrong. It forces a full network re-tune that takes hours. Do not remove and re-add routers during peak hours. Schedule that kind of work for the middle of the night. And do not mix a Philips Hue bridge with a separate Zigbee2MQTT coordinator on the same channel. Put them on channels at least 5 apart, or bridge the Hue devices into Z2M directly.
A well-built Zigbee mesh needs almost no attention once it is set up right. Get the coordinator out of the RF swamp, put enough routers in place, pick a clean channel, and then leave it alone. Most of the “Zigbee is flaky” complaints you see online come from networks built around a single dongle jammed next to a WiFi router. Those problems usually go away as soon as the three basics are right.