Multi-Sensor Weather Station with ESP32 Under $100

Yes, you can build a working outdoor weather station for under $100. You need an ESP32 running ESPHome (current stable: 2026.3.x), a Davis 6410 anemometer for wind, a tipping-bucket rain gauge, and a VEML6075 UV sensor. All of it reports live data to Home Assistant over WiFi. The result is hyperlocal weather data more accurate than any commercial forecast for your yard, roof, or field.
Hardware Selection and Sensor Wiring
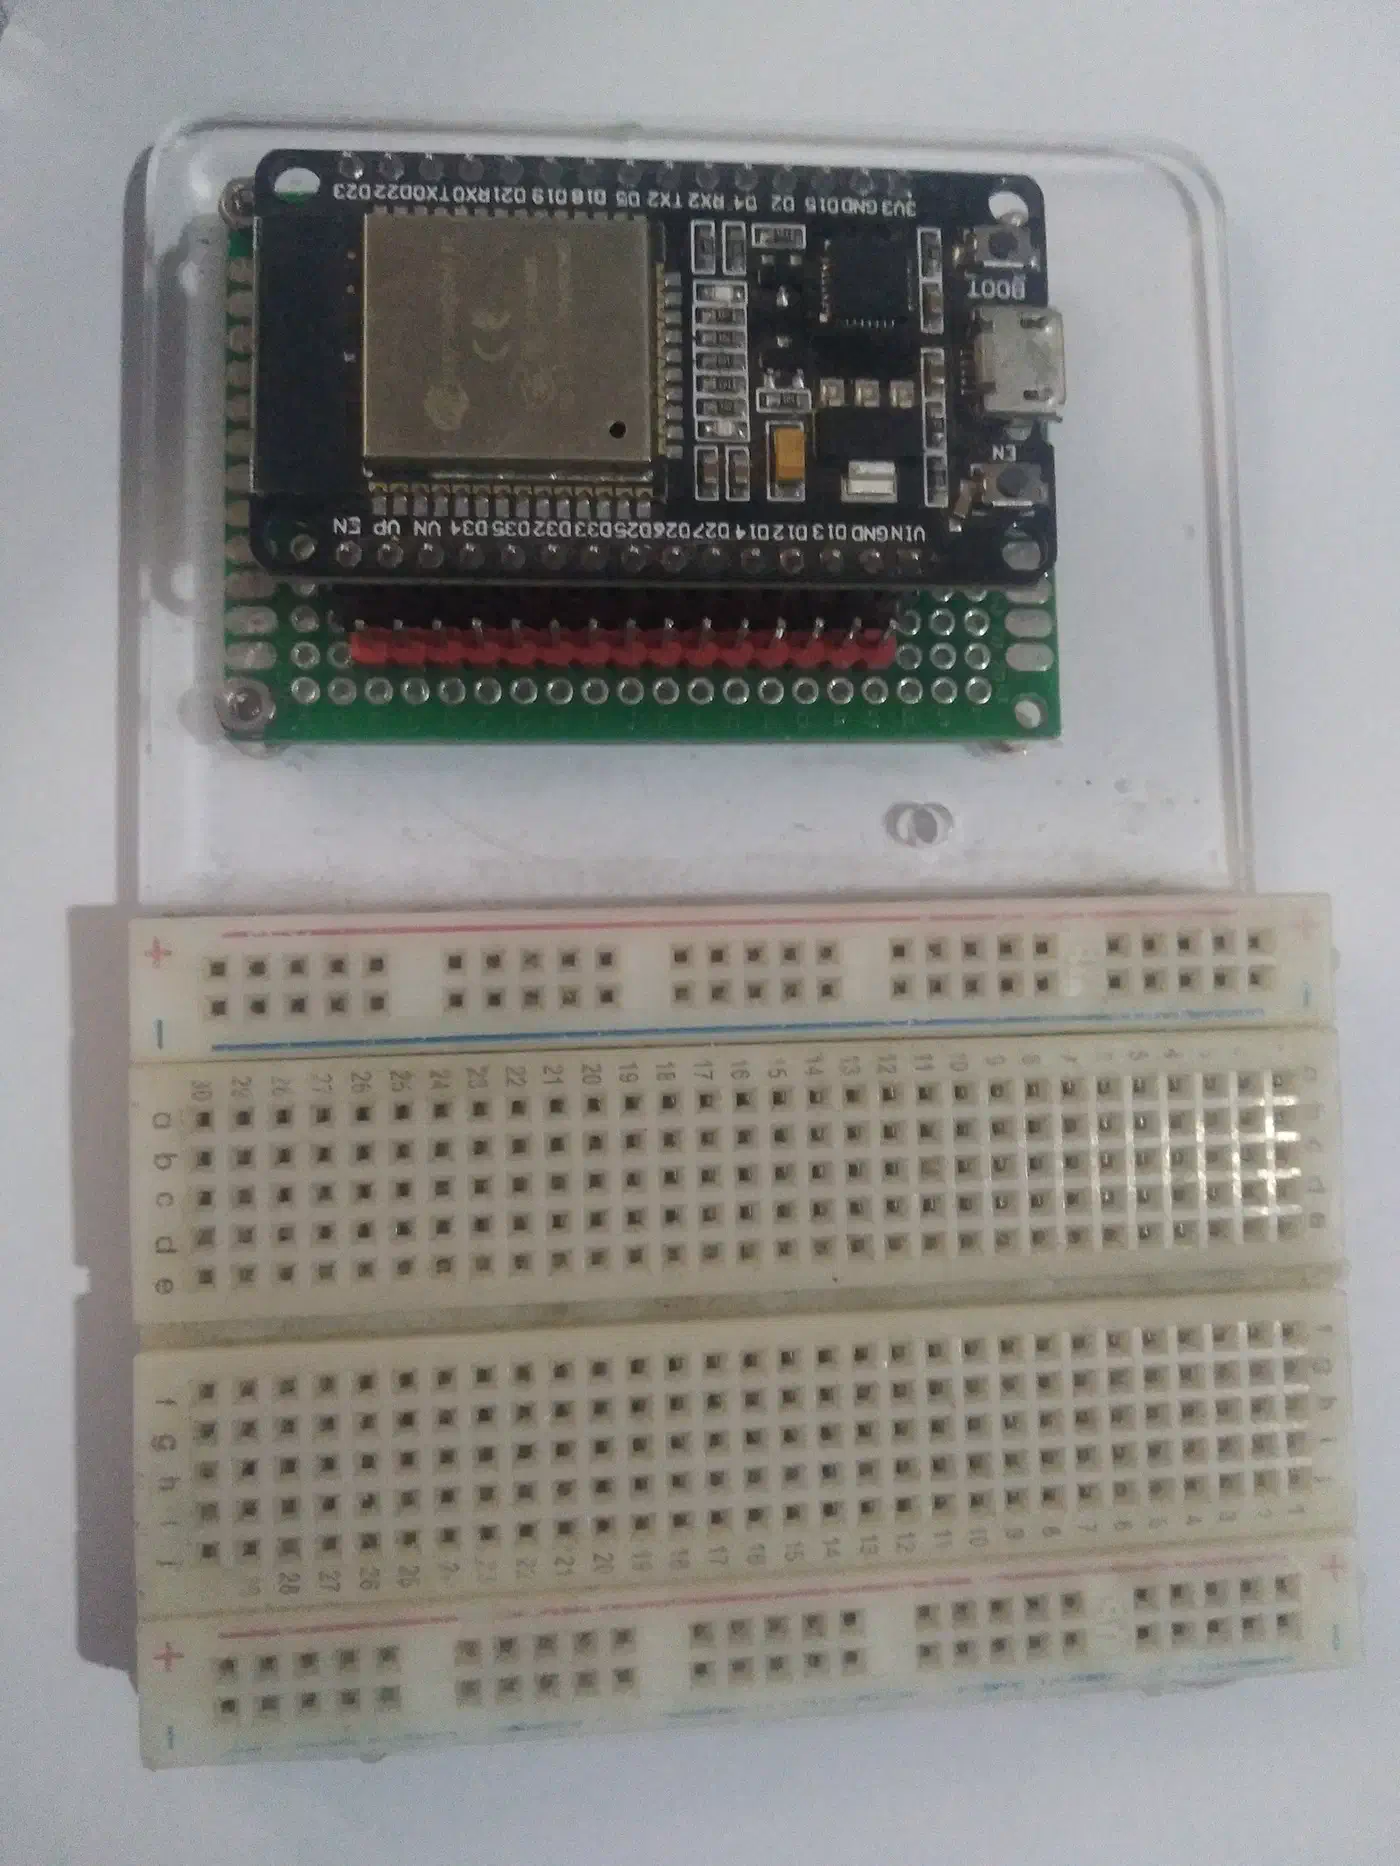
The backbone of this station is an ESP32-S3 DevKitC (or the older ESP32-WROOM-32). The S3 variant has better WiFi range and BLE 5.0 support if you want to expand later. Power it with a 5V USB-C supply. For longer outdoor cable runs, use a 12V barrel jack feeding an LDO voltage regulator. The same board family fits other outdoor builds too. Our guide to tracking particulates with a PMS5003 node uses a similar power and enclosure setup. The weatherproofing carries over to pool and spa water chemistry , where the ESP32 stays in a sealed box and only the probes touch the water.
Here is the bill of materials:
| Component | Purpose | Approximate Price |
|---|---|---|
| ESP32-S3 DevKitC | Microcontroller | $8-12 |
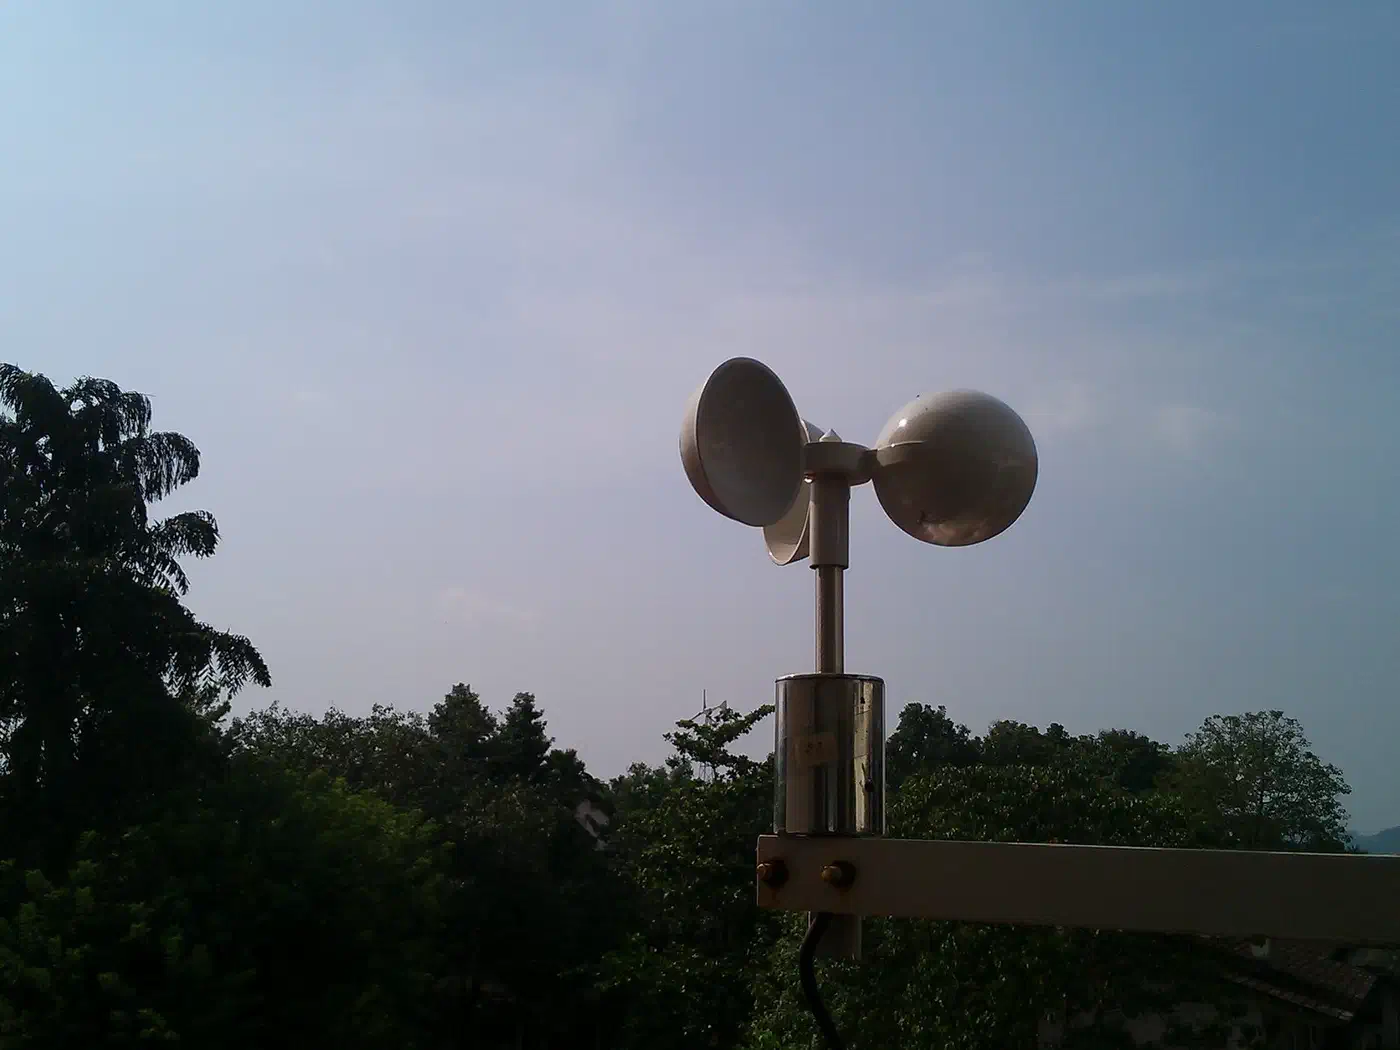
| Davis 6410 anemometer (used) | Wind speed + direction | $25-50 used, ~$235 new |
| Misol WH-SP-RG rain gauge | Precipitation | $14-18 |
| VEML6075 breakout (I2C) | UV index (UVA/UVB) | $6-10 |
| BME280 breakout (I2C) | Temperature, humidity, pressure | $3-5 |
| IP65 ABS junction box | Weatherproof enclosure | $8 |
| PG7 cable glands (pack of 10) | Sealed cable entry | $5 |
| Total | ~$70-110 |
Wind sensor wiring. The Davis 6410 has two signal lines. Wind speed comes from a reed switch. Connect it to any GPIO pin with an internal pull-up resistor. Each closure equals one revolution. Wind direction comes from a potentiometer outputting 0-5V. Read it through an ADC-capable pin (GPIO34 or GPIO36 on the ESP32). Use a voltage divider to drop the 0-5V signal down to the ESP32’s 0-3.3V ADC input range.
Rain gauge wiring. The Misol WH-SP-RG is a tipping-bucket design with a reed switch inside. Each bucket tip equals about 0.2794mm of rainfall. That is the standard Davis calibration value. The Misol spec sheet says 0.3mm. Calibrate against a measuring cup to find your gauge’s true value. Connect the reed switch to a GPIO with internal pull-up enabled.
I2C sensors. The VEML6075 UV sensor and BME280 both talk over I2C. They can share the same SDA/SCL bus. Connect SDA to GPIO21 and SCL to GPIO22 (default I2C pins on most ESP32 boards). If both breakout boards have pull-up resistors, desolder the pull-ups on one board to avoid bus contention.
Mount the VEML6075 under a UV-transparent dome or in a spot with direct sky exposure. Regular glass blocks UVB and will give you useless readings. The BME280 needs a Stevenson screen or radiation shield. Without one, direct sun skews temperature readings by 5 to 10 degrees Celsius.
For the enclosure, route all cables through PG7 cable glands and seal with silicone. Mount the junction box in a shaded spot, or 3D-print a solar shield to keep the ESP32 cool.
ESPHome YAML Configuration
ESPHome’s YAML configuration handles all five sensor types on a single ESP32.
Wind speed uses the pulse_counter platform. The Davis 6410 formula is V = P(2.25/T). P is the pulse count and T is the sample period in seconds. At 1 pulse per second, that equals 2.25 mph (3.621 km/h):
sensor:
  - platform: pulse_counter
    pin:
      number: GPIO18
      mode: INPUT_PULLUP
    name: "Wind Speed"
    unit_of_measurement: "km/h"
    update_interval: 10s
    filters:
      - multiply: 0.0604  # (2.25 * 1.609) / 60 = convert pulses/min to km/h
      - sliding_window_moving_average:
          window_size: 10
          send_every: 1
Wind direction reads the potentiometer via the ADC and maps voltage to compass degrees:
  - platform: adc
    pin: GPIO34
    name: "Wind Direction"
    unit_of_measurement: "degrees"
    update_interval: 10s
    attenuation: 11db
    filters:
      - calibrate_linear:
          - 0.1 -> 0
          - 0.5 -> 45
          - 0.8 -> 90
          - 1.2 -> 135
          - 1.6 -> 180
          - 2.0 -> 225
          - 2.4 -> 270
          - 2.9 -> 315
(You will need to measure the real voltages from your Davis 6410 at each compass heading. Then tune these calibration points to match.)
Rain gauge counts bucket tips and converts to millimeters:
  - platform: pulse_counter
    pin:
      number: GPIO19
      mode: INPUT_PULLUP
    name: "Rainfall"
    unit_of_measurement: "mm"
    update_interval: 60s
    count_mode:
      rising_edge: DISABLE
      falling_edge: INCREMENT
    internal_filter: 50ms
    filters:
      - multiply: 0.2794
For a daily total, use the total_daily_energy pattern with a time component that resets at midnight. Want to feed that rainfall signal back into watering decisions? See our walkthrough on smart garden irrigation with a rain sensor
.
VEML6075 UV sensor is not built into ESPHome at 2026.3.x. You will need an external component. The community keeps one at esphome-customisations by exxamalte on GitHub:
external_components:
  - source:
      type: git
      url: https://github.com/exxamalte/esphome-customisations
    components: [veml6075]

sensor:
  - platform: veml6075
    uv_index:
      name: "UV Index"
    uva:
      name: "UVA"
    uvb:
      name: "UVB"
    update_interval: 30s
BME280 uses the built-in bme280_i2c platform:
  - platform: bme280_i2c
    temperature:
      name: "Temperature"
      oversampling: 2x
    pressure:
      name: "Barometric Pressure"
      oversampling: 16x
    humidity:
      name: "Humidity"
      oversampling: 2x
    update_interval: 30s
    i2c_id: bus_a
Set wifi.power_save_mode: none in your global config for stable outdoor use. Add an ota password. Also turn on the web_server component on port 80. That lets you debug sensor readings in the field without pulling the unit down.
Home Assistant Integration and Dashboard
ESPHome devices auto-discover in Home Assistant over the native API. All sensors show up as entities with the right units, as long as you set unit_of_measurement and device_class in your ESPHome config.
For your dashboard, install these HACS cards:
- mini-graph-card for temperature, pressure, and humidity trends
- compass-card for wind direction as a compass rose
- Standard gauge card for wind speed (0-100 km/h range) and UV index (0-11+)
- Bar chart for hourly rainfall accumulation
To surface a storm warning card only when pressure is dropping or wind gusts spike, wrap it in a card that appears on certain conditions .
Want to merge this dashboard with other data you collect yourself? Our ESPHome plant monitoring system guide shows how to scale to dozens of sensors in one Home Assistant view.
You can also create template sensors in Home Assistant for derived metrics:
- Wind chill (when temperature is below 10C and wind speed tops 4.8 km/h)
- Heat index (when temperature tops 27C and humidity is above 40%)
- Dew point (Magnus formula from temperature and humidity)
- Pressure trend: compare the current BME280 reading to the value 3 hours ago. A drop of more than 3 hPa in 3 hours is a reliable storm signal.
For alerts, set up automations with condition: numeric_state triggers. Push a notification when UV index tops 6, wind gusts pass 50 km/h, or daily rainfall hits 25mm. The Home Assistant Companion app delivers these as phone alerts.
For long-term analysis, turn on the recorder component with a 365-day purge for your weather entities. Want multi-year trend charts? Export to InfluxDB
and plot the data in Grafana
. The UV and sun-exposure readings also pair well with a solar production tracking setup
, giving you a local cause to lay against your generation curve.
Mounting, Calibration, and Maintenance
Sensor placement matters more than sensor quality.
Mount the anemometer at least 3 meters above the nearest obstruction: roof, trees, or walls. The Davis 6410 ships with a mounting arm, but a 1.5-inch galvanized pipe with U-bolts is more rigid. Aim the direction vane’s north mark at true north with a compass. Correct for your local magnetic declination.
Place the rain gauge on a flat surface at least 1 meter above the ground, away from buildings and trees. The WMO rule says the distance from any obstacle should be at least twice the obstacle’s height. Level the gauge with a bubble level.
For UV sensor calibration, compare your VEML6075 readings against the EPA UV Index forecast
for your location over 5 clear days. If readings differ by more than 0.5 UV index points, apply an offset in ESPHome with calibrate_linear. For the BME280, compare pressure readings against your nearest airport’s METAR data at aviationweather.gov
. Apply an altitude correction with an offset filter.
Maintenance is light but important. Clean the rain gauge funnel each month, since leaves and insects jam the tipping bucket. Oil the anemometer bearings once a year with a drop of light machine oil. Check the cable glands and silicone seals every 6 months for UV wear.
For installs without mains power, a 6W solar panel with a TP4056 charge controller and an 18650 lithium cell works well. Turn on ESP32 deep sleep between readings (wake every 60 seconds) and the station runs forever on solar alone. In this mode, switch from the native API to MQTT . Home Assistant’s ESPHome integration does not handle deep sleep reconnects well.
This setup gives you a weather station that reports wind, rain, UV, temperature, humidity, and pressure every 10 to 30 seconds. All of it lands in Home Assistant for the price of one commercial sensor. The data is yours, stored locally, and far more relevant to your spot than any regional forecast.
Want to share your data publicly? Both Weather Underground and PWSWeather accept uploads from Home Assistant through their own integrations. Joining a public weather network helps forecasts for everyone in your area. It also gives you a way to cross-check your readings against nearby stations.