 Botmonster Tech
Three Btrfs jobs that keep your data from rotting away

The Short Answer
Btrfs needs three ongoing maintenance tasks to stay healthy: monthly scrubs that verify every checksum and catch silent bit rot, filtered balance runs that reclaim half-empty chunks before they trigger ENOSPC, and automated Snapper snapshots with retention policies that give you instant rollback without filling the disk. Automate all three with systemd timers and the filesystem ends up more resilient than ext4 while demanding almost nothing from you day to day.
Why Btrfs Needs Maintenance (And ext4 Doesn’t)
Btrfs is a copy-on-write filesystem, which means it never overwrites a block in place. Instead, a modified block is written to a new physical location, and the metadata pointers that reference it are updated to point at the fresh copy. This design is what enables cheap snapshots and per-block checksumming, but it also introduces two wear patterns that ext4 never faces: fragmentation of hot files and uneven space distribution across allocated chunks.
There is also a second structural issue. Btrfs reserves space for metadata separately from data in fixed-size chunks: typically 1 GiB for data and 256 MiB for metadata. If the metadata area fills up while the data area still has headroom, Btrfs flips the filesystem into read-only mode. This is the notorious ENOSPC condition, and it is the single most common way a Btrfs user gets burned. The fix is balance, which rewrites partially-used chunks so space can be reclaimed and reallocated between the two pools.
Finally, Btrfs checksums every data and metadata block using CRC32C by default (xxhash, sha256, and blake2 are available as alternatives on newer kernels). Checksums are only useful if something reads them. A scrub walks the entire filesystem, verifies every checksum, and reports or repairs any mismatch it finds. Without regular scrubs, a corrupted block on a rarely-read file can sit undetected for months.
Compare this with ext4, which has no checksums on file data, no copy-on-write, and no native snapshots. Ext4 is simpler and needs no periodic care, but it also cannot tell you when a cable flip or a failing sector has flipped a bit in your photo archive. The three maintenance tasks for Btrfs are scrub, balance, and snapshot cleanup, and all three can run unattended.
Scrub: Detecting and Repairing Silent Data Corruption
A scrub is conceptually simple: read every block, compute its checksum, and compare it against the stored value. In practice, it is the single most valuable operation you can run on a Btrfs filesystem, because it is the only way to distinguish a healthy archive from one that has been rotting undetected for a year.
On a single-device filesystem, scrub can detect corruption but cannot repair it, because there is no redundant copy to pull from. This is still worth doing. An early warning lets you restore from backup before the bad file is actually needed. For a practical look at recovering deleted or corrupted files on Btrfs and ext4, see the guide on file recovery from ext4 and Btrfs.
On RAID1, RAID10, or DUP metadata profiles, scrub goes one step further: when it finds a mismatch, it reads the alternate copy, confirms its checksum matches, and rewrites the bad block transparently. This is self-healing storage, and it happens without downtime.
Starting a scrub takes one command:
sudo btrfs scrub start /The operation runs in the background at idle I/O priority, so the system stays responsive. Check progress at any time:
sudo btrfs scrub status /Duration depends heavily on the underlying media. A 2 TB NVMe drive finishes in roughly 15 to 30 minutes. A 4 TB spinning disk can take four to eight hours. A RAID1 pair of 8 TB HDDs will easily run overnight. Because scrub reads sequentially from each device, it saturates read bandwidth rather than random I/O, so desktop use during a scrub is usually fine.
The status output has three error counters worth understanding:
| Counter | Meaning | What to do |
|---|---|---|
csum_errors | A block’s stored data does not match its checksum | Restore file from backup; investigate drive health |
verify_errors | A block could not be read at all | The drive is failing; replace it |
corrected_errors | Corruption was found and repaired from a redundant copy | Monitor for recurrence; check SMART data |
A healthy scrub ends with no errors found. Any non-zero counter on a single-device filesystem is a call to action. On a RAID setup, a handful of corrected errors is normal over long timescales, but a rising trend points at a drive that is on its way out.
Recommended cadence: monthly for SSDs, weekly for spinning disks. HDDs have a higher background bit-rot rate, and their self-test routines are less thorough than enterprise SSDs. The btrfsmaintenance package ships with a monthly default that is a sensible starting point for most desktop installs.
Balance: Preventing Space Exhaustion
Balance is the operation that most new Btrfs users skip until the day their filesystem refuses writes despite df reporting 30 GB free. The mechanism behind that failure is worth understanding before the fix makes sense.
When Btrfs needs space, it allocates a new chunk. Data chunks default to 1 GiB and metadata chunks to 256 MiB. Files are written into data chunks, and filesystem bookkeeping lives in metadata chunks. Once a chunk is allocated, it belongs to its pool for the rest of its life unless something frees it. Over time, as files are deleted and rewritten, chunks become sparsely populated: a 1 GiB data chunk might hold only 50 MiB of live data, with the other 950 MiB wasted but unreclaimable.
Check the current state with:
sudo btrfs filesystem usage /The output shows Device allocated, Device unallocated, and Free (estimated). If Device unallocated approaches zero while Free (estimated) is still reasonably high, you are heading toward ENOSPC. That is the signal to run a balance.
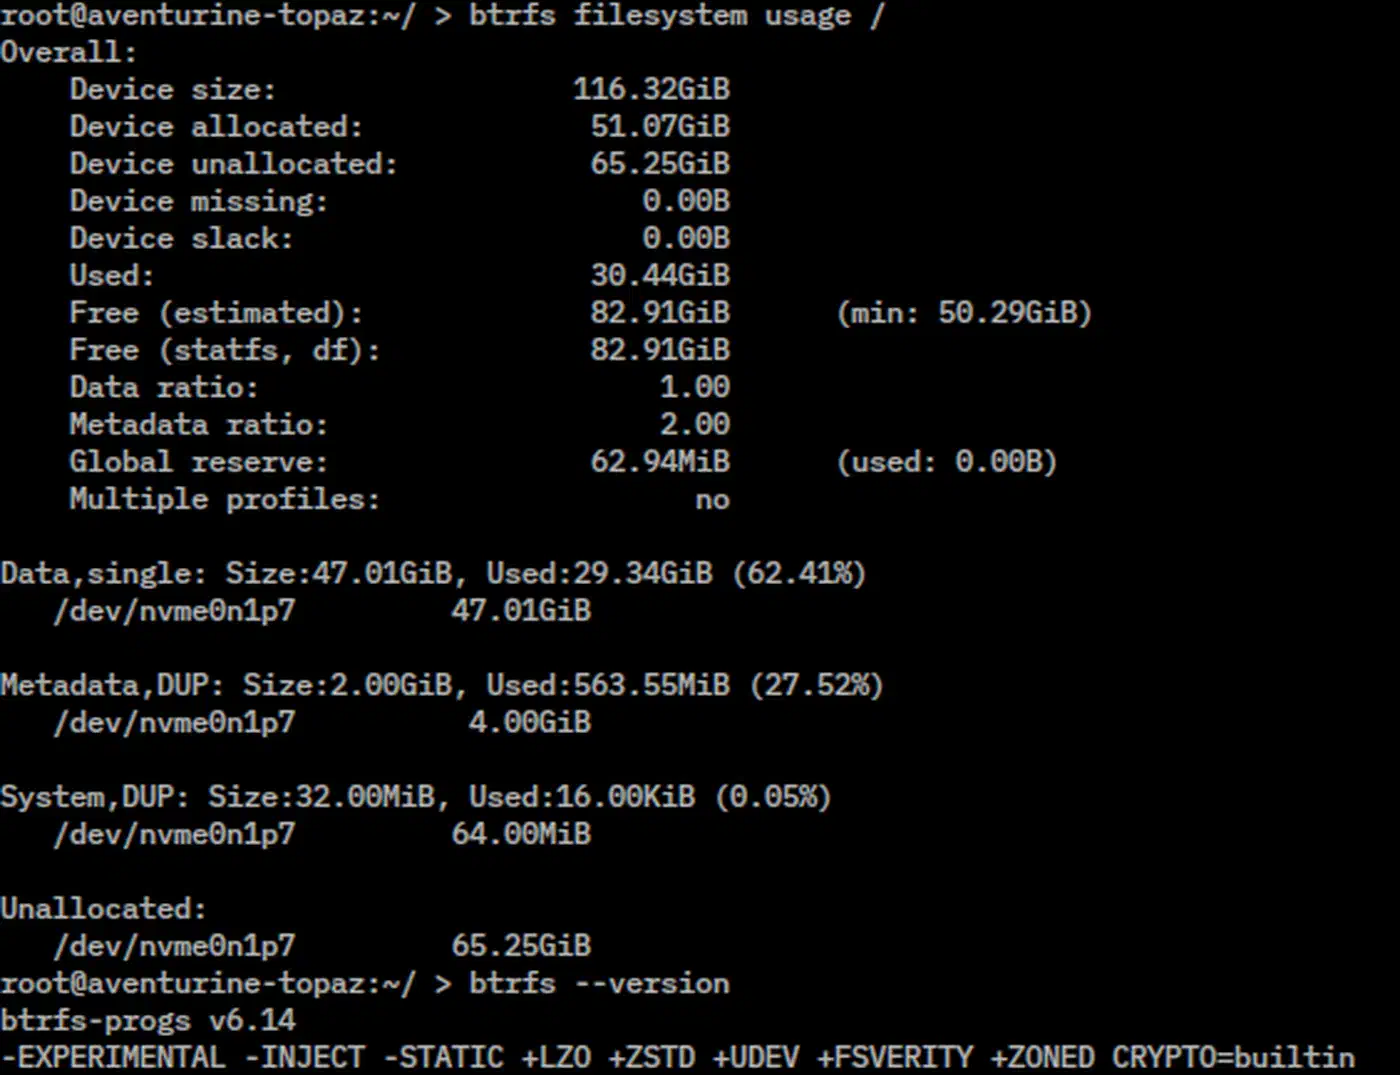
A naive balance rewrites every chunk on the filesystem:
btrfs balance start /Do not run this on a production system. It can take hours, it generates enormous write amplification, and it almost always does far more work than needed. Use filters instead:
sudo btrfs balance start -dusage=50 -musage=50 /The -dusage=50 filter tells Btrfs to only rewrite data chunks that are less than 50% full. The -musage=50 does the same for metadata. These partial chunks are the ones actually wasting space, and rewriting them is fast because there is not much live data to move. A typical filtered balance on a 500 GB desktop finishes in a few minutes.
If a balance takes longer than expected or starts interfering with other work, it can be paused and resumed safely:
sudo btrfs balance pause /
sudo btrfs balance resume /
The btrfsmaintenance project recently lowered its default thresholds to -dusage=10 and -musage=5, reasoning that the more conservative values do enough work to keep ENOSPC at bay while causing less churn. For desktop and laptop use, the dusage=50 musage=50 pair is still a reasonable monthly preventive run. For servers with high write churn, weekly balance runs at lower thresholds are better.
Snapshots with Snapper: Setup and Retention Policies
A Btrfs snapshot is a copy-on-write reference to the entire state of a subvolume at the moment it was taken. Creation is constant-time, regardless of how much data is in the subvolume, and a fresh snapshot occupies essentially no additional space. Only as files diverge from the snapshot does it begin to consume disk space, and only the diverging blocks count against the budget.
The flip side is that snapshots accumulate forever unless something cleans them up. A machine with hourly snapshots and no retention policy will hoard thousands of snapshots over a year, eventually making metadata operations slow and pushing the filesystem toward ENOSPC. Snapper is the standard tool for managing this lifecycle.
Install it on Fedora, Debian, or Ubuntu:
sudo dnf install snapper python3-dnf-plugin-snapper   # Fedora
sudo apt install snapper                               # Debian/Ubuntu
The Fedora plugin hooks Snapper into DNF so that every package transaction produces a pre- and post-snapshot automatically. The equivalent integration for Ubuntu is snapper-gui or manual apt hooks.
Create a configuration for the root subvolume:
sudo snapper -c root create-config /This creates a .snapshots subvolume and writes a default config at /etc/snapper/configs/root. The default timeline policy is too generous for most machines, so edit the config to match your tolerance:
TIMELINE_MIN_AGE="1800"
TIMELINE_LIMIT_HOURLY="10"
TIMELINE_LIMIT_DAILY="7"
TIMELINE_LIMIT_WEEKLY="4"
TIMELINE_LIMIT_MONTHLY="6"
TIMELINE_LIMIT_YEARLY="0"
SPACE_LIMIT="0.2"
FREE_LIMIT="0.2"
This policy keeps 10 hourly, 7 daily, 4 weekly, and 6 monthly snapshots: enough to roll back a botched config change from last week or recover a file deleted during last month’s cleanup spree, but bounded at roughly 30 total snapshots. SPACE_LIMIT="0.2" tells Snapper that snapshots collectively must not consume more than 20% of the filesystem, and FREE_LIMIT="0.2" halts snapshot creation once free space drops below 20%.
Daily operations are short:
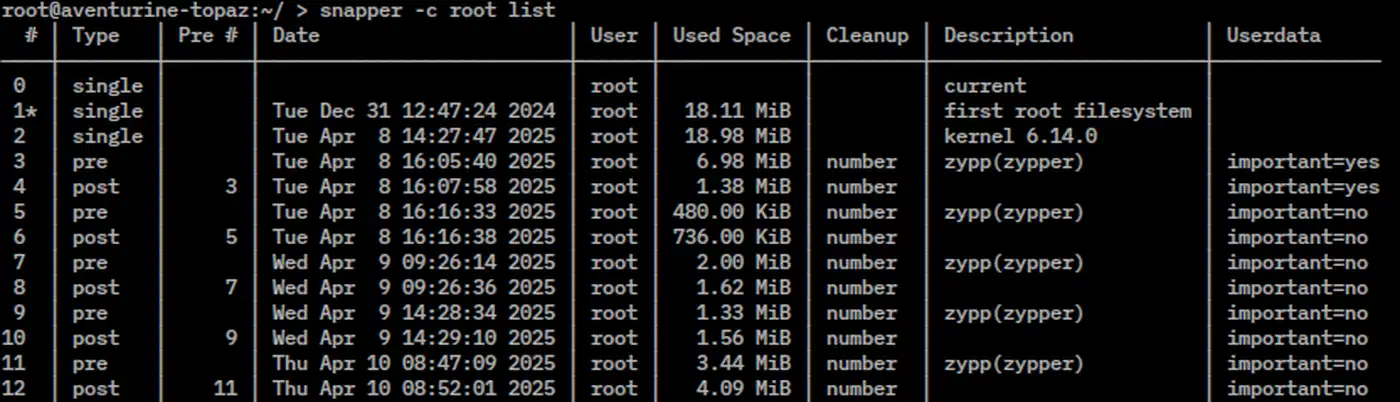
# List all snapshots
sudo snapper -c root list

# Create a manual snapshot before a risky change
sudo snapper -c root create -d "before kernel upgrade"

# Compare two snapshots
sudo snapper -c root diff 42..45

# Undo changes between snapshot 42 and the current state
sudo snapper -c root undochange 42..0
For full rollbacks, boot from a snapshot via grub-btrfs (which auto-generates GRUB menu entries for every snapshot) or set the default subvolume with btrfs subvolume set-default. Space cost is tracked by btrfs filesystem usage /. The number reported under the subvolume quota is the actual diverged-data size, not the sum of logical snapshot sizes, so a machine with 50 snapshots may show only a few GB of real overhead.
Automating Everything with Systemd Timers
Manual maintenance is maintenance that does not happen. Every step so far should be automated, and on modern Linux that means automating it with systemd timer units.
The easiest path is the btrfsmaintenance package, which ships ready-made units for scrub, balance, trim, and defrag:
sudo apt install btrfsmaintenance    # Debian/Ubuntu
sudo dnf install btrfsmaintenance    # Fedora
Edit /etc/default/btrfsmaintenance (or /etc/sysconfig/btrfsmaintenance on RPM systems) to set the mount points and filters:
BTRFS_SCRUB_PERIOD="monthly"
BTRFS_SCRUB_MOUNTPOINTS="/"
BTRFS_SCRUB_PRIORITY="idle"
BTRFS_BALANCE_PERIOD="monthly"
BTRFS_BALANCE_MOUNTPOINTS="/"
BTRFS_BALANCE_DUSAGE="10 50"
BTRFS_BALANCE_MUSAGE="5 30"
BTRFS_TRIM_PERIOD="weekly"
BTRFS_TRIM_MOUNTPOINTS="/"
Then enable the timers:
sudo systemctl enable --now btrfs-scrub.timer
sudo systemctl enable --now btrfs-balance.timer
sudo systemctl enable --now btrfs-trim.timer
Snapper installs its own timers alongside the package itself. Enable the timeline and cleanup units:
sudo systemctl enable --now snapper-timeline.timer snapper-cleanup.timersnapper-timeline.timer creates hourly snapshots. snapper-cleanup.timer runs Snapper’s retention pruning every 15 minutes or so, evicting snapshots that fall outside the policy. Together, they keep the snapshot count bounded with zero intervention.
Logs for every maintenance operation land in the journal. Check recent activity with:
journalctl -u btrfs-scrub.service -n 50
journalctl -u snapper-cleanup.service -n 50
For alerting, a small script that greps scrub output for non-zero error counters and pipes a message through ntfy.sh or email is usually enough. The scenario you want to catch is an uncorrectable error that appeared in a scrub run a week ago while you were on vacation; a scrub that simply runs slower than usual can wait.
Btrfs Assistant: GUI for the Rest of Us
Not every Btrfs user wants to live in a terminal, and Btrfs Assistant is the graphical answer for the rest of them. It is packaged in Fedora, available from the AUR on Arch, and maintained upstream as a Qt application with a clean, tab-based layout.
The overview tab reports filesystem size, allocation, and unallocated space at a glance, which is the fastest way to sanity-check whether a balance is overdue. The subvolumes tab shows every subvolume on the system with creation dates and parent links, and it offers one-click deletion (including nested subvolumes, which is fiddly from the command line).
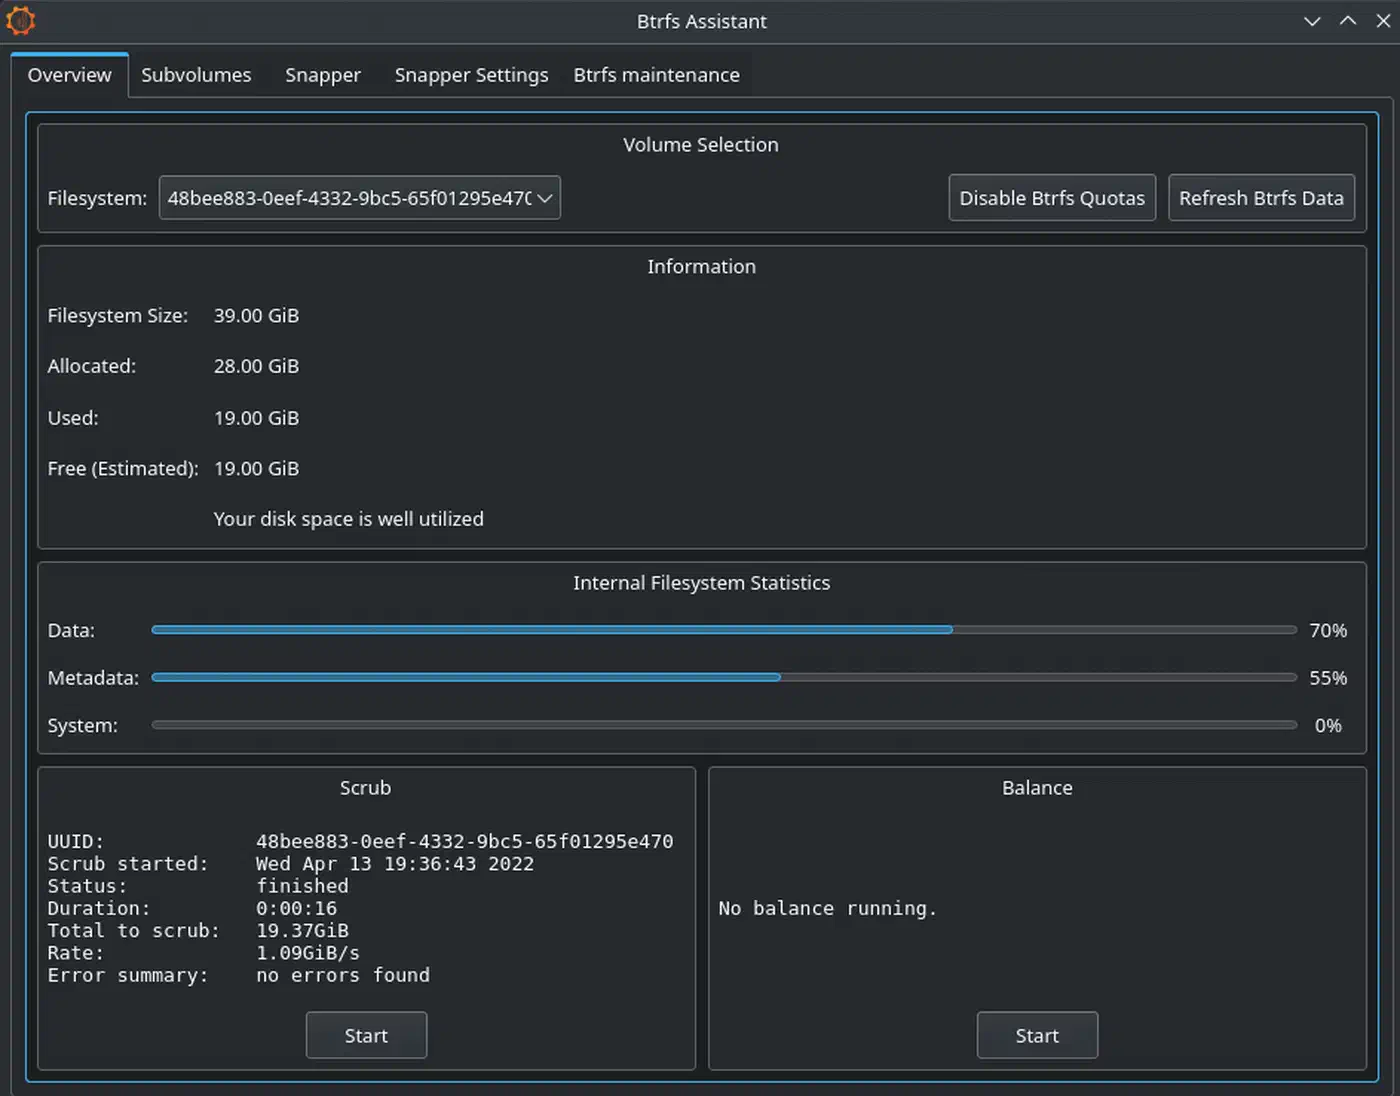
The maintenance tab is a front-end for btrfsmaintenance itself. It reads /etc/default/btrfsmaintenance, presents the schedule and filter settings as form fields, and writes the file back when you save. Scrub and balance can be started on demand from the same tab, with a progress indicator and the last-run summary visible alongside.
The Snapper tab is the headline feature for desktop users. It lists every snapshot with its description and timestamp, lets you browse the file tree of any snapshot, and offers individual-file or full-snapshot restore. It can even restore snapshots when booted from a live ISO, which is exactly the scenario you want covered when a system update leaves you with an unbootable machine.
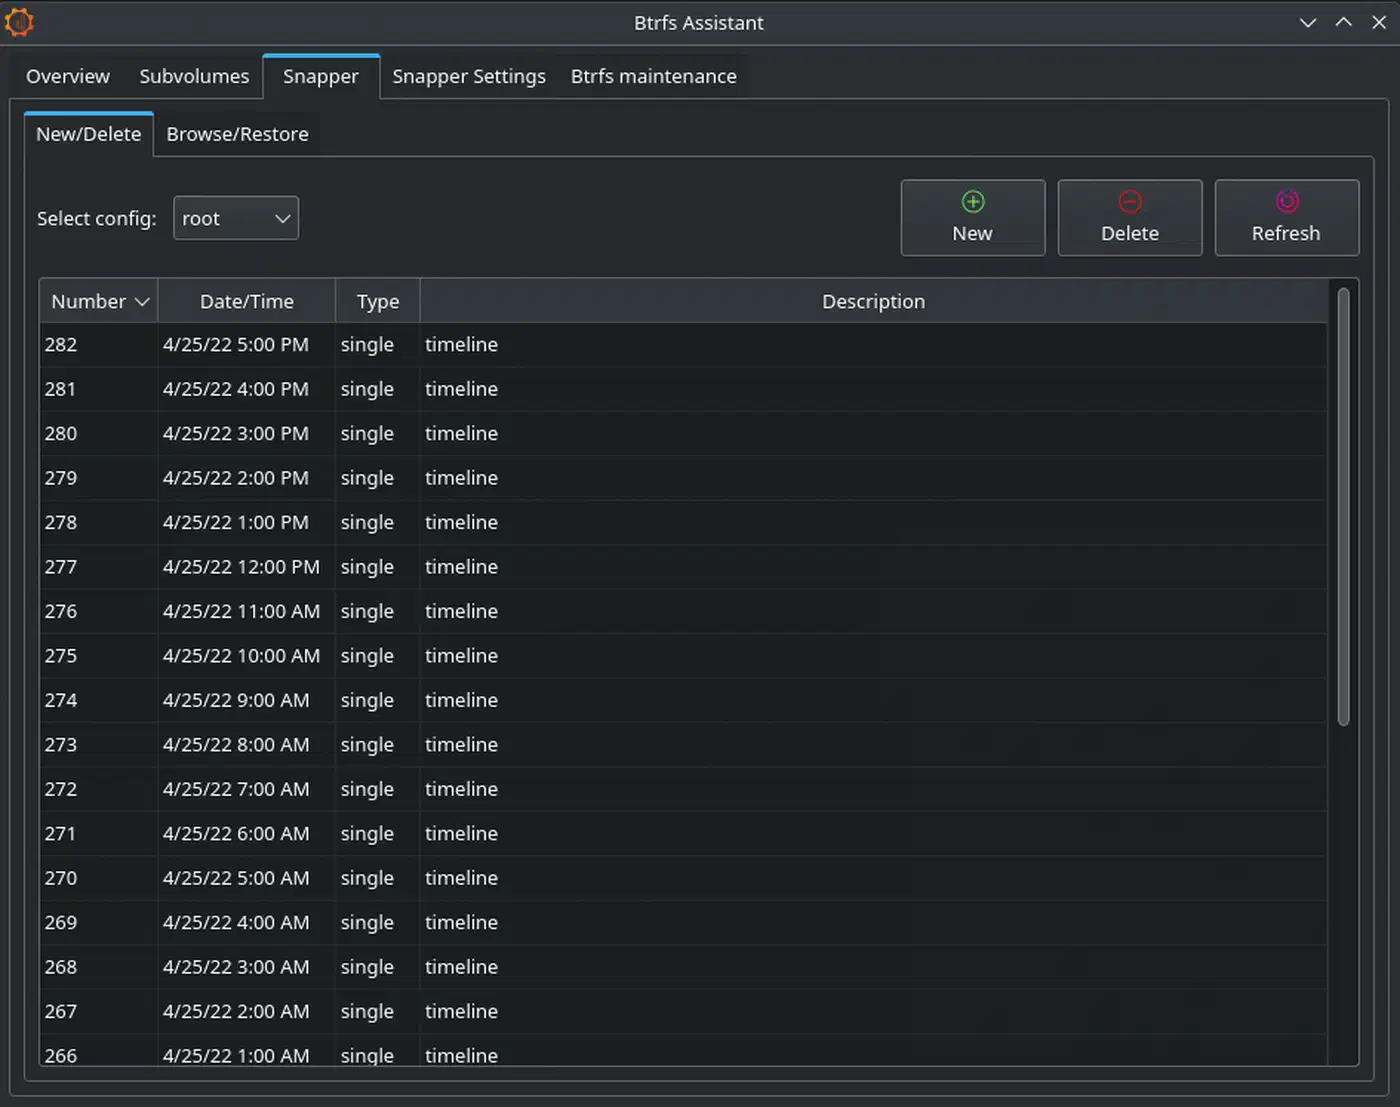
The one thing Btrfs Assistant does not do is replace systemd timers for scheduling. Use it for monitoring and on-demand operations, and keep the timers in charge of unattended work.
A Sensible Default Schedule
For a typical desktop or small server using Btrfs on a single SSD or a RAID1 pair, the following schedule is a reasonable floor. It is worth running on any box that hosts your own build server backed by Gitea Actions, since scrubs catch silent corruption in your Git repos before a bad block reaches a build.
| Task | Frequency | Command / Unit |
|---|---|---|
| Scrub | Monthly (SSD) or weekly (HDD) | btrfs-scrub.timer |
| Balance | Monthly | btrfs-balance.timer with dusage=10 musage=5 |
| TRIM | Weekly | fstrim.timer or btrfs-trim.timer |
| Hourly snapshots | Hourly | snapper-timeline.timer |
| Snapshot cleanup | Continuous | snapper-cleanup.timer |
| Pre/post update snapshots | Per transaction | DNF/apt hooks |
Set it up once, verify the first run of each timer landed cleanly in the journal, and then ignore it. Btrfs rewards this kind of unattended care. If something does eventually need hands-on attention (a failing drive, an uncorrectable error, a runaway snapshot set), it will show up in the alerts you wired earlier, instead of as a read-only filesystem at 2 a.m.